 by
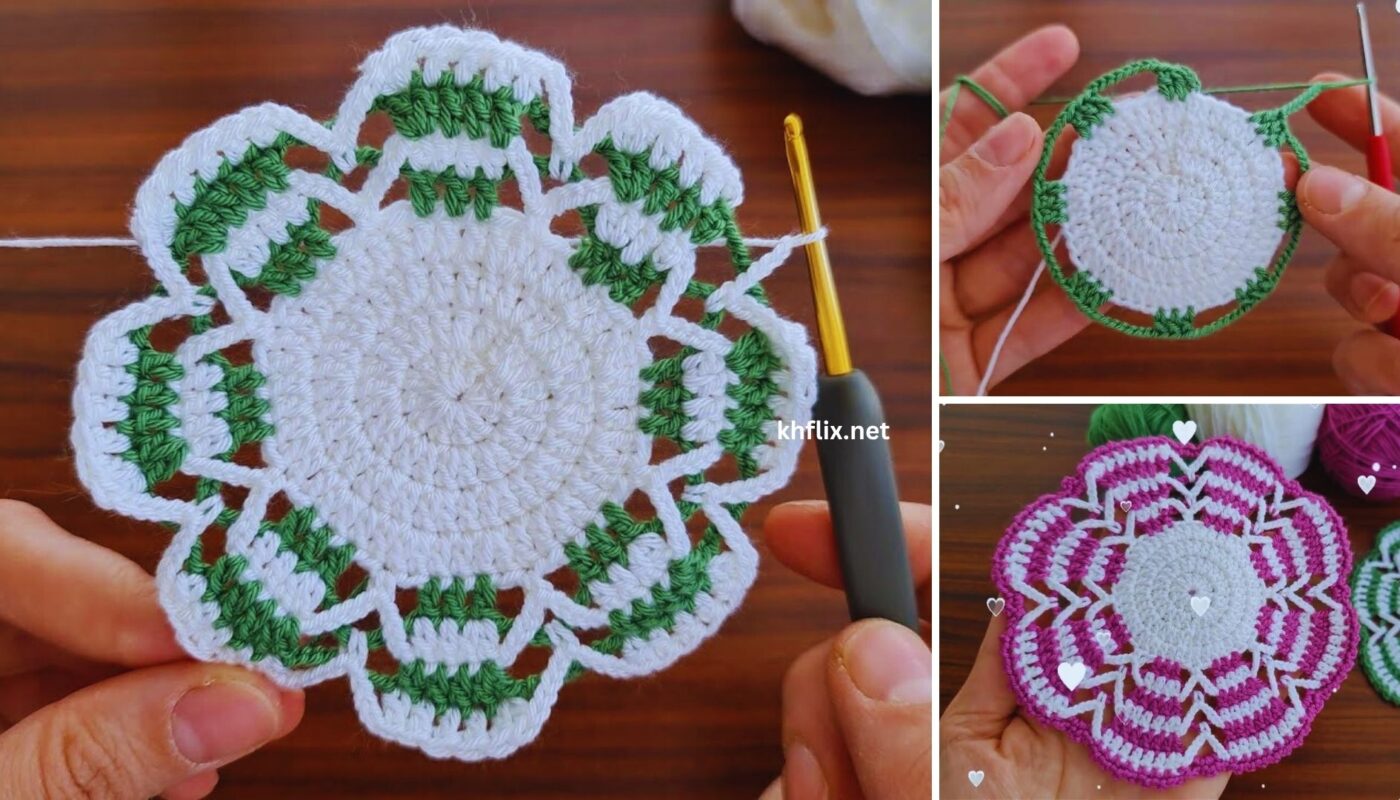
by Creating a beautiful multicolor crochet cup coaster is a fantastic way to add a pop of color and handmade charm to your home. This tutorial will guide you through making a lovely circular coaster with vibrant concentric color rings, perfect for protecting your surfaces while adding a decorative touch.
How to Make a Beautiful Crochet Cup Coaster – Multicolor
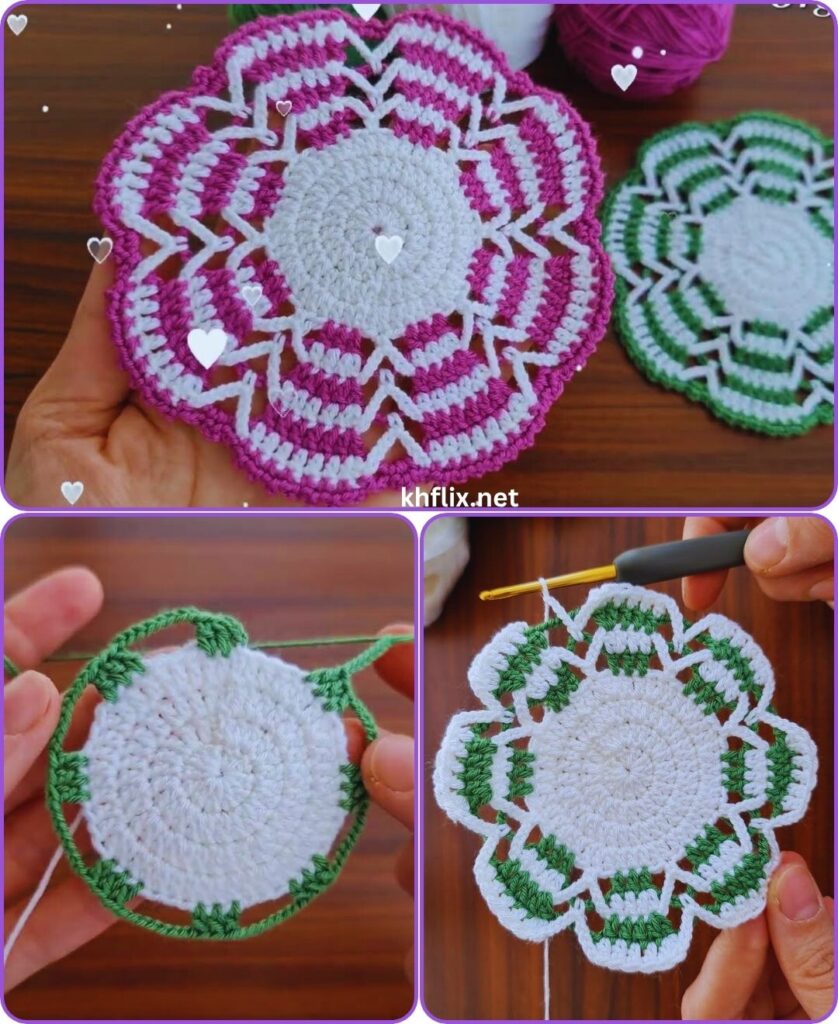
Project Overview: This pattern creates a durable, approximately 4.5-inch (11.5 cm) diameter circular coaster, ideal for cups and mugs. By changing colors every round, you’ll achieve a stunning striped effect that makes each coaster unique and visually appealing.
Skill Level: Beginner-Friendly (Requires knowledge of chain, slip stitch, single crochet, and double crochet, along with simple color changes).
Finished Coaster Dimensions (Approximate):
- Diameter: 4.5 inches (11.5 cm)
Materials You’ll Need:
- Yarn:
- Worsted Weight (Medium #4) Cotton Yarn: Cotton is highly recommended for coasters due to its absorbency, heat resistance, and durability.
- You’ll need small amounts (approx. 10-15 yards / 9-14 meters per color) of 3 to 5 different colors. Choose colors that complement each other or create a fun, contrasting look!
- Crochet Hook:
- Size H/5.0mm (or the hook size that gives you a dense, firm fabric that lies flat. A looser gauge can make the coaster flimsy).
- Yarn Needle (Tapestry Needle): Essential for weaving in loose ends.
- Scissors
- Stitch Marker (Optional): To mark the beginning of each round, especially helpful for beginners.
Gauge (Important for Flatness and Consistency):
For this project, maintaining a consistent gauge is crucial to ensure your coaster lies perfectly flat. If your coaster starts to ruffle, you’re increasing too much or your tension is too loose. If it cups, you’re not increasing enough or your tension is too tight.
- With your H/5.0mm hook, after Round 3 (before the color change), your circle should measure approximately 2 inches (5 cm) in diameter.
Abbreviations Used:
- ch: chain
- sl st: slip stitch
- sc: single crochet
- dc: double crochet
- st(s): stitch(es)
- inc: increase (work 2 stitches into the same stitch)
- MR: Magic Ring (also known as Magic Circle or Adjustable Ring)
- FO: fasten off
How to Make a Clean Color Change (Crucial for Multicolor!):
When you need to switch colors at the end of a round (which will be every round for this pattern):
- Work the last stitch of the round with the current color as normal, but stop when you have two loops left on your hook. (For example, if the last stitch is a DC, you’d yarn over, insert hook, yarn over, pull up a loop, yarn over, pull through 2 loops – stopping here with 2 loops remaining).
- Drop the current color.
- Pick up the new color, yarn over with the new color, and pull it through the remaining two loops on your hook to complete the stitch.
- You have now successfully changed colors. Sl st into the first stitch of the round (with the new color) to join.
- Cut the old color yarn, leaving a 4-6 inch tail to weave in securely later.
Let’s Start Crocheting Your Multicolor Coaster!
We’ll start in the center and work in joined rounds, changing colors at the end of each round.
Part 1: Starting the Coaster (Color 1)
Option A: Starting with a Magic Ring (Recommended for a tight center)
- With Color 1, make a Magic Ring (MR).
- Round 1: Ch 2 (does NOT count as a stitch). Work 12 dc into the MR. Pull the tail tight to close the ring.
- Perform a clean color change to Color 2 (see “How to Make a Clean Color Change” above). Sl st to the top of the first dc (made with Color 1) to join. (Total: 12 dc).
Option B: Starting with Chain 4 Method (Alternative)
- With Color 1, Ch 4. Sl st into the 1st ch to form a ring.
- Round 1: Ch 2 (does NOT count as a stitch). Work 12 dc into the ring.
- Perform a clean color change to Color 2. Sl st to the top of the first dc (made with Color 1) to join. (Total: 12 dc).
Part 2: Building the Coaster Body (Concentric Rings with Color Changes)
Round 2 (Color 2):
- With Color 2, Ch 2 (does NOT count as a stitch).
- Work inc (2 dc) in each dc around.
- Perform a clean color change to Color 3. Sl st to the top of the first dc (made with Color 2) to join. (Total: 24 dc).
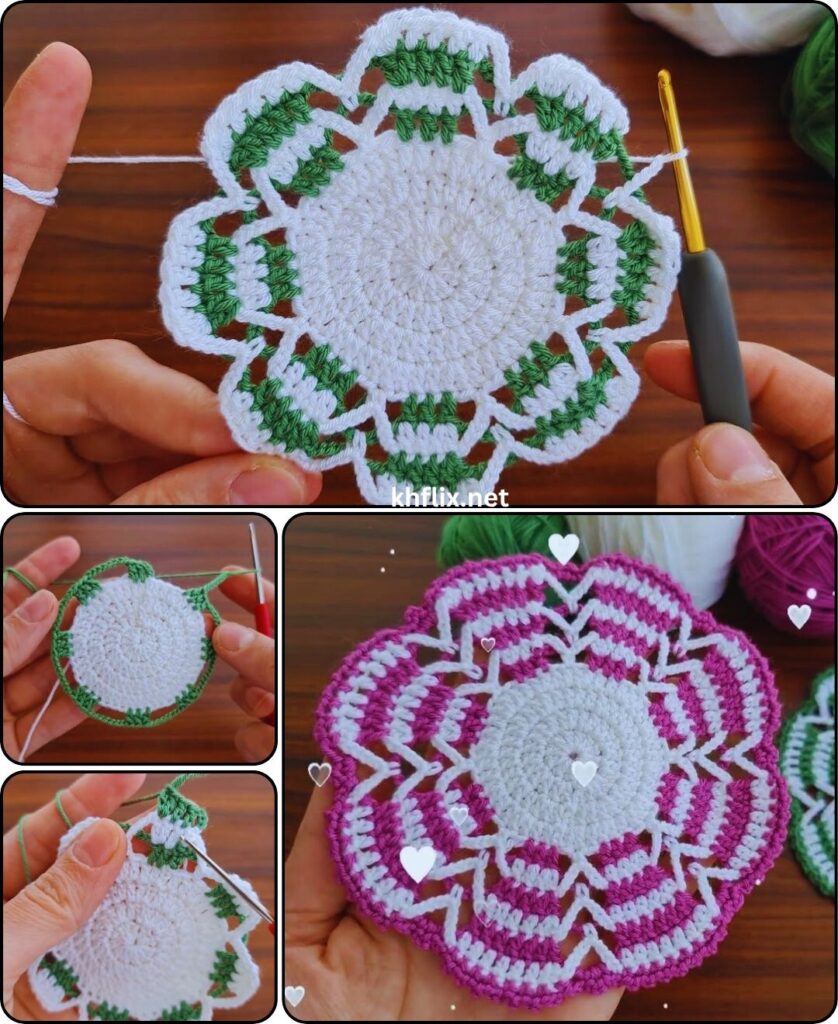
Round 3 (Color 3):
- With Color 3, Ch 2 (does NOT count as a stitch).
- (Dc in the next dc, inc (2 dc) in the next dc). Repeat from * to * around.
- Perform a clean color change to Color 4 (or go back to Color 1 if using only 3 colors). Sl st to the top of the first dc (made with Color 3) to join. (Total: 36 dc).
Round 4 (Color 4):
- With Color 4, Ch 2 (does NOT count as a stitch).
- (Dc in each of the next 2 dc, inc (2 dc) in the next dc). Repeat from * to * around.
- Perform a clean color change to Color 5 (or back to an earlier color). Sl st to the top of the first dc (made with Color 4) to join. (Total: 48 dc).
Round 5 (Color 5 – Final Body Round):
- With Color 5, Ch 2 (does NOT count as a stitch).
- (Dc in each of the next 3 dc, inc (2 dc) in the next dc). Repeat from * to * around.
- Perform a clean color change to Color 1 (or your preferred border color). Sl st to the top of the first dc (made with Color 5) to join. (Total: 60 dc).
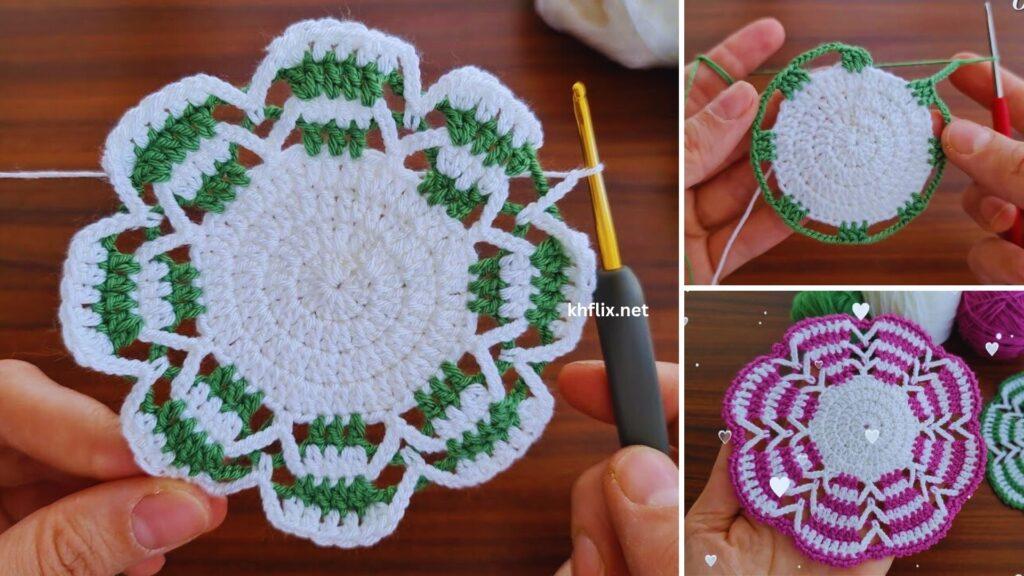
Part 3: Final Decorative Edge (Color 1 – or chosen border color)
This simple border adds a neat and pretty finish to your coaster.
Round 6 (Scalloped Edge – Color 1):
- With Color 1, Ch 1 (does NOT count as a stitch). Sc in the same st where you joined.
- Sk 2 sts, work (2 dc, ch 1, 2 dc) all into the next st (this forms a small shell). Sk 2 sts, sc in the next st. Repeat from * to * around.
- You should end with a small shell, then sl st into the first sc of the round to join.
- FO, leaving a 6-inch tail.
Part 4: Finishing & Blocking (Crucial for a Flat Coaster!)
- Weave in All Ends: This is the most important step for a neat, professional-looking multicolor coaster! Thread each yarn tail onto your yarn needle. Carefully weave each tail through several stitches on the back side of your coaster, ensuring it’s secure and invisible from the front. Take your time with this to make your coaster truly beautiful.
- Blocking (Highly Recommended!): Blocking will make your coaster perfectly flat, open up the stitches, and define the edges beautifully.
- Method: Gently wet your coaster (either by misting with water or a quick dip and gentle squeeze – do not wring). Lay it perfectly flat on a blocking mat or a clean, dry towel. Gently stretch it into a perfect circle, shaping the scallops of the border. Allow it to air dry completely.
Your beautiful multicolor crochet cup coaster is now complete! Make a set in varying color combinations to brighten up your home or give as a thoughtful handmade gift. Enjoy!