 by
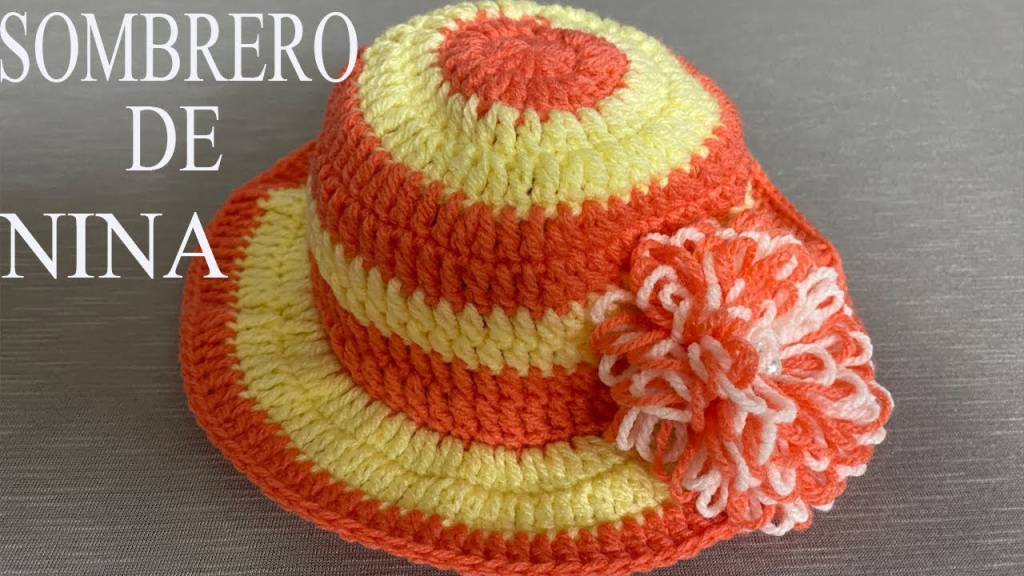
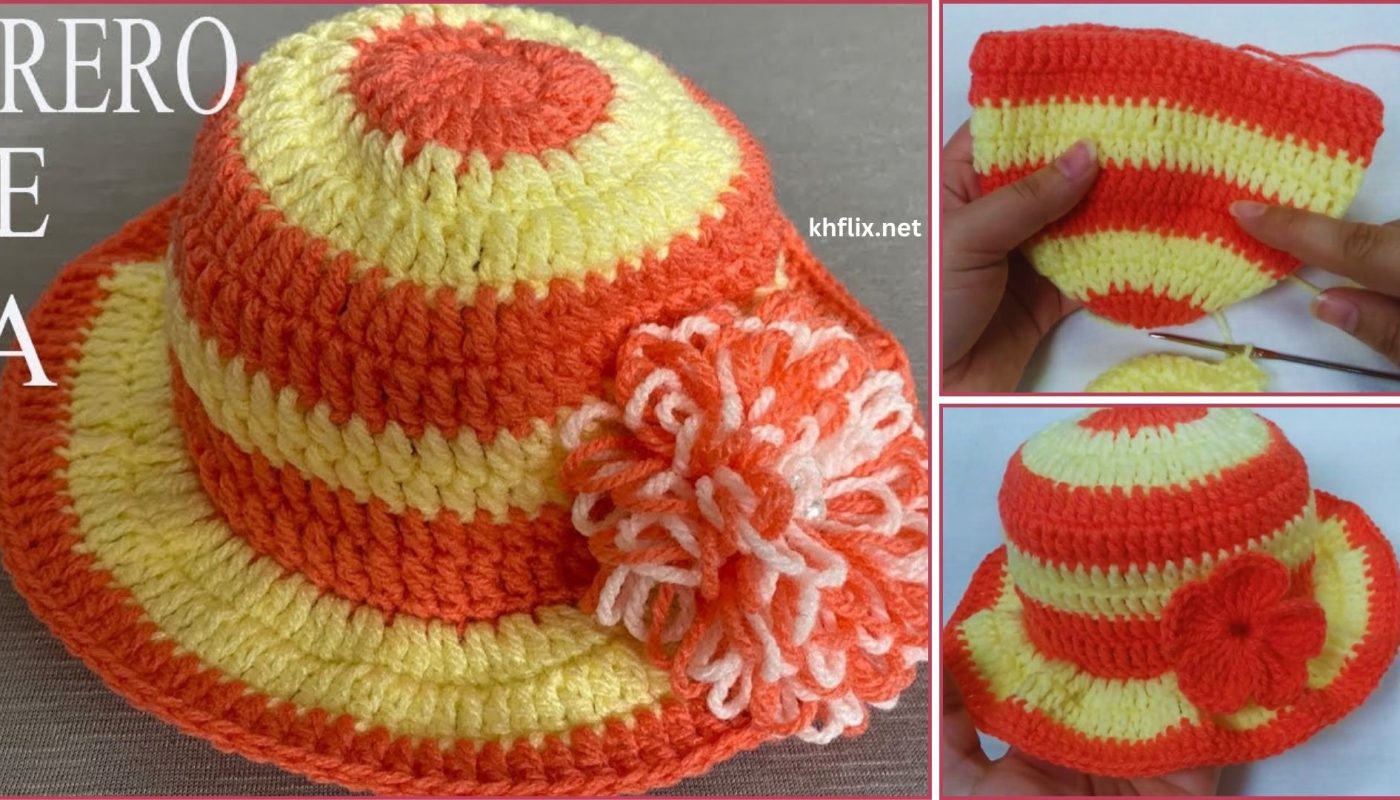
by Let’s create a vibrant and stylish crochet hat with a beautiful striped flower! This project is a fantastic way to add a pop of color and handmade charm to your wardrobe. You’ll learn how to crochet a comfortable hat and then create a charming, multi-colored flower to adorn it, making it truly unique.

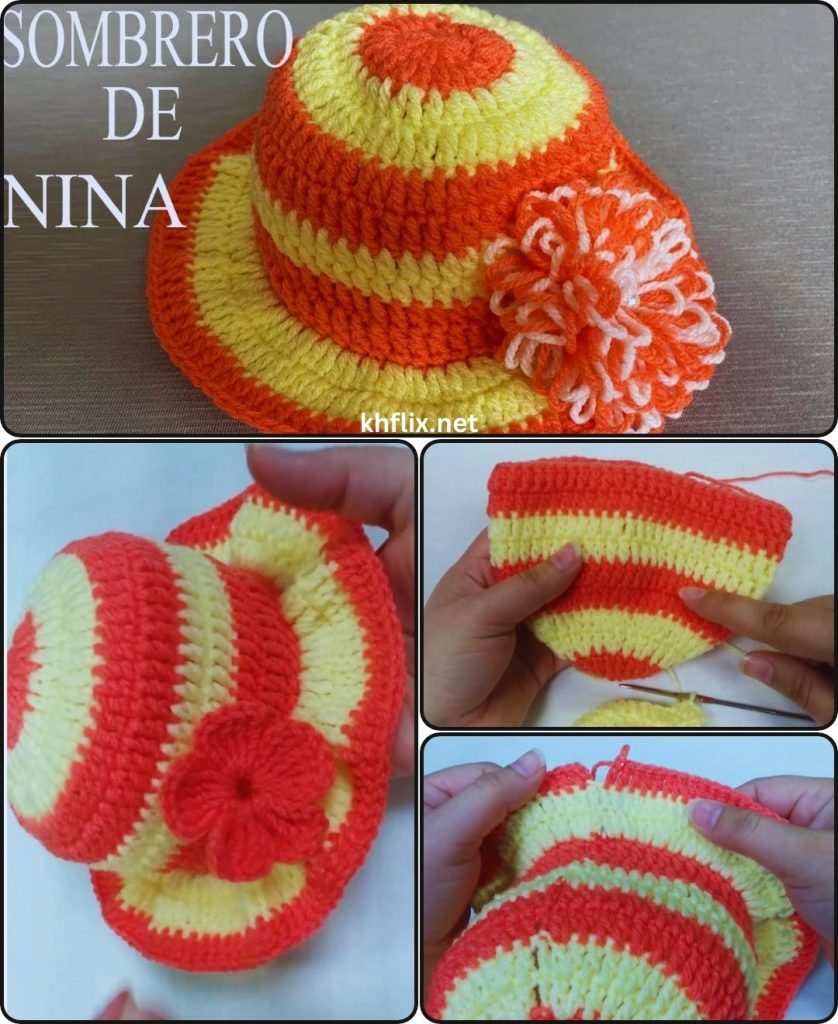
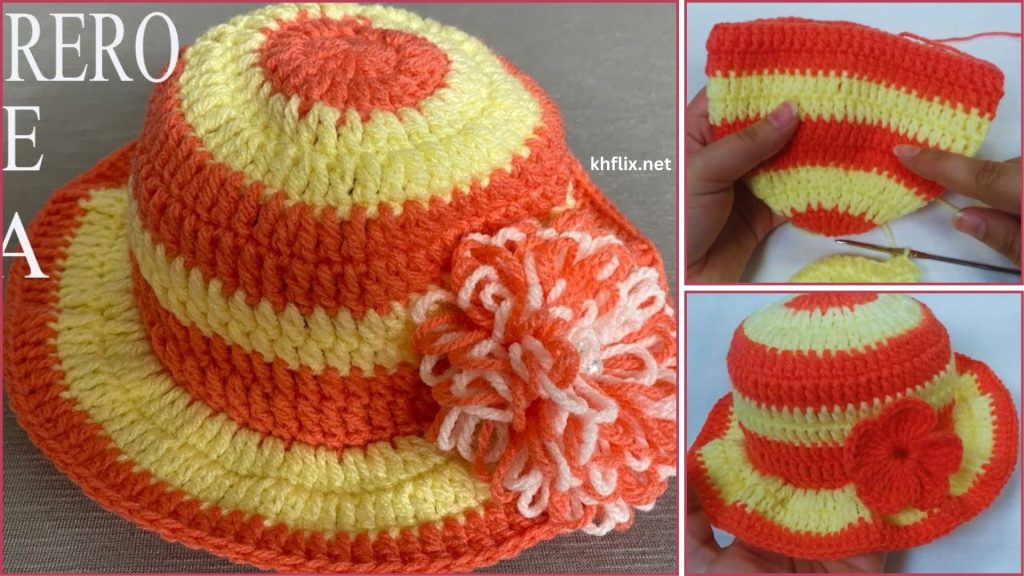
How to Make a Crochet Hat with a Stripe-Colored Flower
This detailed guide will walk you through crocheting a classic beanie-style hat and then show you how to create a lovely, striped flower to be its eye-catching embellishment. We’ll focus on clear instructions for both components, ensuring a beautiful and coordinated finished piece.
Skill Level: Beginner-Intermediate
This project is suitable if you’re comfortable with (or ready to learn!):
- Chain (ch): The basic foundation.
- Slip Stitch (sl st): For joining rounds and neatening.
- Single Crochet (sc): A dense stitch, great for sturdy fabric.
- Half Double Crochet (hdc): A versatile stitch for height.
- Double Crochet (dc): A common stitch for taller elements.
- Magic Ring (MR): An adjustable ring to start circular projects neatly (an alternative start is also provided).
- Working in rounds: Crocheting in a circular manner.
- Increasing (inc): Making more stitches to expand your work.
- Working into specific stitches or chain spaces.
- Changing colors: Essential for the striped flower.
- Creating a strong, even tension.
- Fastening off: Securing your work.
- Weaving in ends securely.
Finished Hat & Flower Dimensions (Approximate):
This pattern creates a standard adult-sized beanie-style hat, typically around 20-22 inches (51-56 cm) in circumference and 8-9 inches (20-23 cm) tall. The striped flower will be about 3-4 inches (7.5-10 cm) in diameter, making it a noticeable and beautiful accent.
Materials You’ll Need:
Gathering your materials beforehand makes for a smoother crocheting experience.
- Yarn:
- Main Hat Color: Approximately 150-200 yards (137-183 meters) of Worsted Weight (Medium #4) Yarn. Acrylic, wool, or a wool blend is great for warmth and stretch. Choose a solid color that will beautifully complement your striped flower (e.g., black, cream, grey, navy, or a deep forest green).
- Flower Colors (Color A & Color B): Small amounts (approx. 15-25 yards / 14-23 meters total for both colors) of Worsted Weight (Medium #4) Yarn in two contrasting or complementary colors for the stripes. For example, two shades of pink, blue and white, yellow and orange, etc.
- Crochet Hook: Size H/5.0mm. This size generally works well for worsted weight yarn, creating a good fabric for a hat and the flower.
- Yarn Needle (Tapestry Needle): Essential for seamlessly weaving in all your loose yarn tails and for securely sewing the flower onto the hat.
- Scissors: For cutting your yarn.
- Stitch Marker (Optional but Highly Recommended): Very helpful for marking the beginning of your rounds when working in a continuous spiral.
Understanding the Hat & Flower Construction:
We’ll approach this project in two main phases:
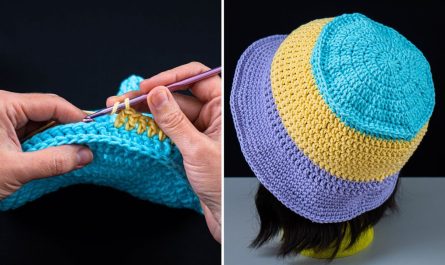
- Crocheting the Hat Body: This forms the base for your floral artistry. It will be built from the top-down in continuous rounds for a classic beanie shape.
- Crocheting and Attaching the Striped Flower: You’ll create the multi-colored flower separately and then carefully sew it onto the finished hat, making it a beautiful and personalized accent.
Let’s Crochet Your Hat with a Striped Flower!
Part 1: Crocheting the Hat
We’ll create a simple, classic beanie shape, working in continuous rounds to minimize seams.
- Crocheting the Crown (Main Hat Color):
- Start with a Magic Ring (MR): With your main hat color yarn, create a Magic Ring (MR).
- Alternative Start: If the Magic Ring is tricky,
ch 4, thensl stinto the first ch to form a ring.
- Alternative Start: If the Magic Ring is tricky,
- Round 1:
Ch 1(does not count as a stitch). Work 10 hdc into the Magic Ring. Pull tail to close ring tightly. Do NOT join. Place your stitch marker in the first hdc. [Total: 10 hdc] - Round 2 (Increase Round): Work 2 hdc into each stitch around. Move your stitch marker to the first hdc of this round. [Total: 20 hdc]
- Round 3 (Increase Round): *Work 1 hdc in the next stitch, 2 hdc in the next stitch*. Repeat from * to * around. Move stitch marker. [Total: 30 hdc]
- Round 4 (Increase Round): *Work 1 hdc in the next 2 stitches, 2 hdc in the next stitch*. Repeat from * to * around. Move stitch marker. [Total: 40 hdc]
- Round 5 (Increase Round): *Work 1 hdc in the next 3 stitches, 2 hdc in the next stitch*. Repeat from * to * around. Move stitch marker. [Total: 50 hdc]
- Round 6 (Increase Round): *Work 1 hdc in the next 4 stitches, 2 hdc in the next stitch*. Repeat from * to * around. Move stitch marker. [Total: 60 hdc]
- Round 7 (Increase Round): *Work 1 hdc in the next 5 stitches, 2 hdc in the next stitch*. Repeat from * to * around. Move stitch marker. [Total: 70 hdc]
- Crown Check: At this point, your circle should be flat and measure approximately 6-7 inches (15-18 cm) in diameter. This is the top of your hat. If it’s ruffling, you might have too many increases or your tension is too loose. If it’s bowing, you might need more increases or your tension is too tight. You can add one more increase round if you want a larger hat (e.g., sc in 6, 2sc in next = 80 hdc).
- Start with a Magic Ring (MR): With your main hat color yarn, create a Magic Ring (MR).
- Building the Hat Body (Main Hat Color):
- Body Rounds: Work 1 hdc into each stitch around (working in continuous spirals, moving your stitch marker at the end of each round).
- Repeat this round for approximately 12-15 more rounds, or until your hat reaches the desired length from the crown to just above where you want the brim to start (e.g., about 7-8 inches / 18-20 cm).
- Maintain consistent tension for an even fabric.
- Adding the Brim (Main Hat Color):
- Brim Round 1 (Optional – Firm Edge): Work 1 sc in the Back Loop Only (BLO) of each stitch around. This creates a neat ridge at the base of the hat, giving a clean transition to the brim.
- Brim Rounds (Ribbed look): *Work 1 Front Post Single Crochet (fpsc) around the post of the next stitch, work 1 Back Post Single Crochet (bpsc) around the post of the next stitch*. Repeat from * to * around. This creates a stretchy, ribbed brim.
- How to fpsc: Insert hook from front to back to front around the post of the stitch. Yarn over, pull up a loop, yarn over, pull through both loops.
- How to bpsc: Insert hook from back to front to back around the post of the stitch. Yarn over, pull up a loop, yarn over, pull through both loops.
- Repeat this ribbed round for 3-4 more rounds, or until your brim is the desired width.
- Fasten off, leaving a 6-inch (15 cm) tail for weaving in.
Part 2: Crocheting and Attaching the Striped Flower
This adds a vibrant accent to your hat! We’ll use two colors to create distinct stripes on the petals.
- Crocheting the Flower Base (Flower Color A):
- Start with a Magic Ring (MR): With Flower Color A, create a Magic Ring (MR).
- Alternative Start:
ch 4, thensl stinto the first ch to form a ring.
- Alternative Start:
- Round 1:
Ch 1(does not count as a stitch). Work 8 sc into the Magic Ring (or chain ring). Pull tail to close ring tightly. Sl st into the first sc to join. [Total: 8 sc] - Round 2 (Chain Spaces for Petals):
Ch 2(does not count as stitch). Work 1 hdc into the same stitch where you joined. Ch 2. *Skip 1 stitch, work 1 hdc into the next stitch, ch 2*. Repeat from * to * around. You should end with a ch 2 after your last hdc. Sl st into the top of the very first hdc you made (not the chain 2) to join. [Total: 4 hdc stitches and 4 ch-2 spaces] - Do NOT fasten off Color A yet!
- Start with a Magic Ring (MR): With Flower Color A, create a Magic Ring (MR).
- Crocheting the Petals with Stripes (Flower Color B and Color A):
- Join Flower Color B: Insert your hook into any of the chain-2 spaces from Round 2. Yarn over with Flower Color B and pull through the space, then pull through the loop on your hook to make a slip stitch (sl st). This joins your new color.
- Petal Row 1 (Color B): In the same chain-2 space where you joined Color B, work: (1 sc, 1 hdc, 1 dc).
- Now, drop Color B (do not cut). Pick up Flower Color A.
- With Color A, work into the same chain-2 space: (1 dc, 1 hdc, 1 sc).
- This completes your first striped petal! Gently tug on it to see its shape.
- Repeat for remaining petals:
- *In the next chain-2 space:
- With Flower Color B, work: (1 sc, 1 hdc, 1 dc).
- Drop Color B, pick up Flower Color A.
- With Flower Color A, work into the same chain-2 space: (1 dc, 1 hdc, 1 sc). *
- *In the next chain-2 space:
- Repeat from * to * around the entire round. You will create a total of 4 beautiful striped petals.
- After you’ve completed the last petal, sl st into the first single crochet stitch of the very first petal you made (this will be in Color B) to join the round.
- Fasten off both Flower Color A and Flower Color B, leaving tails about 6-8 inches (15-20 cm) long for weaving in.
- Tip for more dramatic petals: You can use taller stitches (e.g., treble crochet) in the middle of each color’s segment within the petal to make it larger and more pointed. For example:
(1 sc, 1 hdc, 1 dc, 1 tr)in Color B, then(1 tr, 1 dc, 1 hdc, 1 sc)in Color A.
- Crocheting Optional Leaves (Green Yarn – Make 1-2):
- Make a slip knot with green yarn and chain 8.
- Work 1 sl st into the 2nd ch from hook.
- Work 1 sc into the next ch.
- Work 1 hdc into the next 2 ch.
- Work 1 sc into the next ch.
- Work 1 sl st into the last ch.
- Ch 2 (this creates a little point for the leaf tip).
- Working down the opposite side of the foundation chain:
- Work 1 sl st into the same last ch.
- Work 1 sc into the next ch.
- Work 1 hdc into the next 2 ch.
- Work 1 sc into the next ch.
- Work 1 sl st into the next ch.
- Fasten off, leaving a tail for sewing. Make a second identical leaf if desired. Weave in ends.
- Attaching the Striped Flower (and Leaves) to the Hat:
- Decide on the perfect placement for your striped flower on the hat. It often looks best slightly off-center on the side of the hat, or near the base/brim.
- Use your yarn needle and a yarn tail from the flower’s base to securely stitch the flower onto the hat. Go through the very base of the flower and into the stitches of the hat. Make sure your stitches are invisible from the front of the flower. Stitch all around the base to ensure it’s firmly attached.
- If you made leaves, position them strategically at the base or slightly peeking out from under the flower. Stitch them securely to the hat as well. Weave in all remaining tails very neatly.
Part 3: Final Finishing Touches
- Weave in ALL Remaining Ends:
- This is paramount for a professional-looking and durable hat. You’ll have tails from your hat construction and the flower/leaves. Use your yarn needle to meticulously weave in every single loose yarn tail.
- Technique: Weave into stitches of the same color. Go in one direction for 1.5-2 inches (4-5 cm), then change direction and weave back through some of the same stitches to “lock” the tail. Trim excess close to the fabric.
- Blocking (Optional but Recommended):
- Blocking can significantly improve the shape, drape, and overall finish of your crocheted hat and help the flower sit beautifully.
- Method (Wet Blocking – Ideal for Acrylic/Wool):
- Gently mist your hat evenly with cool water using a spray bottle until it’s damp but not soaking wet.
- Place your hat over a balloon, a suitable-sized bowl, or a wig head to help it dry in a perfect dome shape.
- Carefully shape the hat, ensuring the brim lays nicely. Gently open and arrange the petals of your flower as desired. You can even use pins (rust-proof!) to hold petals in place for more definition while drying.
- Allow the hat to air dry completely and thoroughly in a well-ventilated area. This can take 24-48 hours.
Congratulations! You’ve successfully created a truly unique and beautiful crochet hat adorned with a vibrant striped flower! This handmade creation is not just a warm accessory; it’s a piece of wearable art, showcasing your impressive skill and creativity. Enjoy wearing your exquisite new hat wherever you go!
Video Tutorial 👇👇