 by
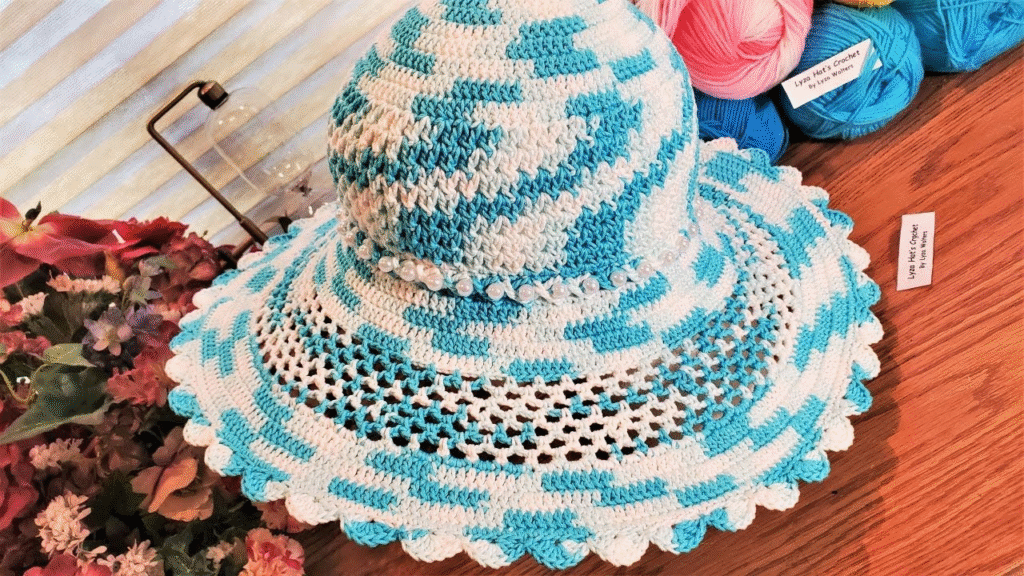
by A beautiful, airy summer sun hat is the perfect accessory for staying cool and stylish on sunny days. This pattern incorporates an open, lacy stitch design using two complementary colors, allowing for excellent breathability while still offering sun protection.

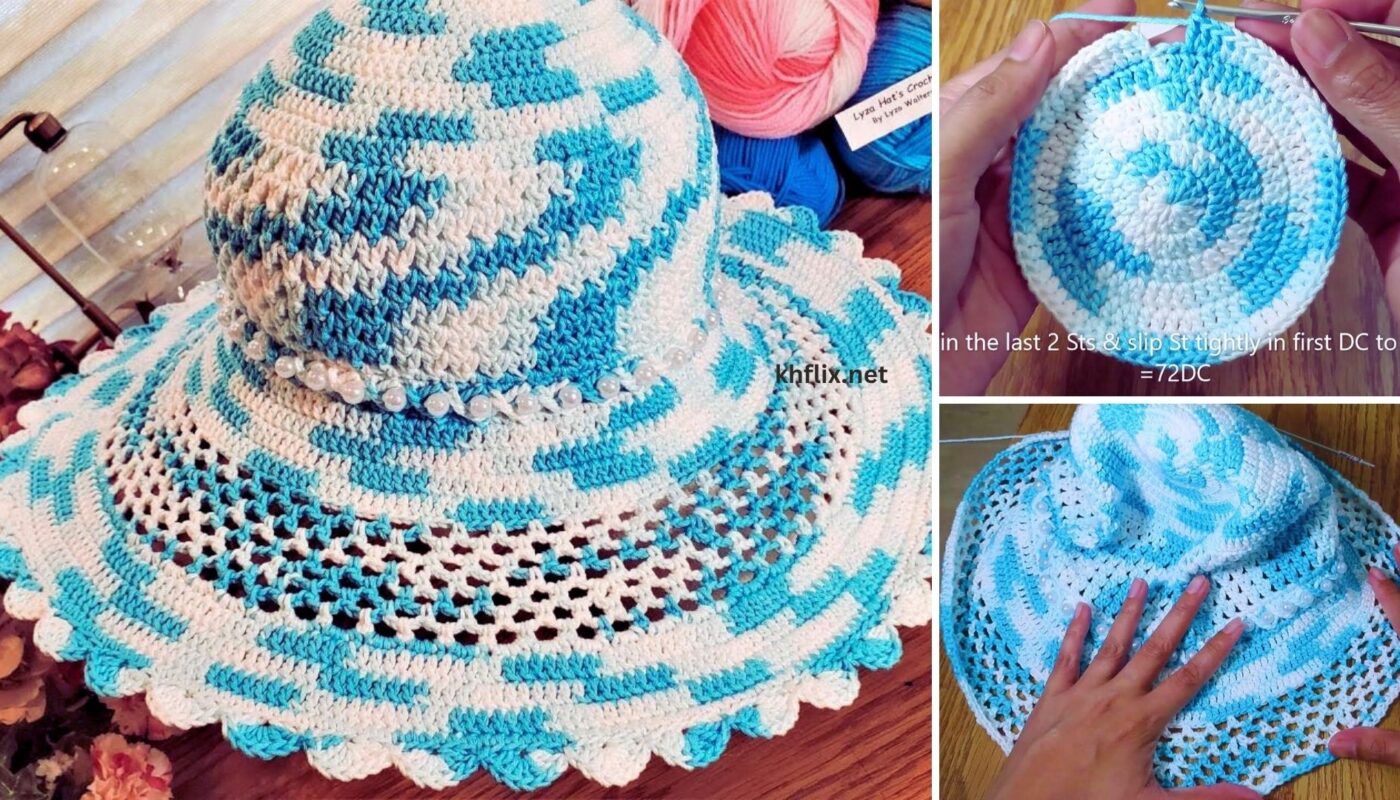
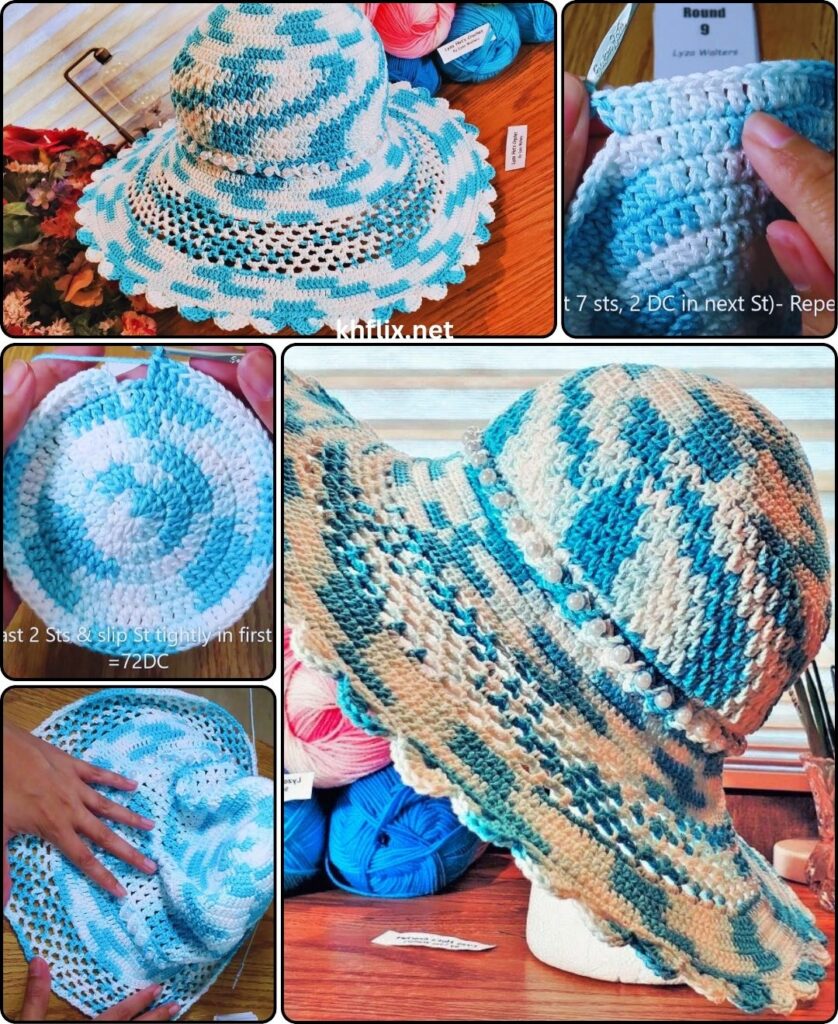
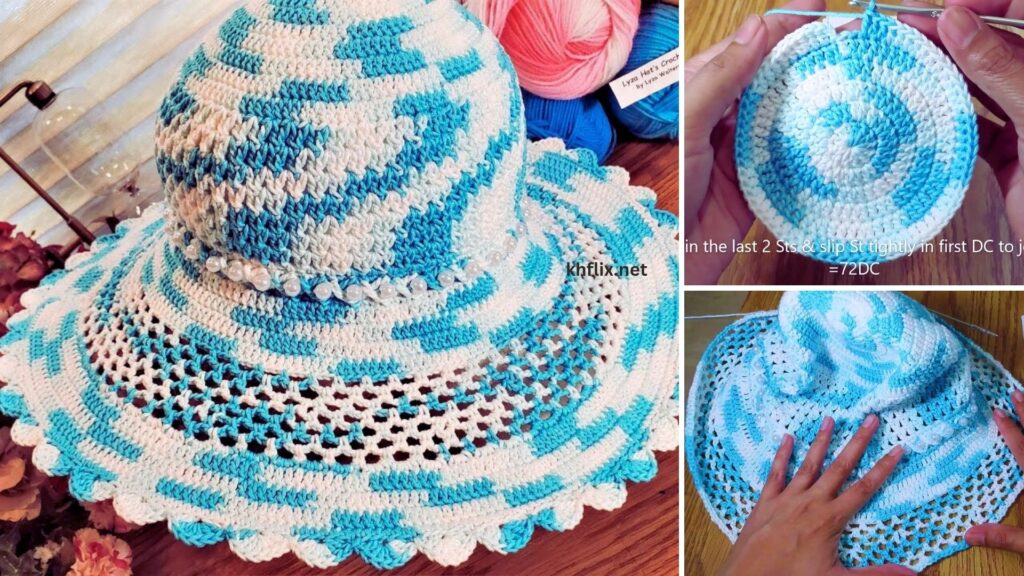
Pattern: How to Make a Beautiful Crocheted Airy Summer Sun Hat (Two Colors)
Project Overview: This pattern creates a lightweight and breathable sun hat, worked from the top-down. It features an openwork stitch pattern (V-stitch) that promotes air circulation, making it ideal for warmer weather. Two colors are alternated to create a lovely striped effect.
Skill Level: Intermediate (Requires comfortable knowledge of basic stitches, working in the round, increasing for a specific stitch pattern, and managing color changes neatly).
Finished Hat Dimensions (Approximate for Adult Medium):
- Head Circumference: 21-22 inches (53-56 cm)
- Crown Diameter (when flat): 7-7.5 inches (18-19 cm)
- Hat Height (Crown to Brim): 7-8 inches (18-20 cm)
- Brim Width: 3.5-4.5 inches (9-11.5 cm) – adjustable
Materials You’ll Need:
- Yarn:
- DK Weight (Light Worsted / #3) Cotton or Cotton Blend Yarn: Approximately 300-350 yards (275-320 meters) total.
- Color A (Main): Approx. 175-200 yards (e.g., White, Natural, Light Blue).
- Color B (Accent): Approx. 125-150 yards (e.g., Coral, Aqua, Lavender, Bright Green).
- Why DK Weight Cotton/Blend? It’s lighter than worsted weight, which inherently creates a more airy fabric. Cotton is breathable and holds shape well.
- DK Weight (Light Worsted / #3) Cotton or Cotton Blend Yarn: Approximately 300-350 yards (275-320 meters) total.
- Crochet Hook:
- Size I/5.5mm (or a size that produces a relatively loose, airy fabric for your chosen yarn, while still maintaining shape).
- Yarn Needle (Tapestry Needle): For weaving in ends.
- Scissors
- Stitch Marker (Highly Recommended): To mark the beginning of rounds.
Gauge (Crucial for Hat Sizing & Airy Pattern!)
With Color A and I/5.5mm hook, working in half double crochet (hdc): 12 hdc = 4 inches (10 cm) wide 9 hdc rows = 4 inches (10 cm) high
Since this is an “airy” hat, your fabric will naturally have more drape and less stiffness than a traditional sun hat. Adjust hook size as needed to maintain a consistent V-stitch pattern and achieve the desired size.
Abbreviations Used:
- ch: chain
- sl st: slip stitch
- sc: single crochet
- hdc: half double crochet
- dc: double crochet
- st(s): stitch(es)
- inc: increase (work 2 stitches into the same stitch)
- FO: fasten off
- MR: magic ring
- V-stitch (V-st): (1 dc, ch 1, 1 dc) worked into the same stitch or space.
Understanding Hat Construction & Airy Stitch
This hat is worked from the top-down in continuous rounds for a seamless finish. The V-stitch is the primary stitch for creating the openwork texture.
- V-stitch Mechanics: Each V-stitch is composed of two double crochets separated by a chain 1. In subsequent rounds, you will typically work new V-stitches into the ch-1 space of the V-stitch from the previous round.
- Increasing with V-stitch: To increase the circle, you’ll sometimes work an extra V-stitch in a round, or occasionally work 2 V-stitches into a single ch-1 space.
- Two-Color Design: We will alternate colors every two rounds to create a distinct striped effect. To change color neatly:
- Work the last stitch of the last round with the current color until you have 2 loops left on your hook.
- Drop the current color, pick up the new color, and yarn over with the new color.
- Pull the new color through the remaining 2 loops on your hook to complete the stitch.
- Continue the next round with the new color. Cut the old color yarn, leaving a 4-6 inch tail to weave in. Do NOT carry yarns up the side, as it will show through the airy fabric.
Let’s Start Crocheting Your Airy Summer Sun Hat!
Part 1: The Crown (I/5.5mm hook, alternating Color A & Color B)
- Work in continuous rounds (do NOT join with sl st at the end of each round) and use a stitch marker to mark the first stitch of each round.
- Round 1 (Color A): With Color A. Make a Magic Ring (MR). Ch 2 (counts as 1st dc). Work 11 dc into the MR. (12 dc).
- If you prefer not to use MR: Ch 4, sl st to first ch to form a ring. Ch 2, work 11 dc into the ring.
- Place stitch marker in the top of the beginning ch 2.
- On the last dc of this round, change to Color B on the last pull-through.
- Round 2 (Color B): Ch 1 (does NOT count as a st). Work V-stitch into the same st as ch 1. Sk 1 st, V-stitch into the next st. Repeat from * to * around. (6 V-stitches).
- On the last dc of the last V-stitch, change to Color A.
- Round 3 (Color A): Ch 1. Work V-stitch into the ch-1 space of the first V-stitch. Work 2 V-stitches into the ch-1 space of the next V-stitch. Work 1 V-stitch into the next V-st ch-1 sp, work 2 V-stitches into the next V-st ch-1 sp. Repeat from * to * around. (9 V-stitches).
- On the last dc of the last V-stitch, change to Color B.
- Round 4 (Color B): Ch 1. Work 1 V-stitch in the ch-1 sp of each of the first 2 V-sts. Work 2 V-stitches in the ch-1 sp of the next V-stitch. Work 1 V-stitch in each of the next 2 V-st ch-1 sps, work 2 V-stitches in the next V-st ch-1 sp. Repeat from * to * around. (12 V-stitches).
- On the last dc of the last V-stitch, change to Color A.
- Round 5 (Color A): Ch 1. Work 1 V-stitch in the ch-1 sp of each of the first 3 V-sts. Work 2 V-stitches in the ch-1 sp of the next V-stitch. Work 1 V-stitch in each of the next 3 V-st ch-1 sps, work 2 V-stitches in the next V-st ch-1 sp. Repeat from * to * around. (15 V-stitches).
- On the last dc of the last V-stitch, change to Color B.
- Round 6 (Color B): Ch 1. Work 1 V-stitch in the ch-1 sp of each of the first 4 V-sts. Work 2 V-stitches in the ch-1 sp of the next V-stitch. Work 1 V-stitch in each of the next 4 V-st ch-1 sps, work 2 V-stitches in the next V-st ch-1 sp. Repeat from * to * around. (18 V-stitches).
- On the last dc of the last V-stitch, change to Color A.
- At this point, your crown should be flat and measure approximately 7-7.5 inches (18-19 cm) in diameter. This is a good size for an adult medium. If you need a larger or smaller hat, adjust by adding or removing increasing rounds. For a larger crown, continue increasing following the pattern (e.g., next round: 1 V-st in next 5 V-sts, 2 V-sts in next V-st ch-1 sp).
Part 2: The Sides (I/5.5mm hook, alternating Color A & Color B)
- Now we will stop increasing and work even rounds to create the height of the hat.
- Continue the established color change pattern (alternating Color A and Color B every round).
- Round 7 (Color A): Ch 1. Work 1 V-stitch in the ch-1 sp of each V-stitch around. (18 V-stitches).
- On the last dc of the last V-stitch, change to Color B.
- Round 8 (Color B): Ch 1. Work 1 V-stitch in the ch-1 sp of each V-stitch around. (18 V-stitches).
- On the last dc of the last V-stitch, change to Color A.
- Repeat Rounds 7 and 8 (alternating Color A and Color B) until the hat sides measure approximately 6-7 inches (15-18 cm) from the top of the crown, or until it reaches just above your ears.
- You might do about 10-12 rounds for the sides. End on a Color A round for a consistent brim start.
- On the very last dc of the final side round, sl st to the top of the first dc of the first V-stitch of the round to join cleanly. This creates a defined transition to the brim.
Part 3: The Brim (I/5.5mm hook, alternating Color A & Color B)
- The brim requires strategic increases to make it flare outwards while maintaining the airy pattern.
- Work in joined rounds for a cleaner brim edge.
- Continue the color change pattern (alternating Color A and Color B every round).
- Round 1 (Brim – Color B): Ch 1 (does NOT count as a st). Work 1 sc in each dc and each ch-1 sp around. Sl st to the first sc to join. (54 sc – for 18 V-sts, each V-st has 2 dc + 1 ch-1 sp = 3 stitches. 18 * 3 = 54).
- On the last sc of the round, change to Color A.
- Working an sc round here creates a slightly firmer base for the brim and hides the V-stitch gaps for a smoother transition.
- Round 2 (Brim – Color A): Ch 1. Work 2 V-stitches into the first st. Work 1 V-stitch into each of the next 2 sts. Work 2 V-stitches into the next st, work 1 V-stitch into each of the next 2 sts. Repeat from * to * around. Sl st to the top of the first dc of the first V-stitch to join. (36 V-stitches).
- On the last dc of the last V-stitch, change to Color B.
- Round 3 (Brim – Color B): Ch 1. Work 1 V-stitch in the ch-1 sp of each V-stitch around. Sl st to join. (36 V-stitches).
- On the last dc of the last V-stitch, change to Color A.
- Round 4 (Brim – Color A): Ch 1. Work 2 V-stitches into the first st. Work 1 V-stitch into each of the next 3 sts. Work 2 V-stitches into the next st, work 1 V-stitch into each of the next 3 sts. Repeat from * to * around. Sl st to join. (45 V-stitches).
- On the last dc of the last V-stitch, change to Color B.
- Round 5 (Brim – Color B): Ch 1. Work 1 V-stitch in the ch-1 sp of each V-stitch around. Sl st to join. (45 V-stitches).
- On the last dc of the last V-stitch, change to Color A.
- Round 6 (Brim – Color A): Ch 1. Work 2 V-stitches into the first st. Work 1 V-stitch into each of the next 4 sts. Work 2 V-stitches into the next st, work 1 V-stitch into each of the next 4 sts. Repeat from * to * around. Sl st to join. (54 V-stitches).
- On the last dc of the last V-stitch, change to Color B.
- Your brim should now be approximately 3.5-4 inches wide. You can add more increasing rounds (alternating an increase round with an even V-stitch round, always increasing by 9 V-stitches) if you desire a wider brim.
- Final Round (Color B): Ch 1. Work 1 sc in each dc and each ch-1 sp around. Sl st to the first sc to join. (162 sc for 54 V-sts).
- FO, leaving a tail to weave in.
Part 4: Finishing Your Beautiful Airy Summer Sun Hat
- Weave in All Ends: This is critical for a clean and neat look, especially with openwork stitches where tails can be visible. Thread each yarn tail onto your yarn needle and carefully weave it into the stitches on the inside of the hat. Take your time to secure them well so they don’t unravel.
- Blocking (Highly Recommended!): Blocking is essential for openwork crochet to define the stitch pattern, create a flat crown, and shape the brim.
- Wet Blocking: Submerge the hat in lukewarm water until thoroughly saturated. Gently squeeze out excess water (do NOT wring).
- Shape: Place the hat on a hat block, a large bowl, a balloon inflated to the correct head size, or a mannequin head. Gently shape the crown and smooth out the sides.
- Brim Shaping: Carefully smooth out the brim, making sure it lays flat or to your desired gentle curve. Pin it down to a blocking mat or towel-covered surface to hold its shape while drying.
- Dry: Let the hat air dry completely. This might take 24-48 hours depending on your yarn and humidity. Do not remove from the form until fully dry.
Tips for Success & Customization:
- Yarn Choice is Key: DK weight cotton, linen, or bamboo blends are excellent choices for an airy, breathable hat. Avoid heavy worsted weight yarns or wool for a truly “airy” feel.
- Tension Control: For openwork patterns, consistent tension is crucial. Too loose, and the hat might stretch out of shape; too tight, and it loses its airiness.
- Seamless Look: Working in continuous rounds for the crown and sides minimizes a visible seam. The sl st join on the brim is common for the final edge.
- Brim Stiffness: Due to the airy nature of the stitch, the brim will be more flexible. For a very firm brim, this pattern is less suitable. However, light fabric stiffener spray after blocking can add a bit more hold if desired.
- Color Combinations: Experiment with a vibrant main color and a neutral accent, or two bright contrasting colors, to create different looks.
- V-stitch Variations: Once comfortable, you can try other variations of openwork stitches like shell stitches or granny squares for a different airy effect.
Enjoy wearing your beautiful, handmade, and airy two-color summer sun hat!