 by
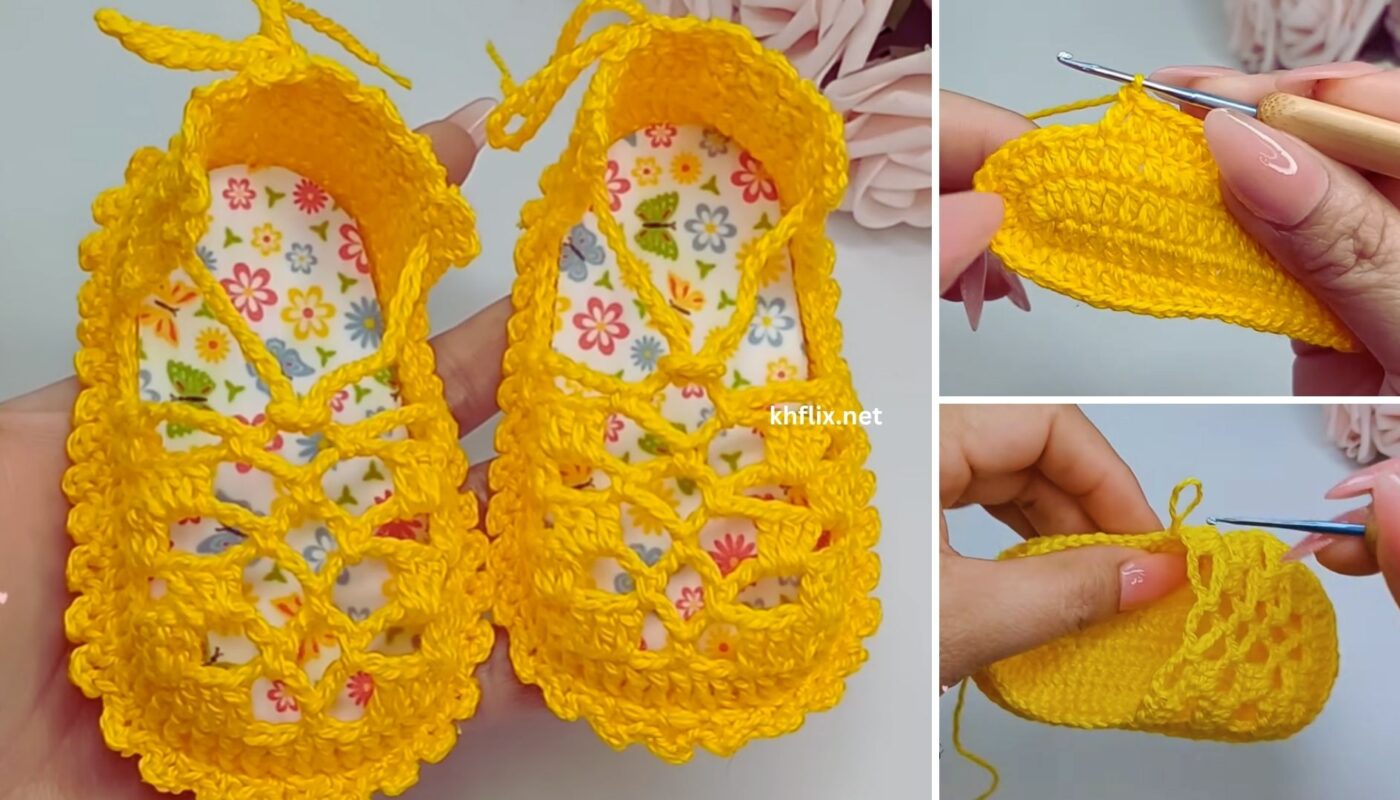
by Crocheting baby shoes is an incredibly adorable and rewarding project, perfect for gifting to new parents or for your own little one! A beautiful yellow baby shoe evokes sunshine, happiness, and sweetness. This tutorial will guide you through making a simple yet beautiful baby bootie with a soft, ribbed cuff, suitable for beginners.
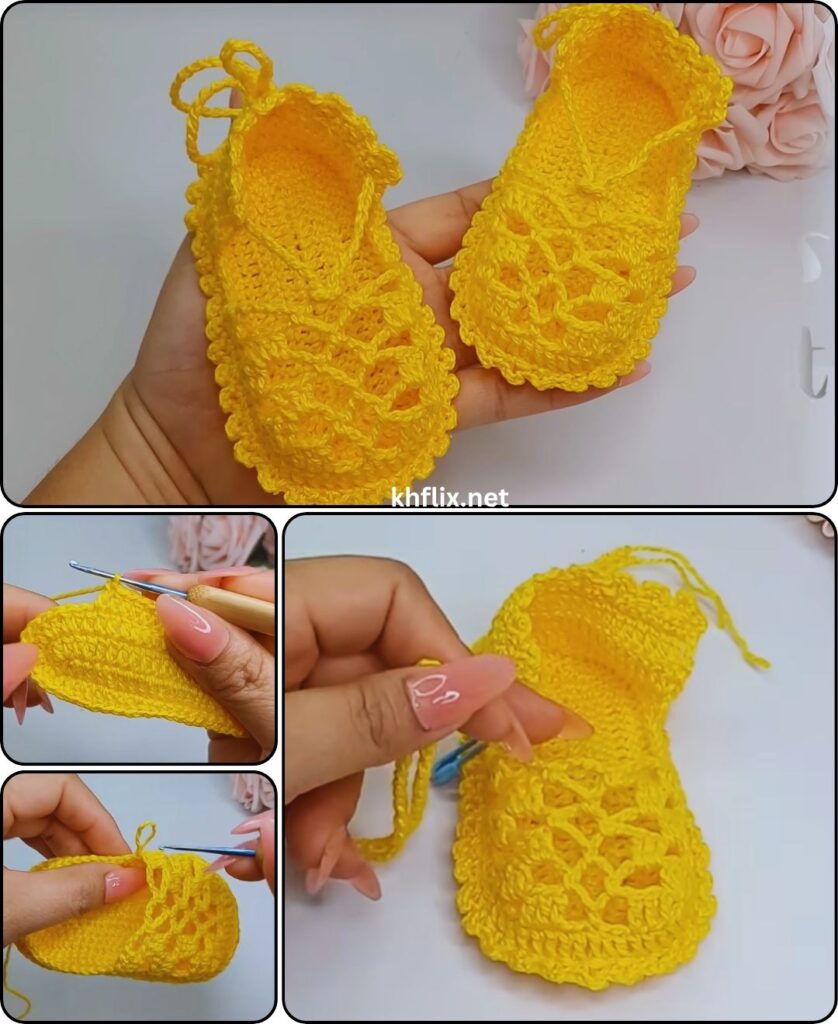
Pattern: How to Make a Beautiful Baby Shoe Crocheted with Yellow Color
Project Overview: This pattern creates a soft, comfortable baby bootie with a structured sole and a delicate ribbed cuff. The primary color will be a lovely yellow, making it perfect for any baby.
Skill Level: Beginner (Requires knowledge of basic stitches: ch, sl st, sc, hdc, and understanding how to work in the round and create simple increases/decreases).
Finished Shoe Size (Approximate):
- 0-3 Months: Approx. 3.5 inches (9 cm) sole length.
- Instructions provided are for this size. See “Sizing Notes” below to adjust.
Materials You’ll Need:
- Yarn:
- Baby Weight (DK or Light Worsted #3) Yarn: Approximately 50-70 yards (45-65 meters) of Yellow yarn.
- (Optional) A small amount of White or Cream yarn for contrast or a decorative border.
- Why Baby Weight/Soft Yarn? It’s gentle on baby’s skin and creates a flexible, comfortable shoe. Avoid scratchy yarns.
- Crochet Hook:
- Size D/3.25mm (or a size that works well with your chosen yarn to create a dense, firm fabric without being too stiff).
- Yarn Needle (Tapestry Needle): For weaving in ends.
- Scissors
- Stitch Markers (Optional): Helpful for marking the beginning of rounds or specific stitches.
Gauge (Crucial for Baby Shoe Sizing!)
With D/3.25mm hook and chosen yarn, working in half double crochet (hdc): 5 hdc = 1 inch (2.5 cm) 4 hdc rows = 1 inch (2.5 cm)
A snug gauge is important to prevent holes and ensure the shoe holds its shape. If your gauge is too loose, go down a hook size.
Abbreviations Used:
- ch: chain
- sl st: slip stitch
- sc: single crochet
- hdc: half double crochet
- dc: double crochet
- st(s): stitch(es)
- inc: increase (work 2 stitches into the same stitch)
- hdc2tog: half double crochet 2 together (decrease)
- BLO: back loop only
- FLO: front loop only
- FO: fasten off
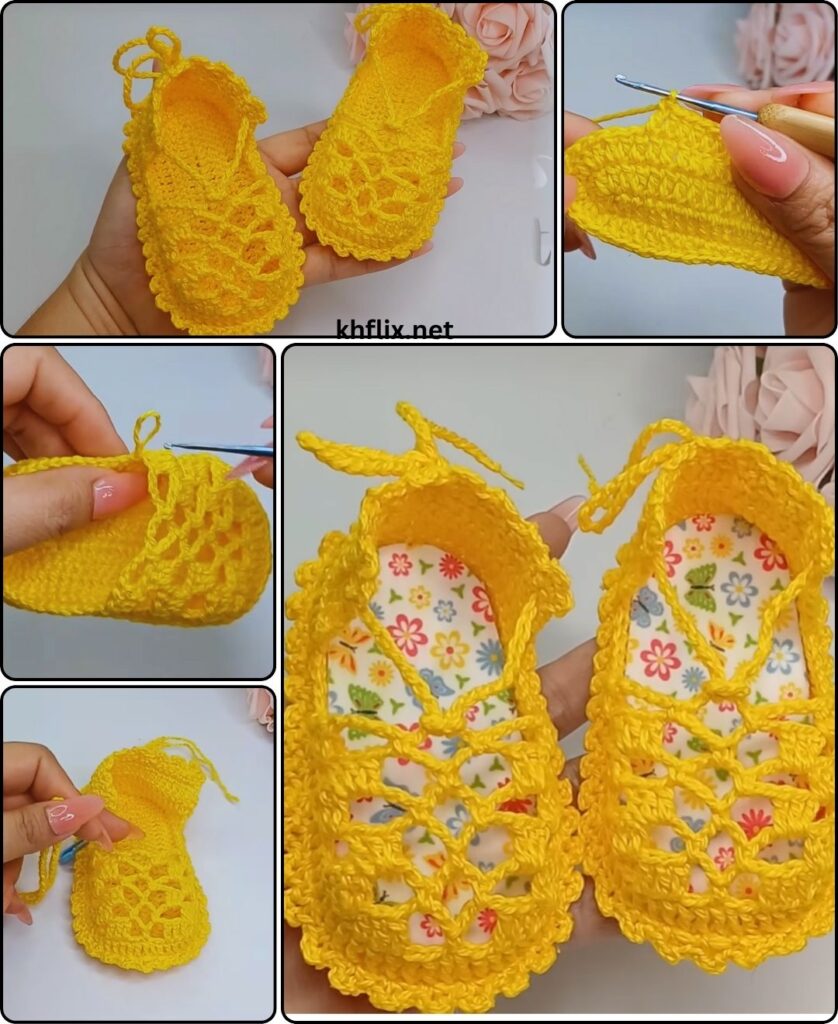
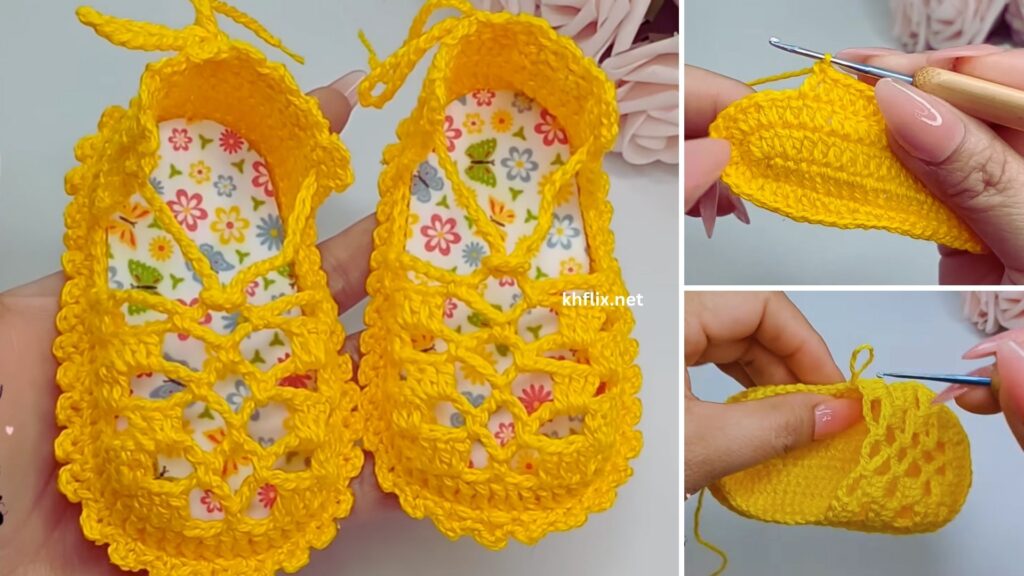
Understanding Baby Shoe Construction
A baby shoe is typically crocheted in three main parts:
- The Sole: An oval base that forms the bottom of the shoe.
- The Sides/Upper: Worked up from the sole, shaping the foot and toe area.
- The Cuff/Ankle: The top part of the bootie, often ribbed for stretch and comfort.
Let’s Start Crocheting Your Beautiful Yellow Baby Shoe!
Part 1: The Sole (Yellow Yarn)
We’ll start by creating the oval sole. This pattern is for a 0-3 month size.
- With Yellow yarn and D/3.25mm hook, ch 13. (This is your starting chain for the sole length).
- Round 1: Work 2 hdc in the 3rd ch from hook. (Counts as 2 hdc). Work 1 hdc in each of the next 9 ch. Work 6 hdc in the very last ch. (This turns the corner). Now, working down the other side of the foundation chain, work 1 hdc in each of the next 9 ch. Work 2 hdc in the last ch. (This is the same ch as your first 2 hdc). Sl st to the top of the beginning ch 2 to join. (28 hdc).
- Round 2: Ch 2 (counts as 1st hdc). Work 1 hdc in the same st as ch 2. Work 2 hdc in the next st. (Total 3 hdc in first 2 sts). Work 1 hdc in each of the next 9 sts. Work 2 hdc in each of the next 6 sts. Work 1 hdc in each of the next 9 sts. Work 2 hdc in each of the last 3 sts. Sl st to the top of the beginning ch 2 to join. (40 hdc).
- Round 3: Ch 2 (counts as 1st hdc). Work 1 hdc in the same st as ch 2. Work 1 hdc in the next st. Work 2 hdc in the next st. (Total 4 hdc in first 3 sts). Work 1 hdc in each of the next 11 sts. Work 2 hdc in each of the next 6 sts. Work 1 hdc in each of the next 11 sts. Work 2 hdc in each of the last 4 sts. Sl st to the top of the beginning ch 2 to join. (52 hdc).
- Your sole should now be an oval, approximately 3.5 inches (9 cm) long. If it’s curling slightly, that’s okay, it will form the base of the shoe.
Part 2: The Sides/Upper (Yellow Yarn)
Now we’ll build the sides of the shoe upwards from the sole, shaping the toe and heel.
- Round 4 (Creating the edge): Ch 1. Work 1 sc in the BLO (back loop only) of each st around. Sl st to the first sc to join. (52 sc).
- Working in the BLO creates a distinct edge, making the sole pop out and helping the sides stand up straight. It also leaves the unworked front loops on the outside, which can be decorative.
- Round 5: Ch 2 (counts as 1st hdc). Work 1 hdc in each st around. Sl st to the top of the beginning ch 2 to join. (52 hdc).
- Round 6 (Start Toe Shaping): Ch 2 (counts as 1st hdc). Work 1 hdc in each of the next 12 sts. (Total 13 hdc).
- Now for the toe decreases: (Hdc2tog) 8 times. (This creates the rounded toe).
- Work 1 hdc in each of the remaining 23 sts. Sl st to the top of the beginning ch 2 to join. (44 hdc).
- Round 7 (Continue Toe Shaping): Ch 2 (counts as 1st hdc). Work 1 hdc in each of the next 10 sts. (Total 11 hdc).
- Now for more toe decreases: (Hdc2tog) 6 times.
- Work 1 hdc in each of the remaining 21 sts. Sl st to the top of the beginning ch 2 to join. (38 hdc).
Part 3: The Ankle/Cuff (Yellow Yarn)
We’ll now create the ribbed cuff of the bootie for a snug and comfortable fit.
- Round 8 (Start Ribbing): Ch 1. Work 1 sc in each st around. Sl st to the first sc to join. (38 sc).
- Round 9 (Ribbing – first row): Ch 6. (This forms the height of your ribbing. Adjust for taller/shorter ribbing).
- Sc in the 2nd ch from hook. Sc in each of the next 4 ch. (5 sc made).
- Sl st into the next 2 sc on the top of the bootie. (This attaches the ribbing to the bootie body).
- Turn your work (do NOT ch 1).
- Row 10 (Ribbing – return row): Sc in the BLO of each of the 5 sc. (5 sc).
- Ch 1, turn.
- Row 11 (Ribbing – attach row): Sc in the BLO of each of the 5 sc. (5 sc).
- Sl st into the next 2 sc on the top of the bootie. (Attach to bootie again).
- Turn your work.
- Repeat Rows 10 and 11 around the entire opening of the bootie until you reach the beginning of the ribbing. You will have a strip of ribbing encircling the ankle.
- Joining the Ribbing: When you’ve worked your last ribbing row and sl stitched to the bootie, bring the two ends of the ribbing together (the first ch-6 edge and the last ribbing row). Sl st them together through the BLO of each sc to create a seamless join.
- FO, leaving a tail to weave in.
- Repeat all steps to create a second matching baby shoe!
Part 4: Finishing Touches
- Weave in All Ends: Use your yarn needle to neatly weave in all loose yarn tails. Ensure they are secure so they don’t unravel, especially since this is for a baby.
- Optional Decoration (Yellow or White Yarn):
- Bow: Make a small crochet chain, tie it into a bow, and stitch it securely to the front of the shoe.
- Small Flower: Create a tiny simple crochet flower (e.g., a magic ring with 5 sc, then (ch 2, 2 dc, ch 2, sl st) in each sc) and stitch it to the side or front.
- Button: Sew a small, flat button securely to the outside of the ankle for decorative purposes (ensure it’s very firmly attached and not a choking hazard).
Sizing Notes (Adjusting for Different Ages):
To adjust the size of the baby shoe, you’ll primarily modify the starting chain for the sole and the number of stitches in the sole’s increasing rounds. Keep the general increase pattern the same (e.g., 6 increases on each end per round) but adjust the “straight” sections.
- 3-6 Months (approx. 4 inches / 10 cm sole):
- Ch 16. (Starting chain should be about 2.5 inches / 6.5 cm less than desired finished length).
- Follow the increase pattern for the sole, adding one more round or more increases in the straight sections to reach approximately 60-64 hdc in the last sole round.
- Adjust the number of toe decreases accordingly (e.g., 9-10 hdc2tog).
- 6-12 Months (approx. 4.5 inches / 11.5 cm sole):
- Ch 19.
- Follow the increase pattern, adding more rounds/increases to reach approximately 68-72 hdc in the last sole round.
- Adjust toe decreases (e.g., 10-12 hdc2tog).
- Remember to check your gauge! Using a slightly larger hook or increasing more in the sole rounds will also increase the shoe size.
Tips for Success:
- Soft Yarn: Always use yarn that is soft and gentle on baby’s skin. Look for “baby” designated yarns.
- Tension: Maintain consistent tension. Too loose, and the shoe might be floppy; too tight, and it won’t be flexible.
- Secure Ends: Because these are for a baby, ensure all yarn ends are very securely woven in and trimmed closely to prevent unraveling and potential hazards.
- Make Two! Don’t forget to make a matching pair!
- Practice Decreases: If hdc2tog is new to you, practice it a few times on scrap yarn until you feel comfortable.
Enjoy crocheting your beautiful yellow baby shoes – they’re sure to bring a smile to anyone’s face!