 by
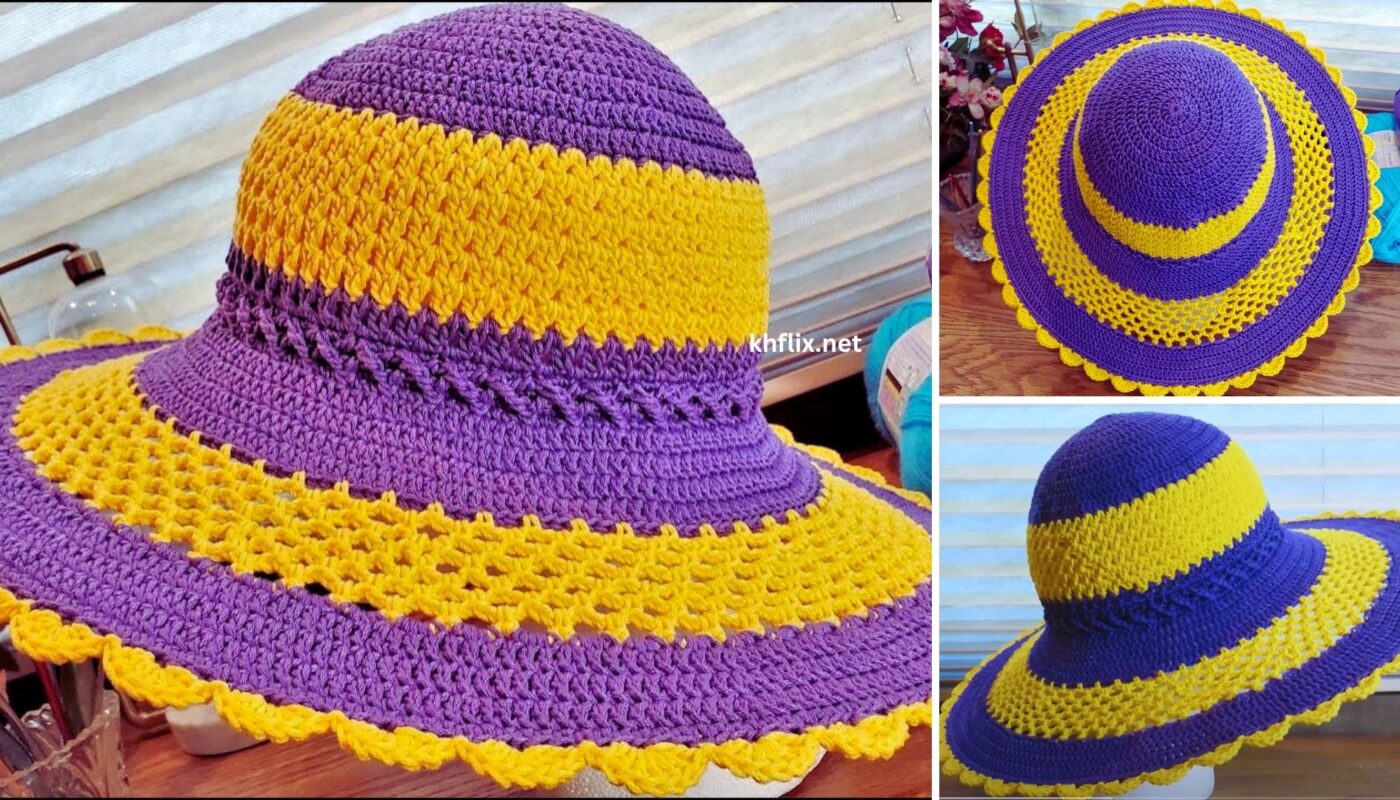
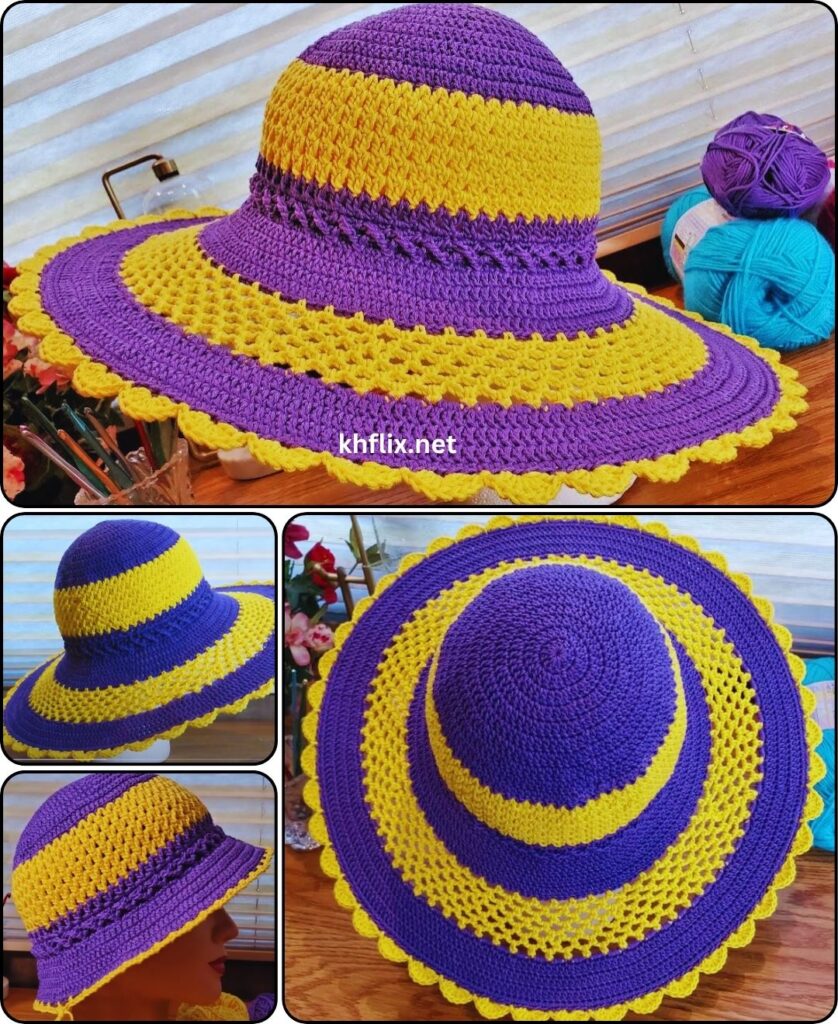
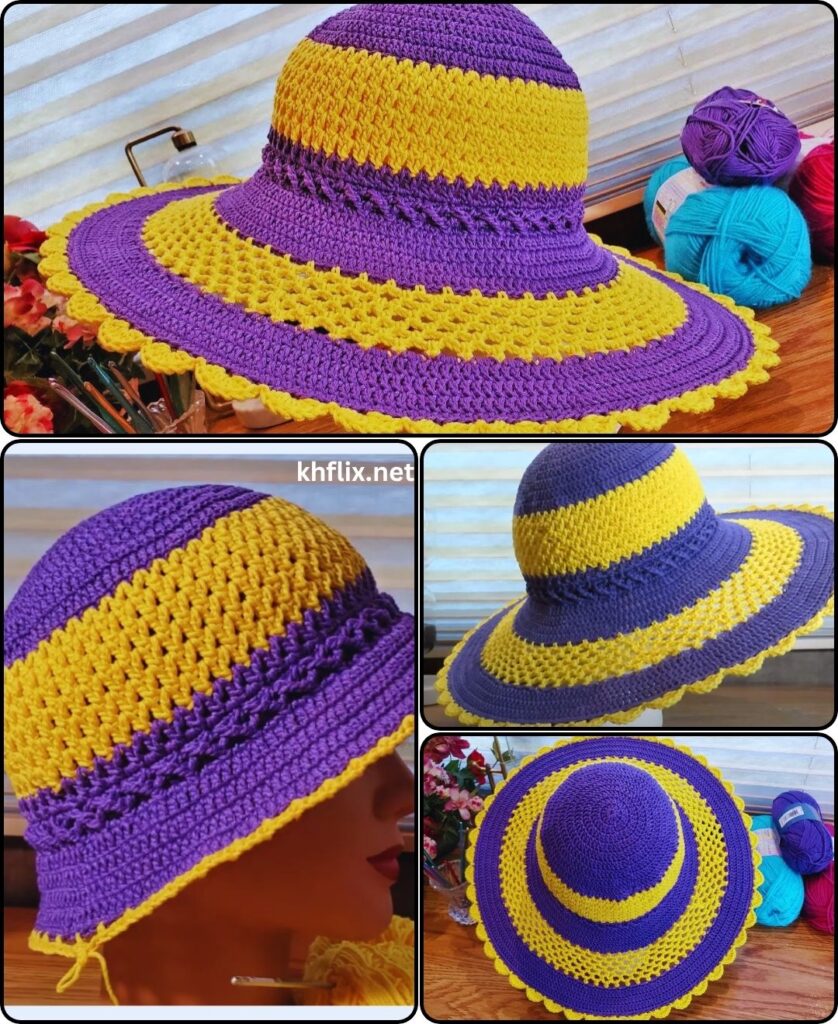
by Creating a “Beautiful Striped Crocheted Sun Hat” is a rewarding project that combines practical sun protection with personalized style. This tutorial will guide you through making a classic sun hat with a wide brim, featuring vibrant stripes.
Pattern: How to Crochet a Beautiful Striped Sun Hat
Project Overview: This pattern creates a comfortable sun hat, worked from the top-down, featuring a sturdy crown, straight sides, and a wide, sun-shading brim. Stripes are integrated throughout for a fun, summery look.
Skill Level: Intermediate (Requires comfortable knowledge of basic stitches, working in the round, increasing, and managing color changes).
Finished Hat Dimensions (Approximate for Adult Medium):
- Head Circumference: 21-22 inches (53-56 cm)
- Crown Diameter (when flat): 7-7.5 inches (18-19 cm)
- Hat Height (Crown to Brim): 7-8 inches (18-20 cm)
- Brim Width: 3-4 inches (7.5-10 cm) – adjustable
Materials You’ll Need:
- Yarn:
- Worsted Weight (Medium #4) Cotton or Cotton Blend Yarn: Approximately 300-400 yards (275-365 meters) total.
- Color A (Main/Background): Approx. 150-200 yards (e.g., Natural, White, Navy).
- Color B (Stripe 1): Approx. 75-100 yards (e.g., Bright Yellow, Coral, Sky Blue).
- Color C (Stripe 2): Approx. 75-100 yards (e.g., Aqua, Lavender, Lime Green).
- Why Cotton/Blend? Cotton is breathable, durable, and provides good stitch definition. It also holds its shape reasonably well. Raffia yarn is another excellent choice for sun hats for stiffness, but can be harder to work with for beginners.
- Crochet Hook:
- Size H/5.0mm (or a size that produces a dense fabric for a hat. Go down a hook size if your fabric feels too loose or gappy).
- Yarn Needle (Tapestry Needle): For weaving in ends.
- Scissors
- Stitch Marker (Highly Recommended): To mark the beginning of rounds.
- Hat Stiffener/Millinery Wire (Optional, but recommended for a very firm brim): If you want a perfectly flat and stiff brim. Can be sewn into the last few rounds of the brim.
Gauge (Crucial for Hat Sizing!)
With Color A and H/5.0mm hook, working in half double crochet (hdc): 13 hdc = 4 inches (10 cm) wide 10 hdc rows = 4 inches (10 cm) high
Make sure your fabric is dense enough so light doesn’t easily shine through. Adjust hook size as needed.
Abbreviations Used:
- ch: chain
- sl st: slip stitch
- sc: single crochet
- hdc: half double crochet
- dc: double crochet
- st(s): stitch(es)
- inc: increase (working 2 stitches into the same stitch)
- FO: fasten off
- CA: Color A
- CB: Color B
- CC: Color C
Understanding Hat Construction
A crocheted hat is typically worked in three main sections:
- The Crown: This is the flat top of the hat. You start with a small circle and increase stitches evenly in each round until the circle reaches the desired diameter for your head size.
- The Sides (Body): Once the crown is the correct diameter, you stop increasing and work even rounds (one stitch per stitch) to build the height of the hat.
- The Brim: For a sun hat, the brim requires significant increases to flare outwards and provide sun protection.
Color Changes for Stripes: For a crisp striped look, you’ll change colors every 1 or 2 rounds. To change color neatly:
- Work the last stitch of the round with the current color until you have 2 loops left on your hook.
- Drop the current color, pick up the new color, and yarn over with the new color.
- Pull the new color through the remaining 2 loops on your hook to complete the stitch.
- Continue the next round with the new color. You can either cut the old color (leaving a 4-6 inch tail to weave in) or carry it loosely up the inside seam of the hat if you plan to use it again soon. For a cleaner finish, cutting and rejoining is often preferred for hats.
Let’s Start Crocheting Your Striped Sun Hat!
Part 1: The Crown (Striped)
- Note: For the crown, we will increase evenly in each round to create a flat circle. The number of stitches between increases will grow by one in each increasing round.
- Work in continuous rounds (do NOT join with sl st at the end of each round) and use a stitch marker to mark the first stitch of each round. This helps with seamless stripes.
- Round 1: With Color A and H/5.0mm hook. Make a Magic Ring (MR). Ch 1 (does NOT count as a st). Work 10 hdc into the MR. (10 hdc).
- If you prefer not to use MR: Ch 3, sl st to first ch to form a ring. Ch 1, work 10 hdc into the ring.
- Place stitch marker in the first hdc.
- On the last hdc of this round, change to Color B on the last pull-through.
- Round 2: With Color B. Work 2 hdc in each st around. (20 hdc).
- On the last hdc of this round, change to Color C.
- Round 3: With Color C. 2 hdc in the first st (inc), 1 hdc in the next st. Repeat from * to * around. (30 hdc).
- On the last hdc, change to Color A.
- Round 4: With Color A. 2 hdc in the first st (inc), 1 hdc in each of the next 2 sts. Repeat from * to * around. (40 hdc).
- On the last hdc, change to Color B.
- Round 5: With Color B. 2 hdc in the first st (inc), 1 hdc in each of the next 3 sts. Repeat from * to * around. (50 hdc).
- On the last hdc, change to Color C.
- Round 6: With Color C. 2 hdc in the first st (inc), 1 hdc in each of the next 4 sts. Repeat from * to * around. (60 hdc).
- On the last hdc, change to Color A.
- Round 7: With Color A. 2 hdc in the first st (inc), 1 hdc in each of the next 5 sts. Repeat from * to * around. (70 hdc).
- On the last hdc, change to Color B.
- Round 8: With Color B. 2 hdc in the first st (inc), 1 hdc in each of the next 6 sts. Repeat from * to * around. (80 hdc).
- On the last hdc, change to Color C.
- Round 9: With Color C. 2 hdc in the first st (inc), 1 hdc in each of the next 7 sts. Repeat from * to * around. (90 hdc).
- On the last hdc, change to Color A.
- At this point, your crown should be flat and measure approximately 7-7.5 inches (18-19 cm) in diameter. This is a good size for an adult medium. If you need a larger or smaller hat, adjust by adding or removing increasing rounds. For a larger crown, continue increasing following the pattern (e.g., Round 10: inc, hdc in next 8, etc.).
Part 2: The Sides (Striped)
- Now we will stop increasing and work even rounds to create the height of the hat.
- Continue the established stripe pattern (alternating A, B, C every round).
- Round 10: With Color A. Work 1 hdc in each st around. (90 hdc).
- On the last hdc, change to Color B.
- Round 11: With Color B. Work 1 hdc in each st around. (90 hdc).
- On the last hdc, change to Color C.
- Round 12: With Color C. Work 1 hdc in each st around. (90 hdc).
- On the last hdc, change to Color A.
- Repeat Rounds 10-12 (alternating A, B, C) until the hat sides measure approximately 6-7 inches (15-18 cm) from the top of the crown, or until it reaches just above your ears.
- You might do about 9-12 rounds for the sides. End on a Color A round for a consistent brim start.
- On the very last hdc of the final side round, sl st to the first hdc of the round to join cleanly. This creates a defined transition to the brim.
Part 3: The Brim (Striped & Shaping)
- The brim requires strategic increases to make it flare outwards. We will work in joined rounds for a cleaner brim edge.
- Continue the stripe pattern (A, B, C, etc.).
- Round 1 (Brim – CA): With Color A. Ch 1 (does NOT count as a st). Work 2 sc in the first st (inc), 1 sc in each of the next 8 sts. Repeat from * to * around. Sl st to the first sc to join. (100 sc).
- On the last pull-through of the sl st, change to Color B.
- Using sc here for a denser brim base.
- Round 2 (Brim – CB): With Color B. Ch 1. Work 1 sc in each st around. Sl st to join. (100 sc).
- On the last pull-through of the sl st, change to Color C.
- An even round helps the brim lay flat without ruffling too much.
- Round 3 (Brim – CC): With Color C. Ch 1. Work 2 sc in the first st (inc), 1 sc in each of the next 9 sts. Repeat from * to * around. Sl st to join. (110 sc).
- On the last pull-through of the sl st, change to Color A.
- Round 4 (Brim – CA): With Color A. Ch 1. Work 1 sc in each st around. Sl st to join. (110 sc).
- On the last pull-through of the sl st, change to Color B.
- Round 5 (Brim – CB): With Color B. Ch 1. Work 2 sc in the first st (inc), 1 sc in each of the next 10 sts. Repeat from * to * around. Sl st to join. (120 sc).
- On the last pull-through of the sl st, change to Color C.
- Round 6 (Brim – CC): With Color C. Ch 1. Work 1 sc in each st around. Sl st to join. (120 sc).
- On the last pull-through of the sl st, change to Color A.
- Round 7 (Brim – CA): With Color A. Ch 1. Work 2 sc in the first st (inc), 1 sc in each of the next 11 sts. Repeat from * to * around. Sl st to join. (130 sc).
- On the last pull-through of the sl st, change to Color B.
- At this point, the brim should be roughly 3-4 inches wide. You can add more increasing rounds (alternating an increase round with an even round, always increasing by 10 stitches) if you desire a wider brim.
- Final Round (Optional for a firmer edge): With Color B. Ch 1. Work a slip stitch into each st around. Sl st to join. (130 sl st). This creates a very neat and firm edge.
- If using millinery wire: On this final slip stitch round, you can crochet over the wire as you go, embedding it into the brim for extra stiffness and shape retention.
- FO, leaving a tail to weave in.

Part 4: Finishing Your Beautiful Striped Sun Hat
- Weave in All Ends: This is critical for a professional and neat look. Thread each yarn tail onto your yarn needle and carefully weave it into the stitches on the inside of the hat. Take your time to secure them well so they don’t unravel.
- Blocking (Highly Recommended!): Blocking is essential for hats to achieve the correct shape and for the brim to lay flat or be shaped.
- Wet Blocking: Submerge the hat in lukewarm water until thoroughly saturated. Gently squeeze out excess water (do NOT wring).
- Shape: Place the hat on a hat block, a large bowl, or even a balloon (inflated to the correct head size). Gently shape the crown.
- Brim Shaping: Carefully smooth out the brim, making sure it lays flat. You can pin it down to a blocking mat if needed. If using wire, shape the wire as desired.
- Dry: Let the hat air dry completely. This might take 24-48 hours depending on your yarn and humidity. Do not remove from the form until fully dry.
Tips for Success:
- Yarn Choice is Key: Cotton or cotton blends are highly recommended for sun hats due to their breathability and less stretch compared to acrylics. Raffia yarn is also great for very stiff brims.
- Gauge Swatch: Don’t skip it! It’s the best way to ensure your hat will fit.
- Trying On: Periodically try the hat on as you go, especially during the crown and side sections, to ensure it fits comfortably.
- Consistent Tension: Maintain even tension throughout to create a smooth fabric and a well-shaped hat.
- Seamless Stripes: Working in continuous rounds (for the crown and sides) helps minimize the “seam” where colors change, giving a very clean stripe. The sl st join on the brim is more visible but is common for brims.
- Customization:
- Brim Stiffness: For an extra stiff brim, consider inserting millinery wire into the final rounds of the brim.
- Stripe Variations: Instead of changing colors every round, you could do 2-3 rows per stripe for thicker stripes, or use more colors.
- Embellishments: Add a crocheted flower, a fabric band, or a simple cord around the base of the crown for extra flair.
Enjoy your beautiful, handmade, and sun-protective striped crochet hat!