 by
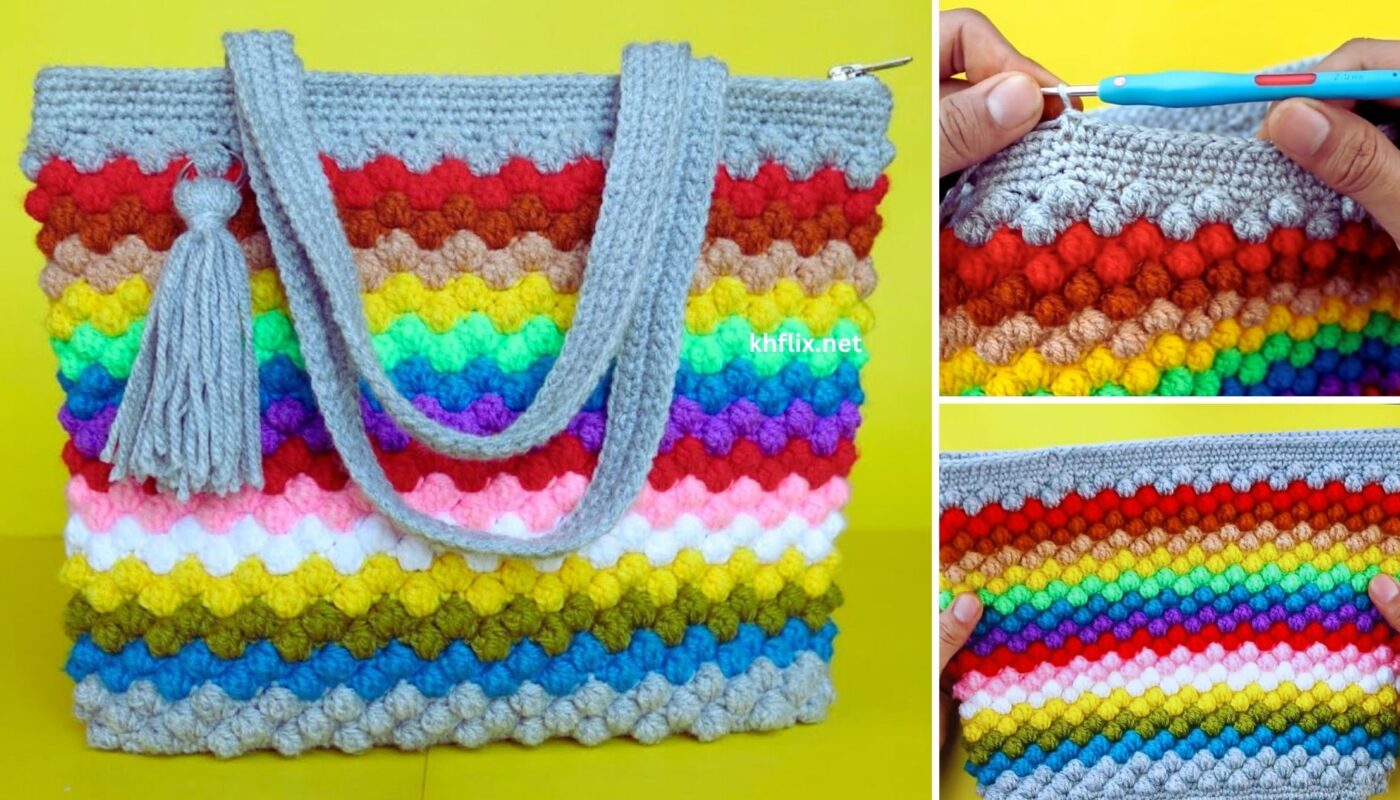
by Creating a “Beautiful Striped Bubble Crochet Bag” is a fantastic way to combine texture and color in a stylish accessory! The bubble stitch creates wonderful raised bumps, giving the bag a unique, tactile feel, while stripes add a dynamic visual element. This pattern will guide you through making a sturdy and eye-catching tote-style bag.
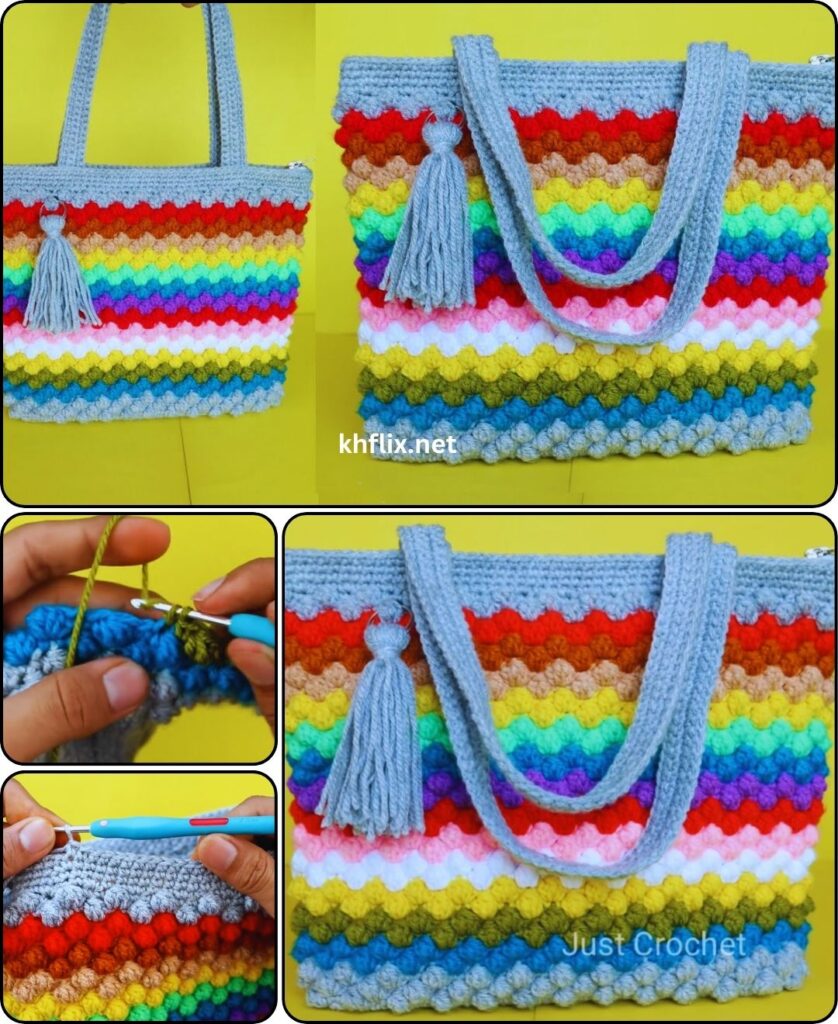
Pattern: How to Crochet a Beautiful Striped Bubble Crochet Bag
Project Overview: This pattern creates a rectangular tote bag featuring a textured bubble stitch worked in horizontal stripes. The bag is constructed by crocheting the base, then building the sides in continuous rounds with color changes, and finally adding handles.
Skill Level: Intermediate (Requires comfortable knowledge of basic stitches, working in the round, color changes, and creating textured stitches like the bubble stitch).
Finished Bag Dimensions (Approximate):
- Width: 9-10 inches (23-25 cm)
- Height (Bag body only): 8-9 inches (20-23 cm)
- Depth: 2-3 inches (5-7.5 cm)
- Handle Drop: Approx. 6-7 inches (15-18 cm) – adjustable.
Materials You’ll Need:
- Yarn:
- Worsted Weight (Medium #4) Cotton or Cotton Blend Yarn: Approximately 400-500 yards (365-450 meters) total.
- Color A (Main/Background): Approx. 250-300 yards (e.g., Cream, Grey, Navy).
- Color B (Stripe 1): Approx. 75-100 yards (e.g., Rust, Mustard, Teal).
- Color C (Stripe 2): Approx. 75-100 yards (e.g., complementary color).
- Why Cotton/Blend? Cotton is durable, has good stitch definition (important for texture), and minimizes stretching, which is crucial for bags.
- Crochet Hook:
- Size H/5.0mm (or a size that produces a very dense, sturdy fabric for the bubble stitch. Go down a hook size if your fabric feels too loose or gappy).
- Yarn Needle (Tapestry Needle): For weaving in ends and seaming.
- Scissors
- Stitch Marker (Highly Recommended): To mark the beginning of rounds.
- Fabric for Lining (Optional, but highly recommended): Approximately 1/2 to 1 yard of cotton fabric. This significantly increases the bag’s durability, prevents stretching, and hides yarn tails.
- Matching Sewing Thread and Needle (Optional): For attaching lining.
Gauge (Crucial for Bag Size & Bubble Stitch Definition!)
With H/5.0mm hook and Color A, working in single crochet: 16 sc = 4 inches (10 cm) wide 18 rows sc = 4 inches (10 cm) high
It’s crucial that your fabric is dense and firm. Adjust hook size as needed.
Abbreviations Used:
- ch: chain
- sl st: slip stitch
- sc: single crochet
- dc: double crochet
- st(s): stitch(es)
- inc: increase (working 2 stitches into the same stitch)
- FLO: front loop only
- FO: fasten off
- CA: Color A
- CB: Color B
- CC: Color C
- Bubble St: Bubble Stitch (detailed explanation below)
Understanding the Bubble Stitch
The bubble stitch is created by working multiple double crochet stitches into the same stitch, but not completing them until the very end, and then securing them. It typically pushes the “bubble” to the front side of your work.
How to make a Bubble Stitch (for this pattern):
- Work into the stitch from the previous round.
- [Yarn over (YO), insert hook into the specified stitch, YO, pull up a loop, YO, pull through 2 loops on hook] 5 times. (You will have 6 loops on your hook).
- YO, pull through all 6 loops on your hook.
- Secure the bubble with a ch 1 (this chain counts as part of the stitch space if you’re counting for the next row).
- After making a Bubble St, you will usually skip the next stitch or work into the next stitch, depending on the pattern. In our case, we’ll work a sc into the next stitch to secure it.
Important for Striped Bubble Stitch:
- You will typically work the Bubble Stitch rows in one color (e.g., CB or CC) over a base row of single crochet in another color (e.g., CA).
- The bubbles pop out on the right side of the fabric. Since we’re working in continuous rounds, your “right side” will always be facing you.
- You do NOT carry the unused yarn colors in this pattern. You will drop one color and pick up the next as needed, leaving longer floats if necessary, or simply cutting the yarn and rejoining. For a cleaner look and to avoid too many ends, try to carry the main background color (CA) when not in use through the non-bubble rows.
Understanding the Bag Structure
- Bag Base: Crocheted first as a sturdy oval in solid single crochet (CA).
- Bag Sides: Worked upwards from the base, using alternating stripes of solid sc rows and bubble stitch rows.
- Top Edge: A few simple sc rounds to finish the opening.
- Handles: Crocheted separately and securely attached.
Let’s Start Crocheting Your Striped Bubble Bag!
Part 1: The Bag Base (Color A)
- With Color A and H/5.0mm hook, ch 36. (Adjust chain length to change bag width).
- Round 1: Work 2 sc in the 2nd ch from hook. Sc in each of the next 33 ch. Work 4 sc in the last ch. (This turns the corner). Now, working down the other side of the foundation chain, sc in each of the next 33 ch. Work 2 sc in the very last ch (same as first 2 sc). Do NOT join with sl st, work in continuous rounds. (74 sc).
- Place a stitch marker in the first sc of the round.
- Round 2: Work 2 sc in the first st. Sc in each of the next 35 sts. Work 2 sc in each of the next 3 sts. Sc in each of the next 35 sts. Work 2 sc in the last st. (80 sc).
- Round 3: Work 2 sc in the first st. Sc in each of the next 37 sts. Work 2 sc in each of the next 3 sts. Sc in each of the next 37 sts. Work 2 sc in the last st. (86 sc).
- Round 4: Work 2 sc in the first st. Sc in each of the next 39 sts. Work 2 sc in each of the next 3 sts. Sc in each of the next 39 sts. Work 2 sc in the last st. (92 sc).
- Your base should now be a sturdy oval, approx. 9.5 inches long and 2.5 inches wide.
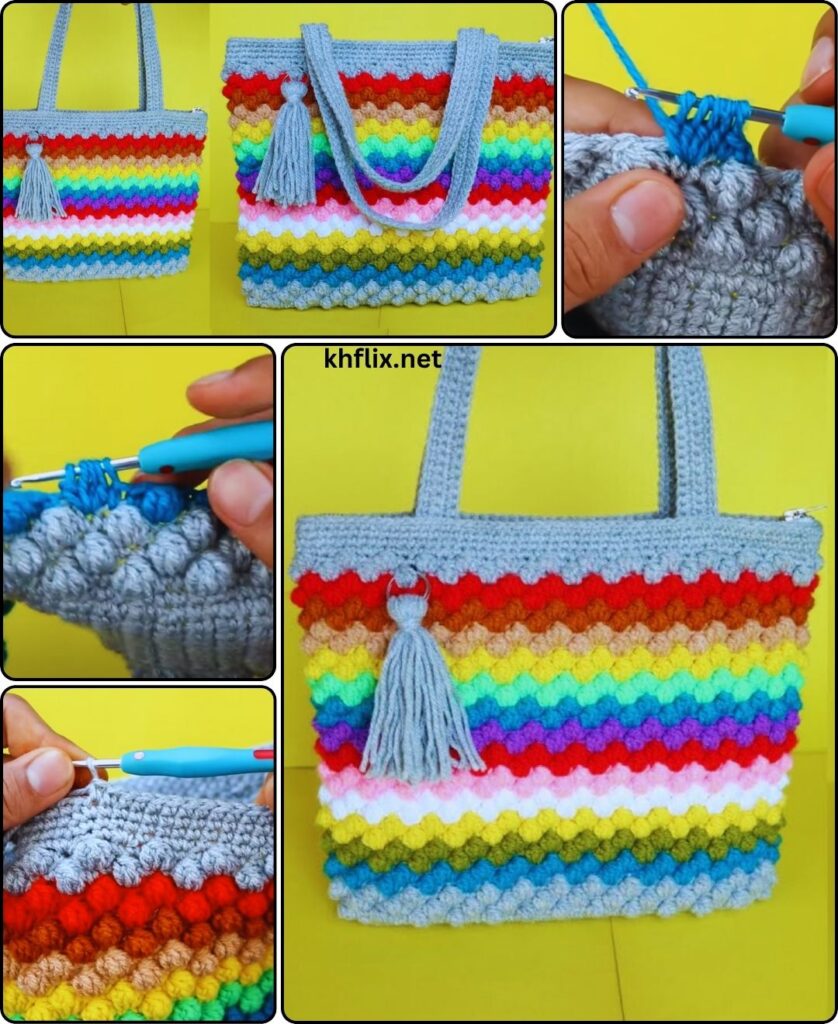
Part 2: The Bag Sides (Striped Bubble Stitch)
We will now build the sides, introducing the stripes and bubble stitch.
- Round 5 (Foundation for sides): With Color A, work 1 sc in the FLO (front loop only) of each st around. (92 sc).
- Working in the FLO creates a defined ridge that helps the sides stand up straight. On the last sc of this round, do not complete the stitch with CA. Change to Color B on the last pull-through to prepare for the next round.
- You can cut CA here and weave in the end, or drop it and pick it up on a later round if you’re comfortable managing floats.
Stripe Pattern (Work 2 rounds per stripe color):
- Stripe 1 (Color B):
- Round 6 (Bubble Row): With Color B. Ch 1 (does NOT count as a st). Work sc in the first st. Work Bubble St in the next st, then sc in the next st. Repeat from * to * around. (46 Bubble St, 46 sc).
- On the last sc of this round, change to Color B for the next round, but if you want the next stripe to be CA, change to CA on the last pull-through of the last sc.
- Round 7 (SC Row): With Color B (or the color you changed to). Ch 1. Work 1 sc in each st around. (92 sc).
- On the last sc of this round, change to Color C on the last pull-through.
- Round 6 (Bubble Row): With Color B. Ch 1 (does NOT count as a st). Work sc in the first st. Work Bubble St in the next st, then sc in the next st. Repeat from * to * around. (46 Bubble St, 46 sc).
- Stripe 2 (Color C):
- Round 8 (Bubble Row): With Color C. Ch 1. Work sc in the first st. Work Bubble St in the next st, then sc in the next st. Repeat from * to * around. (46 Bubble St, 46 sc).
- On the last sc, change to Color C.
- Round 9 (SC Row): With Color C. Ch 1. Work 1 sc in each st around. (92 sc).
- On the last sc, change to Color A.
- Round 8 (Bubble Row): With Color C. Ch 1. Work sc in the first st. Work Bubble St in the next st, then sc in the next st. Repeat from * to * around. (46 Bubble St, 46 sc).
- Stripe 3 (Color A – Background Color):
- Round 10 (Bubble Row): With Color A. Ch 1. Work sc in the first st. Work Bubble St in the next st, then sc in the next st. Repeat from * to * around. (46 Bubble St, 46 sc).
- On the last sc, change to Color A.
- Round 11 (SC Row): With Color A. Ch 1. Work 1 sc in each st around. (92 sc).
- On the last sc, change to Color B.
- Round 10 (Bubble Row): With Color A. Ch 1. Work sc in the first st. Work Bubble St in the next st, then sc in the next st. Repeat from * to * around. (46 Bubble St, 46 sc).
Continue Pattern:
- Repeat Rounds 6 through 11 until the bag body measures approximately 8-9 inches (20-23 cm) high from the base. You’ll have multiple stripes.
- End on a SC Row (like Round 7, 9, or 11).
- On the very last sc of the final body round, change to Color A (if not already on it) and complete the stitch. Sl st into the first sc of that round to join neatly.
- FO Color B and Color C, leaving tails to weave in.
Part 3: Finishing the Top Edge (Color A)
We’ll create a few solid rounds in Color A for a clean finish to the bag’s opening.
- Round 1 (Top Edge): With Color A. Ch 1. Work 1 sc in each st around. Sl st to the first sc to join. (92 sc).
- Round 2: Ch 1. Work 1 sc in each st around. Sl st to join. (92 sc).
- Round 3: Ch 1. Work 1 sc in each st around. Sl st to join. (92 sc).
- You can add more rounds for a deeper border, or change to a decorative stitch like crab stitch (reverse sc) for a textured edge.
- FO Color A, leaving a tail to weave in.
Part 4: Adding Handles (Crocheted)
We’ll make two simple, sturdy crocheted handles.
- With Color A (or a contrasting color) and H/5.0mm hook, ch 61. (Adjust chain length for desired handle length).
- Row 1: Sc in the 2nd ch from hook. Sc in each remaining ch across. (60 sc).
- Row 2: Ch 1, turn. Sc in each sc across. (60 sc).
- Repeat Row 2 for 3 more rows (total 5 rows for thickness/sturdiness).
- FO, leaving a very long tail (at least 12-15 inches) on each end of the handle for sewing.
- Repeat steps 1-5 to create the second handle.
Attaching Crocheted Handles:
- Lay your bag flat and find the center of the front and back.
- Position each handle on the inside top edge of the bag, roughly 2-3 inches from the side seams, centered on the front and back.
- Using your yarn needle, securely sew each end of the handle to the top edge of the bag. Go through multiple layers of the bag’s border stitches for maximum strength. Make sure they are firmly attached and evenly spaced.
Part 5: Optional Lining & Closure
A. Add Fabric Lining (Highly Recommended):
- Adding a fabric lining greatly increases the bag’s durability, prevents stretching of the crochet fabric, and hides all the yarn tails and color changes on the inside.
- Measure your bag: Measure the finished width, height, and depth of your crocheted bag.
- Cut fabric pieces: You’ll typically cut one large rectangle for the body (width = bag’s circumference + seam allowance, height = bag’s height + seam allowance) and two smaller rectangles for the sides (matching bag depth and height + seam allowance).
- Sew the lining: Sew the fabric pieces together using a sewing machine or hand-stitching to create a fabric bag shape that fits snugly inside your crocheted bag.
- Hem the top: Fold over and press (and sew) a hem along the top edge of the fabric lining.
- Insert and Sew: Insert the completed fabric lining into your crocheted bag. Align the seams. Hand-sew the top edge of the fabric lining to the inside top edge of your crocheted bag, using small, neat stitches and matching sewing thread.
B. Add a Closure (Optional):
- For a simple tote, a closure isn’t always necessary. However, you can add a magnetic snap or a simple button loop if desired.
- Magnetic Snap: Position the two parts of the magnetic snap on the inside front and back of the bag’s opening, centered, about 1-1.5 inches from the top edge. Stitch securely using matching sewing thread and needle.
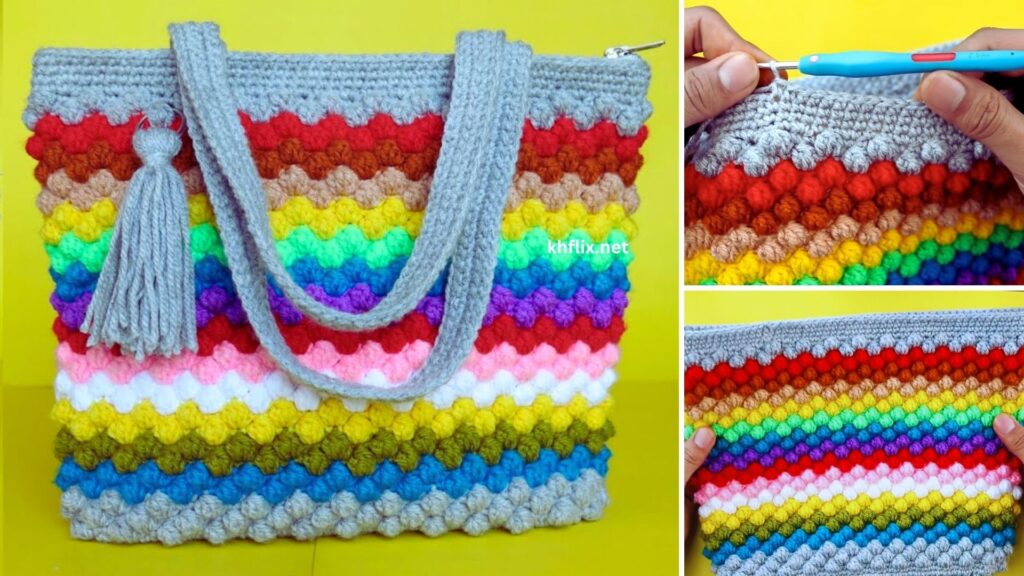
Finishing Your Beautiful Striped Bubble Crochet Bag
- Weave in all remaining yarn ends thoroughly and securely.
- Give your bag a final check for security of joins and handles.
- Blocking (Optional): While not always strictly necessary for a sturdy bag, a light blocking can help define the shape and even out the stitches, especially the bubble texture. Gently mist the bag with water and reshape it.
Tips for Success with Striped Bubble Stitch:
- Tension for Bubbles: Maintain relatively even tension. If you pull too tightly when closing the bubble stitch, it can disappear or distort the fabric.
- Color Changes: Practice neat color changes. When changing colors on the last pull-through of a stitch, make sure the new color is pulled tightly enough to blend smoothly without leaving gaps.
- Yarn Management: Since you’re not carrying all colors throughout, you’ll have more ends to weave in. Weave them in as you go (after every few stripes) to prevent a huge task at the end.
- Bubble Direction: The bubble stitch naturally pushes the texture to one side. Since we’re working in the round, your “right side” will always be facing you, so the bubbles will consistently pop out on the exterior of the bag.
- Stripe Width: You can easily customize the width of your stripes by repeating the 2-round bubble pattern more or fewer times per color.
- Creative Combinations: Experiment with different color palettes – bold and contrasting, or subtle and tonal – to achieve various looks.
Enjoy your unique and beautiful striped bubble crochet bag!