 by
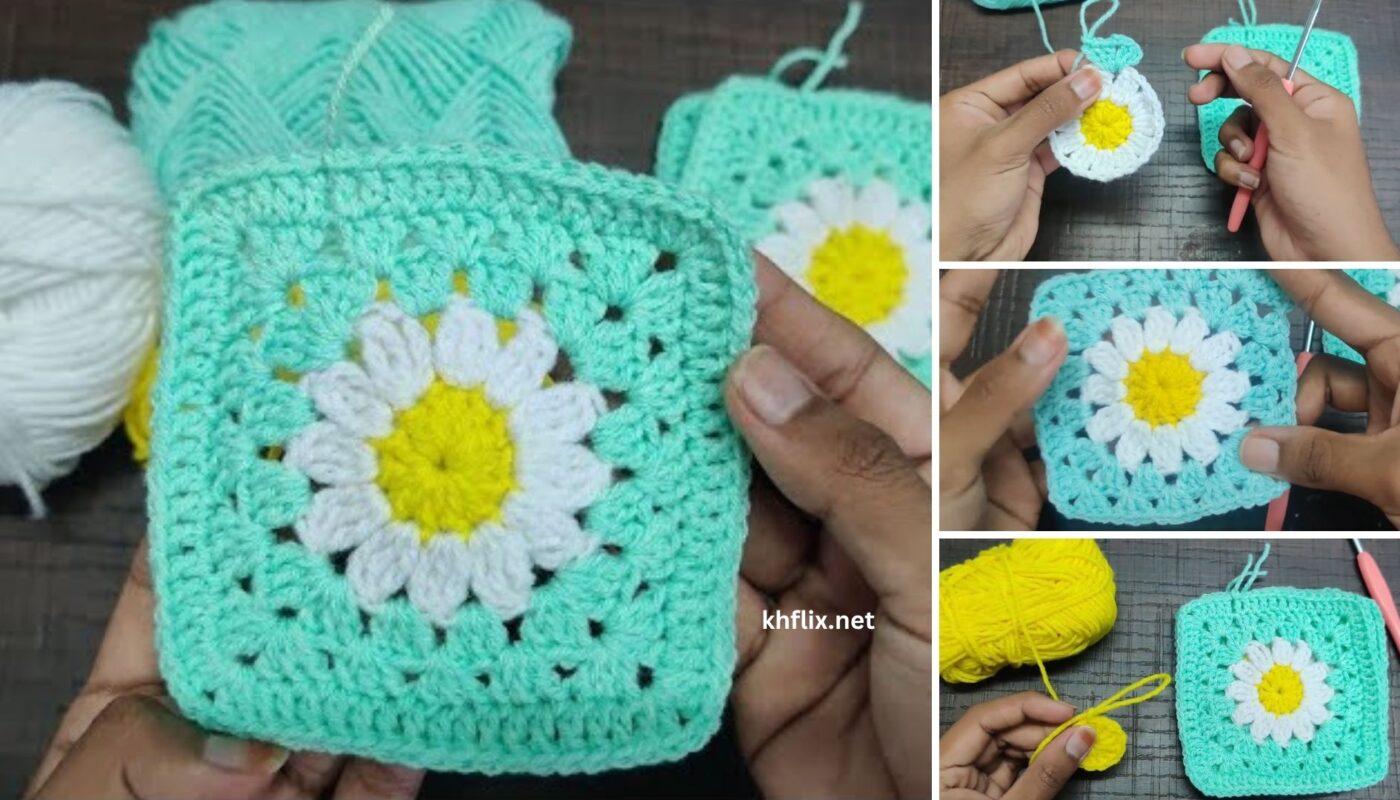
by A “daisy granny square” is a charming and popular crochet motif, and it’s surprisingly accessible for beginners! This tutorial will guide you through making a classic daisy square, breaking down each step. It’s perfect for blankets, bags, coasters, or anything you want to make colorful and floral.
Pattern: How to Crochet a Daisy Granny Square for Beginners
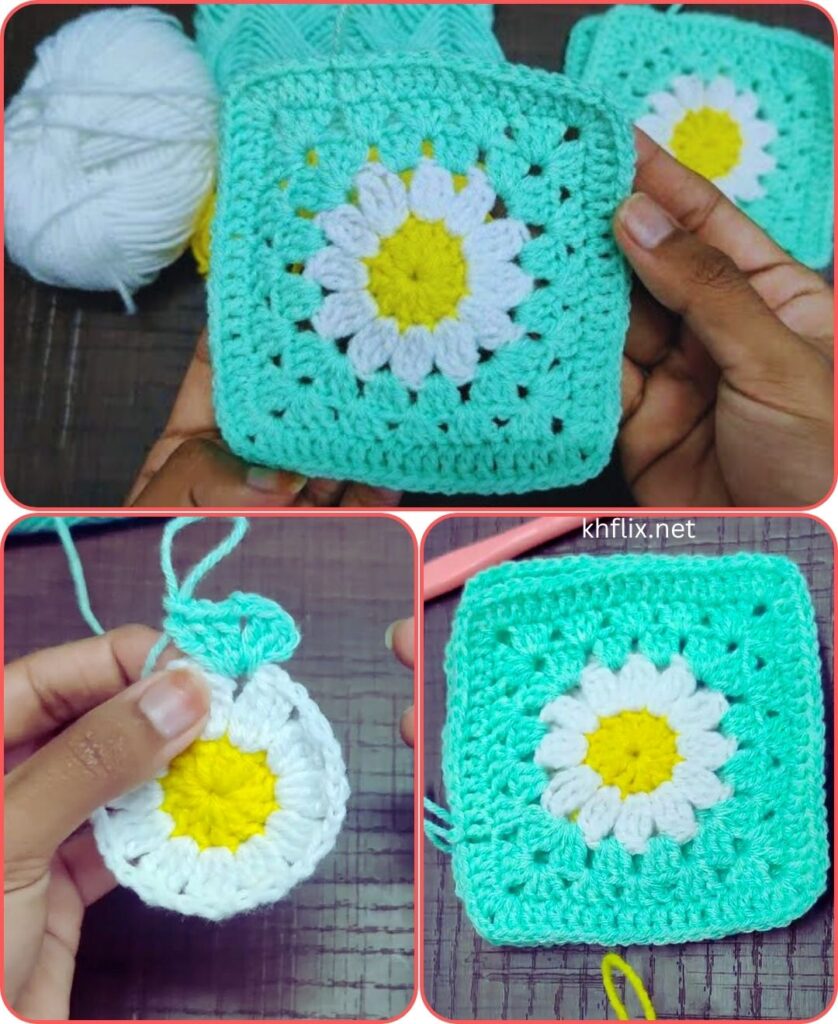
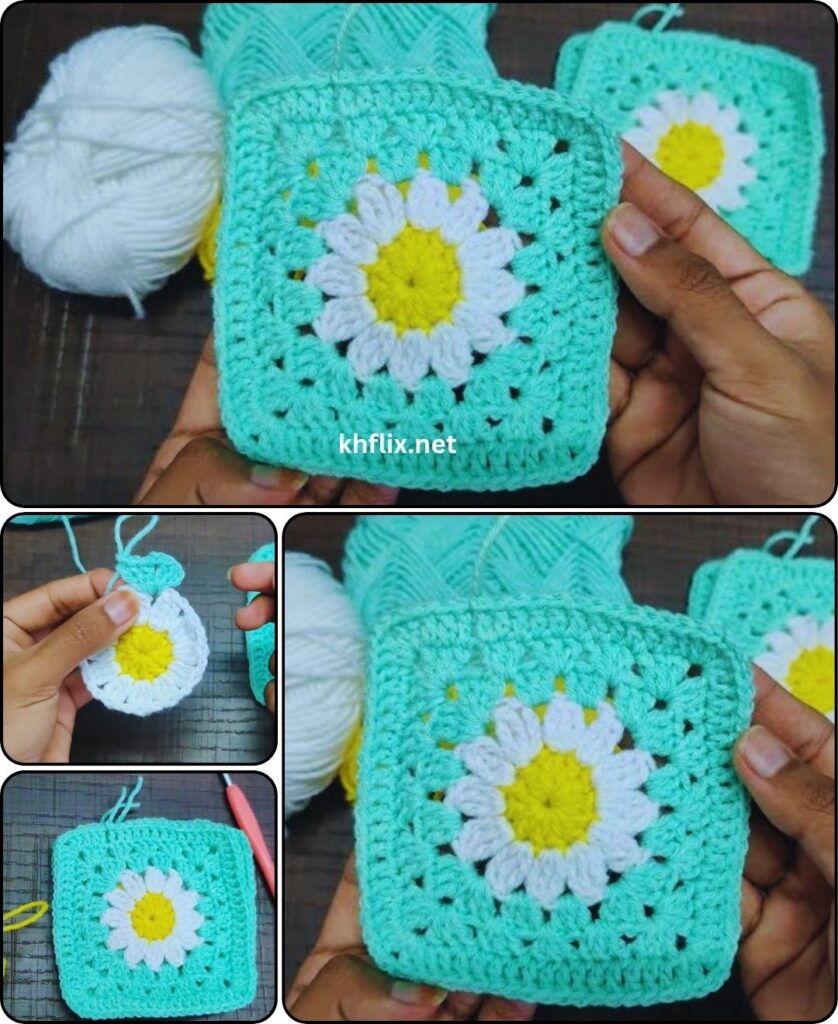
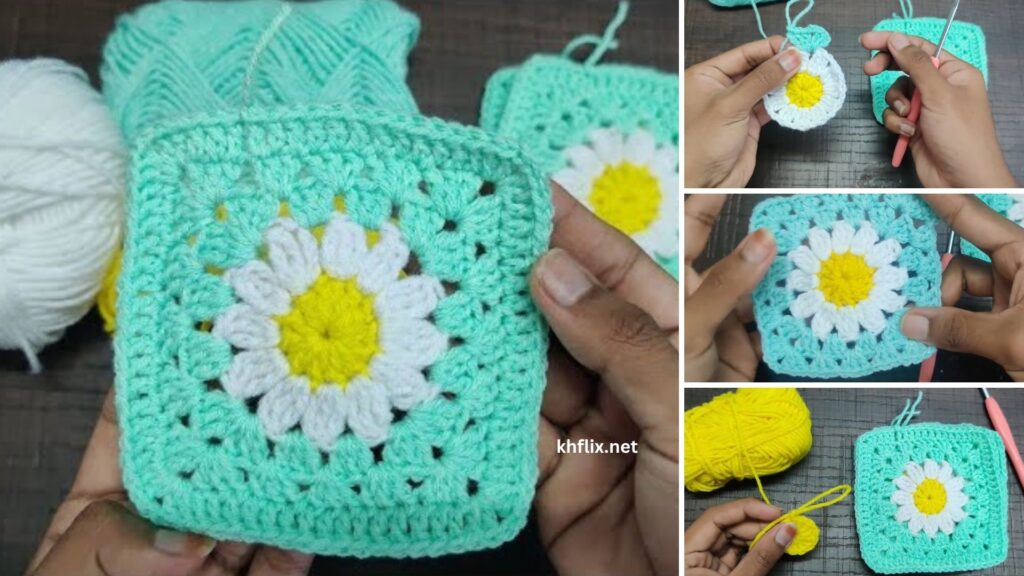
Project Overview: This pattern creates a lovely square featuring a raised daisy in the center, formed by simple puff stitches for the petals. The surrounding rounds then square off the circle into a classic granny square shape.
Skill Level: Beginner (Requires knowledge of basic stitches: ch, sl st, sc, dc, and the puff stitch, which will be explained).
Finished Square Size (Approximate):
- Using Worsted Weight yarn and H/5.0mm hook: Approx. 5-6 inches x 5-6 inches (12.5-15 cm x 12.5-15 cm).
- Size will vary based on your gauge and chosen yarn/hook.
Materials You’ll Need:
- Yarn:
- Worsted Weight (Medium #4) Yarn: Small amounts of three colors are perfect.
- Color A: For the daisy center (e.g., Yellow).
- Color B: For the daisy petals (e.g., White or a light color like light pink/blue).
- Color C: For the squaring-off and outer rounds (e.g., Green for a leaf effect, or any color you like for the main square).
- Worsted Weight (Medium #4) Yarn: Small amounts of three colors are perfect.
- Crochet Hook:
- Size H/5.0mm (or a size recommended for your yarn).
- Yarn Needle (Tapestry Needle): For weaving in ends.
- Scissors
- Stitch Marker (Optional): To mark the beginning of rounds, but for joined rounds, the sl st acts as a marker.
Abbreviations Used:
- ch: chain
- sl st: slip stitch
- sc: single crochet
- dc: double crochet
- sp: space
- ch-sp: chain space
- MR: magic ring (or magic circle)
- Puff St: Puff Stitch (detailed explanation below)
- FO: fasten off
Understanding the Daisy Square Structure
This square is built in three main parts:
- Daisy Center: A small, solid circle forms the middle of your daisy.
- Petals: Puff stitches are worked around the center to create the raised, distinct petals.
- Squaring Off: Subsequent rounds use granny square techniques (clusters and chain spaces) to transform the round flower into a neat square.
Let’s Start Crocheting Your Daisy Granny Square!
Part 1: The Daisy Center (Color A – Yellow)
Start: With Color A (Yellow) and H/5.0mm hook.
- Round 1: Create a Magic Ring (MR).
- If you prefer not to use MR: Ch 4, sl st into the 1st ch to form a ring.
- Ch 3 (counts as your first dc). Work 11 dc into the center of the ring (or into the ch-4 ring).
- Sl st into the top of the beginning ch 3 to join the round. (12 dc).
- If using Magic Ring, gently pull the starting yarn tail to close the center hole tightly.
- FO Color A, leaving a tail to weave in.
Part 2: The Daisy Petals (Color B – White)
This round creates the pretty, dimensional petals of your daisy.
How to make a Puff Stitch (Puff St):
- Yarn over (YO).
- Insert hook into the specified stitch.
- YO, pull up a loop (3 loops on hook).
- [YO, insert hook into the same stitch, YO, pull up a loop] 2 more times. (You should now have 7 loops on your hook).
- YO, pull through all 7 loops on your hook.
- Ch 1 to close the puff stitch. (This closing chain is essential!).
Instructions for Petal Round:
- Round 2: Join Color B (White) with a sl st into any dc stitch from Round 1.
- Ch 1 (does NOT count as a st).
- Work Puff St into the same dc stitch where you joined.
- Ch 1.
- Work Puff St into the next dc stitch, Ch 1.
- Repeat from * to * around, making a Puff St in each dc stitch from Round 1.
- Sl st into the top of the first Puff St to join the round. (12 Puff St, 12 ch-1 spaces).
- FO Color B, leaving a tail to weave in.
- Your daisy flower now has 12 lovely, puffy petals!
Part 3: Squaring Off the Daisy (Color C – Green)
This round begins to transform your round daisy into a square using granny stitch techniques.
- Round 3: Join Color C (Green) with a sl st into any ch-1 space (between two petals). Ch 3 (counts as your first dc).
- Work (2 dc, ch 1) into the same ch-1 space. (This is your first side group).
- Work 3 dc into the next ch-1 space, Ch 1. (This is another side group).
- Now for the corner: In the next ch-1 space, work (3 dc, ch 2, 3 dc). (This creates your first corner).
- Work 3 dc into the next ch-1 space, Ch 1. (This is a side group).
- Work 3 dc into the next ch-1 space, Ch 1. (This is another side group).
- Now for the next corner: In the next ch-1 space, work (3 dc, ch 2, 3 dc).
- Repeat steps 5-7 two more times to complete the four sides and corners of the square.
- Sl st into the top of the beginning ch 3 to join the round.
- You should have 4 corners (3 dc, ch 2, 3 dc) and 8 side groups of 3 dc, separated by ch 1 spaces.
- FO Color C, leaving a tail to weave in.
- You should now clearly see the square shape forming around your daisy.
Part 4: Final Round of the Square (Color C or New Color)
This round defines the edges of your square and brings it to a good size.
- Round 4: Join Color C (Green) (or a new color if you wish) with a sl st into any ch-2 corner space. Ch 3 (counts as your first dc).
- Work (2 dc, ch 2, 3 dc) into the same ch-2 corner space.
- Now, working along the side: Ch 1. 3 dc into the next ch-1 space. Ch 1. 3 dc into the next ch-1 space. Ch 1. 3 dc into the next ch-1 space. Ch 1.
- Now, working to the next corner: Work (3 dc, ch 2, 3 dc) into the next ch-2 corner space.
- Repeat steps 3-4 two more times to complete the four sides and corners of the square.
- Ch 1. 3 dc into the next ch-1 space. Ch 1. 3 dc into the next ch-1 space. Ch 1. 3 dc into the last ch-1 space. Ch 1.
- Sl st into the top of the beginning ch 3 to join.
- You should have 4 corners (3 dc, ch 2, 3 dc) and 12 side groups of 3 dc, separated by ch 1 spaces.
- FO, leaving a tail to weave in.
- Your daisy granny square is complete! It should be approximately 5-6 inches (12.5-15 cm).
Finishing Your Daisy Granny Square
- Weave in All Ends: This is essential for a clean and durable square. Thread each yarn tail onto your yarn needle and carefully weave it into the stitches on the back of the square. Try to hide it securely so it doesn’t unravel.
- Blocking (Highly Recommended):
- Gently wet your finished square (or spray it with water until it’s damp).
- Pin the square onto a foam blocking mat or a towel-covered surface. Gently stretch and shape it into a perfect square, making sure your corners are pointed and the sides are straight.
- Let it air dry completely. Blocking makes a huge difference in opening up the stitches, making the square lay flat, and ensuring consistent sizing if you’re making multiple squares for a larger project.
Tips for Beginners:
- Practice the Puff Stitch: If it’s new to you, make a few practice puff stitches on a scrap chain until you feel comfortable.
- Consistent Tension: Try to keep your yarn tension even throughout. This helps your stitches look uniform and prevents the square from buckling or cupping.
- Counting is Your Friend: Always count your stitches and chain spaces at the end of each round. This is the best way to catch mistakes early.
- Color Choices: Experiment with different color combinations! Bright yellow and white is classic, but you can try other colors for the daisy center and petals.
- Read Ahead: Always read the instructions for the next step or round before you start crocheting it.
- Don’t Be Afraid to Undo: If a round doesn’t look right, it’s okay to unravel (or “frogging”) and try again. Practice makes perfect!
Enjoy creating your beautiful and cheerful daisy granny squares!