by
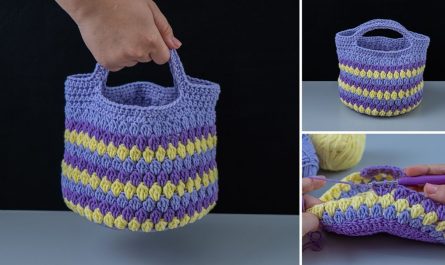
by Let’s crochet an adorable and practical mini tote bag using two colors! This project is perfect for beginners who want to create a charming accessory while practicing essential crochet stitches and learning how to change colors neatly. This mini tote is ideal for carrying small essentials, as a gift bag, or even as a cute decorative item.
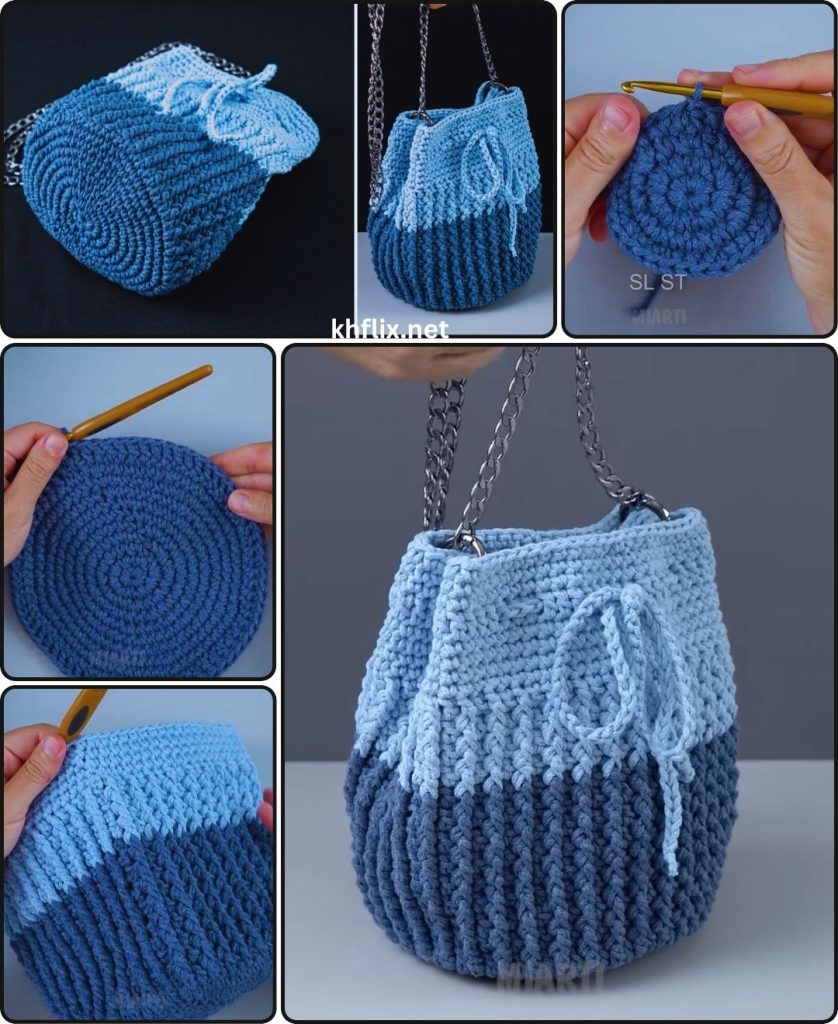
How to Crochet a Cute Mini Tote Bag with Two Colors
This detailed guide will walk you through crocheting a lovely mini tote, from its base to its handles, incorporating a two-color striped design.
Skill Level: Beginner
This project is ideal if you’re comfortable with (or ready to learn!):
- Chain (ch): The basic foundation.
- Slip Stitch (sl st): For joining rounds and neatening.
- Single Crochet (sc): A dense stitch, great for sturdy bags.
- Working in rounds (spirals and joined): Crocheting in a circular manner.
- Color changes: Neatly switching between yarn colors.
- Fastening off: Securing your yarn.
- Weaving in ends: The essential finishing touch.
Finished Mini Tote Dimensions (Approximate):
Using worsted weight yarn and the suggested hook, your finished mini tote will typically measure around:
- Base: 4 inches (10 cm) x 2 inches (5 cm) oval
- Height: 4-5 inches (10-12.5 cm) (excluding handles)
- Handles: 4-5 inches (10-12.5 cm) tall loop
You can easily adjust the size by changing the starting chain length for the base or the number of rounds for the body.
Materials You’ll Need:
Gathering your materials beforehand ensures a smoother crocheting experience.
- Yarn: Approximately 50-80 yards (45-73 meters) of Worsted Weight (Medium #4) Cotton or Cotton Blend Yarn.
- Why Cotton? Cotton yarn provides good structure and durability, which is excellent for bags. It also holds its shape well.
- Color Choices:
- Color A (Base & Main Body): Choose your primary color (e.g., a neutral like cream, grey, or a solid bright color). You’ll need about 30-50 yards.
- Color B (Stripes & Accent): Choose a contrasting or complementary color for your stripes and handles (e.g., a pastel, a bright pop, or a darker shade). You’ll need about 20-30 yards.
- Crochet Hook: Size H/5.0mm. This hook size works well with worsted weight cotton yarn to create a firm, dense fabric for a sturdy bag.
- Yarn Needle (Tapestry Needle): Essential for seamlessly weaving in your loose yarn tails. It has a blunt tip and a large eye.
- Scissors: Any sharp pair of scissors.
- Stitch Marker (Optional but Recommended): Helpful for marking the first stitch of each round when working in continuous spirals, especially for the base.
Let’s Crochet Your Cute Mini Tote Bag!
We’ll build this bag from the bottom up, starting with an oval base, then working up the sides, and finally adding the handles.
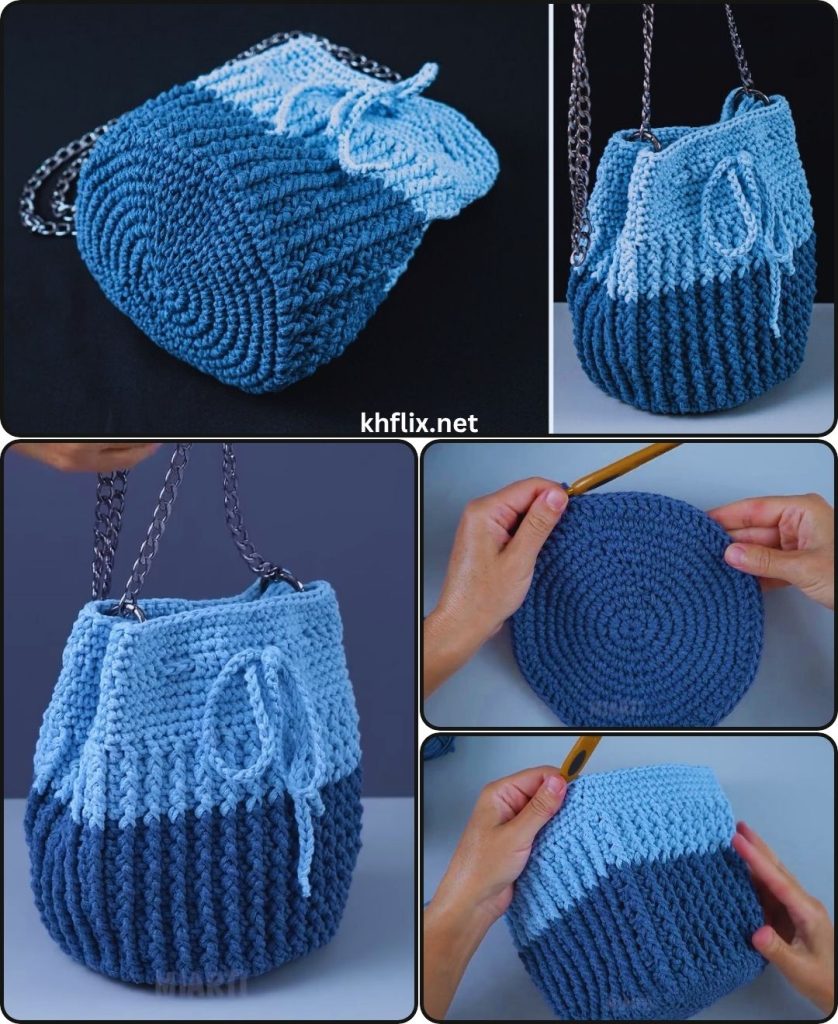
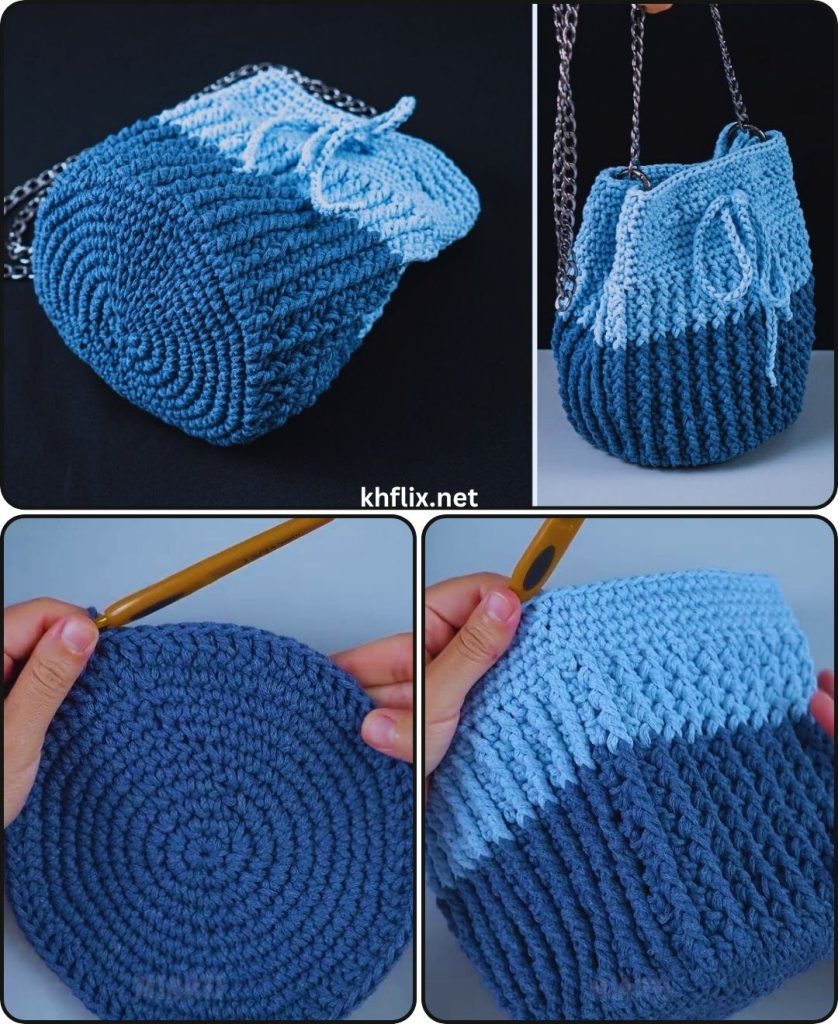
Part 1: The Oval Base (Color A)
We’ll start by creating an oval shape that will form the sturdy bottom of your bag. We’ll work around a starting chain to achieve this.
- Starting Chain (with Color A):
- Make a slip knot with Color A and place it onto your H/5.0mm crochet hook.
- Chain (ch) 9.
- Round 1 (Working around the chain):
- Work 2 single crochet (sc) stitches into the 2nd chain from your hook. Place a stitch marker in the first sc you just made (this will be the first stitch of your round).
- Work 1 sc into each of the next 6 chains.
- In the last chain (the 9th chain from your hook): Work 4 sc into this single chain. This turns the corner.
- Now you’ll be working back down the other side of your starting chain, into the bottom loops.
- Work 1 sc into each of the next 6 stitches.
- In the last stitch (the same chain where you put your first 2 sc): Work 2 sc into this chain. This turns the other corner.
- You should now have 20 sc stitches. Do NOT join with a slip stitch. You will be working in continuous rounds for the base.
- Round 2 (Continuing the Oval Shape):
- Work 2 sc into the first stitch of the round (where your stitch marker is). Move your stitch marker to this new first sc.
- Work 1 sc into the next stitch.
- Work 1 sc into each of the next 6 stitches.
- Work 2 sc into each of the next 2 stitches.
- Work 1 sc into each of the next 6 stitches.
- Work 2 sc into each of the next 2 stitches.
- You should now have 28 sc stitches. Continue working in continuous rounds.
- Round 3 (Final Base Round):
- Work 2 sc into the first stitch of the round (where your stitch marker is). Move your stitch marker to this new first sc.
- Work 1 sc into the next 2 stitches.
- Work 1 sc into each of the next 6 stitches.
- Work 2 sc into each of the next 2 stitches.
- Work 1 sc into each of the next 2 stitches.
- Work 1 sc into each of the next 6 stitches.
- Work 2 sc into each of the next 2 stitches.
- You should now have 36 sc stitches.
- Stop here! When you finish the last sc of this round, remove your stitch marker.
- Slip stitch (sl st) into the first sc of this round to join. This flattens the end of the round for a cleaner color change.
- Fasten off Color A, leaving a 4-inch (10 cm) tail for weaving in.
Part 2: Building the Body of the Bag (Color A & B Stripes)
Now we’ll work up the sides of the bag, introducing your second color to create stripes. We’ll switch to working in joined rounds to keep a neat seam.
- Round 4 (First Side Round – with Color B):
- Join Color B with a slip stitch (sl st) into the same stitch where you just fastened off Color A.
- Chain 1 (ch 1 – does NOT count as a stitch).
- Work 1 single crochet (sc) into the back loop only (BLO) of each stitch around the entire round. (36 sc)
- Why BLO? Working into the back loop creates a nice defined edge that helps the bag sides stand up straight from the base.
- Slip stitch (sl st) into the first sc to join the round.
- Do NOT fasten off Color B yet!
- Round 5 (Second Side Round – with Color B):
- Chain 1.
- Work 1 sc into each stitch around the round. (36 sc)
- Crucial Step: Color Change! When you make the very last single crochet of this round (the 36th sc), stop when you have two loops left on your hook.
- Drop Color B. Pick up Color A.
- With Color A, yarn over and pull through both loops on your hook to complete the stitch. Color A is now active on your hook.
- Now, complete the round by doing a slip stitch (sl st) with Color A into the first single crochet stitch you made at the beginning of this round.
- Fasten off Color B, leaving a 4-inch (10 cm) tail for weaving in.
- Round 6 (Third Side Round – with Color A):
- Chain 1.
- Work 1 sc into each stitch around the round. (36 sc)
- Slip stitch (sl st) into the first sc to join the round.
- Do NOT fasten off Color A yet!
- Round 7 (Fourth Side Round – with Color A):
- Chain 1.
- Work 1 sc into each stitch around the round. (36 sc)
- Color Change! When you make the very last single crochet of this round, stop when you have two loops left on your hook.
- Drop Color A. Pick up Color B.
- With Color B, yarn over and pull through both loops on your hook to complete the stitch. Color B is now active on your hook.
- Now, complete the round by doing a slip stitch (sl st) with Color B into the first single crochet stitch you made at the beginning of this round.
- Fasten off Color A, leaving a 4-inch (10 cm) tail for weaving in.
- Continue Stripes:
- Repeat Rounds 5, 6, and 7 until your bag reaches your desired height. A total of 8-10 rounds for the body (after the base) usually looks good for a mini tote. This would mean 4-5 stripes of Color A and 4-5 stripes of Color B.
- End with Color B as your active color for the start of the handles.
Part 3: Creating the Handles (Color B)
The handles will extend from the top of your bag, using your accent color.
- Round (or Row) for Handle Placement (with Color B):
- After your last body round (ending with Color B as active yarn), chain 1.
- Work 5 sc stitches.
- Chain 12 (ch 12 – this creates the length of your first handle).
- Skip the next 8 stitches.
- Work 10 sc stitches (this will take you across the front/back to the other side).
- Chain 12 (ch 12 – this creates the length of your second handle).
- Skip the next 8 stitches.
- Work 5 sc stitches (this should bring you back to the start of the round).
- Slip stitch (sl st) into the first sc of this round to join.
- Round for Handle Finishing:
- Chain 1.
- Work 1 sc into each of the 5 sc stitches from the previous round.
- Now, work 12 sc stitches around your chain-12 handle loop. Make sure to work into the chain itself and not just the top.
- Work 1 sc into each of the 10 sc stitches between the handles.
- Work 12 sc stitches around the second chain-12 handle loop.
- Work 1 sc into each of the remaining 5 sc stitches.
- Slip stitch (sl st) into the first sc of the round to join.
- Fasten Off:
- Cut your yarn, leaving a 6-inch (15 cm) tail.
- Yarn over with your hook, pull the cut tail completely through the loop left on your hook, and gently tug to secure the knot.
Part 4: Final Finishing Touches
- Weave in All Ends:
- This is the most crucial step for a neat, professional-looking bag. You’ll have tails from your starting chain, all your color changes, and the final fasten-off.
- Use your yarn needle to meticulously weave in every single loose yarn tail.
- How to Weave Neatly: Thread the yarn tail onto your yarn needle. Weave the tail into the stitches of the same color as the tail. Go in one direction for at least 1-2 inches (2.5-5 cm). To truly secure it, subtly change direction (e.g., weave along a stitch, then turn and weave back through some of the same stitches diagonally or perpendicularly) to “lock” the tail in place and prevent it from unraveling. Trim any excess yarn close to the fabric, being careful not to cut any of your actual stitches.
- Blocking (Optional):
- If your bag seems a little wonky or uneven, you can lightly block it. Gently mist the bag with cool water. You can stuff it lightly with tissue paper or a small towel to help it hold its shape while it dries. Allow it to air dry completely. This will help define the shape and even out your stitches.
Congratulations! You’ve successfully crocheted a cute and functional mini tote bag with two colors! This handmade accessory is perfect for showcasing your creativity and is sure to be admired. What little treasures will you carry in your new tote?