by
by Let’s get cozy and create a fantastic pair of blue crochet slippers! Crocheted slippers are wonderfully warm, customizable, and a perfect project for making something practical and comfortable. This detailed guide will walk you through making a classic, comfortable slipper in your chosen shade of blue, from the sole to the final embellishments.
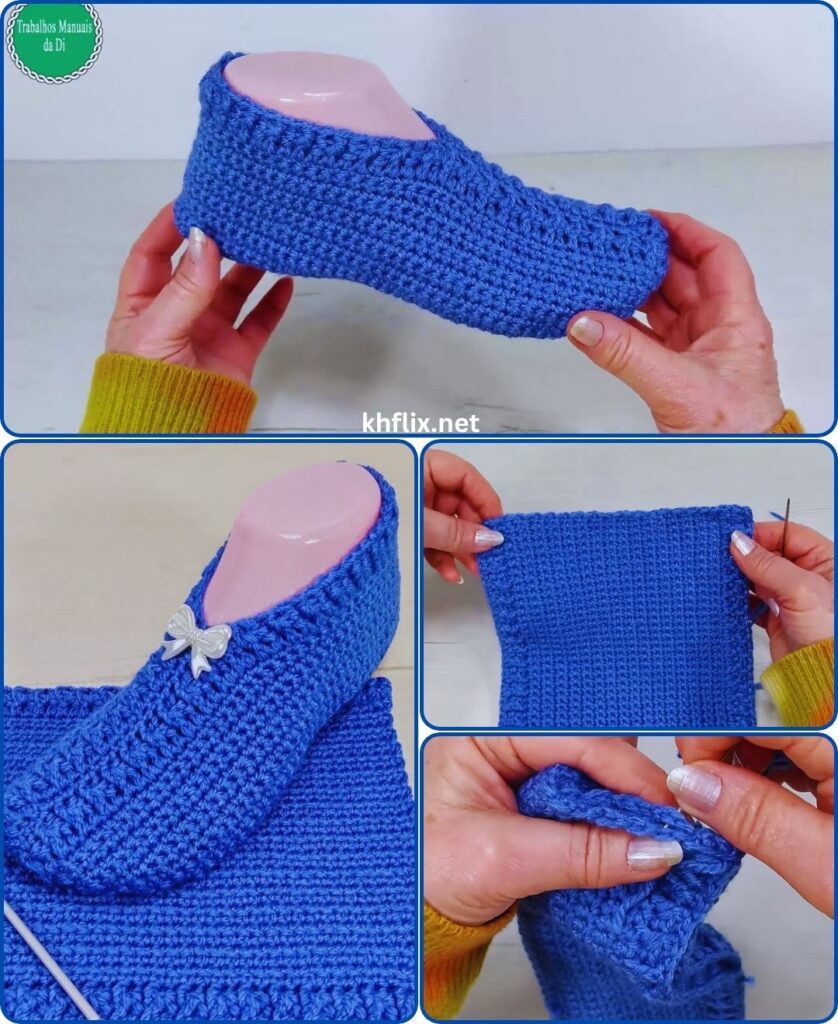
How to Crochet Cozy Blue Slippers: A Detailed Step-by-Step Tutorial
This comprehensive tutorial will guide you through creating a comfortable and durable pair of crocheted slippers. We’ll focus on techniques that ensure a good fit, a sturdy structure, and a polished finish.
Skill Level: Intermediate
This project assumes you’re comfortable with:
- Chain (ch): The basic foundation stitch.
- Slip Stitch (sl st): For joining rounds and neatening edges.
- Single Crochet (sc): A dense, sturdy stitch, ideal for slipper soles and main body.
- Half Double Crochet (hdc): A slightly taller stitch that works up faster while maintaining good density.
- Double Crochet (dc): A taller stitch, good for some variations or specific effects.
- Working in rounds: Crocheting in a continuous or joined circular manner.
- Increasing: Adding stitches to expand your work (for the sole).
- Decreasing: Reducing stitches to shape the toe and heel of the slipper.
- Working into specific loops (BLO/FLO): A simple but effective technique for creating defined edges.
- Weaving in ends securely.
Finished Slipper Dimensions (Approximate):
This pattern is written for an Adult Medium (Women’s US 7-8 / EU 38-39), resulting in a sole length of approximately 9-9.5 inches (23-24 cm).
To Adjust Size:
- For Smaller Sizes: Start with a slightly shorter initial chain for the sole. You’ll also do fewer increase rounds on the sole and fewer body rounds.
- For Larger Sizes: Start with a longer initial chain for the sole. You’ll do more increase rounds on the sole and more body rounds. Always try the sole on your foot as you go!
Materials You’ll Need:
- Yarn: Approximately 150-200 yards (137-183 meters) of Worsted Weight (Medium #4) Yarn in your preferred shade of Blue.
- Why Worsted Weight? This weight provides good warmth and structure for slippers.
- Fiber Content:
- Acrylic: Affordable, durable, machine washable, and comes in a huge range of blues.
- Wool/Wool Blend: Offers excellent warmth and breathability, but may require hand washing depending on the blend.
- Cotton Blend: Less stretch, good stitch definition, but might not be as warm as wool or as soft as acrylic for slippers.
- Blue Shades: Think about a calming sky blue, a rich navy, a playful turquoise, or a deep indigo.
- Crochet Hook: Size H/5.0mm or I/5.5mm. A 5.0mm hook generally creates a denser fabric, which is ideal for a sturdy slipper. If your tension is very tight, you might prefer a 5.5mm. A denser fabric is preferred to prevent stretching and holes.
- Yarn Needle (Tapestry Needle): Essential for seamlessly weaving in all your loose yarn tails.
- Scissors: For cutting your yarn.
- Stitch Markers (Optional but Highly Recommended): These are incredibly helpful for marking the beginning of your rounds, as well as specific stitches for shaping the toe and heel.
- Non-Slip Fabric Paint / Liquid Latex (Optional but Recommended): For adding grip to the bottom of your slippers to prevent slipping on smooth floors.
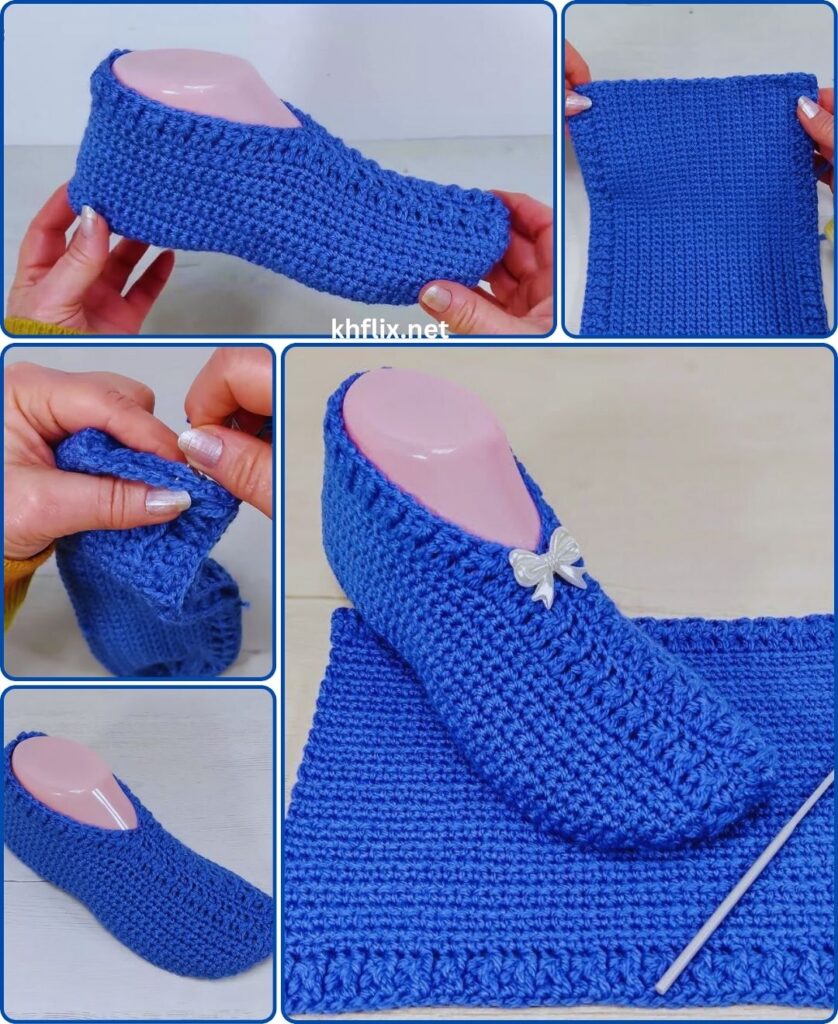
Understanding Slipper Construction:
We’ll build these slippers from the bottom up, in three main sections:
- The Sole: An oval foundation that shapes the bottom of your foot.
- The Body: Working upwards from the sole to create the sides of the slipper.
- The Top/Toe: Shaping the top part that covers your foot.
We’ll be making two identical slippers.
Let’s Crochet Your Blue Slippers!
Part 1: Crocheting the Slipper Sole (Make 2)
A sturdy and well-shaped sole is the foundation of a comfortable slipper. We’ll use single crochet (sc) for a dense and durable sole.
- Starting Chain (Foundation for the Sole):
- Make a slip knot and place it on your hook.
- Chain (ch) 25. (This chain forms the initial length of your slipper sole. Adjust for size: shorter for smaller feet, longer for larger feet. This pattern is for approx. US Women’s 7-8).
- Round 1 (Shaping the First Half of the Sole):
- Work 2 single crochet (sc) stitches into the 2nd chain from your hook.
- Work 1 sc into each of the next 22 chains across.
- Work 5 sc into the very last chain. (This forms the smooth, curved toe end of your sole, allowing you to turn your work around the corner.)
- Now, working down the opposite side of the foundation chain (into the bottom loops of the chains you just worked into): Work 1 sc into each of the next 22 chains across.
- Work 3 sc into the very first chain (the same chain where you placed the initial 2 sc). (This creates the rounded heel end.)
- Slip stitch (sl st) into the first sc of the round to join.
- [Total: 54 sc] (This completes your first oval sole round. It should look like a flattened oval.)
- Round 2 (Further Shaping the Sole):
- Ch 1 (this chain does NOT count as a stitch, it just gives height).
- Work 2 sc into the first stitch.
- Work 1 sc into the next stitch.
- Work 2 sc into the next stitch.
- Work 1 sc into each of the next 22 stitches.
- Work 2 sc into the next stitch.
- Work 1 sc into each of the next 3 stitches.
- Work 2 sc into the next stitch.
- Work 1 sc into each of the next 22 stitches.
- Work 2 sc into the next stitch.
- Work 1 sc into the next stitch.
- Work 2 sc into the next stitch.
- Sl st into the first sc to join.
- [Total: 62 sc]
- Round 3 (Final Sole Shaping):
- Ch 1.
- Work 1 sc into the first 3 stitches.
- Work 2 sc into the next stitch.
- Work 1 sc into each of the next 26 stitches.
- Work 2 sc into the next stitch.
- Work 1 sc into each of the next 3 stitches.
- Work 2 sc into the next stitch.
- Work 1 sc into each of the next 26 stitches.
- Work 2 sc into the next stitch.
- Sl st into the first sc to join.
- [Total: 66 sc]
- Sole Check: At this point, your sole should be a flat oval that closely resembles the shape of your foot. Place it on your foot to check the size. If it’s too small, add another increase round, distributing increases evenly at the toe and heel ends. If it’s too big, you might need to undo a round or adjust your tension/hook size for the second slipper.
Part 2: Building the Slipper Body
Now we’ll transition from the flat sole to build the upright sides of your slipper. We’ll use half double crochet (hdc) for this section. Hdc creates a fabric that’s dense and warm, but also works up faster than single crochet.
- Round 4 (Creating the Defined Edge):
- Ch 1 (does NOT count as a stitch).
- Work 1 hdc in the back loop only (BLO) of each stitch around. (This is a crucial step! By working only into the back loop, you create a beautiful, defined ridge where the sole seamlessly transitions into the slipper’s upright sides. This gives your slipper a professional, structured look and helps it hug your foot.)
- Sl st into the first hdc to join.
- [Total: 66 hdc] (Your stitch count will remain exactly the same as your final sole round, but the fabric will now start to turn upwards.)
- Round 5 onwards (Building the Slipper Sides):
- Ch 1 (does NOT count as a stitch).
- Work 1 hdc into each stitch around (now working through both loops as you normally would for hdc).
- Sl st into the first hdc to join.
- [Total: 66 hdc]
- Repeat this Round (Round 5) for 3-4 more rounds (or until the slipper sides cover the top of your foot to about your instep, just before your toes start). The number of rounds needed here depends on your foot height.
Part 3: Shaping the Slipper Top/Toe
This is where we’ll start decreasing stitches to create the closed toe and the opening for your foot. We’ll continue using hdc.
- Round (Start Decreasing for Toe):
- Ch 1.
- Work 1 hdc in each of the first 20 stitches. (These stitches form the sides and back of your foot opening. Adjust this number if you need a wider or narrower opening.)
- Now, we’ll work decreases for the toe: Hdc2tog (half double crochet 2 stitches together – this is your decrease) 8 times. (This creates the narrowing for the front of the slipper.)
- Work 1 hdc in each of the remaining 30 stitches.
- Sl st into the first hdc to join.
- [Total: 58 hdc]
- Round (Further Toe Shaping):
- Ch 1.
- Work 1 hdc in each of the first 20 stitches.
- Hdc2tog 4 times.
- Work 1 hdc in each of the remaining 30 stitches.
- Sl st into the first hdc to join.
- [Total: 54 hdc]
- Round (Final Toe Shaping – Optional, depending on fit):
- Ch 1.
- Work 1 hdc in each of the first 20 stitches.
- Hdc2tog 2 times.
- Work 1 hdc in each of the remaining 30 stitches.
- Sl st into the first hdc to join.
- [Total: 52 hdc]
- Try it On: At this point, carefully try the slipper on (or if making for someone else, compare it to their foot). The toe should feel snug but not too tight. The opening should be comfortable. Adjust decreases if needed.
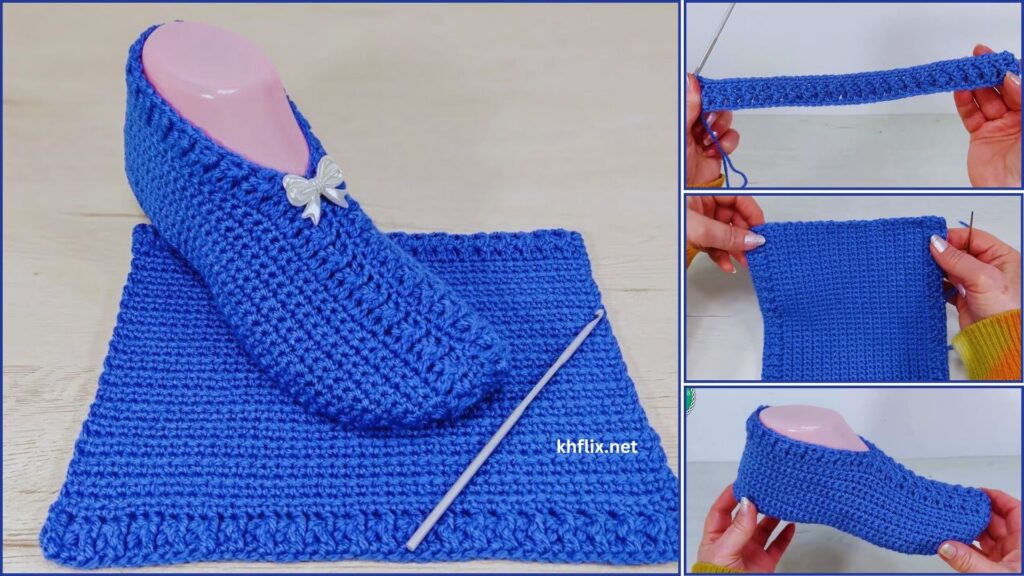
Part 4: Finishing the Slipper Opening
To give your slipper a neat and durable edge around the foot opening, we’ll add a few rounds of single crochet.
- Round (Neatening the Opening):
- Ch 1 (does NOT count as a stitch).
- Work 1 sc in each stitch around the entire opening of the slipper. This includes the top stitches you just worked and the side stitches of the “instep” where you started your decreases. Try to space stitches evenly around the sides of the instep opening.
- Sl st into the first sc to join.
- [Total: Varies slightly, but should be around 50-52 sc]
- Round (Final Border):
- Ch 1.
- Work 1 sc in each stitch around.
- Sl st into the first sc to join.
- Fasten off, leaving a 6-inch (15 cm) tail for weaving in.
Part 5: Finishing Touches (Highly Recommended!)
These final steps will make your blue slippers truly comfortable, durable, and professional-looking.
- Weave in ALL Ends: This is crucial for a clean, neat, and durable slipper. Use your yarn needle to meticulously weave in all remaining tails (from your starting chain, any Fasten Off points, and any specific areas you started/joined yarn).
- How to Weave Neatly: Weave tails into the stitches on the inside of the slipper. Weave in one direction for about 1.5-2 inches (4-5 cm), then subtly change direction and weave back through some of the same stitches. This “locks” the tail in place and prevents it from unraveling. Be patient and thorough; well-woven ends are practically invisible and significantly contribute to your slipper’s longevity and appearance.
- Blocking (Optional but Very Helpful): Blocking is a process that sets your stitches, evens out tension, and helps your slipper take on its intended shape. It can make a huge difference in how the slipper fits and looks.
- Gently stuff your slipper with tissue paper, old socks, or a small towel to fill it to its desired foot shape.
- Using a spray bottle, lightly mist the entire slipper evenly with water (if using cotton or wool yarn). For acrylic yarn, you can gently hover a steamer or an iron (on a low, steam setting) over the fabric without touching it.
- Gently shape the slipper with your hands while it’s damp, ensuring the sole is flat and the foot opening is even.
- Allow the slipper to air dry completely and thoroughly before removing the stuffing. This can take 24-48 hours.
- Add Non-Slip Grip (Highly Recommended for Safety): Crocheted slippers can be very slippery on hard floors. Adding a non-slip grip is essential for safety.
- Option A: Non-Slip Fabric Paint / Liquid Latex: These products are readily available at craft stores. Turn your slipper inside out (or keep right side out if you want the design on the sole). Apply dots or lines of the paint/latex to the bottom of the sole. Allow it to dry completely (often 24-48 hours) as per product instructions. You may need multiple coats.
- Option B: Suede or Leather Patches: You can cut pieces of non-slip suede or leather (available at craft stores) to the shape of your sole. Use a strong fabric glue or heavy-duty thread to hand-stitch these patches securely to the bottom of your slipper.
- Option C: Fabric Puffs: For a temporary or softer solution, you can create small “puffs” on the sole by working additional sc or bobble stitches strategically, though this offers less grip than paint/patches.
- Embellishments (Optional):
- Add a small crocheted flower, a pom-pom, or an embroidered detail to the top of your slipper for a personalized touch.
- Consider adding a faux fur trim around the ankle for extra warmth and luxury.
Congratulations! You’ve now created a truly beautiful, cozy, and functional pair of blue crochet slippers that are ready to keep your feet warm and stylish. This handmade accessory is a wonderful testament to your creativity and will be a cherished item for yourself or a thoughtful gift for someone special! Enjoy your comfy new slippers!