 by
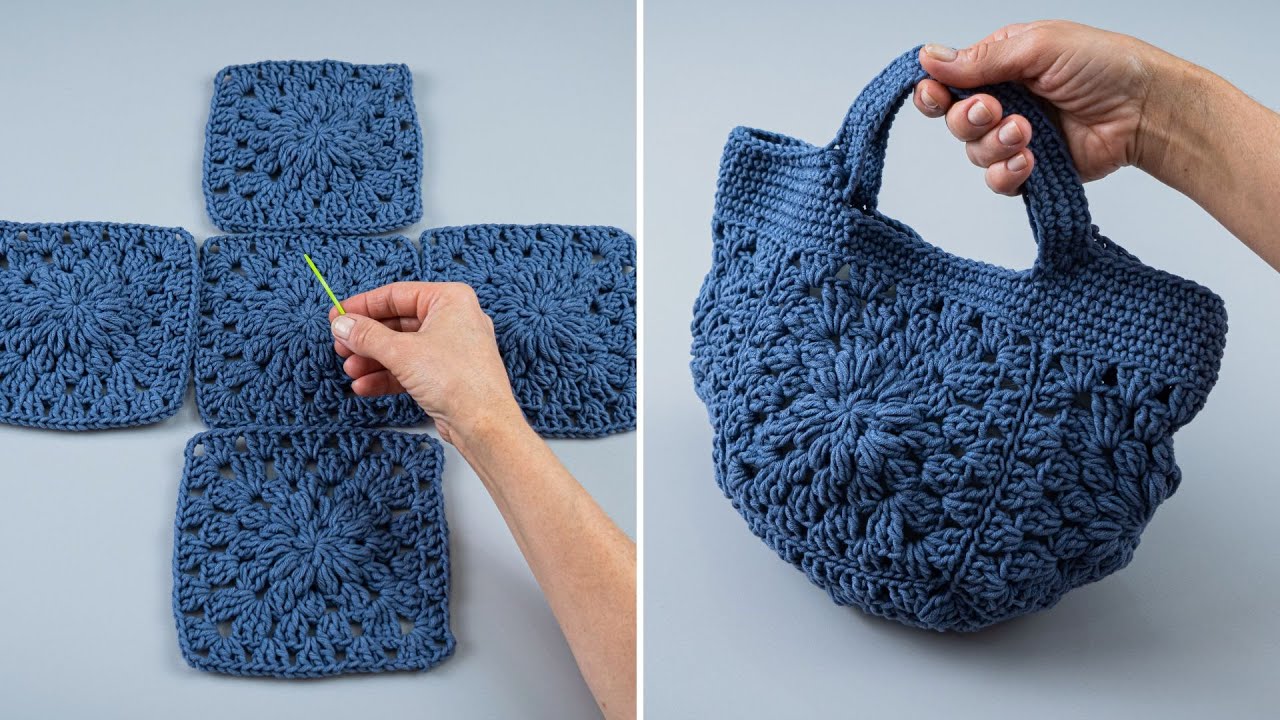
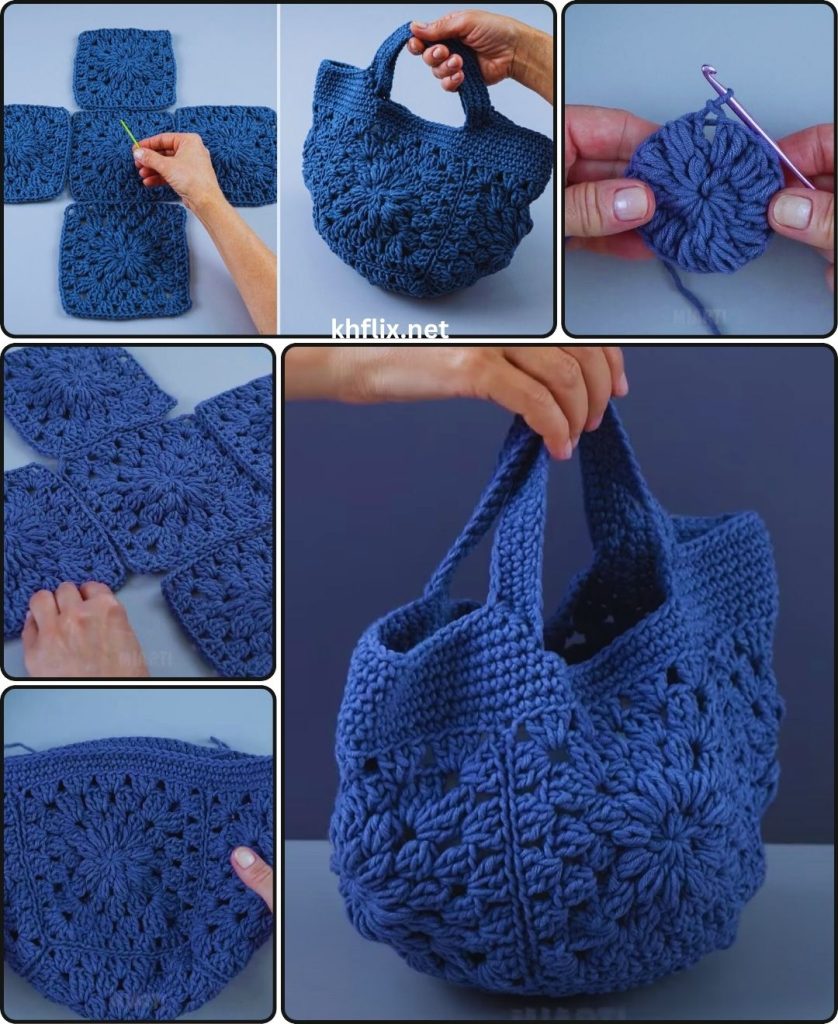
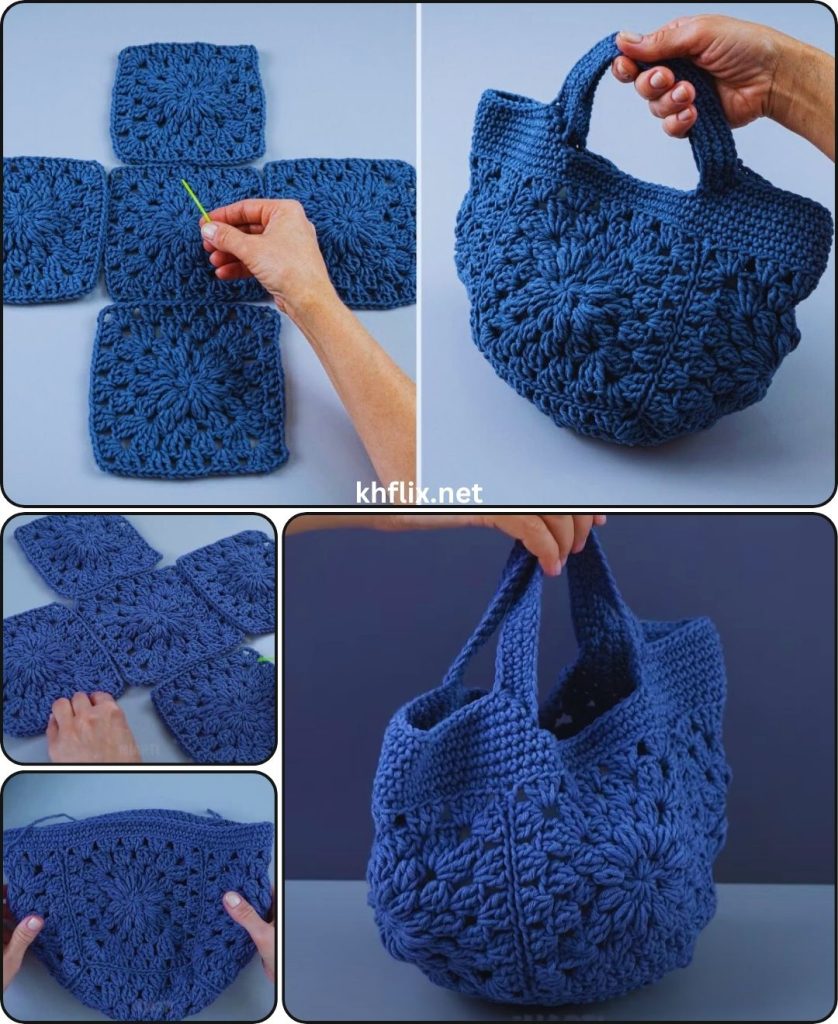
by Let’s get crocheting a stylish and customizable Granny Square Crochet Handbag! This project is a fantastic way to combine the timeless appeal of granny squares with the practicality of a finished bag. You’ll learn how to crochet the squares, join them, and add a simple handle for a unique accessory.
How to Crochet a Granny Square Crochet Handbag
This detailed tutorial will guide you from crocheting individual granny squares to assembling them into a chic handbag. It’s a satisfying project that’s perfect for both beginners and those looking for a fun, portable craft.
Skill Level: Beginner
This project is great if you’re comfortable with (or ready to learn!):
- Chain (ch): The foundation.
- Slip Stitch (sl st): For joining rounds.
- Double Crochet (dc): The main stitch for granny squares.
- Working in rounds: Crocheting in a circular fashion.
- Magic Ring (MR) / Chain-3 Start: For a neat center hole.
- Changing colors (optional): For multi-colored squares.
- Fastening off: Securing your yarn.
- Weaving in ends: The essential finishing touch.
- Basic seaming: Joining squares with a a yarn needle or slip stitch.
Finished Handbag Dimensions (Approximate):
A handbag made with 9 squares (3×3 layout) and 5-inch (12.5 cm) granny squares will be roughly:
- Body: 15 inches (38 cm) wide by 10 inches (25 cm) tall (excluding the handle).
- Handle: This tutorial uses a simple crocheted loop handle that you can customize for length.
You can easily adjust the size of your bag by making more or fewer squares, or by making larger or smaller squares.
Materials You’ll Need:
Gathering your materials beforehand makes for a smoother crocheting experience.
- Yarn: Approximately 250-350 yards (230-320 meters) of Worsted Weight (Medium #4) Cotton or Acrylic Yarn.
- Why Cotton/Acrylic? Cotton yarn provides excellent structure, durability, and stitch definition, making it ideal for bags that need to hold their shape. Acrylic is a great, affordable alternative that’s widely available, soft, and easy to wash.
- Color Choices: Get creative! You can use one color for all squares, a different color for each round of a square, or make each square a unique color. For a multi-color bag, you’ll need several smaller skeins (50-100 yards each) in your chosen palette.
- Crochet Hook: Size H/5.0mm. This hook size is generally good for worsted weight yarn, producing a sturdy fabric for your bag.
- Yarn Needle (Tapestry Needle): Essential for seamlessly weaving in all your loose yarn tails and for joining the granny squares. It has a blunt tip and a large eye.
- Scissors: Any sharp pair of scissors.
- Stitch Markers (Optional): Handy for marking corners or specific stitches if you’re new to granny squares.
Part 1: How to Crochet a Classic Granny Square
The core component of your handbag! We’ll make a classic 3-round granny square. You will need a total of 9 squares for the main body of the bag.
Granny Square Construction: Working in Rounds, Corner to Corner
Granny squares are built by working clusters of stitches (typically 3 double crochets) into chain spaces, creating that familiar open, square fabric.
Let’s Crochet a Granny Square!
- Starting the Square (with Color 1):
- Make a slip knot and put it on your H/5.0mm crochet hook.
- Magic Ring (MR) Method (Recommended for a neat center): Create a magic ring.
- (Alternative start if Magic Ring is tricky): Chain 4, then slip stitch (sl st) into the first chain to form a ring.
- Round 1: Chain 3 (ch 3 – counts as your first double crochet (dc)). Work 2 dc into the ring. (This is your first 3-dc cluster).
- Chain 3 (ch 3 – this creates your first corner space).
- Work 3 dc into the ring. (Second 3-dc cluster).
- Chain 3 (ch 3 – second corner space).
- Work 3 dc into the ring. (Third 3-dc cluster).
- Chain 3 (ch 3 – third corner space).
- Work 3 dc into the ring. (Fourth 3-dc cluster).
- Chain 3 (ch 3 – fourth corner space).
- If using a magic ring, gently pull the tail tight to close the center hole.
- Slip stitch (sl st) into the top of the beginning ch 3 to join the round. You should have 4 clusters of 3 dc stitches and 4 chain-3 corner spaces.
- Fasten off Color 1, leaving a 4-inch (10 cm) tail for weaving in.
- Round 2 (Joining New Color / Expanding the Square – with Color 2):
- Join Color 2 with a slip stitch (sl st) into any of the chain-3 corner spaces from Round 1.
- Chain 3 (ch 3 – counts as first dc). Work 2 dc into the same corner space. (First 3-dc cluster for this round).
- Chain 3 (ch 3 – this is the new corner space).
- Work 3 dc into the same corner space. (This completes the first corner of Round 2).
- *Chain 1 (ch 1 – this creates the side space between clusters).
- In the next chain-3 corner space: Work (3 dc, ch 3, 3 dc).* (This completes a corner).
- Repeat from * to * around the remaining two corner spaces.
- Chain 1 (ch 1 – for the last side space).
- Slip stitch (sl st) into the top of the beginning ch 3 to join the round. You should now have 8 clusters of 3 dc stitches, 4 chain-3 corner spaces, and 4 chain-1 side spaces.
- Fasten off Color 2, leaving a 4-inch (10 cm) tail.
- Round 3 (Adding More Detail – with Color 3 or repeat Color 1):
- Join Color 3 (or use one of your previous colors) with a slip stitch (sl st) into any of the chain-3 corner spaces from Round 2.
- Chain 3 (ch 3 – counts as first dc). Work 2 dc into the same corner space.
- Chain 3 (ch 3 – new corner space).
- Work 3 dc into the same corner space. (Completes first corner).
- *Chain 1 (ch 1 – side space).
- Work 3 dc into the next chain-1 side space from Round 2. (This is a side cluster).
- Chain 1 (ch 1 – side space).
- In the next chain-3 corner space: Work (3 dc, ch 3, 3 dc).* (Completes a corner).
- Repeat from * to * around the remaining two sides and corners.
- Chain 1 (ch 1 – for the last side space).
- Slip stitch (sl st) into the top of the beginning ch 3 to join the round.
- Fasten off, leaving a 4-inch (10 cm) tail.
- Repeat!
- Make a total of 9 granny squares following these steps.
- Weave in all ends for each square as you finish them. This is a crucial step for a tidy and professional-looking project! Use your yarn needle to thread each tail through several stitches on the back of the square, changing direction once or twice to secure it, then trim neatly.
Part 2: Assembling Your Granny Square Handbag
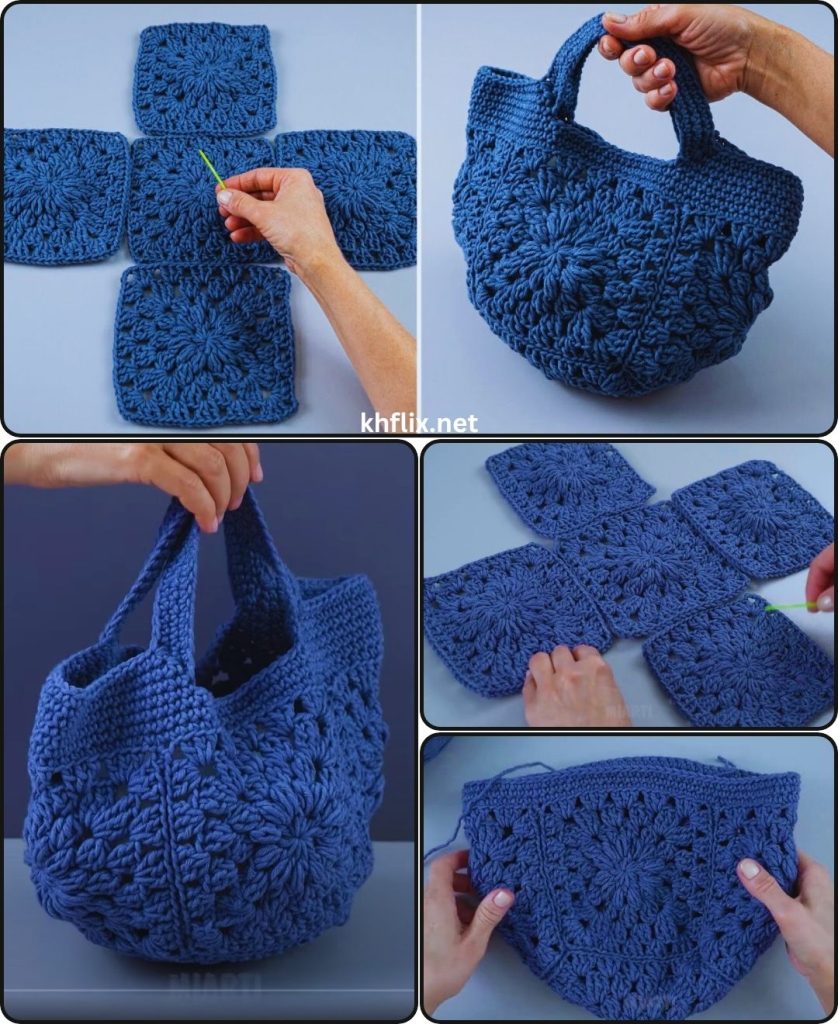
Now for the fun part: bringing your squares to life! A common layout for a handbag is a 3×3 grid for the front, and then folding it to create the bag.
Bag Layout (for a 3×3 square handbag)
- Main Body: All 9 squares will form one large rectangular panel (3 squares wide x 3 squares tall). This panel will then be folded and seamed.
Joining the Squares: The Whip Stitch Method (Beginner-Friendly)
The whip stitch is a simple and effective way to seam crochet pieces together.
- Arrange Your Squares:
- Lay out your 9 squares on a flat surface in a 3×3 grid. This is your main bag panel. Decide which sides will face out (these will be the “right sides”).
- Seaming the Squares Together:
- Take two squares you want to join. Place them right sides facing each other (so the backs are facing out). Align the stitches along the edge you want to join.
- Cut a long piece of yarn (about 3 times the length of the edge you’re joining) in a color that matches your squares or a contrasting color for a design feature. Thread it onto your yarn needle.
- To whip stitch: Insert your needle from back to front through both loops of the first stitch/space on both squares. Pull the yarn through, leaving a tail to weave in later.
- Insert your needle from back to front through both loops of the next stitch/space on both squares. Pull the yarn through.
- Repeat this process, always going in the same direction, through both loops of each corresponding stitch/space along the edge. Keep your tension consistent but not too tight, or it will pucker.
- Continue joining all squares until you have one large 3×3 rectangular panel. You’ll join 3 squares horizontally in 3 rows, and then join those rows vertically.
- Folding and Seaming the Bag Body:
- Once your 3×3 panel is complete, fold the bottom row of squares up. Imagine your panel is (Row 1 / Row 2 / Row 3). You’ll fold Row 1 up to meet Row 3.
- Place the bottom edge of Row 1 onto the bottom edge of Row 3, with right sides facing each other.
- Using your yarn needle and whip stitch (or your preferred joining method), seam these two edges together. This creates the bottom seam of your bag.
- Now, fold the bag so the outer squares become the sides. Seam the two side edges together. You’ll essentially be seaming from the bottom corner up towards the top opening of the bag.
- Once all sides are seamed, turn the bag right side out. You now have a basic pouch!
Part 3: Adding the Handle
A simple crocheted handle will complete your handbag.
- Crocheting the Handle (with a matching or contrasting yarn):
- Decide how long you want your handle to be. For a handheld bag, Chain (ch) about 40-50. For a shoulder bag, chain much longer, perhaps ch 80-100.
- Row 1: Work 1 single crochet (sc) into the 2nd chain from your hook, and 1 sc into each chain across. (You’ll have one less sc than your starting chain).
- Row 2: Chain 1 (ch 1), turn your work. Work 1 sc into each sc across.
- Repeat Row 2 until your handle is about 1 inch (2.5 cm) wide (usually 2-3 rows total for sc).
- Fasten off, leaving a long tail (at least 12 inches / 30 cm) for attaching the handle.
- Attaching the Handle:
- Thread the long tail of your handle onto your yarn needle.
- Locate the top corners of your bag. You’ll attach one end of the handle to the inside top edge of one side of the bag, and the other end of the handle to the inside top edge of the opposite side.
- Fold the handle end over slightly and use your yarn needle to securely stitch it to the bag. Go through multiple times for strength, ensuring your stitches are neat and secure.
- Repeat for the other end of the handle, ensuring the handle isn’t twisted before you sew it down. Weave in any remaining tail securely.
Part 4: Final Finishing Touches
- Weave in ALL Remaining Ends:
- This is the most critical step for a professional-looking, durable bag. Double-check that all your loose yarn tails from joining the squares and attaching the handle are securely woven in.
- Optional: Bag Lining (for added durability and neatness):
- For a truly sturdy and long-lasting bag that won’t stretch out and will prevent small items from slipping through the granny square gaps, consider adding a fabric lining. This is a separate sewing step.
- Measure the finished dimensions of your crocheted bag. Cut fabric pieces slightly larger than your bag, sew them into a matching pouch, and then hand-stitch or machine-stitch it inside your crocheted bag.
- Optional: Buttons or Closures:
- For added security, you can sew on a magnetic snap or a large decorative button with a crocheted loop closure at the top center of your bag.
Congratulations! You’ve successfully crocheted and assembled a beautiful and unique Granny Square Crochet Handbag! This project is a fantastic way to showcase your creativity and craftsmanship. Enjoy carrying your handmade creation, or perhaps gift it to someone special!