 by
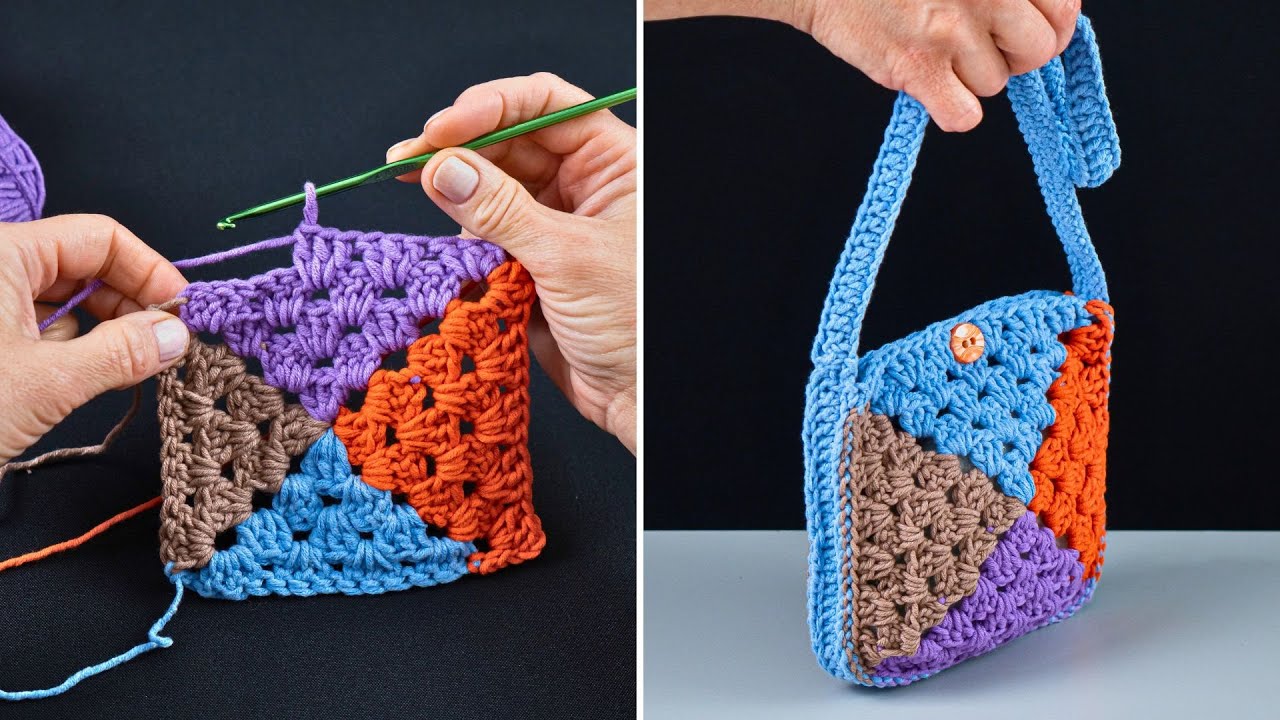
by Let’s create a vibrant and stylish 4-colored granny square tote bag! This project is fantastic for beginners who want to move beyond basic stitches and learn how to make and join granny squares, as well as incorporating multiple colors. The classic granny square is an incredibly versatile motif, and by combining four colors, you’ll create a truly eye-catching and unique bag.
How to Crochet a 4-Colored Granny Square Tote Bag
This detailed tutorial will guide you through crocheting individual granny squares with four colors, joining them to form a sturdy bag, and adding a comfortable strap. It’s a rewarding project that allows for endless color combinations and personal expression.
Skill Level: Advanced Beginner / Intermediate
This project builds on basic skills and is ideal if you’re comfortable with:
- Magic Ring (MR) / Chain-2 Start: For a neat center.
- Chain (ch): For stitches and spaces.
- Slip Stitch (sl st): For joining and neatening.
- Double Crochet (dc): The main stitch for granny squares.
- Working in rounds: Crocheting in a circular manner.
- Color changes: Seamlessly switching yarns.
- Fastening off & Weaving in ends: Crucial for a clean finish.
- Seaming (joining squares): Connecting pieces neatly.
Finished Tote Bag Dimensions (Approximate):
Using worsted weight yarn and the suggested hook, your finished tote will typically measure around 12-14 inches (30-35 cm) wide and 14-16 inches (35-40 cm) tall (excluding the strap), depending on your chosen granny square size and number.
Materials You’ll Need:
Gathering your materials beforehand ensures a smooth and enjoyable crocheting experience.
- Yarn: Approximately 500-700 yards (457-640 meters) of Worsted Weight (Medium #4) Cotton or Cotton Blend Yarn.
- Why Cotton? Cotton yarn is highly recommended for bags as it’s durable, has minimal stretch, holds its shape well, and is washable.
- Color Choices: Select four distinct colors. You’ll use one color per round for the granny squares. For example:
- Color A (Center): Yellow
- Color B (Round 2): Blue
- Color C (Round 3): Green
- Color D (Round 4 & Joining/Strap): Cream or Black (a good contrasting/neutral color for the border and strap).
- Crochet Hook: Size H/5.0mm. This hook size creates a nice, dense fabric that’s suitable for a sturdy bag.
- Yarn Needle (Tapestry Needle): Essential for seamlessly weaving in all your loose yarn tails (and there will be many with color changes!) and for joining the granny squares. It has a blunt tip and a large eye.
- Scissors: Any sharp pair of scissors.
- Stitch Markers (Optional but Highly Recommended): Very helpful for marking corners of the granny squares, especially when you’re starting out.
Understanding the Granny Square Tote Bag Construction:
This bag is built from individual modules (granny squares) that are then assembled:
- Individual Granny Squares: You’ll crochet multiple 4-round granny squares, each using four different colors.
- Assembly: The squares will be joined together to form the front, back, and sides of the bag.
- Top Border (Optional but Recommended): A final round of single crochet around the top edge provides a neat finish and reinforces the opening.
- Strap: A sturdy crocheted strap will be attached for carrying.

Let’s Crochet Your 4-Colored Granny Square Tote Bag!
Follow these steps carefully. Consistency in your tension and neat color changes are key for a great-looking bag.
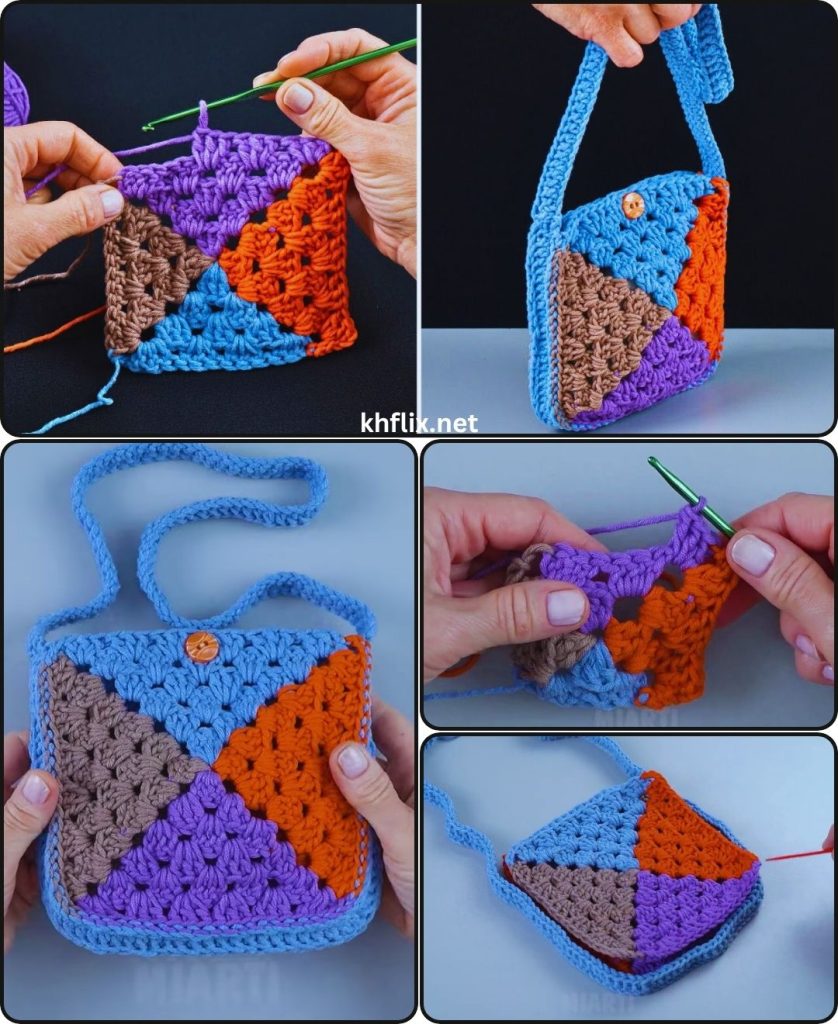
Part 1: Crocheting a 4-Colored Granny Square (Make 12-16 squares, or as needed)
You’ll make a series of identical squares. The number depends on how large you want your bag to be. For a 12-14 inch wide bag, you might need 12 squares (e.g., 3 wide by 2 high for front, 3 wide by 2 high for back), or more if you want to add depth with side panels. Let’s aim for a base of 12 squares (6 for front, 6 for back).
Pattern for one 4-Colored Granny Square:
- Start with Color A (Center):
- Begin with a Magic Ring (MR).
- (Alternative start if MR is tricky): Chain 4, slip stitch into the first chain to form a ring.
- Round 1: Chain 3 (counts as first dc). Work 2 dc into the ring. (Chain 2, 3 dc) 3 times into the ring. Chain 2. Slip stitch into the top of the beginning Chain 3 to join.
- Pull the Magic Ring tail tightly to close the center hole.
- Fasten off Color A, leaving a 4-6 inch tail.
- Begin with a Magic Ring (MR).
- Join Color B (Round 2):
- Join Color B with a slip stitch into any chain-2 corner space from Round 1.
- Round 2: Chain 3 (counts as first dc). Work (2 dc, ch 2, 3 dc) into the same chain-2 corner space. This forms your first corner.
- *Chain 1. Work (3 dc, ch 2, 3 dc) into the next chain-2 corner space.* Repeat from * to * 2 more times.
- Chain 1. Slip stitch into the top of the beginning Chain 3 to join.
- Fasten off Color B, leaving a 4-6 inch tail.
- Join Color C (Round 3):
- Join Color C with a slip stitch into any chain-2 corner space from Round 2.
- Round 3: Chain 3. Work (2 dc, ch 2, 3 dc) into the same chain-2 corner space.
- *Chain 1. Work 3 dc into the next chain-1 space (this is the space between the 3-dc clusters from the previous round, not a corner). Chain 1. Work (3 dc, ch 2, 3 dc) into the next chain-2 corner space.* Repeat from * to * 2 more times.
- Chain 1. Work 3 dc into the last chain-1 space. Chain 1. Slip stitch into the top of the beginning Chain 3 to join.
- Fasten off Color C, leaving a 4-6 inch tail.
- Join Color D (Round 4):
- Join Color D with a slip stitch into any chain-2 corner space from Round 3.
- Round 4: Chain 3. Work (2 dc, ch 2, 3 dc) into the same chain-2 corner space.
- *Chain 1. Work 3 dc into the next chain-1 space. Chain 1. Work 3 dc into the next chain-1 space. Chain 1. Work (3 dc, ch 2, 3 dc) into the next chain-2 corner space.* Repeat from * to * 2 more times.
- Chain 1. Work 3 dc into the next chain-1 space. Chain 1. Work 3 dc into the last chain-1 space. Chain 1. Slip stitch into the top of the beginning Chain 3 to join.
- Fasten off Color D, leaving a 4-6 inch tail.
Repeat these steps until you have made all your desired granny squares.
- Recommendation: For a bag roughly 12-14 inches wide by 14-16 inches tall, you could make 12 squares. This would allow for a layout of 3 squares wide by 2 squares high for the front, and 3 squares wide by 2 squares high for the back. This will create a flat, pouch-style bag.
Part 2: Weaving in Ends
This is critical for a neat and durable granny square project! Weave in every single yarn tail from all your color changes on each square before joining them. Use your yarn needle, going in one direction for a few stitches, then subtly changing direction to lock the tail in place.
Part 3: Assembling the Bag (Joining Granny Squares)
There are many ways to join granny squares. For beginners, a simple slip stitch join or single crochet join is effective and sturdy.
- Plan Your Layout:
- Lay out your squares on a flat surface to plan the front and back of your bag. For a simple tote, you’ll have two large panels made of squares.
- For example, if you made 12 squares, arrange 6 squares (3 wide x 2 high) for the front panel, and 6 squares (3 wide x 2 high) for the back panel.
- Joining Method (Single Crochet Join – recommended for sturdiness):
- Take two squares with their right sides facing up. Place them side-by-side.
- Using Color D (or a new complementary color) and your H/5.0mm hook, insert your hook through both loops of the corresponding stitches on both squares.
- Join yarn with a slip stitch.
- Chain 1.
- Work 1 sc into the first stitch, going through both layers.
- Continue working 1 sc into each corresponding stitch along the edge, going through both layers, until you reach the end of the squares.
- Fasten off, leaving a tail to weave in.
- Repeat this process to join all the squares together to form your two large panels (front and back of the bag).
- Join along the columns first, then along the rows.
- (Alternative: Whip Stitch Join with Yarn Needle): If you prefer sewing, align two squares with right sides facing up. Use your yarn needle and a length of Color D yarn. Whip stitch through both loops of corresponding stitches along the edge. This creates a neat, flat seam.
- Joining the Front and Back Panels:
- Once you have your two large joined panels, place them right sides together.
- Using Color D and your preferred joining method (single crochet join with hook, or whip stitch with needle), join the two panels together along three sides (the bottom edge and both side edges).
- Leave the top edge (where the bag opening will be) unjoined.
- Ensure your corners are neat and sturdy. Fasten off and weave in all tails.
- Turn the bag right side out. Your bag body is now formed!
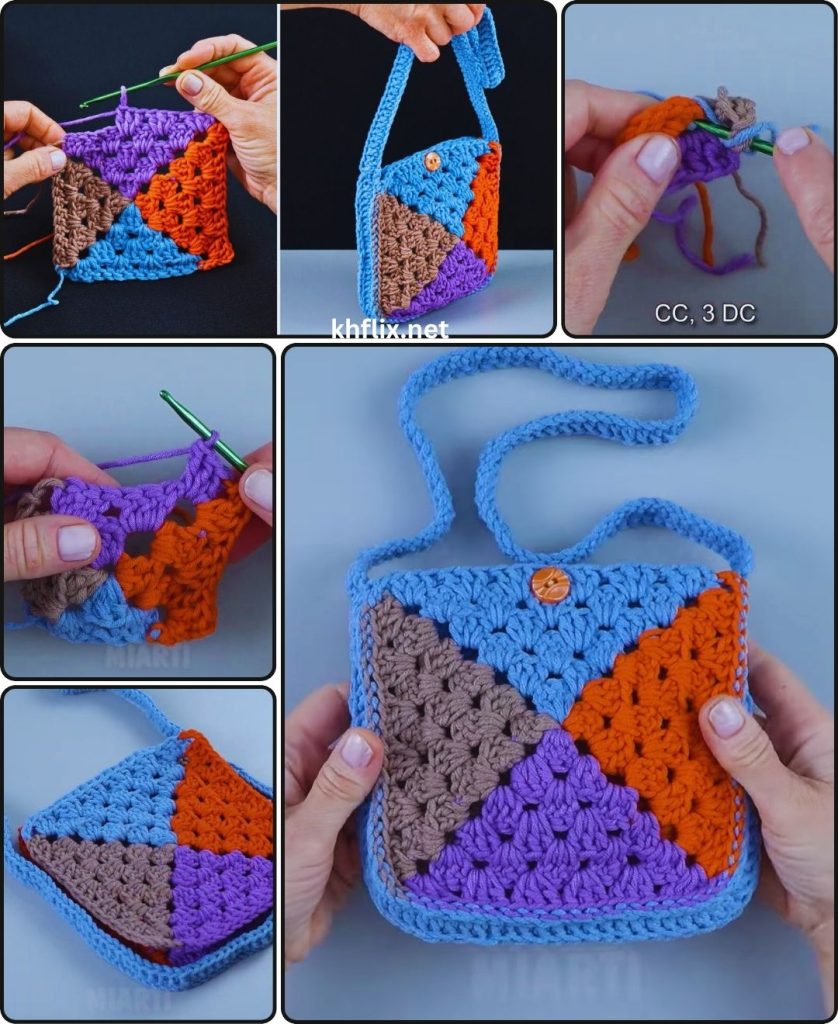
Part 4: Adding a Top Border (Optional but Recommended)
A simple border around the top opening of the bag provides a clean finish and added structure.
- Round 1 (Single Crochet):
- Join Color D with a slip stitch into any stitch along the top opening of your bag.
- Chain 1. Work 1 single crochet (sc) into each stitch evenly around the entire top opening of the bag. Try to get an even number of stitches per square section. When you encounter a seam between squares, try to work 1-2 sc stitches over the seam itself to bridge the gap smoothly.
- Slip stitch into the first sc to join the round.
- [Total stitch count will depend on your squares and seams]
- Round 2 (Single Crochet – for thickness):
- Chain 1. Work 1 sc into each sc around the entire top opening.
- Slip stitch into the first sc to join.
- Repeat Round 2 for 1-2 more rounds for a thicker, more reinforced top edge.
- Fasten off Color D, leaving a tail to weave in. Weave in the tail.
Part 5: Crocheting and Attaching the Strap
A comfortable and sturdy strap is essential for carrying your tote. We’ll make a simple single crochet strap in Color D.
- Crocheting the Strap:
- Make a slip knot with Color D.
- Chain (ch) 101. (This will create a strap of about 25-30 inches / 64-76 cm, which is a good length for a shoulder bag. Adjust this chain length for a longer or shorter strap if desired.)
- Row 1: Work 1 sc into the 2nd ch from your hook. Work 1 sc into each remaining ch across. You should have 100 sc.
- Chain 1, turn.
- Rows 2-4: Work 1 sc into each sc across the row. You will still have 100 sc in each row.
- Chain 1, turn. (You can make more rows here if you want an even wider, thicker strap.)
- Fasten off, leaving a very long tail (at least 15-20 inches / 38-50 cm) at each end of the strap for sewing.
- Attaching the Strap to the Bag:
- Lay your bag flat and find the top opening.
- Position the ends of your crocheted strap on the inside of the bag’s top opening. A good placement is to center them over the top corners, or slightly inward (e.g., 1 square in from each side if you have multiple squares across the top).
- Thread one of the long tails from the strap onto your yarn needle.
- Stitch firmly back and forth, going through the strap end and into the top edge of the bag. Make sure to go through multiple stitches and layers for a very strong attachment. Work your needle in a way that the stitches are discreet from the outside.
- Repeat this process for the other end of the strap, ensuring the strap is not twisted before you stitch it down.
- Weave in all remaining strap tails very securely into the top edge of the bag.
Part 6: Final Finishing Touches
- Final Weave in Ends:
- Double-check that every single yarn tail has been meticulously woven in. This is especially important with granny squares due to the frequent color changes. Loose ends can unravel and spoil your beautiful work.
- Blocking (Optional but Highly Recommended):
- Blocking can significantly improve the shape, even out any tension inconsistencies, and give your bag a more polished, professional look. It makes a big difference with cotton yarn and joined squares!
- Method (Wet Blocking – Ideal for Cotton/Cotton Blends):
- Gently mist your entire bag evenly with cool water using a spray bottle until it’s damp but not soaking wet.
- Carefully stuff your bag with clean towels or crumpled paper to help it hold its desired shape (e.g., a nice rectangular form) while drying.
- Smooth out any wrinkles and gently shape the bag, ensuring the seams lay flat and the squares look even.
- Allow the bag to air dry completely and thoroughly in a well-ventilated area. This can take several hours to a full day, depending on humidity and ventilation. Ensure it’s bone dry before handling or using it.
Congratulations! You’ve successfully crocheted a beautiful and functional 4-colored granny square tote bag! This handmade accessory is not only practical but also a fantastic way to showcase your developing crochet skills and love for color. Enjoy using your vibrant new creation!