 by
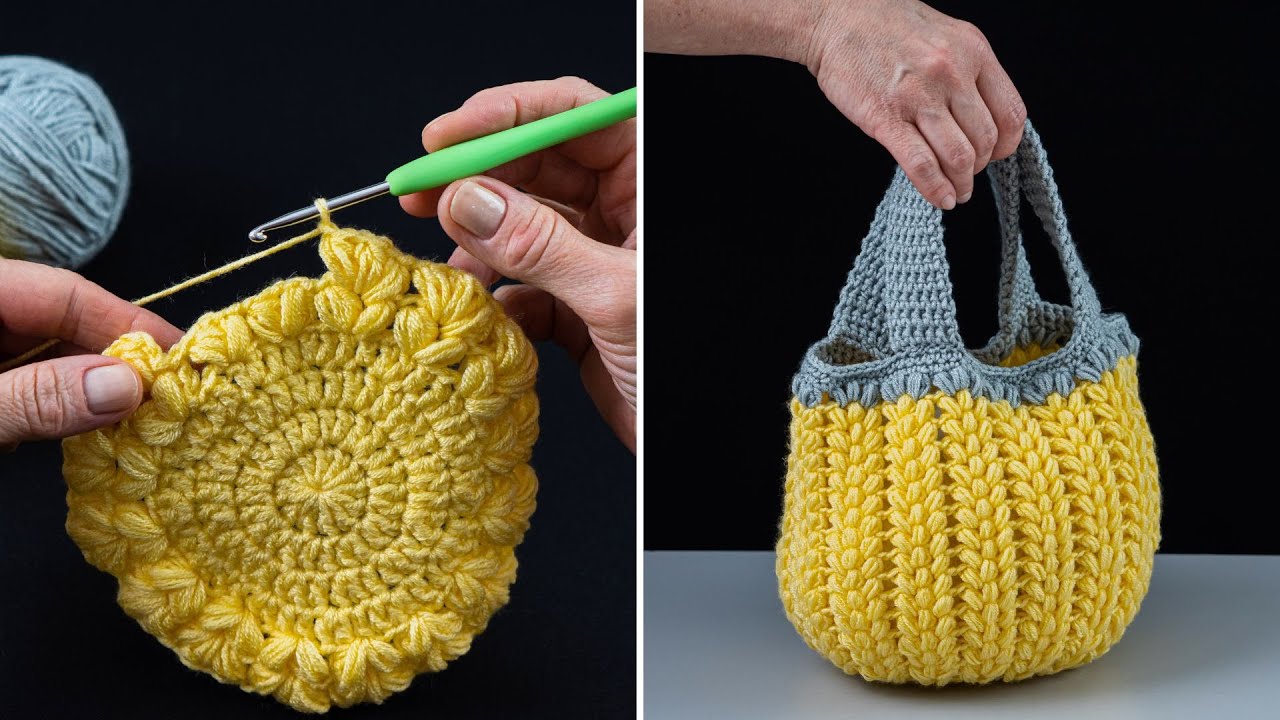
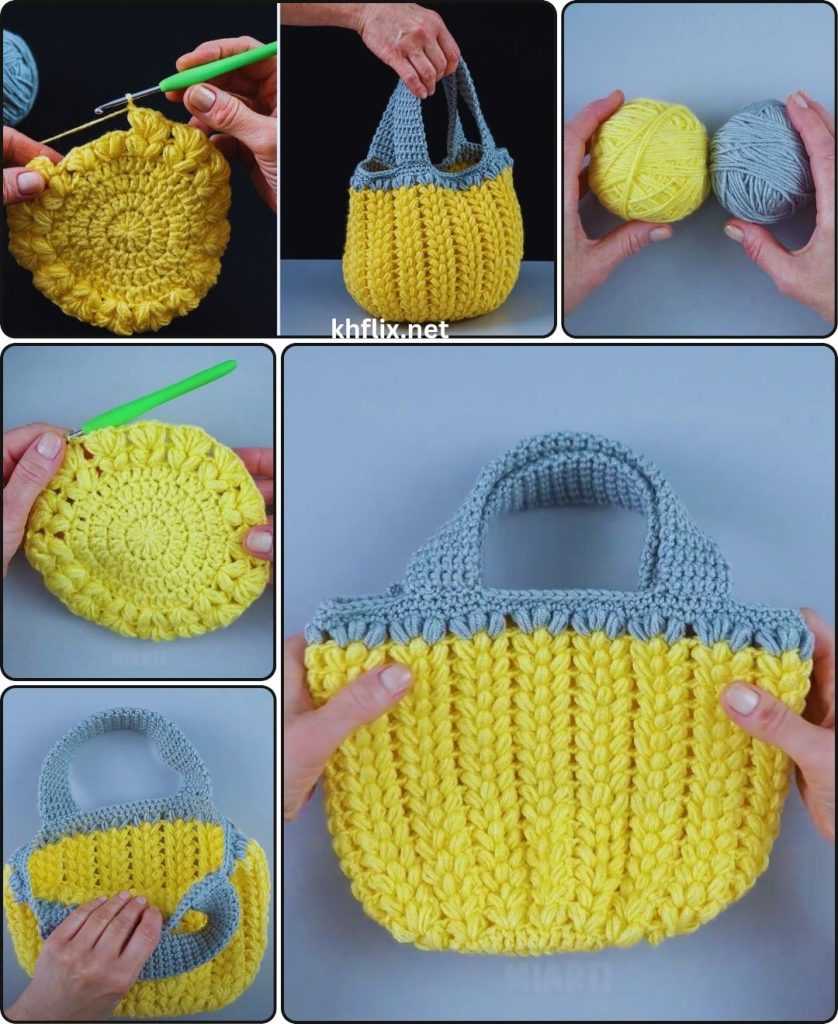
by Want a charming little bag for your essentials that works up in a flash? This tutorial will show you how to crochet a cute, mini tote bag quickly and easily, using a cheerful yellow yarn. It’s the perfect project for beginners looking for instant gratification or experienced crocheters needing a speedy gift. We’ll use simple stitches to create a sturdy little bag that’s perfect for holding your phone, keys, lip balm, or a small notion kit.
Skill Level: Beginner
This project is fantastic for new crocheters! You’ll practice:
- Chain (ch): The absolute foundation of crochet.
- Slip Stitch (sl st): For joining stitches and rounds neatly.
- Single Crochet (sc): A compact and sturdy stitch, great for bag construction.
- Working in Rounds: Crocheting in continuous circles, essential for a seamless look.
- Increasing: Making your work wider for the bag’s base.
- Fastening Off: Securely ending your yarn.
- Weaving in Ends: The crucial final step for a polished finish.
Finished Mini Tote Bag Dimensions (Approximate):
Using worsted weight yarn and the suggested hook, your finished mini tote will be approximately:
- Base: 5-6 inches (12.5-15 cm) long by 2-3 inches (5-7.5 cm) wide (oval shape).
- Height: 6-7 inches (15-18 cm) (excluding handles).
- Handles: 4-5 inches (10-12.5 cm) tall loop (from bag edge to top of handle).
These dimensions are easy to adjust. Want it a little bigger? Start with a longer chain for the base. Taller? Add more rounds to the body.
Materials You’ll Need:
Gathering your supplies beforehand ensures a smooth and enjoyable crafting session!
- Yarn: Approximately 100-150 yards (90-135 meters) of Worsted Weight (Medium #4) Cotton or Cotton Blend Yarn.
- Color: Your chosen yellow! From bright lemon to soft pastel, pick a shade that makes you happy. Cotton yarn is highly recommended for bags because it’s strong, durable, holds its shape well, and is less likely to stretch out than pure acrylic.
- Crochet Hook: Size H/5.0mm. This hook size works well with worsted weight yarn to create a dense, firm fabric that will allow your mini tote to stand up nicely on its own.
- Yarn Needle (Tapestry Needle): This blunt-tipped needle with a large eye is essential for seamlessly weaving in all your loose yarn tails at the end of the project.
- Scissors: Any sharp pair for cutting your yarn.
- Stitch Marker (Optional but Recommended): Incredibly helpful for marking the first stitch of each round when working the base in a continuous spiral.
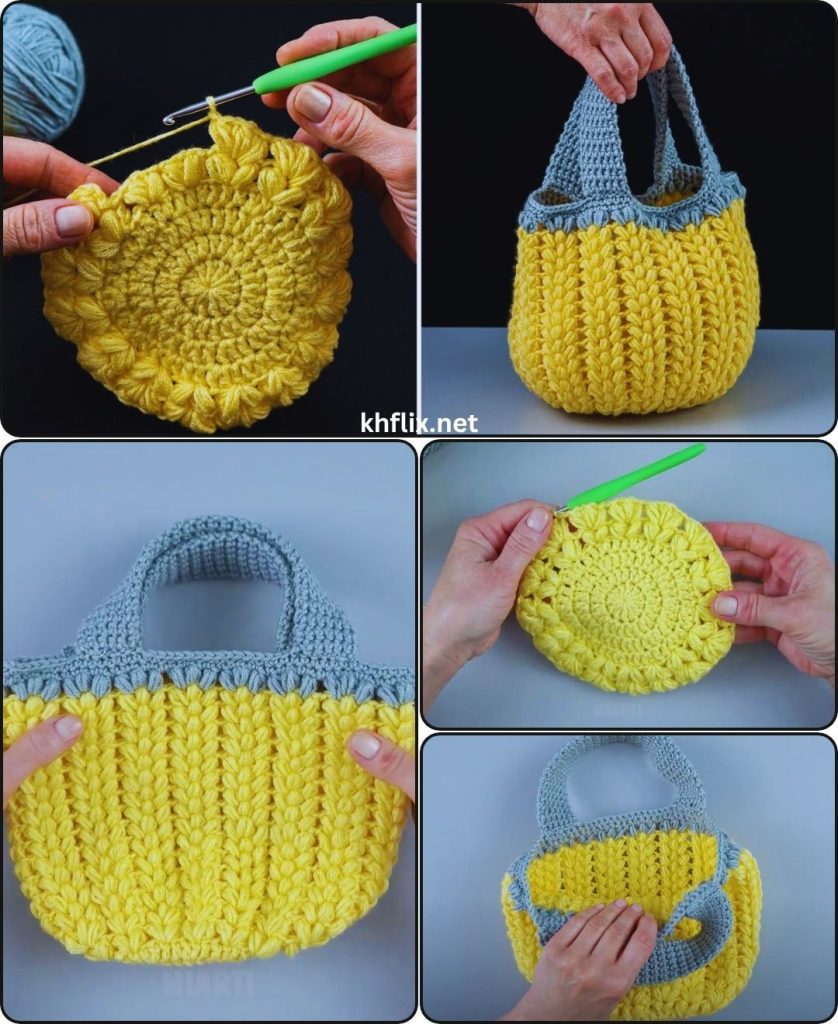
Let’s Crochet Your Cute Yellow Mini Tote Bag!
We’ll build this mini tote from the bottom up: starting with a simple oval base, then working straight up for the bag’s body, and finishing with sturdy, integrated handles. We’ll use single crochet throughout for maximum quickness and durability.
Part 1: The Oval Base
We’ll create a flat, sturdy oval that forms the bottom of your mini tote. This is done by working single crochet stitches around a starting chain in continuous rounds, which helps avoid a visible seam.
- Starting Chain:
- Make a slip knot with your yellow yarn.
- Chain (ch) 16. (This chain length determines the initial length of your bag’s base. For a slightly longer base, chain more stitches; for a shorter one, chain fewer. An even number often works well, but it’s not crucial for this simple design.)
- Round 1 (Working Around the Chain):
- Work 2 single crochet (sc) stitches into the 2nd chain from your hook.
- (Optional: Place your stitch marker in the first sc you just made. This will be the first stitch of your round for easy tracking.)
- Work 1 sc into each of the next 13 chains.
- In the last chain (which is the 16th chain from your hook): Work 4 sc stitches into this single chain. This helps you smoothly turn the corner around the end of your chain.
- Now, you’ll work back down the other side of your starting chain. Crochet into the bottom loops (the unworked loops) of each chain.
- Work 1 sc into each of the next 13 stitches.
- In the last stitch (this will be the same chain where you placed your very first 2 sc): Work 2 sc stitches into this chain. This finishes turning the other corner and brings you back to where you started the round.
- You should now have a total of 34 sc stitches (2 + 13 + 4 + 13 + 2 = 34). Important: Do NOT join with a slip stitch yet. For the base, you’ll work in continuous rounds (like a spiral) to avoid a visible seam and create a sturdier foundation.
- Work 2 single crochet (sc) stitches into the 2nd chain from your hook.
- Round 2 (Continuing the Oval Shape):
- Work 2 sc into the very first stitch of the round (the one with your stitch marker).
- (If using, move your stitch marker to this new first sc of the round.)
- Work 1 sc into the next stitch.
- Work 1 sc into each of the next 13 stitches.
- Work 2 sc into each of the next 3 stitches. (These are the increases on one of the rounded ends).
- Work 1 sc into the next stitch.
- Work 1 sc into each of the next 13 stitches.
- Work 2 sc into each of the next 2 stitches. (These are the increases on the other rounded end).
- You should now have 40 sc stitches. Continue in continuous rounds.
- Round 3 (Final Base Round):
- Work 2 sc into the first stitch of the round (where your stitch marker is).
- (If using, move your stitch marker to this new first sc of the round.)
- Work 1 sc into the next 2 stitches.
- Work 1 sc into each of the next 13 stitches.
- Work 2 sc into each of the next 3 stitches.
- Work 1 sc into the next 2 stitches.
- Work 1 sc into each of the next 13 stitches.
- Work 2 sc into each of the next 2 stitches.
- You should now have 46 sc stitches.
- Stop here! When you finish the last sc of this round, remove your stitch marker.
- Slip stitch (sl st) into the first sc of this round to join. This completes your oval base neatly and prepares you for working straight up the sides of the bag.
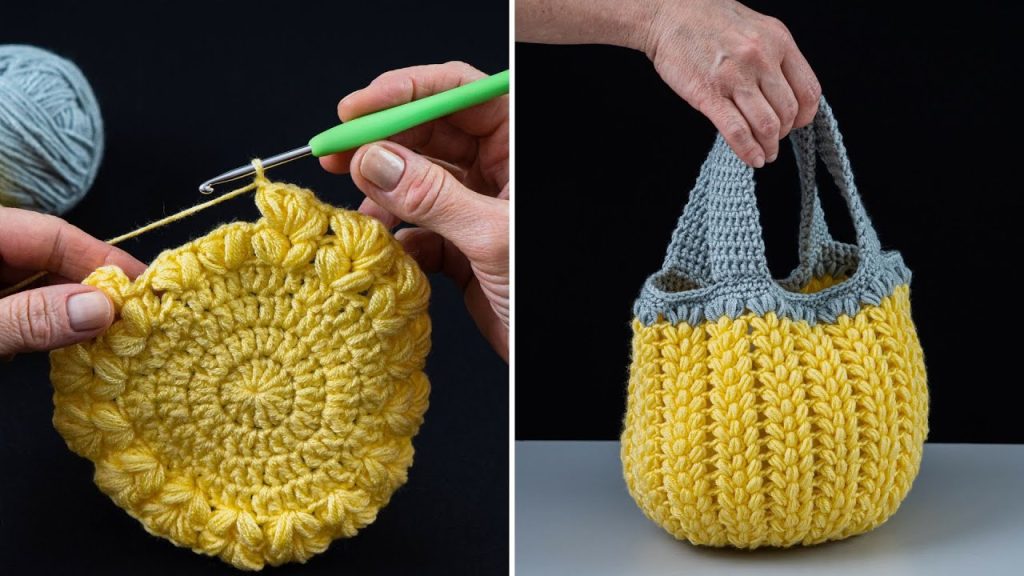
Part 2: Building the Body of the Mini Tote
Now, you’ll work straight up from the finished base to create the main walls of your mini tote bag. We’ll use single crochet throughout and work in joined rounds to maintain a neat, vertical line.
- Round 4 (First Side Round – Defining the Edge):
- Chain 1 (ch 1 – this does NOT count as a stitch; it just gives height).
- Work 1 single crochet (sc) into the back loop only (BLO) of each stitch around the entire round. (46 sc)
- Why BLO? Working into the back loop creates a distinct, visible ridge on the outside of the bag, right where the base transitions to the sides. This ridge helps the bag’s sides stand up straight and gives it a crisp, defined bottom.
- Slip stitch (sl st) into the first sc of the round to join.
- Rounds Onwards (Body Height):
- Chain 1 (ch 1 – this does NOT count as a stitch).
- Work 1 sc into both loops of each stitch around the round. (Your stitch count remains the same: 46 sc).
- Slip stitch (sl st) into the first sc of the round to join.
- Repeat this round (working 1 sc in each stitch around and joining with a sl st) until your mini tote reaches your desired height. For the approximate dimensions given, you’ll want to do about 12-15 more rounds (for a total of 16-19 rounds for the body, including Round 4).
- The height is entirely a personal preference. Hold it up as you go and see if you like the look and feel. The single crochet creates a dense and sturdy fabric, perfect for a bag.
Part 3: Creating the Handles
Now you’ll create comfortable, integrated handles that extend directly from the top of your bag. We’ll continue using single crochet for consistency and durability.
- Handle Placement Round (Setting up the openings):
- After your last body round, make sure you’ve joined with a slip stitch.
- Chain 1 (ch 1 – does NOT count as a stitch).
- Work 1 sc into the first 8 stitches. (This creates the front section of the bag opening).
- Chain 20 (ch 20 – this creates the length of your first handle. Adjust this number for a longer or shorter handle).
- Skip the next 7 stitches on the bag’s top edge (this creates the open space for the bag’s main opening).
- Work 1 sc into the next 16 stitches. (This section bridges the gap across the top of the bag between your two handles).
- Chain 20 (ch 20 – this creates the length of your second handle, matching the first).
- Skip the next 7 stitches.
- Work 1 sc into the next 8 stitches. (This should bring you back to the start of the round, completing the other front section).
- Slip stitch (sl st) into the first sc of the round to join.
- Handle Strengthening Round:
- Chain 1 (ch 1 – does NOT count as a stitch).
- Work 1 sc into each sc stitch along the top edge of the bag (these are the 8 sc, 16 sc, and 8 sc sections).
- When you reach a chain-handle loop, you’ll work single crochets directly into each chain of the loop. Work 1 sc into each of the 20 chains of the loop. This creates a very sturdy and comfortable handle.
- Continue working sc stitches into the bag top and then around the second chain-20 handle loop (20 sc into those chains).
- Slip stitch (sl st) into the first sc of the round to join.
- Fasten Off (FO), leaving a tail of about 6 inches (15 cm).
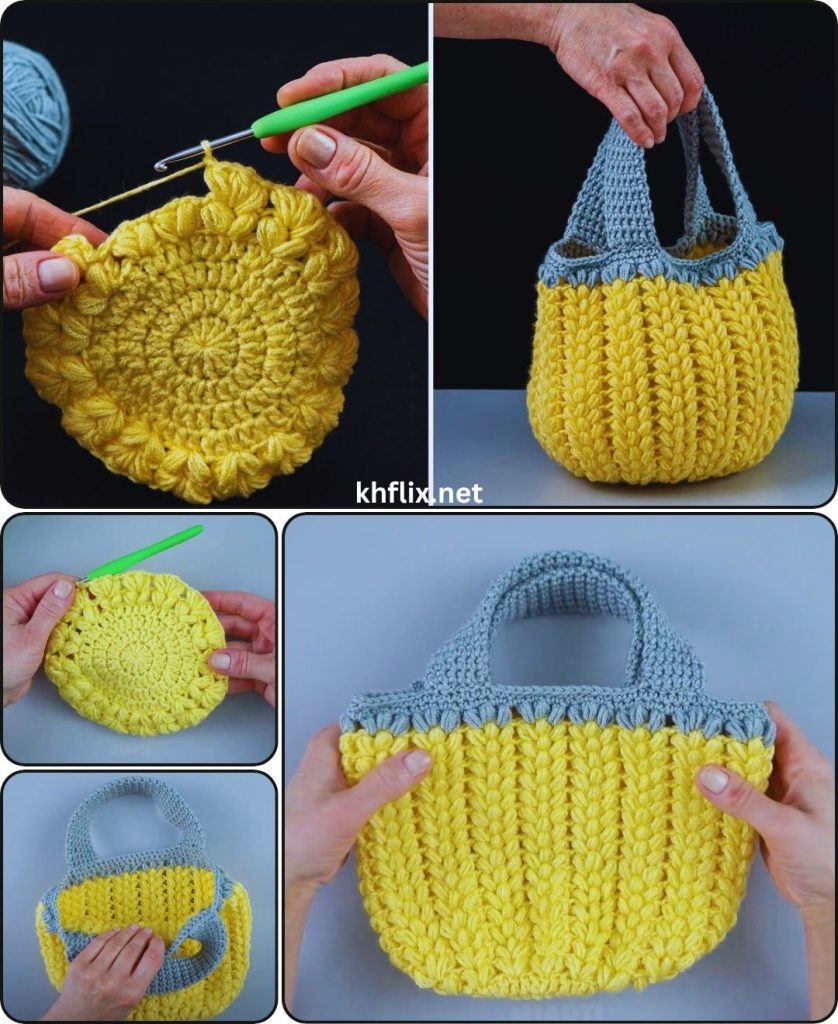
Part 4: Final Finishing Touches (The Secret to a Professional Look!)
This stage is crucial for making your mini tote look polished, clean, and truly finished.
- Weave in All Ends (Meticulously!):
- You’ll likely have two yarn tails: one from your starting chain on the base, and one from where you fastened off at the handles.
- Thread each yarn tail onto your yarn needle.
- How to Weave Neatly: Insert the needle into existing stitches on the inside of your bag. Weave the tail into existing stitches for at least 3-4 inches (7.5-10 cm). Try to follow the path of existing stitches to make it invisible. To make it extra secure and prevent unraveling, subtly change direction (e.g., weave along a stitch, then turn and weave back through some of the same stitches diagonally or perpendicularly) to “lock” the tail in place.
- Once secured, trim any excess yarn close to the fabric, being careful not to cut any of your actual crocheted stitches.
- Blocking (Optional but Recommended):
- Blocking is a simple process that can significantly improve the shape of your bag, even out any minor tension inconsistencies, and give it a more polished, professional appearance. It helps the bag stand up nicely on its own.
- Method for Cotton Yarn:
- Gently mist the entire bag evenly with cool water using a spray bottle until it’s damp, but not soaking wet.
- Stuff the bag lightly with clean towels, old T-shirts, or even plastic bags to help it hold its intended rectangular shape (paying attention to the corners and the handles).
- Allow the bag to air dry completely and thoroughly in a well-ventilated area. This might take a day or two, depending on humidity. Do not move or use the bag until it’s bone dry.
Congratulations! You’ve successfully crocheted an adorable, quick, and easy Yellow Mini Tote Bag! This is a fantastic accomplishment for any beginner, and you now have a sturdy, handmade accessory that’s both functional and stylish.
What will be the first cute thing you carry in your new mini tote?