 by
by Crochet flower keychains are not only adorable but also a great way to add a personal, handmade touch to your everyday accessories. Whether you hang them on your keys, bags, or gift them to a loved one, they always bring a smile.
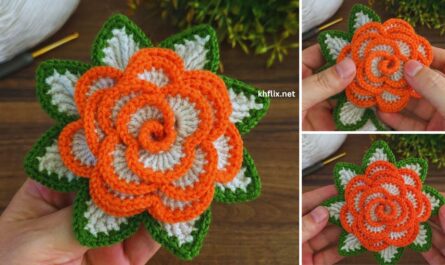
In this tutorial, we’ll make a beautiful crochet rose keychain with leaves — elegant, compact, and easy enough for beginners to make. The rose design captures the classic charm of real blooms, while the added green leaves make it look fresh and natural.
Let’s dive into this fun and creative project! 🌹✨
🌿 Why You’ll Love This Project
This crochet rose keychain is perfect for crafters of all skill levels because:
- 🌸 It’s simple yet elegant — looks like a real rose but works up easily.
- 💕 It’s beginner-friendly — uses only basic stitches.
- 🎁 It makes a thoughtful handmade gift for birthdays, weddings, or Mother’s Day.
- 🧶 It’s quick to finish — one flower takes less than an hour!
- 🌼 You can use it as a keychain, bag charm, or decorative accessory.
🧶 Materials You’ll Need
Before starting, make sure you have the right tools and supplies:
Yarn
- Color A (Petals): Red, pink, or any color of your choice.
- Color B (Leaves): Green.
- Optional: A small amount of yellow for the rose center (if desired).
Recommended Yarn: Cotton or Acrylic (Lightweight or DK #3) — durable and holds shape well for keychains.
Hook
- 3 mm or 3.5 mm crochet hook (depending on yarn weight).
Accessories
- ✂️ Scissors
- 🪡 Tapestry needle
- 🔑 Metal keyring or lobster clasp
- 🎀 Optional: Small bead, pearl, or button for decoration
🌸 Stitches & Techniques Used
You’ll only need a few simple crochet stitches for this rose keychain:
- ch – chain
- sl st – slip stitch
- sc – single crochet
- hdc – half double crochet
- dc – double crochet
If you’re new, these are great beginner stitches — once you know them, you can make countless crochet projects!
🌹 Step-by-Step Crochet Rose Keychain Tutorial
This pattern creates a spiral rose flower with simple leaves attached to the base.
🌷 Step 1: Crochet the Rose Base
- With Color A (Petal Color):
- Chain 52 (for a medium-sized rose).
- This foundation chain determines the flower’s size — adjust as desired:
- Small rose: 42 chains
- Large rose: 72 chains
- Row 1:
- In the 3rd chain from hook, make 1 dc.
- Work 2 dc in each stitch across the row.
- This creates a long strip that will naturally start curling slightly.
- When you reach the end, chain 2 and turn your work.
🌹 Step 2: Form the Petals
Now we’ll create scalloped edges along the strip to make the rose petals.
- Row 2:
- In the first stitch, work: (1 sc, 1 hdc, 3 dc, 1 hdc, 1 sc) — this forms one petal.
- Skip 1 stitch, and repeat the same petal pattern in the next stitch.
- Continue across the row until you reach the end.
You’ll see pretty wavy petals forming along the strip.
- When you finish, fasten off but leave a 10-inch yarn tail for sewing the rose together.
🌹 Step 3: Shape the Rose
- Lay the strip flat with the petal side facing you.
- Starting from one end, roll the strip tightly into a spiral — this forms the rose bloom.
- Adjust the petals slightly as you roll so they fan outward naturally like rose layers.
- Once happy with the shape, thread the long yarn tail through your tapestry needle.
- Sew through the base layers (not the petals) several times to secure the shape.
You now have a beautiful rose blossom that will never wilt! 🌹
🌿 Step 4: Crochet the Leaves
Every rose needs a touch of green — let’s add simple leaves.
🍃 Leaf Pattern:
- Using Color B (Green): Chain 8.
- In the second chain from hook, make:
- 1 sc in first stitch,
- 1 hdc in next,
- 1 dc in each of the next 3 stitches,
- 1 hdc in next,
- 1 sc in last stitch.
- Chain 1, and turn your work to crochet along the other side of the chain:
- 1 sc, 1 hdc, 1 dc in next 3, 1 hdc, 1 sc.
- Slip stitch to the first stitch to close the leaf shape.
- Fasten off, leaving a long tail for sewing.
💡 Make 2 or 3 leaves depending on how full you want your design to look.
🌿 Step 5: Assemble the Flower & Leaves
- Arrange your leaves behind the rose bloom, overlapping them slightly at the base.
- Use your yarn tails and tapestry needle to sew the leaves securely to the base of the rose.
- Make sure all ends are tight and neat — weave in any extra yarn.
Your rose with leaves is now complete and ready to be turned into a keychain! 💚
🔑 Step 6: Attach the Keyring
- Take your metal keyring or lobster clasp and position it at the top of the flower’s back.
- You have two ways to attach it: Option 1:
- Crochet a small loop — chain 10 using green yarn.
- Slip stitch into the starting stitch to form a loop.
- Sew this loop securely onto the top of your rose, then slip the keyring through.
- Simply sew the metal ring directly onto the back of the flower using yarn or thread.
- Double-knot the attachment thread for extra strength.
Now you’ve got your very own crochet rose keychain! 🌹✨
🌸 Optional Embellishments
You can personalize your rose keychain with fun details:
- ✨ Add beads or pearls in the flower center.
- 🎀 Sew a mini ribbon bow beneath the rose for a romantic touch.
- 💫 Use metallic thread for a subtle sparkle.
- 💕 Spray light fabric stiffener if you want the petals to hold shape firmly.
Each variation gives your keychain a different style — from elegant and classy to playful and boho-chic.
🌻 Quick Reference Pattern Summary
| Section | Instructions |
|---|---|
| Base Chain | Chain 52 (or desired length) |
| Row 1 | 2 dc in each chain across |
| Row 2 (Petals) | (1 sc, 1 hdc, 3 dc, 1 hdc, 1 sc) repeat |
| Shape Flower | Roll strip into spiral, sew base |
| Leaf | ch 8, sc-hdc-dc-hdc-sc both sides |
| Assembly | Sew leaves to rose, attach keyring |
| Skill Level | Beginner-Friendly |
| Project Time | 30–60 minutes |
🌿 Tips for Perfect Results
- Use cotton yarn for a crisp, defined rose shape.
- Keep your tension even — it helps petals stay uniform.
- Don’t roll your flower too tightly; allow petals to breathe for a natural look.
- If gifting, attach a tiny handmade tag with the recipient’s name.
- Add a few drops of essential oil (like rose or lavender) to the yarn for a scented keepsake.
💐 Gift & Use Ideas
This crochet rose keychain makes a charming addition to everyday life and thoughtful handmade gifts. Try these ideas:
- 🌹 Attach to handbags, backpacks, or purses for a touch of handmade flair.
- 🎁 Add to gift bags or boxes as a reusable decoration.
- 💌 Give as wedding favors or Valentine’s Day gifts.
- 💖 Sell at craft fairs — they’re small, quick, and loved by everyone!
🌸 Final Thoughts
Crocheting a DIY Rose Keychain is the perfect little project — simple, satisfying, and stunning. With just a few stitches and colors, you can transform yarn into a lifelike bloom that never fades. 🌹
It’s a lovely blend of creativity and craftsmanship — a reminder that even the smallest handmade item can bring beauty into everyday life.
So grab your yarn and hook, find a cozy spot, and let your creativity blossom — one rose petal at a time. 🌸🧶💖