 by
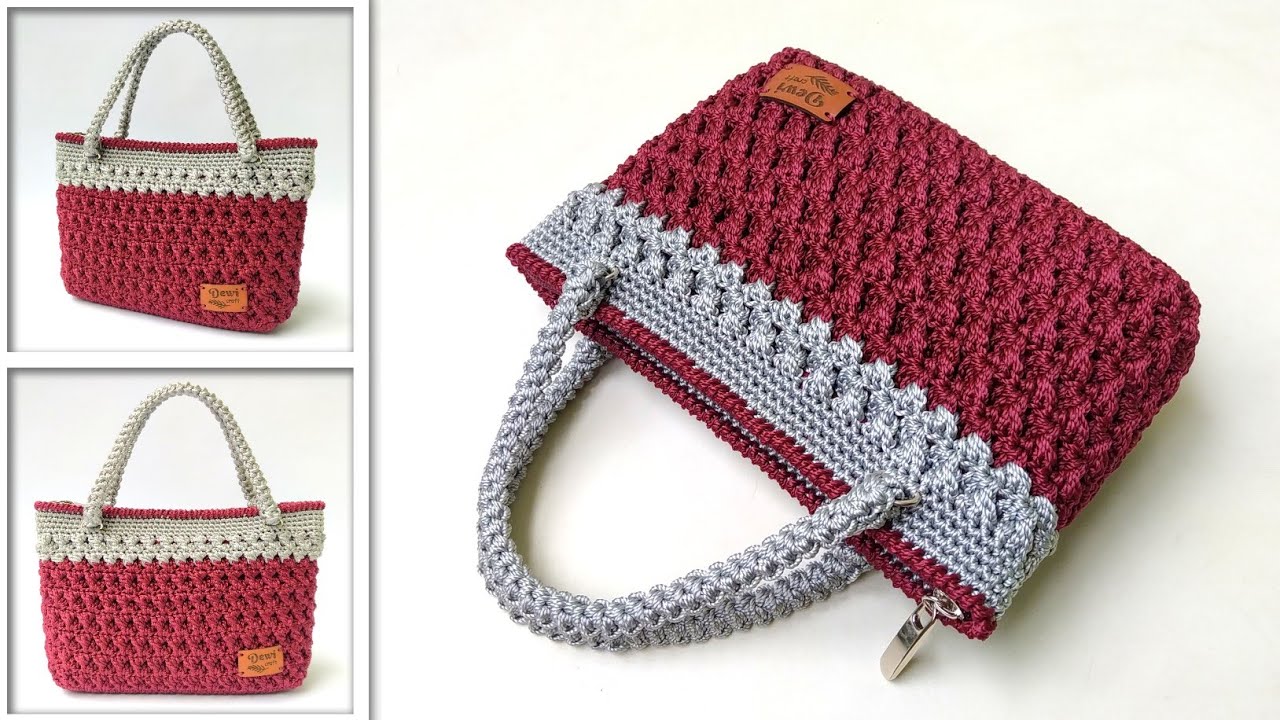
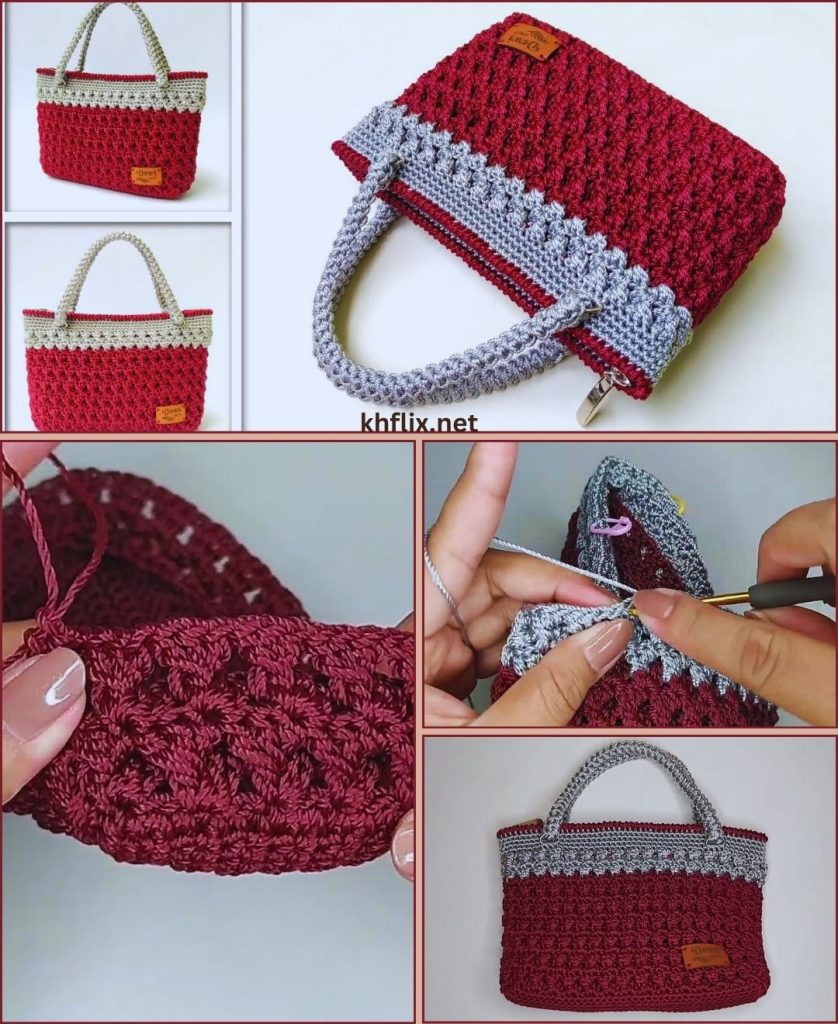
by Crochet handbags have become a favorite DIY project for crafters because they’re stylish, sturdy, and fully customizable. The bag in the image is a beautiful two-color handbag featuring a rich textured stitch at the bottom, a decorative stitch pattern at the top, and strong durable handles.
This guide will walk you step-by-step through the process. Even if you’re new to crochet, you can follow along easily.

✅ Materials You Will Need
Yarn
- Color A (Body): Medium-weight yarn (e.g., burgundy)
- Color B (Top and Handles): Medium-weight yarn (e.g., silver/gray)
Tools
- Crochet hook size appropriate for your yarn (usually 4.0–5.0 mm)
- Stitch markers
- Yarn needle (for sewing ends)
- Scissors
- Optional: Bag lining fabric + sewing needle (if you want a lined interior)
- Optional: Leather label/tag
🧵 Basic Crochet Stitches Used
Beginners only need to know these stitches:
- Chain (ch)
- Slip Stitch (sl st)
- Single Crochet (sc)
- Half Double Crochet (hdc)
- Double Crochet (dc)
- Cluster Stitch / Puff Stitch (for the textured body)
- Shell Stitch (for the decorative light gray band)
Don’t worry if you haven’t used cluster or shell stitches—the steps will be explained.
✨ SECTION 1 — Crocheting the Base of the Bag
The bag begins with an oval-shaped base, which gives the handbag a flat bottom.
Step 1: Create a Foundation Chain
- Using Color A, chain 36–40 chains depending on how wide you want the bag.
Step 2: Begin Working Around the Chain
You are going to crochet around the chain to form an oval.
- Round 1
- Sc in the second chain from hook.
- Sc across all chains.
- Put 3 sc into the last chain to turn.
- Work back down the other side of the chain.
- Put 2 sc into the final chain to complete the oval.
- Join with a slip stitch.
This creates a long oval shape.
Step 3: Build Up the Base
Repeat rounds adding increases only at the curved ends.
- Round 2–4
- Sc around the oval.
- Increase by making 2 sc in each corner stitch at both ends.
This widens and flattens the base.
Stop when the base is the size you want—typically 28–32 cm long.
✨ SECTION 2 — Crocheting the Textured Body (Burgundy)
The signature look of the bag comes from its textured cluster (or puff) stitch.
Step 4: Start the Sides of the Bag
- Work 1 round of sc all the way around the base edge.
- This helps the sides transition upward.
Step 5: Begin the Textured Stitch Pattern
Repeat the following rows for about 15–20 rows.
Cluster Stitch Pattern (Simple Version)
- Chain 2, yarn over, insert hook into the same stitch, pull up a loop
- Repeat this 3 times
- Yarn over and pull through all loops
- Chain 1 to secure
- Skip next stitch
- Make next cluster in next stitch
Go all around. Join with sl st.
This creates the bubble/pebble texture seen in the burgundy part.
Step 6: Continue Until Desired Height
Continue the cluster stitch until the burgundy section measures about 20–22 cm tall or your desired height.
Tie off Color A.
✨ SECTION 3 — Crocheting the Decorative Top Band (Silver/Gray)
Now switch to Color B.
Step 7: Basic Single Crochet Round
- Make one round of sc to clean up the top of the textured section.
Step 8: Create the Decorative Shell Stitch Section
This stitch adds elegance and a nice transition to the handles.
Shell Stitch:
- 5 dc in one stitch
- Skip 2 stitches
- 1 sc in next stitch
- Skip 2 stitches
- Repeat shell
Work 3–5 rounds of these shells.
Step 9: Add Straight Rows for Strength
Add 3–4 rows of hdc or sc after the shell section.
These straight rows help stabilize the handle area.
✨ SECTION 4 — Creating the Handles
The bag in the image has sturdy crocheted handles, made separately then attached.
Step 10: Making the Handles
Make 2 handles, each about 35–45 cm long.
Basic Handle Pattern
- Chain 70–80
- Row 1: Sc in each stitch
- Row 2–5: Sc across
- Tie off and make one more
This creates a strong, thick strap.
You can make the handles thicker by adding more rows if you want.
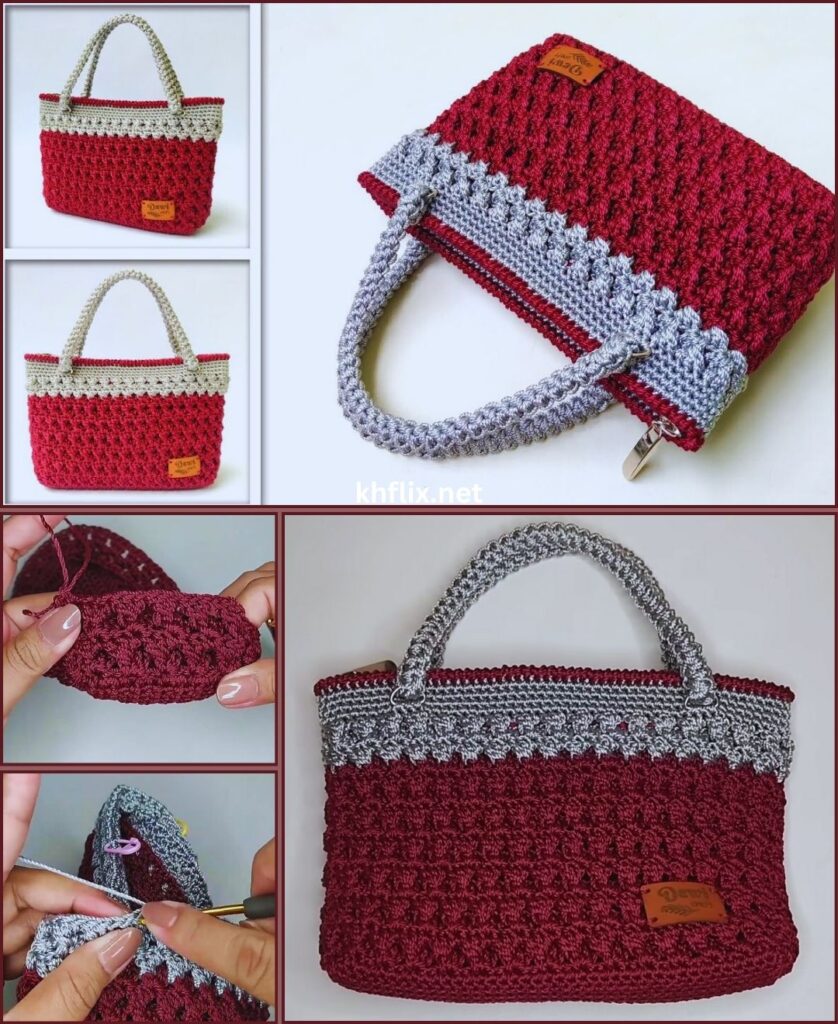
Step 11: Attach Handles to the Bag
- Position each end about 8–10 cm from the bag’s side edges
- Sew securely using a yarn needle
- Reinforce the stitching multiple times for durability
Optional: Add metal rings or holder loops if you want a more professional look.
✨ SECTION 5 — Finishing Touches
Step 12: Weave in All Yarn Ends
Using a yarn needle, weave in all leftover yarn ends inside the bag.
Step 13: Optional — Add Lining
A fabric lining will:
- Prevent stretching
- Strengthen the bag
- Stop small items from falling out
You can hand-sew or machine-sew a simple rectangle fabric inside.
Step 14: Add Tag or Label
Sew the leather tag on the lower right corner of the bag.
This adds a handmade, professional finish.
👜 Your Handmade Crochet Bag Is Complete!
You now have a beautifully crafted, stylish two-tone crochet handbag with a textured body and elegant patterned top. This project teaches you:
- How to work an oval base
- How to crochet textured stitches
- How to shape and strengthen a handbag
- How to make and attach handles
- How to create clean finishing touches
Even if you’re a beginner, this structured guide helps you create a bag that looks advanced and professional.