 by
by A Detailed Step-by-Step Guide for Beginners
If you’re looking for a crochet project that is simple, eye-catching, and slightly different from the traditional granny square, this two-color easy crochet square is perfect for you. It’s beginner-friendly, works up quickly, and creates a beautiful contrast effect using just two colors.
This detailed guide will walk you through everything — from materials and stitches to color changes, finishing, and creative ways to use your squares.
Let’s get started! 🧶✨
Why Make a Two-Color Crochet Square?
Two-color crochet squares are:
- More visually interesting than single-color squares
- Great for learning color changes
- Perfect for using leftover yarn
- Easy to customize
- Ideal for blankets, bags, cushions, and garments
The color contrast creates depth and texture — even when using very simple stitches.
Materials You Will Need
🧶 Yarn
- DK or worsted weight yarn
- Two contrasting colors (Color A and Color B)
- Cotton for crisp shape or acrylic for softness
Example combinations:
- White + navy
- Cream + mustard
- Pink + gray
- Lavender + mint
🪡 Crochet Hook
- 4.0mm – 5.5mm (check yarn label)
✂️ Other Supplies
- Yarn needle
- Scissors
- Stitch marker (optional)
Basic Stitches Required
This square uses only beginner stitches:
- Chain (ch)
- Slip Stitch (sl st)
- Single Crochet (sc)
- Double Crochet (dc)
If you can make double crochet, you can easily complete this project.
Finished Size
Approximate size:
- 6–7 inches (15–18 cm)
You can easily increase the size by adding more rounds.
Pattern Overview
This “different” square is special because:
- The center is one solid color
- The second color creates a bold framed border
- The stitch placement gives a subtle textured look
- The contrast creates a modern design
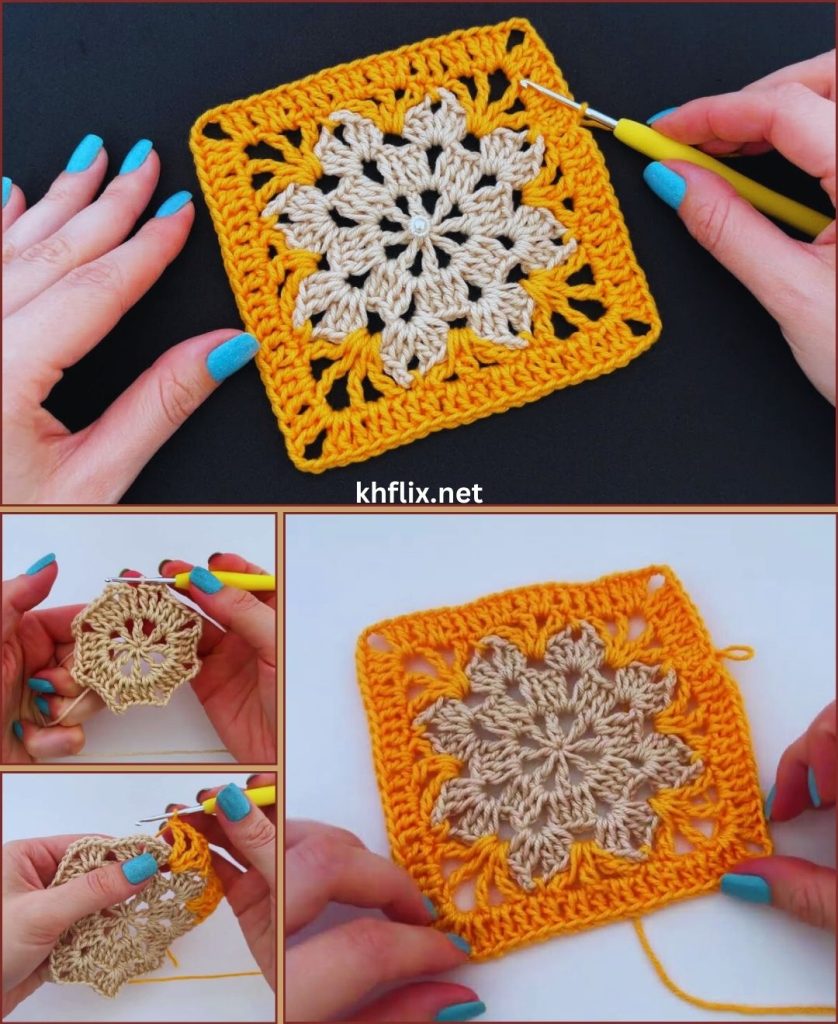
Step-by-Step: Different and Very Easy Crochet Square (Two Colors)
ROUND 1 – Create the Center (Color A)
- Make a magic ring (or chain 4 and join to form a ring).
- Chain 3 (counts as first double crochet).
- Work 15 double crochets into the ring.
- Slip stitch to top of chain 3.
You should have 16 double crochets total.
Pull tight and fasten off.
This creates a clean circular center.
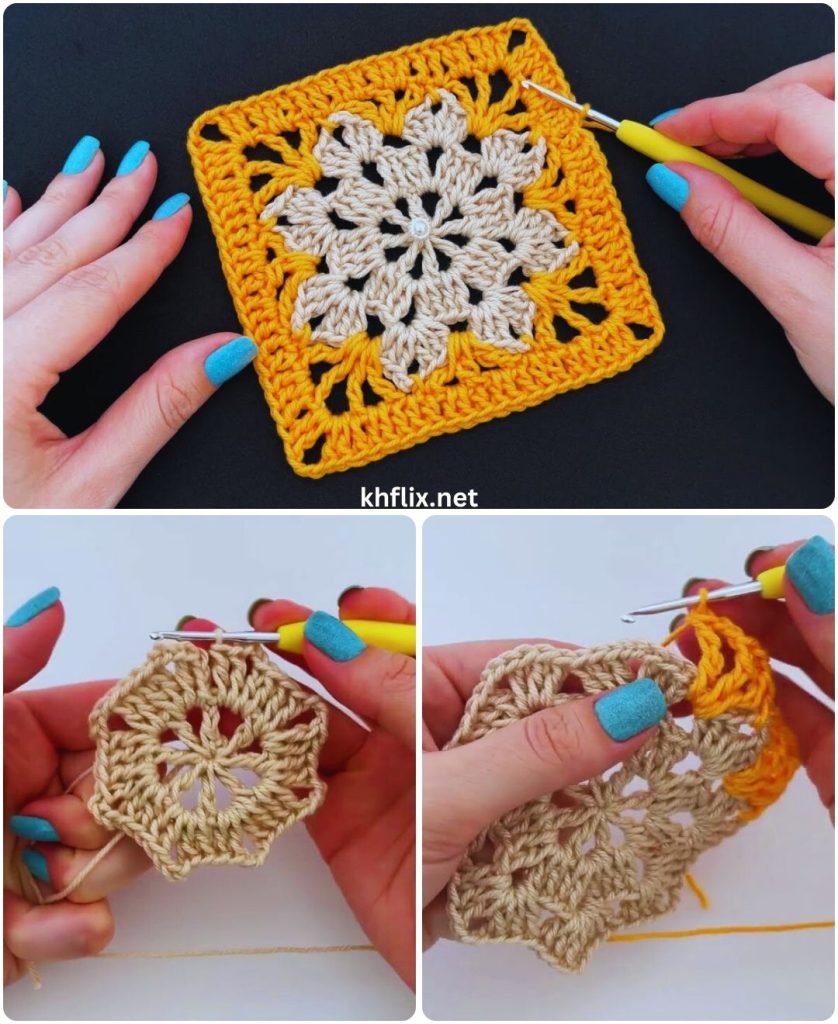
ROUND 2 – Forming the Square Shape (Color A)
Join Color A in any stitch.
- Chain 3.
- Double crochet in same stitch.
- Chain 2.
- Double crochet in same stitch.
This creates your first corner.
Skip 3 stitches.
In the next stitch, work:
(2 dc, ch 2, 2 dc)
Repeat around.
You should have 4 corners total.
Slip stitch to join.
Now your circle has transformed into a square.
Changing to Color B (Important Step)
To change colors neatly:
- Complete the last stitch of Round 2 until the final yarn-over.
- Pull Color B through the last loop.
- Tighten gently.
This makes a smooth color transition.
ROUND 3 – Add Contrast Border (Color B)
Slip stitch into corner space.
Corner:
- Chain 3
- 2 double crochet
- Chain 2
- 3 double crochet
Sides:
- 3 double crochet in each space between corners
- Chain 1 between clusters
Repeat around square.
Slip stitch to join.
You’ll now see a beautiful framed look forming.
ROUND 4 – Make It Bold and Structured (Color B)
Slip stitch into next corner space.
Corner:
(3 dc, ch 2, 3 dc)
Sides:
- 3 dc in each chain space
- Chain 1 between clusters
Repeat around.
Fasten off and weave in ends.
Your two-color square is complete!
Why This Square Looks Different
Even though it’s easy, it stands out because:
- Solid center contrasts with framed border
- Color blocking creates modern appeal
- Cluster stitches give texture
- Simple repetition keeps it beginner-friendly
Sometimes the simplest patterns look the most elegant.
Optional Variation: Reverse the Colors
Try:
- Round 1–2 in Color B
- Round 3–4 in Color A
This gives a completely different look using the same pattern.
Optional Variation: Add a Final Single Crochet Edge
For a clean, finished look:
- Attach either color.
- Single crochet evenly around.
- Work (sc, ch 1, sc) in each corner.
This creates a crisp border.
Tips for Perfect Squares
✔ Always count corner spaces
✔ Keep chain-2 spaces in every corner
✔ Maintain even tension
✔ Block finished square
✔ Use contrasting colors for bold effect
Blocking Your Square
Blocking helps your square lie flat and look professional.
Steps:
- Lightly spray with water.
- Pin to a flat surface.
- Shape into perfect square.
- Allow to dry completely.
How to Join Multiple Squares
You can join using:
Slip Stitch Join
Flat and simple.
Single Crochet Join
Adds decorative ridge.
Invisible Seam Join
Clean, seamless appearance.
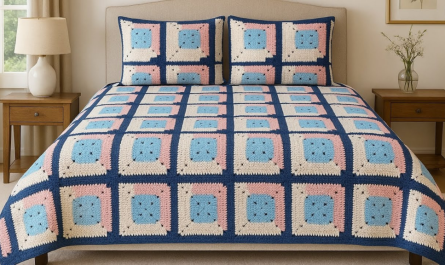
What Can You Make with These Squares?
This two-color crochet square is perfect for:
- Blankets
- Cushion covers
- Tote bags
- Cardigans
- Baby blankets
- Table runners
- Wall décor
- Patchwork sweaters
Make 20–30 squares and you already have the base for a beautiful blanket.
Beautiful Color Combination Ideas
🤍 White + Royal Blue
🌸 Pink + Charcoal
🌿 Sage + Cream
🌈 Bright rainbow borders
🖤 Black + Mustard
💜 Lavender + Deep Purple
High contrast makes the pattern pop.
Common Beginner Mistakes
Corners Not Forming Properly
Fix: Always use (3 dc, ch 2, 3 dc) in corners.
Square Curling
Fix: Use slightly larger hook or block.
Uneven Sides
Fix: Count clusters on each side.
How Long Does It Take?
- Beginner: 30–45 minutes per square
- Experienced crocheter: 15–20 minutes
It’s quick and satisfying!
Final Thoughts
This different and very easy two-color crochet square proves that simple stitches can create stunning results. With just double crochets, chain spaces, and two contrasting colors, you can design something modern, elegant, and versatile.
Start with one square.
Try new color combinations.
Experiment with borders.
Join multiple squares.
Soon you’ll have a beautiful handmade project made entirely from easy two-color crochet squares.
If you’d like, I can also provide:
- A printable PDF version
- A crochet diagram/chart
- A blanket size calculator
- A step-by-step photo guide layout
- A more advanced textured variation
Happy crocheting! 🧶✨