 by
by Crocheting baby shoes is one of the most enjoyable and rewarding crochet projects you can make. These tiny handmade shoes are soft, comfortable, and adorable, making them perfect for newborns, baby showers, birthdays, or special keepsakes. Unlike store-bought baby shoes, crochet shoes can be customized in any color, size, or style to match a baby’s outfit or nursery theme.
Whether you’re completely new to crochet or already have some experience, this step-by-step guide will teach you how to make beautiful crochet baby shoes from start to finish. By learning a few basic stitches and simple shaping techniques, you’ll be able to create cozy baby shoes that are both practical and stylish.
Why Make Crochet Baby Shoes?
Crochet baby shoes are popular because they combine comfort, creativity, and functionality. They are lightweight, flexible, and gentle on delicate baby feet, making them ideal for infants who are not yet walking.
Some of the biggest benefits include:
- Soft and comfortable for newborns and infants
- Easy and quick to complete
- Perfect handmade gifts for baby showers
- Budget-friendly and made with minimal yarn
- Great project for beginners
- Easy to customize with different colors and decorations
- Wonderful keepsakes that families can treasure
Every pair is unique and made with care, making handmade crochet shoes extra special.
Materials You’ll Need
Before starting your project, gather all of your supplies.
Yarn
Choose a soft baby-friendly yarn such as:
- Baby acrylic
- Cotton yarn
- Cotton-acrylic blend
Avoid rough or scratchy fibers that may irritate a baby’s skin.
Crochet Hook
A 3.0 mm to 4.0 mm crochet hook works well for most baby yarns.
Other Supplies
- Yarn needle
- Sharp scissors
- Stitch markers (optional)
- Measuring tape
- Small decorative buttons, bows, or flowers (optional)
Using high-quality materials will produce softer, more durable baby shoes.
Basic Crochet Stitches
This project uses simple crochet stitches that are easy for beginners.
You’ll need to know:
- Chain (ch)
- Slip Stitch (sl st)
- Single Crochet (sc)
- Half Double Crochet (hdc)
- Double Crochet (dc)
- Single Crochet Two Together (sc2tog)
Practicing these stitches before beginning will help you crochet more smoothly.
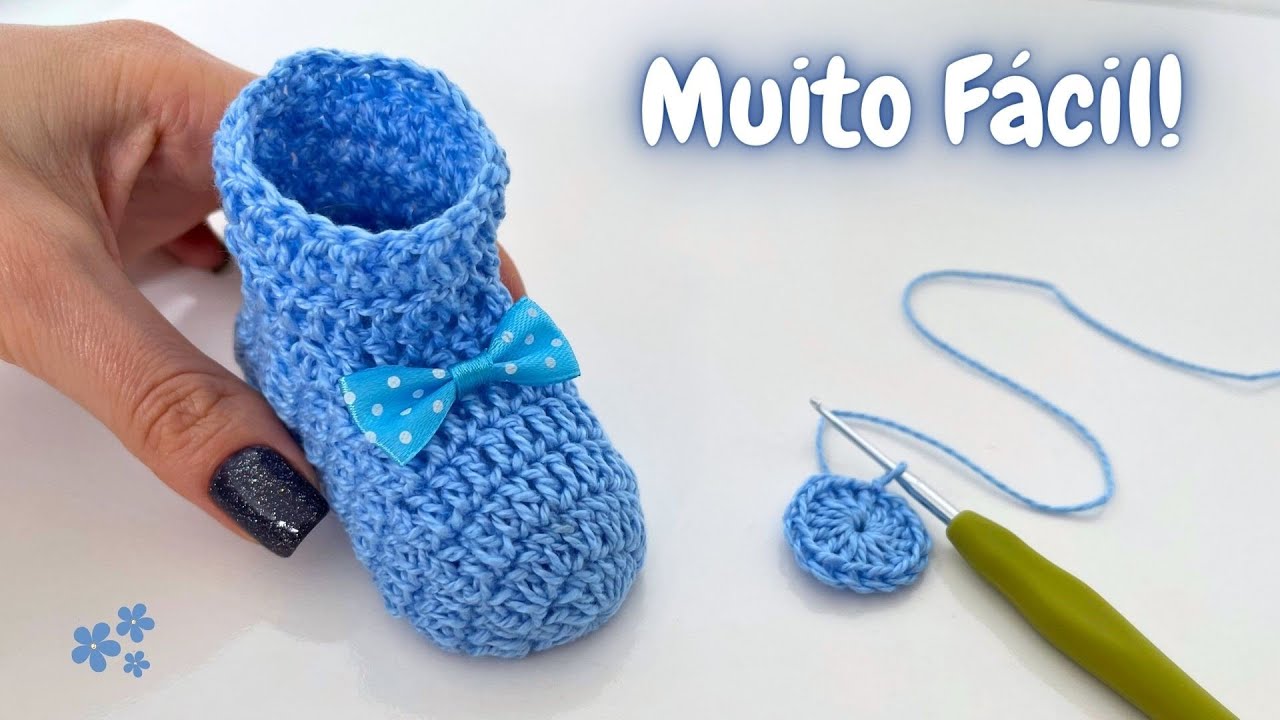
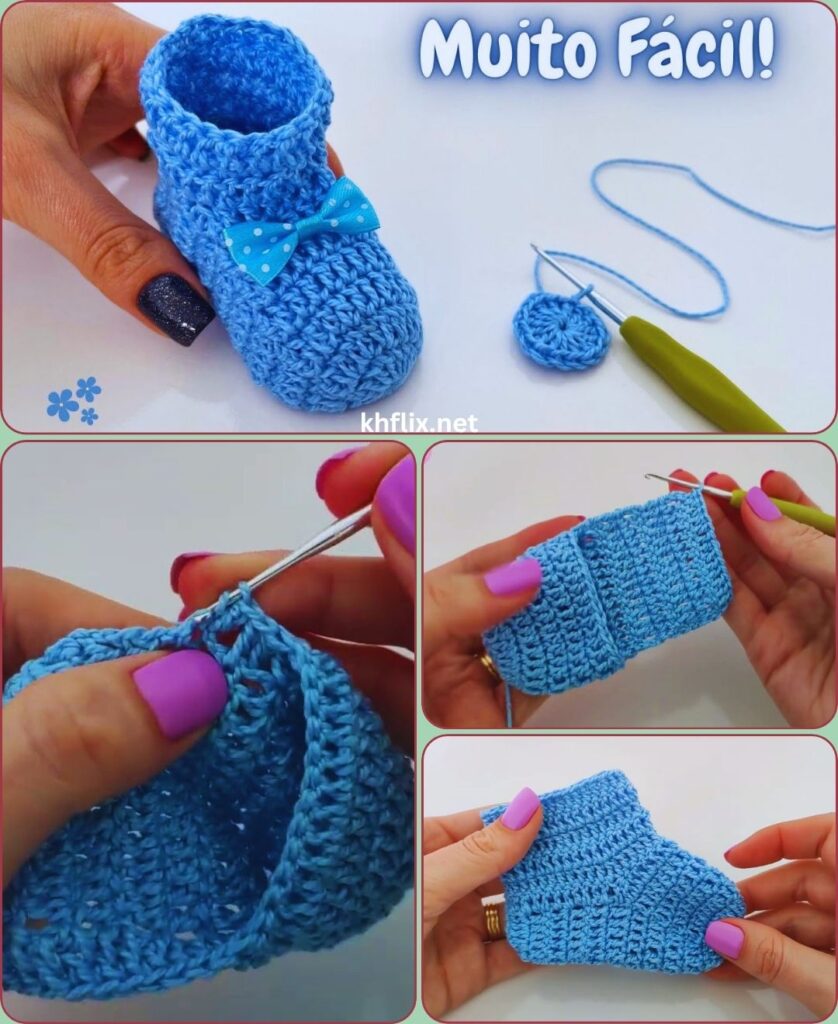
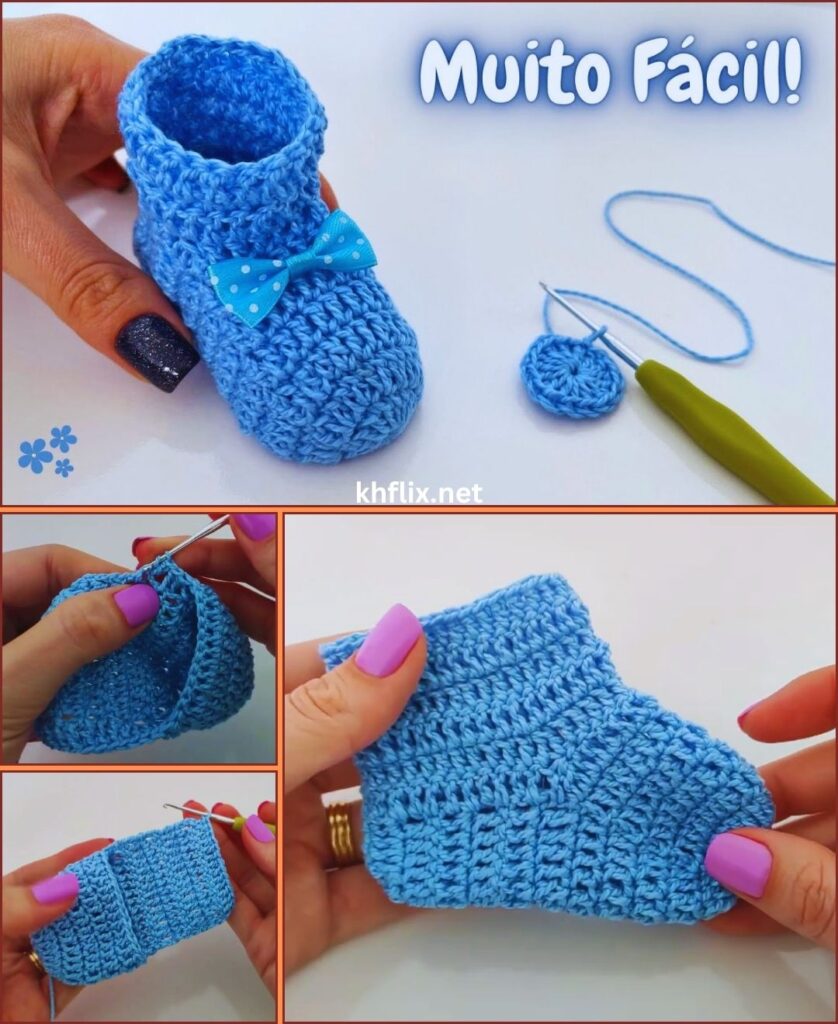
Step 1: Create the Sole
The sole forms the base of the baby shoe.
Begin by making a foundation chain of approximately 10 chains for a newborn size.
Round One
- Work two single crochet stitches into the second chain from the hook.
- Crochet one single crochet across each remaining chain.
- At the final chain, work several stitches into the same stitch to create a rounded toe.
- Continue crocheting along the opposite side of the foundation chain.
- Join with a slip stitch.
After completing this round, you should have an oval-shaped sole.
Step 2: Increase the Sole
The second round expands the sole so the shoe has enough width.
- Chain one.
- Work increases evenly around the toe and heel.
- Crochet one stitch into each side stitch.
- Finish with a slip stitch join.
Keep counting your stitches to ensure both shoes remain identical.
Step 3: Build the Shoe Sides
Now it’s time to transform the flat sole into a shoe.
Work one complete round of single crochet through the back loops only.
This creates a decorative ridge around the shoe while allowing the sides to stand upright naturally.
This simple technique gives your crochet shoes a professional appearance.
Step 4: Crochet the Body
Continue crocheting regular single crochet stitches around the shoe.
Repeat this round two or three times, depending on how tall you want the shoe sides.
Maintain even tension throughout each round to create smooth edges and an attractive finish.
Step 5: Shape the Toe
The toe shaping creates the classic baby shoe look.
Find the center front of the shoe.
As you reach this section:
- Crochet two stitches together repeatedly across the toe.
- Continue crocheting normally around the remaining stitches.
- Repeat another decrease round if necessary.
These gradual decreases create a rounded toe that fits comfortably around the baby’s foot.
Avoid decreasing too quickly, which can produce a sharp or uneven shape.
Step 6: Create the Upper Shoe
After the toe is shaped, continue working around the opening.
You can choose from several different styles.
Simple Slip-On
Continue crocheting evenly for a classic baby shoe.
Folded Cuff
Add several extra rounds before folding the top downward for a cozy winter design.
High-Top Style
Continue crocheting upward to create ankle coverage that resembles miniature sneakers.
Each style uses the same basic construction with only minor adjustments.
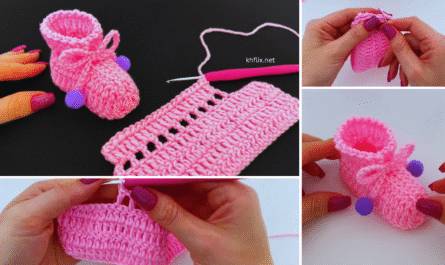
Step 7: Make a Strap (Optional)
A strap helps keep the baby shoe securely on the foot while adding a decorative feature.
Attach yarn to one side of the shoe opening.
- Chain 12–15 stitches.
- Turn your work.
- Crochet one single crochet into each chain.
- Attach the strap to the opposite side.
Sew a decorative button onto the shoe to fasten the strap securely.
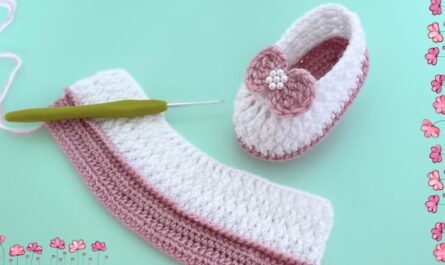
Step 8: Add Decorative Details
Personalize your crochet baby shoes with creative embellishments.
Popular ideas include:
- Crochet flowers
- Satin ribbon bows
- Tiny hearts
- Stars
- Animal ears
- Lace trim
- Colorful edging
- Small pom-poms
- Embroidered initials
Choose decorations that complement your yarn colors while ensuring they are securely attached.
Step 9: Finish Your Shoes
Once both shoes are complete:
- Cut the yarn.
- Pull the yarn through the final loop.
- Weave in every loose end using a yarn needle.
- Trim excess yarn.
- Shape the shoes gently with your hands.
Compare both shoes side by side to ensure they match in size and shape.
Helpful Tips for Perfect Crochet Baby Shoes
These tips will help improve your finished project:
- Use soft baby-safe yarn.
- Maintain even stitch tension.
- Count stitches every round.
- Use stitch markers when needed.
- Crochet both shoes simultaneously for matching sizes.
- Practice smooth color changes if using multiple colors.
- Lightly shape the shoes before gifting.
Patience and consistency will give your shoes a polished, professional finish.
Common Beginner Mistakes
Shoes Are Different Sizes
Count stitches carefully after every round and compare both shoes regularly.
Sole Is Curving
Your crochet tension may be too tight. Try relaxing your grip or using a slightly larger hook.
Toe Looks Too Pointed
Decrease stitches gradually across multiple rounds instead of all at once.
Shoes Feel Too Loose
Use a smaller crochet hook or reduce the number of stitches slightly.
Uneven Sides
Maintain consistent tension throughout every round.

Beautiful Color Combinations
Experiment with different colors to create unique baby shoes.
Popular combinations include:
- White and baby pink
- Sky blue and white
- Mint green and cream
- Beige and brown
- Lavender and gray
- Navy blue and white
- Peach and ivory
- Sage green and tan
- Yellow and white
- Rainbow pastel stripes
Adding contrasting soles, cuffs, or straps can make the design even more attractive.
Caring for Crochet Baby Shoes
To keep your handmade shoes looking beautiful:
- Wash gently by hand with mild detergent.
- Rinse thoroughly with cool water.
- Remove excess water by pressing gently—do not twist.
- Lay flat on a towel to dry.
- Store in a clean, dry place away from direct sunlight.
Proper care helps preserve the softness, shape, and color of the finished shoes.
Final Thoughts
Making crochet baby shoes is a wonderful way to create something both beautiful and practical. This beginner-friendly project teaches essential crochet techniques while producing a handmade item that families will cherish. From shaping the sole to finishing the final decorative details, every stitch contributes to a cozy, comfortable pair of shoes made with love.
As your skills improve, you can experiment with different stitch patterns, colorful yarn combinations, textured soles, decorative cuffs, and creative embellishments. Before long, you’ll be able to design your own unique crochet baby shoes that are perfect for gifts, special occasions, or even selling as handmade creations.
Happy crocheting, and enjoy every stitch of your next beautiful baby shoe project!