by
by Creating a “beautiful” crochet cup coaster in a flower shape with three distinct colors is a wonderful project that combines functionality with decorative artistry. This tutorial will guide you through making a lovely, layered flower coaster that highlights each of your chosen colors, making it a charming addition to any table.
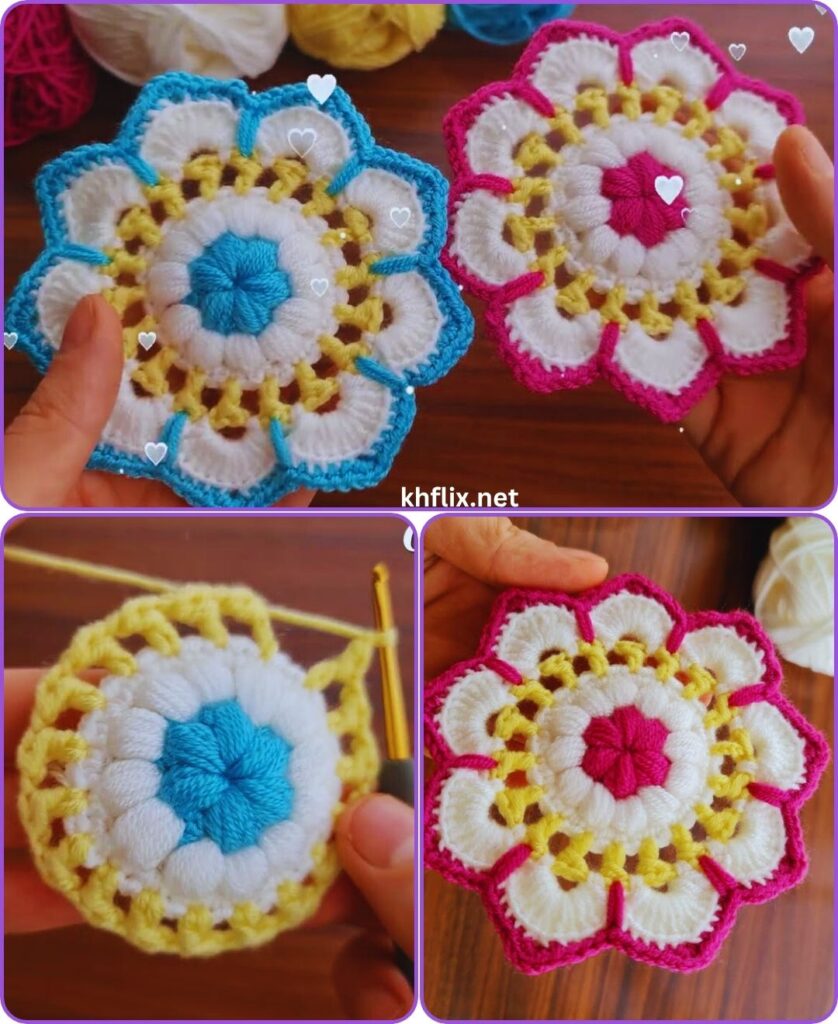
How to Make a Beautiful Crochet Coaster Flower – Three Colors
Project Overview: This pattern creates a durable and visually appealing circular coaster, approximately 4.5 inches (11.5 cm) in diameter, designed in the shape of a layered flower. By strategically using three different colors, you’ll create distinct layers of petals that add depth and beauty, perfect for protecting surfaces from cups and mugs.
Skill Level: Intermediate (Requires comfortable knowledge of basic stitches, working in the round, understanding how to work into different parts of stitches/rounds to create layers, and making neat color changes).
Finished Coaster Dimensions (Approximate):
- Diameter: 4.5 inches (11.5 cm)
Materials You’ll Need:
- Yarn:
- Worsted Weight (Medium #4) Cotton Yarn: Cotton is highly recommended for coasters due to its absorbency, heat resistance, and durability, as well as its excellent stitch definition.
- You’ll need small amounts (approx. 10-20 yards / 9-18 meters per color) of three different colors:
- Color A (Flower Center & Outer Edge): A vibrant or grounding color.
- Color B (Inner Petals): A complementary or contrasting color.
- Color C (Outer Petals): A third color that harmonizes with A and B.
- Crochet Hook:
- Size H/5.0mm (or the hook size that gives you a neat, firm fabric that lies flat. Consistency in tension is key for a good coaster).
- Yarn Needle (Tapestry Needle): Essential for weaving in loose ends.
- Scissors
- Stitch Marker (Optional): Can be helpful for marking the beginning of rounds.
- Optional: A small decorative button or bead for the very center.
Gauge (Important for Flatness and Consistency):
Maintaining a consistent gauge is crucial for a coaster to lie perfectly flat. If your coaster starts to ruffle, you’re increasing too much or your tension is too loose. If it cups, you’re not increasing enough or your tension is too tight.
- With your H/5.0mm hook and chosen yarn, after Round 1, your center circle should measure approximately 1.25 inches (3 cm) in diameter.
Abbreviations Used:
- ch: chain
- sl st: slip stitch
- sc: single crochet
- hdc: half double crochet
- dc: double crochet
- tr: treble crochet (yarn over twice, insert hook, yo and pull up loop, [yo and draw through 2 loops] 3 times)
- st(s): stitch(es)
- inc: increase (work 2 stitches into the same stitch)
- sk: skip
- ch-sp: chain space
- MR: Magic Ring (also known as Magic Circle or Adjustable Ring)
- FLO: Front Loop Only
- BLO: Back Loop Only
- FO: fasten off
How to Make a Clean Color Change:
When you need to switch colors at the end of a round:
- Work the last stitch of the round with the current color as normal, but stop when you have two loops left on your hook.
- Drop the current color.
- Pick up the new color, yarn over with the new color, and pull it through the remaining two loops on your hook to complete the stitch.
- You have now successfully changed colors. Sl st into the first stitch of the round (with the new color) to join.
- Cut the old color yarn, leaving a 4-6 inch tail to weave in securely later.
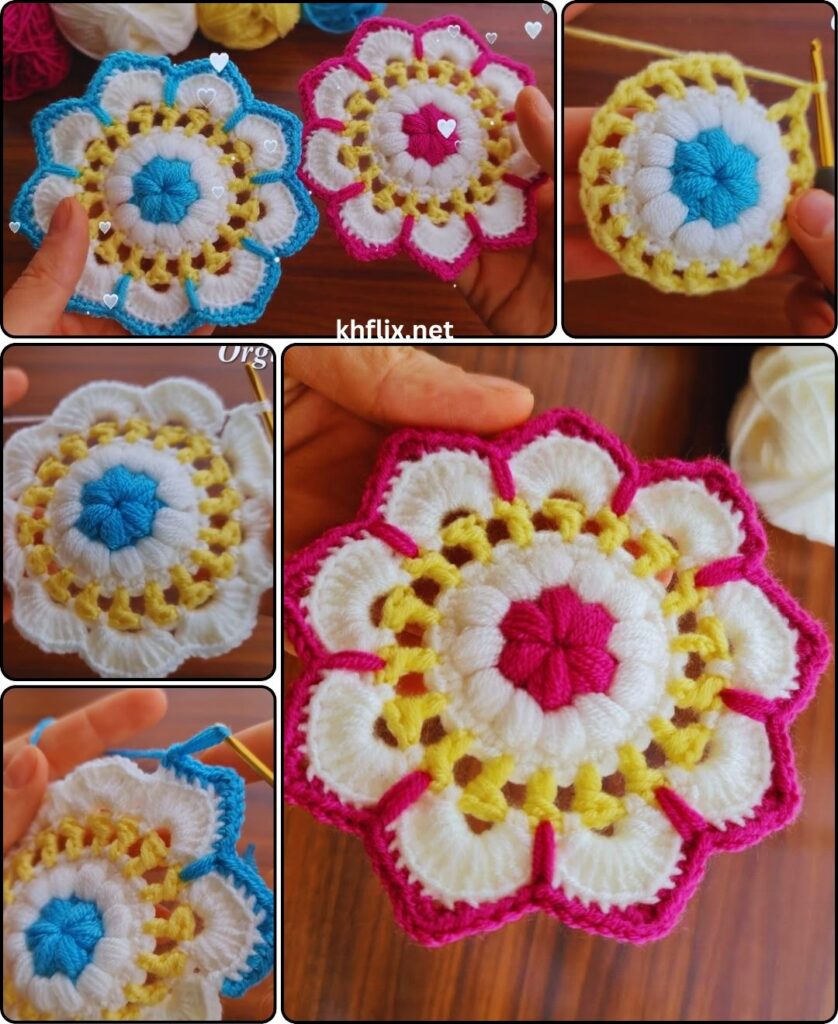
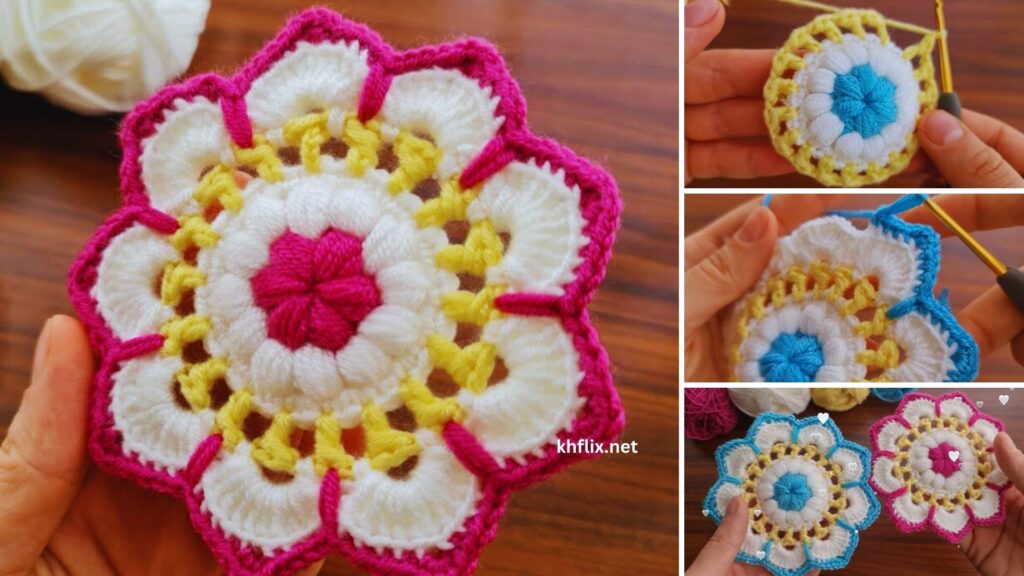
Understanding Flower Coaster Construction: Layered Petals
This flower coaster is built in distinct layers, allowing for the beautiful three-color design:
- Central Disk (Color A): A tight, flat base that forms the center of the flower.
- Inner Petals (Color B): These are worked into the front loops of a round on the central disk, creating one layer of smaller petals.
- Outer Petals (Color C): These are worked into the back loops of the same round where the inner petals were worked, creating a second, larger layer of petals that lie behind the first. This technique is key to achieving a full, layered look without making the flower too bulky.
- Final Coaster Edge (Color A): A final round of stitches worked around the entire motif to expand it to coaster size and create a sturdy, flat edge.
Let’s Start Crocheting Your Three-Color Flower Coaster!
Part 1: Flower Center (Color A)
Option A: Magic Ring (Recommended for a tight center)
- With Color A, make a Magic Ring (MR).
- Round 1: Ch 1 (does NOT count as a stitch). Work 10 sc into the MR. Pull the tail tight to close the ring.
- Perform a clean color change to Color B (see “How to Make a Clean Color Change” above). Sl st to the first sc to join. (Total: 10 sc).
Option B: Chain 2 Method (Alternative)
- With Color A, Ch 2.
- Round 1: Work 10 sc into the 2nd ch from hook.
- Perform a clean color change to Color B. Sl st to the first sc to join. (Total: 10 sc).
Part 2: First Layer of Petals (Inner Petals – Color B)
We’ll work this layer of petals into the Front Loops Only (FLO) of the stitches from Round 1. This leaves the back loops free for the next layer.
Round 2 (Petal Base & Petals):
- With Color B, Ch 1 (does NOT count as a stitch).
- In the FLO of the first sc from Round 1, work the first petal: (sc, hdc, dc, hdc, sc) all into that same FLO stitch.
- (Sl st into the FLO of the next sc from Round 1. In the FLO of the next sc from Round 1, work (sc, hdc, dc, hdc, sc)) Repeat from * to * 4 more times, forming a total of 5 petals.
- After making the last petal, sl st into the FLO of the first sc from Round 1 (the base of your first petal) to secure.
- FO, leaving a 6-inch tail. Weave in this tail securely on the back of your flower.
You will now see a layer of petals on the front, and a ring of unused back loops from Round 1 directly behind them.
Part 3: Second Layer of Petals (Outer Petals – Color C)
Now, we’ll work into the unworked Back Loops Only (BLO) of Round 1, creating a larger layer of petals behind the first.
Round 3 (Outer Petals):
- With Color C, join yarn with a sl st into any BLO from Round 1 (the ring of loops directly behind your first layer of petals).
- Ch 1 (does NOT count as a stitch).
- In the BLO of the first sc from Round 1 (where you joined), work: (sc, hdc, 2 tr, hdc, sc) all into that same BLO stitch.
- (Sl st into the BLO of the next sc from Round 1. In the BLO of the next sc from Round 1, work (sc, hdc, 2 tr, hdc, sc)) Repeat from * to * 4 more times, forming a total of 5 larger petals.
- After making the last petal, sl st into the BLO of the first sc from Round 1 (the base of your first petal) to secure the round.
- Perform a clean color change to Color A (for the final edge). Sl st into the first sc (of Color C) to join.
Part 4: Final Coaster Edge (Color A)
This final round will expand the motif to a suitable coaster size and provide a sturdy, neat edge.
Round 4 (Solid Edge – Color A):
- With Color A, Ch 1 (does NOT count as a stitch).
- Work 2 sc into the first sc from Round 3 (the base of a petal).
- Work 1 sc in the next hdc. Work 2 sc in each of the next 2 tr. Work 1 sc in the next hdc. Work 2 sc in the next sc. (This should be 8 sc across one petal).
- Work 1 sc into the sl st between petals from Round 3.
- Repeat steps 2-4 for the remaining 4 petals. You should have 8 sc across each petal and 1 sc in the sl st between them.
- Sl st to the first sc to join. (Total: 45 sc).
- FO, leaving a 6-inch tail.
Part 5: Finishing & Blocking (Crucial for a Flat Coaster!)
- Weave in All Ends: This is essential for a neat, professional-looking flower coaster. Thread each yarn tail onto your yarn needle. Carefully weave each tail through several stitches on the back side of your coaster, ensuring it’s secure and invisible from the front. Take your time with this step.
- Blocking (Highly Recommended!): Blocking will make your coaster perfectly flat, open up the stitches, and define the petal shapes beautifully.
- Method: Gently wet your finished coaster (either by misting with water or a quick dip and gentle squeeze – do not wring). Lay it perfectly flat on a blocking mat or a clean, dry towel. Gently shape each petal and ensure the entire coaster is flat and circular. Allow it to air dry completely.
- Add a Center Embellishment (Optional): For an extra touch of cuteness, you can sew a small decorative button or bead onto the very center of your flower.
Your beautiful three-color crochet flower coaster is now complete! Make a set in varying color combinations to brighten up your home or give as a thoughtful handmade gift. Enjoy!