by
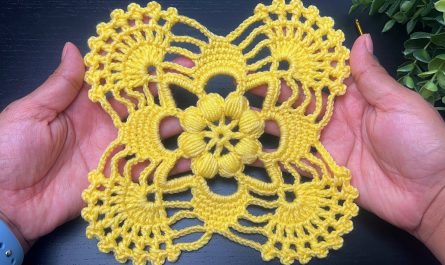
by Creating a beautiful crochet flower for a table runner is a delightful project that adds a touch of elegance and handmade charm to your dining space. This tutorial will guide you through making a lovely, multi-layered flower motif using three distinct colors, perfect for repeating and joining to form a stunning runner.

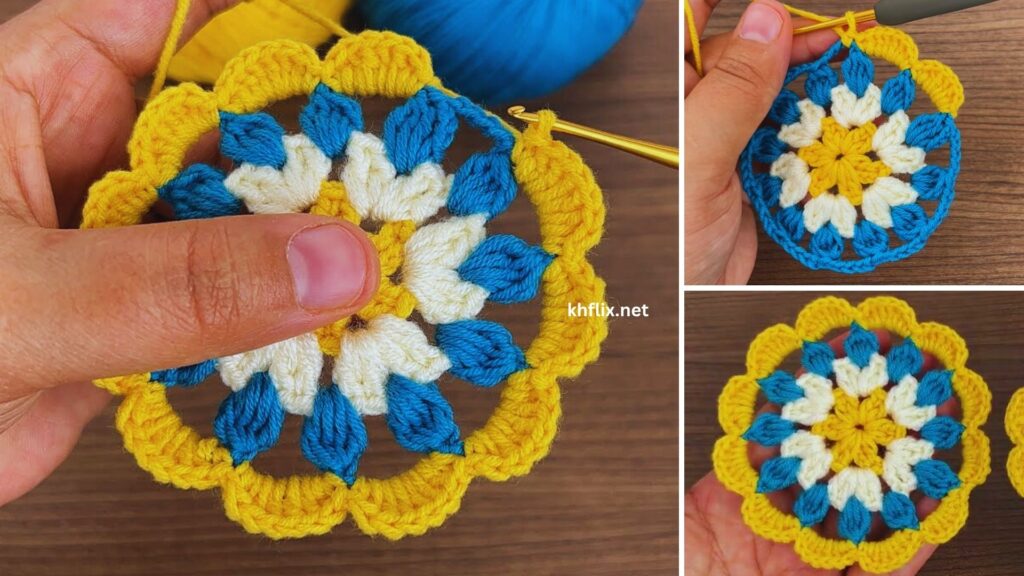
How to Make a Beautiful Crochet Runner Table Flower – Three Colors
Project Overview: This pattern creates a charming, multi-layered flower motif, approximately 3.5-4 inches (9-10 cm) in diameter. It’s designed to lie relatively flat, making it ideal for a table runner. The three-color design emphasizes the flower’s different layers: a central pop of color, an inner ring of petals, and a larger, outer ring of petals, all contributing to its visual depth and beauty.
Skill Level: Intermediate (Requires comfortable knowledge of basic stitches, working in the round, understanding how to work into different parts of stitches/rounds to create layers, and making neat color changes).
Finished Motif Dimensions (Approximate):
- Diameter: 3.5 – 4 inches (9 – 10 cm)
Materials You’ll Need:
- Yarn:
- Worsted Weight (Medium #4) Cotton Yarn: Cotton is highly recommended for table runners due to its durability, washability, and ability to hold shape well.
- You’ll need small amounts (approx. 15-25 yards / 14-23 meters per color) of three different colors:
- Color A (Flower Center): A vibrant or contrasting color.
- Color B (Inner Petals): A complementary or contrasting color.
- Color C (Outer Petals/Base): Often a softer or grounding color that might also be used for joining.
- Crochet Hook:
- Size H/5.0mm (or the hook size that gives you a neat, firm fabric without being too stiff. Gauge should be consistent).
- Yarn Needle (Tapestry Needle): Essential for weaving in loose ends.
- Scissors
- Stitch Marker (Optional): Can be helpful for marking the beginning of rounds.
- Optional: A small decorative button or bead for the very center.
Gauge (Important for Motif Consistency):
While not as critical as for garments, maintaining a consistent gauge will ensure all your flower motifs are the same size, which is important for joining them into a cohesive runner.
- With your H/5.0mm hook and chosen yarn, after Round 3 (the initial petal base), your circle should measure approximately 2 inches (5 cm) in diameter.
Abbreviations Used:
- ch: chain
- sl st: slip stitch
- sc: single crochet
- hdc: half double crochet
- dc: double crochet
- tr: treble crochet (yarn over twice, insert hook, yo and pull up loop, [yo and draw through 2 loops] 3 times)
- st(s): stitch(es)
- inc: increase (work 2 stitches into the same stitch)
- sk: skip
- ch-sp: chain space
- MR: Magic Ring (also known as Magic Circle or Adjustable Ring)
- FLO: Front Loop Only
- BLO: Back Loop Only
- FO: fasten off
How to Make a Clean Color Change:
When you need to switch colors at the end of a round:
- Work the last stitch of the round with the current color as normal, but stop when you have two loops left on your hook.
- Drop the current color.
- Pick up the new color, yarn over with the new color, and pull it through the remaining two loops on your hook to complete the stitch.
- You have now successfully changed colors. Sl st into the first stitch of the round (with the new color) to join.
- Cut the old color yarn, leaving a 4-6 inch tail to weave in securely later.
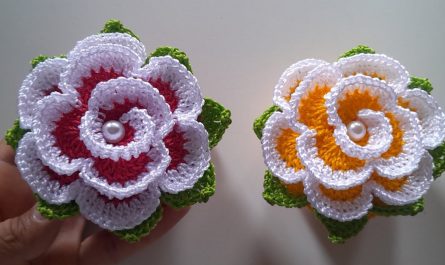
Understanding Flower Construction: Layered Petals
This flower is built in distinct layers, making it ideal for a three-color design:
- Central Disk (Color A): A tight, flat base.
- Inner Petals (Color B): These are worked into the front loops of a round on the central disk, creating one layer of smaller petals.
- Outer Petals (Color C): These are worked into the back loops of the same round where the inner petals were worked, creating a second, larger layer of petals that lie behind the first. This technique is key to achieving a full, layered look without making the flower too bulky on the back, and perfectly separates your three colors.
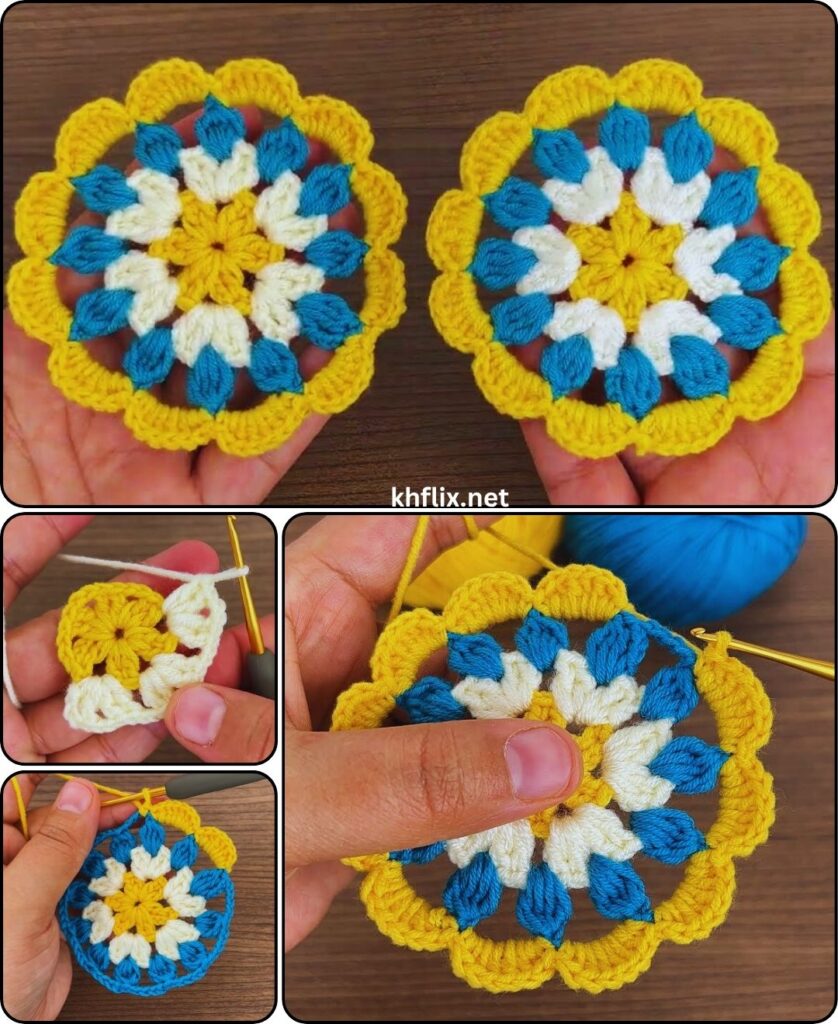
Let’s Start Crocheting Your Three-Color Flower Motif!
Part 1: Flower Center (Color A)
Option A: Magic Ring (Recommended for a tight center)
- With Color A, make a Magic Ring (MR).
- Round 1: Ch 1 (does NOT count as a stitch). Work 10 sc into the MR. Pull the tail tight to close the ring.
- Perform a clean color change to Color B. Sl st to the first sc to join. (Total: 10 sc).
Option B: Chain 2 Method (Alternative)
- With Color A, Ch 2.
- Round 1: Work 10 sc into the 2nd ch from hook.
- Perform a clean color change to Color B. Sl st to the first sc to join. (Total: 10 sc).
Part 2: First Layer of Petals (Inner Petals – Color B)
We’ll work this layer of petals into the Front Loops Only (FLO) of the stitches from Round 1. This leaves the back loops free for the next layer.
Round 2 (Petal Base & Petals):
- With Color B, Ch 1 (does NOT count as a stitch).
- In the FLO of the first sc from Round 1, work the first petal: (sc, hdc, dc, hdc, sc) all into that same FLO stitch.
- (Sl st into the FLO of the next sc from Round 1. In the FLO of the next sc from Round 1, work (sc, hdc, dc, hdc, sc)) Repeat from * to * 4 more times, forming a total of 5 petals.
- After making the last petal, sl st into the FLO of the first sc from Round 1 (the base of your first petal) to secure.
- FO, leaving a 6-inch tail. Weave in this tail securely on the back of your flower.
You will now see a layer of petals on the front, and a ring of unused back loops from Round 1 directly behind them.
Part 3: Second Layer of Petals (Outer Petals – Color C)
Now, we’ll work into the unworked Back Loops Only (BLO) of Round 1, creating a larger layer of petals behind the first.
Round 3 (Outer Petals):
- With Color C, join yarn with a sl st into any BLO from Round 1 (the ring of loops directly behind your first layer of petals).
- Ch 1 (does NOT count as a stitch).
- In the BLO of the first sc from Round 1 (where you joined), work: (sc, hdc, 2 tr, hdc, sc) all into that same BLO stitch.
- (Sl st into the BLO of the next sc from Round 1. In the BLO of the next sc from Round 1, work (sc, hdc, 2 tr, hdc, sc)) Repeat from * to * 4 more times, forming a total of 5 larger petals.
- After making the last petal, sl st into the BLO of the first sc from Round 1 (the base of your first petal) to secure the round.
- FO, leaving a long tail (at least 6-8 inches / 15-20 cm) for weaving in securely, or for joining if you plan to join as you go.
Part 4: Finishing the Motif
- Weave in All Ends: This is crucial for a neat, professional-looking flower. Thread each yarn tail onto your yarn needle. Carefully weave each tail through several stitches on the back side of your flower, ensuring it’s secure and invisible from the front.
- Light Blocking (Recommended!): This will help your flower lie perfectly flat and define the petals beautifully.
- Method: Gently mist your finished flower with water. Lay it flat on a blocking mat or a clean towel. Gently shape each petal with your fingers to open them up and ensure the flower is flat. Allow it to air dry completely.
- Add a Center Embellishment (Optional): For an extra touch of beauty, sew a small decorative button or bead onto the very center of your flower.
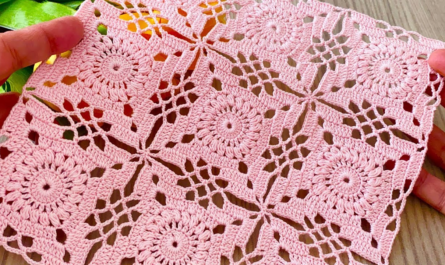
Part 5: Creating the Table Runner (Joining Ideas)
To make a table runner, you will need to crochet multiple identical flower motifs. Here are a few common ways to join them:
- Whip Stitch: A simple and common method. Place two motifs right sides together, and use a yarn needle and matching yarn to stitch through both motifs along their edges.
- Slip Stitch Join: Place two motifs right sides together, and use your hook to slip stitch through the corresponding stitches of both motifs.
- Single Crochet Join: Place two motifs right sides together, and use your hook to single crochet through the corresponding stitches of both motifs.
- Join-As-You-Go (JAYG): This is an advanced technique where you incorporate the joining into the final round of the second or subsequent motifs, making a seamless connection. This requires planning but results in very neat joins.
- Granny Square Style Join: You could work a small square or diamond-shaped “filler” motif in Color C (or another coordinating color) to join the flowers at their corners, creating a continuous runner with negative space.
For a simple runner:
- You could simply make a strip of flowers joined side-by-side.
- Or, join them in a grid (e.g., 2 flowers wide by desired length), using the outermost petals/stitches for joining. The sl st in Round 3 between the outer petals (where you attached Color C) provides a good anchor point for joining.
Make several motifs, block them, and then experiment with arrangements before joining to create your beautiful and unique table runner!