 by
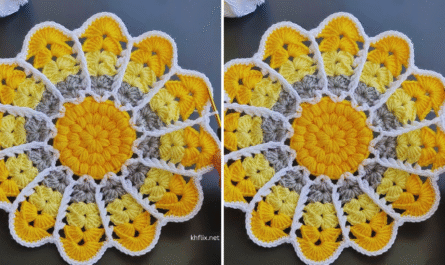
by Let’s create a beautiful crochet flower coaster! This project is a delightful way to add a touch of handmade charm and elegance to your home decor. It’s also fantastic for using up those smaller bits of yarn you might have in your stash.
How to Crochet a Beautiful Flower Coaster: Detailed Tutorial Pattern
This comprehensive pattern will guide you through making a lovely, flat flower that’s perfect for protecting your surfaces from drinks. We’ll cover everything from materials to the final finishing touches, ensuring you create a stunning and functional piece.
Skill Level: Easy
This pattern is designed to be accessible for crocheters who know the very basic stitches. You’ll need to be comfortable with:
- Chain (ch): The foundation of most crochet projects.
- Slip Stitch (sl st): Used for joining rounds and finishing stitches.
- Single Crochet (sc): A compact, dense stitch.
- Double Crochet (dc): A taller, more open stitch.
- Working in rounds: Crocheting in a continuous spiral or joined circles.
- Creating a Magic Ring (MR) or Magic Circle/Adjustable Ring: This technique creates a tight, neat center for your project, preventing a hole. It’s optional, but highly recommended for a polished finish.
Finished Coaster Dimensions (Approximate):
Your finished coaster will typically measure around 4.5 to 5.5 inches (11.5 to 14 cm) in diameter. This can vary slightly based on your yarn thickness, hook size, and personal tension.
Materials You’ll Need:
To make your beautiful flower coaster, gather the following:
- Yarn: Approximately 30-50 yards (27-45 meters) of Worsted Weight (Medium #4) Cotton Yarn.
- Why Cotton? Cotton yarn is highly recommended for coasters because it’s absorbent (great for condensation), durable, and heat-resistant. Acrylic yarn can melt if exposed to very hot temperatures, so cotton is the safer and more practical choice for a coaster.
- Color Choices: You have complete creative freedom here!
- One solid color: For a classic, minimalist flower.
- Two colors: A contrasting color for the center and a different color for the petals creates a striking look.
- Multiple colors: Use different colors for each round or alternate colors for a vibrant, multi-toned flower.
- Crochet Hook: Size H/5.0mm. This is a common hook size for worsted weight yarn and should give you a good balance of firmness and flexibility for your coaster. If your stitches feel too tight or too loose, you can adjust your hook size up or down accordingly.
- Yarn Needle (Tapestry Needle): This blunt-tipped needle is essential for seamlessly weaving in all your loose yarn tails at the end, giving your coaster a professional and tidy finish.
- Scissors: For cutting your yarn.
Gauge:
While exact gauge isn’t as critical for a coaster as it might be for a wearable item, aiming for consistent tension is important. Consistent tension will help ensure your coaster is well-formed, flat, and effective. If your stitches are too loose, the coaster might be too flimsy or stretch out of shape; if too tight, it could be too rigid and buckle.
Abbreviations Used in This Pattern:
- ch: chain
- sl st: slip stitch
- sc: single crochet
- dc: double crochet
- st(s): stitch(es)
- MR: Magic Ring (also known as Magic Circle or Adjustable Ring)
- (): repeat instructions within parentheses a specified number of times.
- []: indicates the total number of stitches you should have at the end of a specific round.
Understanding Clean Color Changes (If Using Multiple Colors):
If you decide to use more than one color, learning how to make a clean color change will give your coaster a much neater appearance.
- Work the last stitch of your current round with the current color as usual, but stop when you have two loops left on your hook. (For a dc, this means you’ve yarned over, inserted hook, yarned over, pulled up a loop, yarned over, pulled through two loops – two loops remain.)
- Drop the current color yarn.
- Pick up your new color yarn. Yarn over with the new color, and pull it through the remaining two loops on your hook to complete the stitch.
- Now, using the new color, sl st into the first stitch of the round (or the top of your turning chain) to join the round.
- Always cut the old color yarn, leaving a 4-6 inch tail. These tails will be neatly woven in later to secure the change and hide them.
Let’s Crochet Your Beautiful Flower Coaster!
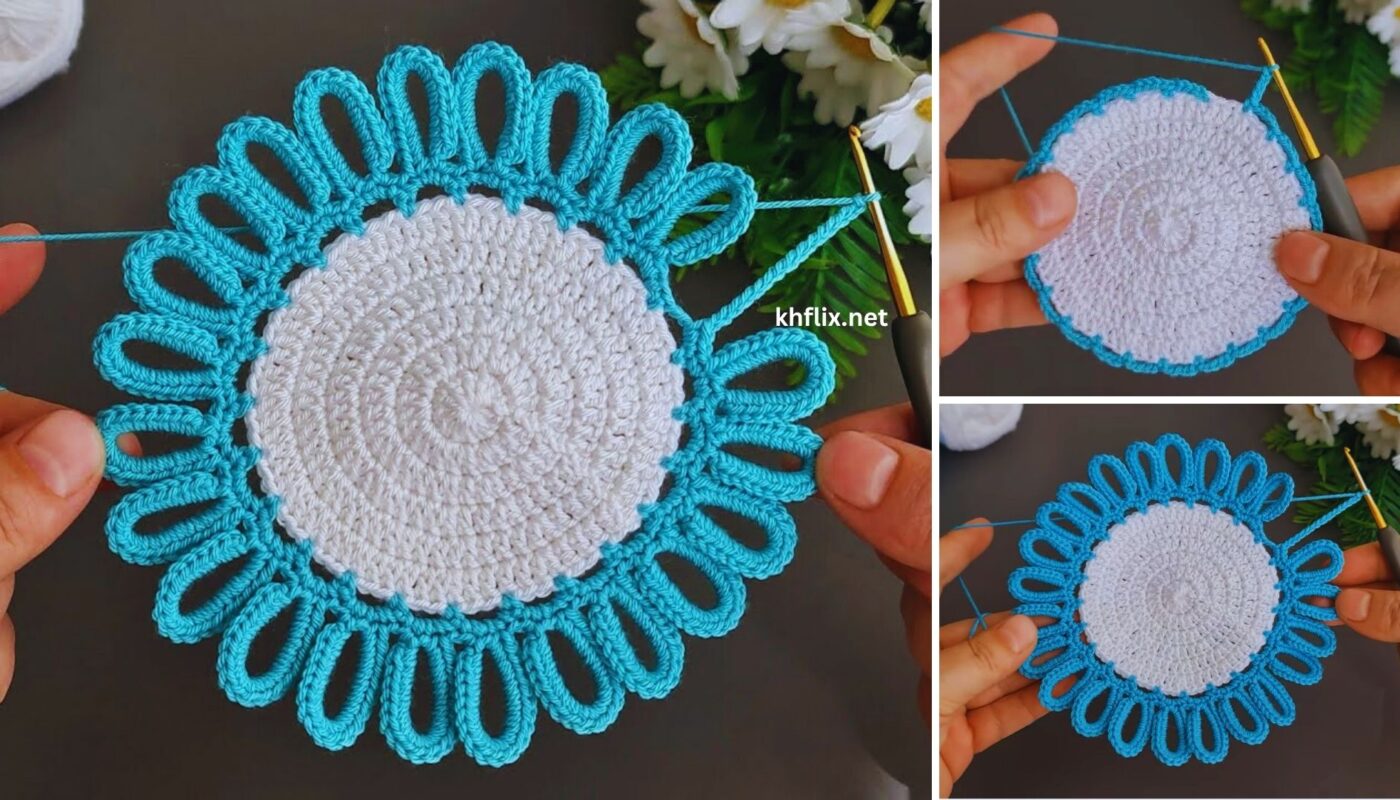
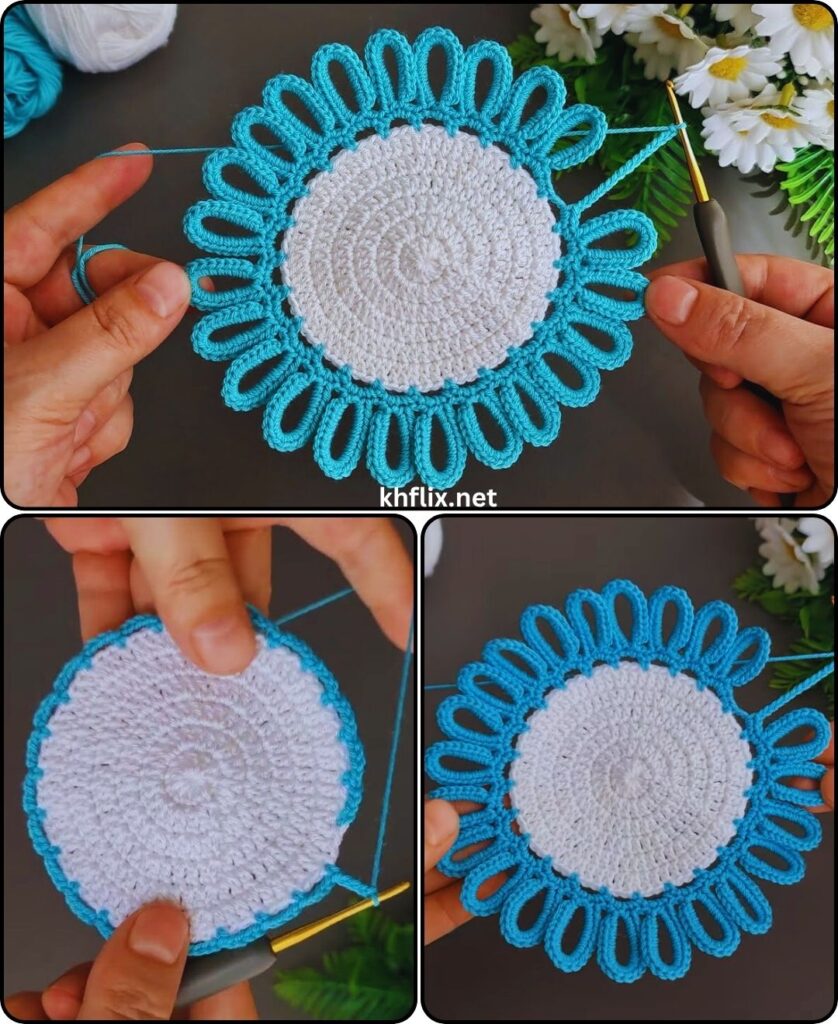
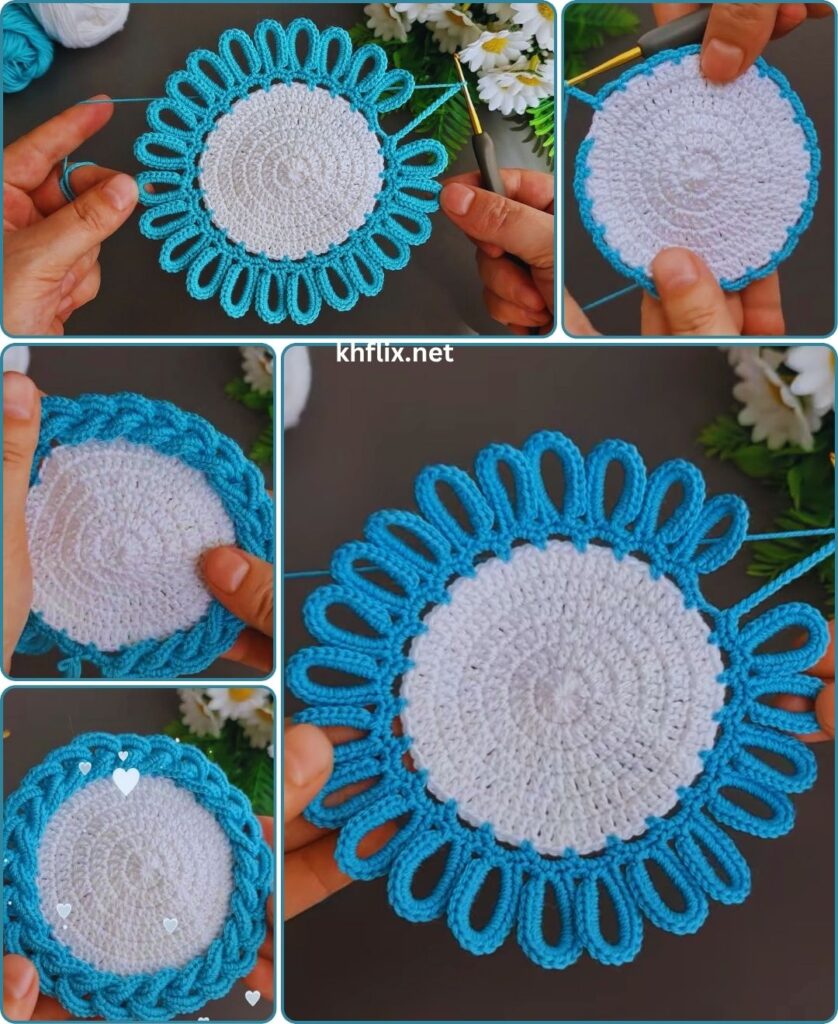
This coaster is typically worked in two main parts: the central disk (which forms the base) and then the lovely petals.
Part 1: The Flower Center
We’ll start with the heart of your flower. For this section, use Color A (or your chosen first color).
- Start:
- Method A (Magic Ring – Recommended): Make a Magic Ring (MR). This creates a beautifully tight center with no hole.
- Method B (Chain Method): If you prefer, ch 4, then sl st into the first chain to form a ring. This creates a small hole in the center.
- Round 1:
- Ch 1 (this chain does NOT count as a stitch).
- Work 10 single crochet (sc) stitches into the MR (or into the center of your ch-4 ring).
- If using a Magic Ring, pull the starting tail tightly to close the center hole.
- Sl st into the first sc to join the round.
- [You should have 10 sc stitches at the end of this round.]
- Round 2:
- Ch 2 (this chain does NOT count as a stitch, but gives height for your dc stitches).
- Work 2 double crochet (dc) stitches into each stitch around. This means you’ll make two dc stitches in the top of each of the 10 sc stitches from the previous round.
- Sl st into the top of the first dc to join the round.
- [You should have 20 dc stitches at the end of this round.]
- Color Change Point (Optional): If you’re switching colors for your petals, now is the time to do it. On the very last dc of this round, perform a clean color change to Color B (refer to the “Understanding Clean Color Changes” section above). After completing the stitch with Color B, sl st into the top of the first dc of the round to join. Cut Color A, leaving a 4-inch tail to weave in later.

Part 2: The Flower Petals
This is where your coaster transforms into a beautiful flower. For this section, use Color B (if you changed colors) or continue with Color A.
- Round 3 (Petals):
- Ch 1 (this chain does NOT count as a stitch).
- In the first stitch (where you just joined your new color, or continued with the same color): Sl st into this stitch.
- Now, you’ll create the petal sequence. For each petal:
- *(Ch 2, work 3 double crochet (dc) stitches into the next stitch, ch 2, sl st into the next stitch).*
- Repeat the sequence from * to * 9 more times around the circle.
- You are essentially working a cluster of (ch 2, 3 dc, ch 2, sl st) into every other stitch from the previous Round 2. This perfectly creates 10 evenly spaced, beautiful scallops for your petals.
- After you have made your very last petal, sl st into the first sl st you made at the beginning of this Round 3 to securely finish the round.
- Fasten off (FO), leaving a 6-inch tail.
Part 3: Finishing Your Flower Coaster
This final stage is crucial for a durable and professional-looking coaster.
- Fasten Off: After completing Round 3 and its final slip stitch, cut your yarn, leaving a 6-inch tail. Yarn over (YO) and pull the tail completely through the loop on your hook. Gently pull the tail to secure the last stitch.
- Weave in All Ends: This is often the least favorite part of crocheting, but it’s incredibly important!
- Thread each yarn tail (from your Magic Ring, any color changes, and your final fasten-off) onto your yarn needle.
- Carefully weave them through several stitches of the same color on the back side of your coaster. Try to go through the middle of the stitches to fully hide the tails. Weave in one direction for a few stitches, then change direction slightly and weave back for a few stitches (this locks the tail in place).
- Take your time with this step to ensure your coaster looks neat, won’t unravel with use or washing, and the tails are completely invisible from the front.
- Shape: Gently lay your finished coaster flat on a clean surface. Use your fingers to gently manipulate and smooth out the petals. Ensure they lie flat and have a beautiful, even, and open shape. You can slightly stretch or push them into place if needed.
Congratulations! You’ve now created a truly beautiful crochet flower coaster! This simple yet elegant design is perfect for adding a handmade touch to your home, brightening up your living space, or giving as a thoughtful, personalized gift. What delightful color combination are you excited to try for your next flower coaster?