by
by Let’s crochet a beautiful 3D flower motif coaster in classic white and sunny yellow! These coasters are not just practical for protecting your surfaces but also add a delightful, handmade touch to your home decor. The raised 3D flower makes them truly special and a joy to create.
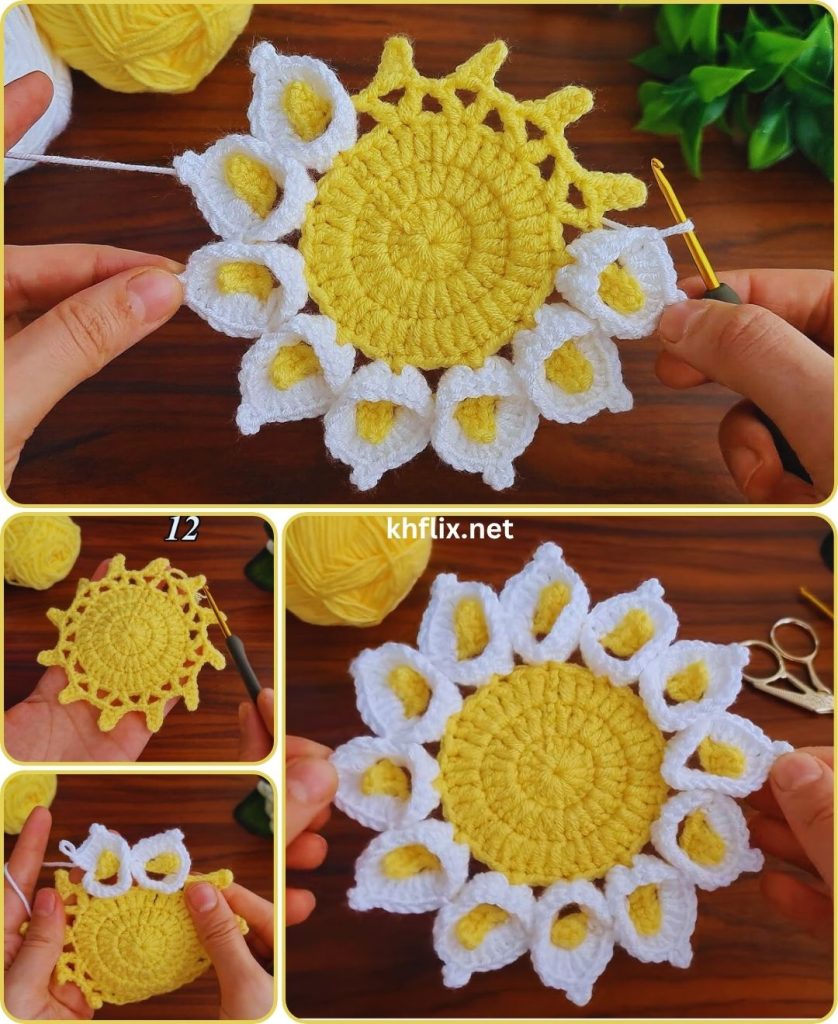
How to Make a Beautiful 3D Flower Motif Crochet Coaster: White and Yellow Edition
This detailed tutorial will guide you through creating a charming round coaster with a prominent, three-dimensional flower in the center, featuring a lovely white and yellow color scheme. We’ll focus on clear stitch definitions, building up the layers of the flower, and finishing with a neat base for your coaster.
Skill Level: Intermediate
This project assumes you’re comfortable with:
- Chain (ch): The basic foundation.
- Slip Stitch (sl st): For joining rounds.
- Single Crochet (sc): For dense fabric and stability.
- Half Double Crochet (hdc): A good intermediate stitch.
- Double Crochet (dc): A common stitch for height.
- Magic Ring (MR): A common starting method for working in the round.
- Working in rounds: Crocheting in a continuous or joined circular manner.
- Working into stitch spaces: Creating stitches into the chain spaces of previous rounds.
- Weaving in ends securely.
What is a 3D Flower Motif?
For this coaster, the “3D flower” is created by layering petals of different heights and textures, building outwards from a central core. The key to the 3D effect involves working stitches into the same space multiple times or using taller stitches to make the petals stand out.
Finished Coaster Dimensions (Approximate):
The finished coaster will be approximately 4-5 inches (10-12.5 cm) in diameter, suitable for most mugs and glasses. The exact size will depend on your yarn weight, hook size, and tension.
Materials You’ll Need:
- Yarn: Approximately 20-30 yards (18-27 meters) total of Worsted Weight (Medium #4) Cotton Yarn.
- Why Cotton? Cotton is highly recommended for coasters. It’s absorbent, durable, easy to wash, and holds its shape well. It also has excellent stitch definition, which is great for showing off the flower’s details.
- Color Choice:
- Color A (Flower Center): Yellow (a bright or sunny shade works wonderfully).
- Color B (Inner Petals): White.
- Color C (Outer Petals): Yellow (the same shade as Color A, or a slightly different one for contrast).
- Color D (Coaster Base): White (for a unified look) or a light green (for a leafy effect).
- Crochet Hook: Size H/5.0mm. This size generally provides a nice, dense fabric suitable for a coaster, preventing too much stretching.
- Yarn Needle (Tapestry Needle): Essential for seamlessly weaving in all your loose yarn tails.
- Scissors: For cutting your yarn.
- Stitch Marker (Optional): Helpful for marking the beginning of rounds.
Understanding the Coaster Construction:
We’ll build this coaster in distinct layers:
- Flower Center: The very middle of the flower.
- Inner Petals: The first layer of 3D petals.
- Outer Petals: The second, often taller, layer of 3D petals.
- Coaster Base/Leaves: The flat foundation that forms the coaster itself, extending outwards from behind the flower.
You’ll be changing colors frequently to achieve the beautiful multi-layered look. Remember to leave decent tails for weaving in after each color change.

Let’s Crochet Your 3D Flower Coaster!
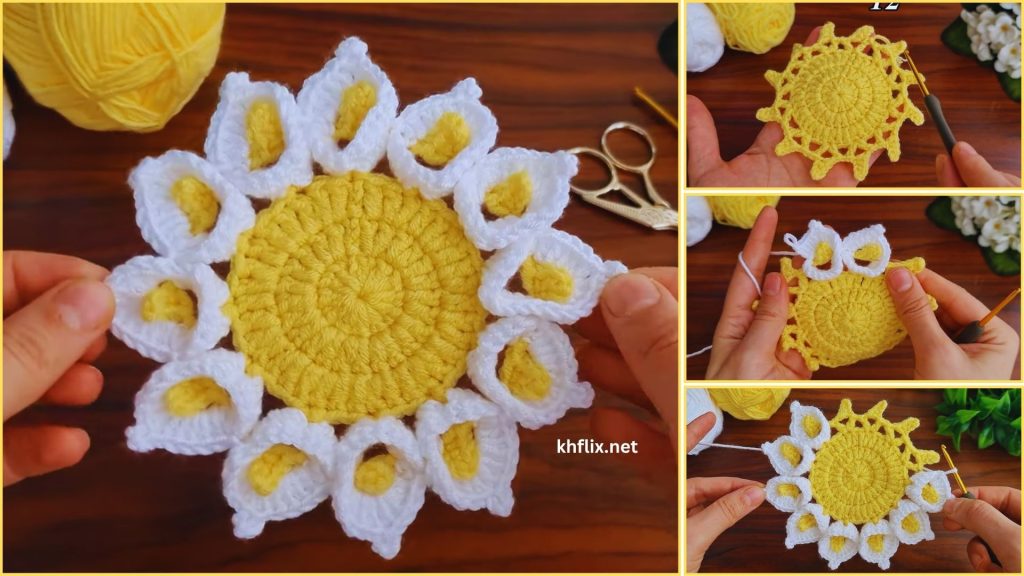
Part 1: Flower Center (Color A: Yellow)
- Start: With Color A (Yellow), create a Magic Ring (MR).
- Alternative start: Ch 4, then sl st into the first ch to form a ring.
- Round 1:
- Ch 2 (does NOT count as a stitch).
- Work 10 hdc into the Magic Ring.
- Sl st into the first hdc to join the round.
- [Total: 10 hdc]
- If using MR, pull the tail tightly to close the center hole.
- Fasten off, leaving a tail for weaving in.
Part 2: Inner Petals (Color B: White)
We’ll attach Color B (White) and create the first layer of petals. These petals will be worked into the spaces between the hdc stitches of the previous round.
- Join Color B: Join Color B (White) with a sl st into any space between two hdc stitches from Round 1.
- Round 2 (Inner Petals):
- Ch 2 (does NOT count as a stitch).
- In the same space where you joined: Work (1 dc, 1 hdc, 1 sc).
- In the next space between hdc stitches: Work (1 sc, 1 hdc, 1 dc).
- *(In the next space between hdc stitches: Work (1 dc, 1 hdc, 1 sc).
- In the next space between hdc stitches: Work (1 sc, 1 hdc, 1 dc)).*
- Repeat from * to * 3 more times around. You should have created 5 groups of (dc, hdc, sc) and 5 groups of (sc, hdc, dc). These will form 10 individual smaller petals.
- Sl st into the base of the first petal (the first ch 2) to join.
- [Total: 10 petals]
- Fasten off, leaving a tail for weaving in.
Part 3: Outer Petals (Color C: Yellow)
Now for the larger, more prominent outer petals. These will be worked into the same base stitches (hdc from Round 1) as the inner petals, but behind them, for a layered effect.
- Join Color C: Join Color C (Yellow) with a sl st into any hdc stitch from Round 1, behind the petals of Round 2. (You’re basically working under the white petals of Round 2).
- Round 3 (Outer Petals):
- Ch 3 (counts as first dc).
- In the same hdc stitch from Round 1 where you joined: Work (2 dc, ch 2, 3 dc). (This creates your first large petal group.)
- *(Skip 1 hdc from Round 1. In the next hdc from Round 1: Work (3 dc, ch 2, 3 dc)).*
- Repeat from * to * 3 more times. You will have 5 large petal groups.
- Sl st into the top of the beginning Ch 3 to join.
- [Total: 5 large petal groups]
- Fasten off, leaving a tail for weaving in.
- Note: The Ch 2 in the middle of the (3dc, Ch 2, 3dc) cluster creates a slight “point” to the petal and provides a space for later rounds.
Part 4: Coaster Base/Leaves (Color D: White or Green)
This part will create the flat circular base of your coaster, extending outwards from behind the flower. We’ll use the chain spaces from the previous round as anchor points.
- Join Color D: Join Color D (White or Green) with a sl st into any Ch 2 space from Round 3 (the space in the middle of a large yellow petal group).
- Round 4 (Coaster Base – First Layer):
- Ch 3 (counts as first dc).
- In the same Ch 2 space: Work (2 dc, ch 2, 3 dc). (This creates a corner/point for your coaster base, which will appear as “leaves” or the outer edge of the flower.)
- Ch 1.
- *Skip to the next Ch 2 space (the next large yellow petal’s center). In that space: Work (3 dc, ch 2, 3 dc).
- Ch 1.*
- Repeat from * to * 3 more times.
- Sl st into the top of the beginning Ch 3 to join.
- [Total: 5 ‘leaf’ groups, 5 Ch 1 spaces]
- Round 5 (Coaster Base – Expansion):
- Ch 3 (counts as first dc).
- Work 1 dc into each of the next 2 dc.
- In the Ch 2 space (the ‘point’ of the leaf): Work (2 dc, ch 2, 2 dc).
- Work 1 dc into each of the next 3 dc.
- Work 2 dc into the next Ch 1 space.
- *Work 1 dc into each of the next 3 dc.
- In the Ch 2 space: Work (2 dc, ch 2, 2 dc).
- Work 1 dc into each of the next 3 dc.
- Work 2 dc into the next Ch 1 space.*
- Repeat from * to * 3 more times.
- Sl st into the top of the beginning Ch 3 to join.
- [Total: 60 dc, 5 Ch 2 spaces]
- Round 6 (Coaster Edge):
- Ch 1.
- Work 1 sc in each dc around.
- In each Ch 2 space (at the ‘points’ of your leaves): Work 3 sc.
- Continue working 1 sc in each dc around until you reach your starting point.
- Sl st into the first sc to join.
- Fasten off, leaving a 6-inch (15 cm) tail.
Finishing Touches (Highly Recommended for a Beautiful Coaster!)
These final steps are what will truly make your 3D flower coaster look polished and lie flat.
- Weave in ALL Ends: This is absolutely critical for a clean and professional-looking doily. Use your yarn needle to meticulously weave in all remaining tails (from your starting ring and every single color change). Take your time here! Weave them into stitches of the same color to make them invisible.
- How to Weave Neatly: Weave the tails into stitches of the same color as the tail. Weave in one direction for about 1.5-2 inches (4-5 cm), then subtly change direction and weave back through some of the same stitches. This “locks” the tail in place and prevents it from unraveling.
- Blocking (Essential for Coasters and Doilies!): Blocking is the process of wetting or steaming your crochet item and then shaping it and pinning it into place while it dries. This opens up the stitches, evens out tension, and makes the coaster lie perfectly flat. It will truly bring out the definition of your 3D flower!
- Method 1 (Wet Blocking – Recommended for Cotton):
- Fill a basin with cool water and immerse your coaster. Let it soak for 15-20 minutes until thoroughly wet.
- Gently squeeze out excess water (do not wring!). Roll the coaster in a clean towel to absorb more moisture.
- Lay your coaster flat on a blocking mat or a thick foam board.
- Using rust-proof pins, carefully pin the coaster into its desired round/square shape, stretching it gently to open up the stitches and ensure the petals stand out. Pin all points and curves.
- Allow the coaster to air dry completely (this can take 24-48 hours depending on humidity).
- Method 2 (Steam Blocking):
- Lay your coaster flat on a blocking mat or a thick towel.
- Using a steamer or an iron on the steam setting (do NOT touch the iron to the coaster!), hover the steam over the coaster until it’s damp and pliable.
- Immediately pin the coaster into shape as described above.
- Allow to dry completely.
- Method 1 (Wet Blocking – Recommended for Cotton):
Congratulations! You’ve now created a truly beautiful and intricate 3D flower motif crochet coaster in lovely white and yellow! This charming handmade piece will brighten any table and makes a wonderful gift. How many will you make for your home?