by
by Let’s create an absolutely adorable and surprisingly easy DIY Crochet Strawberry Bag! This project is perfect for beginners because it uses simple stitches to build a unique shape, and incorporating multiple colors adds to its charm without being overly complicated. You’ll be delighted with your sweet, handmade accessory!
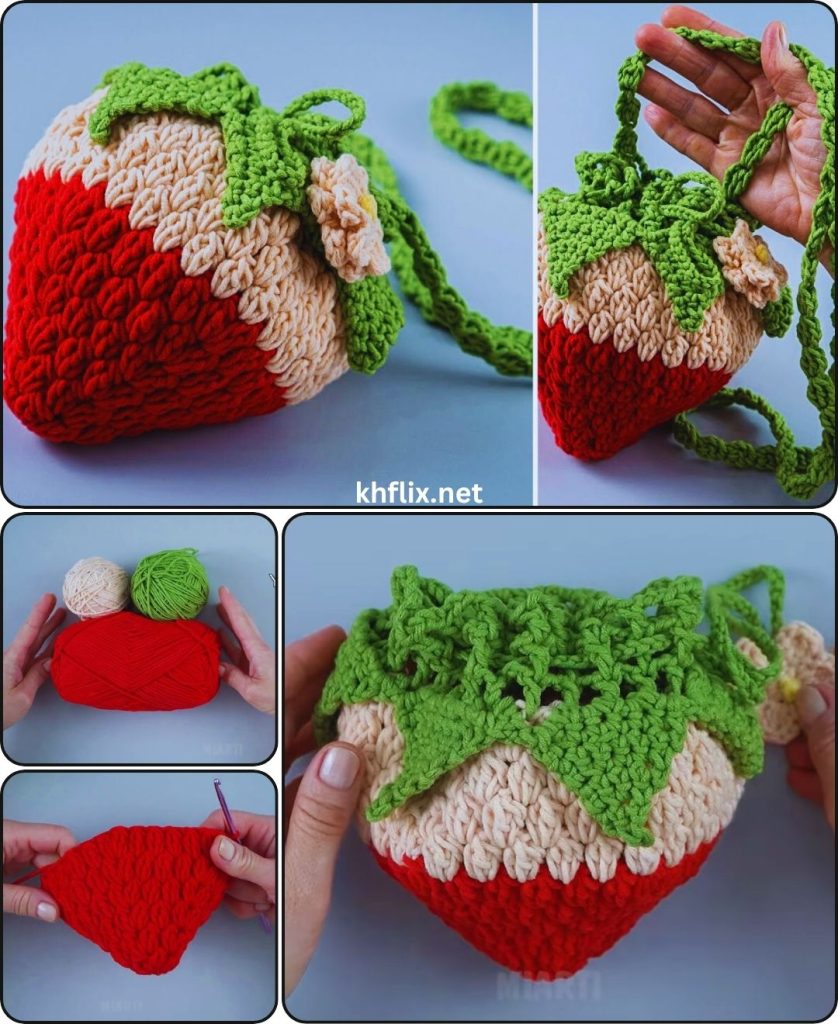
How to Make an Amazing DIY Crochet “Strawberry” Bag: Easy for Beginners!
This detailed tutorial will guide you step-by-step through crocheting a charming strawberry-shaped bag. We’ll focus on building the conical body, adding the green “leaves” and handle, and finishing with those signature “seeds.”
Skill Level: Absolute Beginner Friendly!
This project is excellent if you’re ready to learn or practice:
- Magic Ring (MR) / Chain-2 Start: For a tight, seamless center.
- Chain (ch): The fundamental starting stitch.
- Slip Stitch (sl st): For joining rounds neatly.
- Single Crochet (sc): A compact, sturdy stitch, great for bags.
- Half Double Crochet (hdc): A slightly taller stitch that helps the bag work up faster.
- Working in the round: Crocheting in a circular motion to build height.
- Increasing & Decreasing: Shaping techniques to create the strawberry’s form.
- Changing Colors: Essential for the multi-color strawberry look.
- Fastening off: Securing your yarn.
- Weaving in ends: The crucial final step for a polished finish.
Finished Strawberry Bag Dimensions (Approximate):
Using worsted weight yarn and the suggested hook, your finished strawberry bag will be approximately:
- Height: 6-8 inches (15-20 cm) (excluding the leaves/handle)
- Diameter (at widest point): 5-6 inches (12.5-15 cm)
- Handle: 8-10 inches (20-25 cm) tall loop
These dimensions can vary based on your tension and chosen yarn. You can adjust the size by using a different hook or yarn weight, or by adding/subtracting increase/decrease rounds.
Materials You’ll Need:
Gathering your supplies before you begin ensures a smooth and enjoyable crocheting session!
- Yarn: Approximately 150-200 yards (137-183 meters) of Worsted Weight (Medium #4) Cotton or Acrylic Yarn.
- Main Color: About 100-150 yards in Red (or a deep pink, or even blue for a “blueberry” bag!).
- Accent Color 1: About 30-50 yards in Green (for the leaves and handle).
- Accent Color 2: A very small amount (5-10 yards) in Yellow or Cream (for the “seeds”).
- Why Cotton/Acrylic? Cotton is durable and holds shape well, while acrylic is widely available and comes in many colors. Both are suitable for this project.
- Crochet Hook: Size H/5.0mm. This size creates a nice dense fabric suitable for a bag, preventing items from falling out.
- Yarn Needle (Tapestry Needle): Essential for weaving in ends and sewing the “seeds.”
- Scissors: Any sharp pair for cutting your yarn.
- Stitch Marker (Highly Recommended!): Very helpful for marking the beginning of each round, especially when working in a spiral.
Let’s Crochet Your Amazing Strawberry Bag!
We’ll build this bag in three main stages: creating the red strawberry body, adding the green top and handle, and finally embroidering the yellow “seeds.”

Part 1: The Red Strawberry Body
We’ll start by making a simple circle and then increasing to form the widest part of the strawberry, then decreasing to shape the bottom. You’ll primarily use single crochet for a dense fabric.
Important Note on Working in Continuous Rounds: For the strawberry body, we’ll work in continuous rounds (spirals) without joining with a slip stitch at the end of each round. This creates a seamless fabric, which is great for bags. Use your stitch marker to mark the first stitch of each round and move it up as you go.
- Starting with Red Yarn:
- Make a Magic Ring (MR). (Alternatively, chain 2 and work all stitches into the 2nd chain from hook).
- Round 1 (Red – Base of Strawberry):
- Work 6 single crochet (sc) stitches into the magic ring.
- Pull the magic ring tail tight to close the center hole.
- Place your stitch marker in the first sc you made. (6 sc)
- Round 2 (Red – Increasing):
- Work 2 sc into each stitch around.
- Move your stitch marker to the first stitch of this round. (12 sc)
- Round 3 (Red – Increasing):
- *Work 1 sc into the next stitch.
- Work 2 sc into the next stitch.*
- Repeat from * to * around.
- Move your stitch marker. (18 sc)
- Round 4 (Red – Increasing):
- *Work 1 sc into the next 2 stitches.
- Work 2 sc into the next stitch.*
- Repeat from * to * around.
- Move your stitch marker. (24 sc)
- Round 5 (Red – Increasing):
- *Work 1 sc into the next 3 stitches.
- Work 2 sc into the next stitch.*
- Repeat from * to * around.
- Move your stitch marker. (30 sc)
- Round 6 (Red – Increasing):
- *Work 1 sc into the next 4 stitches.
- Work 2 sc into the next stitch.*
- Repeat from * to * around.
- Move your stitch marker. (36 sc)
- Round 7 (Red – Increasing):
- *Work 1 sc into the next 5 stitches.
- Work 2 sc into the next stitch.*
- Repeat from * to * around.
- Move your stitch marker. (42 sc)
- Rounds 8-15 (Red – Straight Sides):
- Work 1 sc into each stitch around. (42 sc per round).
- Continue moving your stitch marker at the beginning of each round.
- (This creates the height of the main strawberry body. You can do more or fewer rounds here for a taller or shorter bag).
- Round 16 (Red – Decreasing for Bottom of Bag):
- Now we’ll start shaping the bottom of the strawberry.
- *Work 1 sc into the next 5 stitches.
- Single Crochet Decrease (sc2tog): Insert hook into next stitch, yarn over, pull up a loop (2 loops on hook). Insert hook into next stitch, yarn over, pull up a loop (3 loops on hook). Yarn over, pull through all 3 loops on hook.*
- Repeat from * to * around.
- Move your stitch marker. (36 sc)
- Round 17 (Red – Decreasing):
- *Work 1 sc into the next 4 stitches.
- sc2tog.*
- Repeat from * to * around.
- Move your stitch marker. (30 sc)
- Round 18 (Red – Decreasing):
- *Work 1 sc into the next 3 stitches.
- sc2tog.*
- Repeat from * to * around.
- Move your stitch marker. (24 sc)
- Round 19 (Red – Decreasing and Prepare for Opening):
- *Work 1 sc into the next 2 stitches.
- sc2tog.*
- Repeat from * to * around. (18 sc)
- Remove your stitch marker.
- Slip stitch (sl st) into the first stitch of this round to join and finish the red section. This creates a neat opening for the bag.
- Fasten off the red yarn, leaving a short tail (2-3 inches).
Part 2: The Green Top and Handle
Now, we’ll add the signature green leaves and create a sturdy handle. We’ll switch to working in joined rounds for the top part.
- Join Green Yarn:
- With your green yarn, make a slip knot on your hook.
- Join the green yarn with a slip stitch (sl st) into any stitch where you finished the red section.
- Round 20 (Green – First Layer of Leaves):
- Chain 1 (ch 1 – does NOT count as a stitch).
- Work 1 single crochet (sc) into the same stitch where you joined.
- Work 1 sc into each stitch around. (18 sc)
- Slip stitch (sl st) into the first sc of the round to join.
- Round 21 (Green – Shaping Leaves and Handle Placement):
- Chain 1 (does not count as a stitch).
- Work 3 sc into the first stitch. (This creates a “point” for a leaf)
- Work 1 sc into the next 3 stitches.
- Work 3 sc into the next stitch.
- Work 1 sc into the next 3 stitches.
- Now, let’s create the handle: Chain 50 (ch 50). This length makes a nice hand/wrist strap. For a shoulder strap, chain 80-100 stitches.
- Skip the next 5 stitches on the top edge of your bag.
- Work 1 sc into the next stitch.
- Work 3 sc into the next stitch.
- Work 1 sc into the next 3 stitches.
- Work 3 sc into the next stitch.
- Work 1 sc into the next stitch.
- Slip stitch (sl st) into the first sc of the round to join.
- Round 22 (Green – Strengthening Handle and Top):
- Chain 1 (does not count as a stitch).
- Work 1 sc into each sc stitch around the top edge of the bag.
- When you reach the chain-50 handle, work 1 sc into each of the 50 chains. This creates a sturdy and comfortable handle.
- Continue with 1 sc into each sc stitch along the bag’s top, then work 1 sc into each of the 50 chains of the second handle.
- Work 1 sc into any remaining sc stitches.
- Slip stitch (sl st) into the first sc of the round to join.
- Fasten off, leaving a 6-inch (15 cm) tail for weaving.
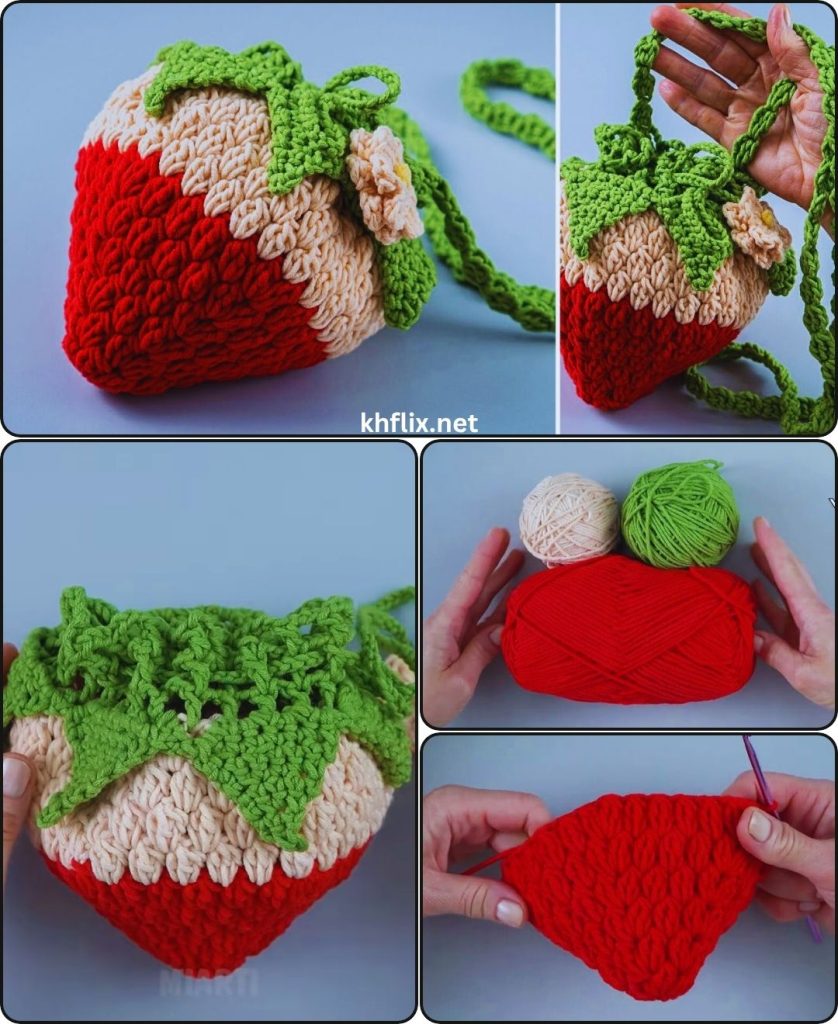
Part 3: Adding the Yellow “Seeds” (Multi-color detail!)
This is where your strawberry truly comes to life! We’ll use a simple embroidery technique for the “seeds.”
- Thread Your Needle:
- Cut a length of your yellow or cream yarn (about 2-3 feet / 60-90 cm).
- Thread it onto your yarn needle. You might want to double the yarn if it’s thin for more prominent seeds.
- Embroider the Seeds:
- Starting from the inside of your strawberry bag, bring your needle up through a stitch on the red body where you want a seed.
- Make a small, short stitch (like a dash or a “V” shape) over 1 or 2 yarn strands.
- Bring your needle back to the inside of the bag.
- Repeat this process, creating random “seeds” all over the red body of your strawberry. Don’t worry about perfect spacing; natural variation looks best!
- When you’re running low on yarn or finished with a section, weave in the tail on the inside of the bag to secure it, then start a new length of yarn.
- Continue until you’re happy with the number and placement of your seeds.
Part 4: Final Finishing Touches
- Weave in All Ends (Meticulously!):
- You’ll have several yarn tails from your starting magic ring, color changes, and where you fastened off.
- Thread each yarn tail onto your yarn needle.
- How to Weave Neatly: Insert the needle into existing stitches on the inside of your bag. Weave the tail into stitches of the same color for at least 2-3 inches (5-7.5 cm). To make it extra secure and prevent unraveling, subtly change direction (e.g., weave along a stitch, then turn and weave back through some of the same stitches diagonally or perpendicularly) to “lock” the tail in place.
- Once secured, trim any excess yarn close to the fabric, being careful not to cut any of your actual crocheted stitches.
- Gentle Shaping:
- Gently use your hands to push out the bottom of the strawberry and shape the top leaves to give your bag its perfect, plump strawberry form.
Congratulations! You’ve successfully crocheted an amazing DIY Strawberry Bag! This unique and adorable accessory is a wonderful accomplishment for any beginner, showcasing your growing skills and creativity.
What will be the first sweet treat you carry in your new handmade strawberry bag?