 by
by You’re asking for a detailed guide on “How to crochet a coaster flower making (Striped style).” This means creating a flat, sturdy flower-shaped coaster where the “stripes” are achieved by using different colors for each concentric layer or significant section of the flower.
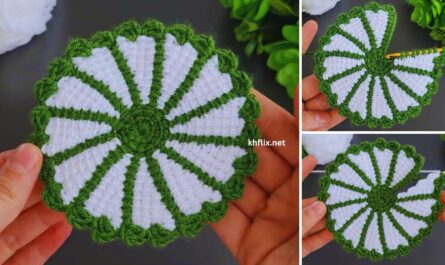
This tutorial will guide you through making a beautiful, multi-layered, flat flower motif that functions perfectly as a coaster, with its vibrant striped appearance created by strategic color changes.
How To Crochet a Flower Coaster (Striped Style)
This pattern creates a dense, flat, multi-layered flower motif. The “striped style” comes from using different colors for each distinct layer of petals and the underlying connecting rounds, creating a stunning visual effect as the colors radiate outwards in concentric “stripes.”
Skill Level: Intermediate to Advanced Intermediate (Requires comfort with basic stitches, working in the round, making clean color changes, and working into specific loops like FLO/BLO to create layers).
Finished Motif Dimensions (Approximate):
- Diameter: 7-8 inches (18-20 cm)
Materials You’ll Need:
- Yarn:
- Worsted Weight (Medium #4) Cotton Yarn: Approximately 80-120 yards (73-110 meters) per coaster. Cotton is highly recommended for coasters due to its durability, absorbency, heat resistance, and its ability to hold its shape well, which is crucial for a flat flower.
- Colors: Choose 3-4 contrasting or complementary colors for a vibrant striped effect.
- Color 1 (Flower Center)
- Color 2 (Inner Petals)
- Color 3 (Middle Layer/Connecting)
- Color 4 (Outer Petals)
- Crochet Hook:
- Size H/5.0mm (or the hook size that gives you a firm, dense fabric that lies perfectly flat. Gauge is more important here than for a 3D object).
- Yarn Needle (Tapestry Needle): Essential for weaving in loose ends.
- Scissors
- Stitch Marker (Optional): Helpful for marking the beginning of rounds.
Gauge (Crucial for Flatness and Size!):
Maintaining a consistent gauge is vital to ensure your flower coaster lies perfectly flat without ruffling or cupping.
- After Round 4 (end of the middle connecting layer), your circle should measure approximately 4.5 – 5 inches (11-12.5 cm) in diameter before the outer petals are added.
- If your work is significantly smaller, try a larger hook. If it’s larger, try a smaller hook.
Abbreviations Used:
- ch: chain
- sl st: slip stitch
- sc: single crochet
- hdc: half double crochet
- dc: double crochet
- tr: treble crochet (or triple crochet)
- st(s): stitch(es)
- ch-sp: chain space
- MR: Magic Ring (also known as Magic Circle or Adjustable Ring)
- FLO: Front Loop Only
- BLO: Back Loop Only
- FO: fasten off
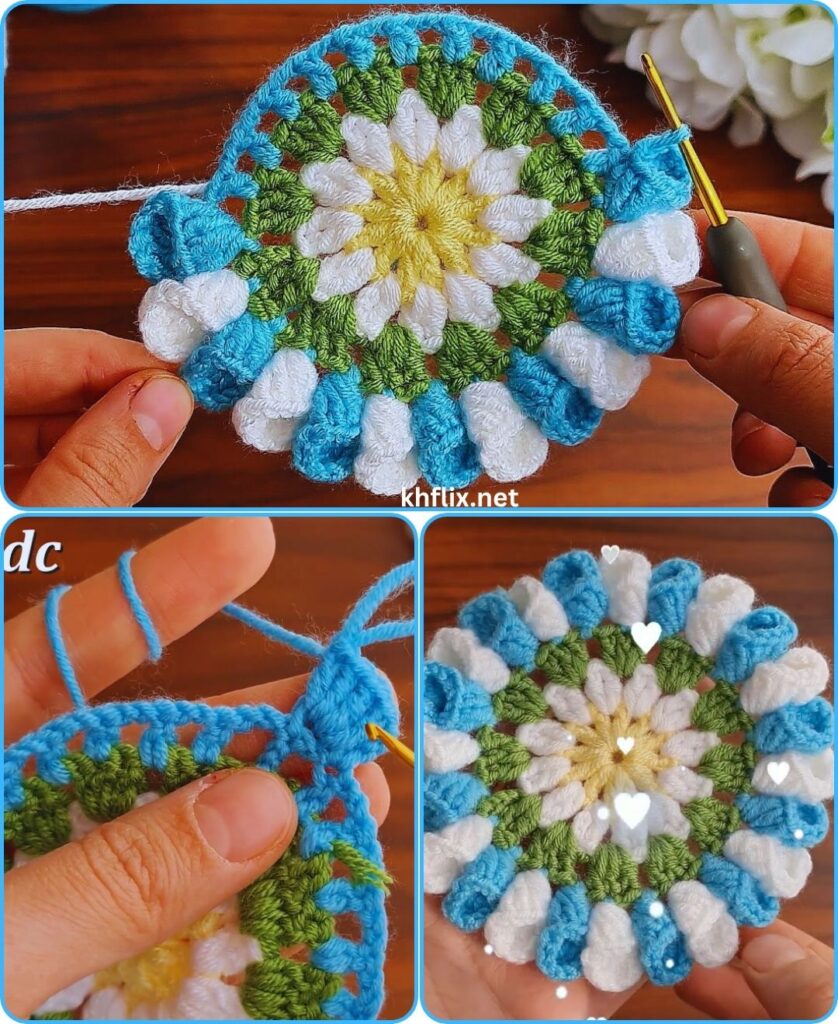
Understanding Striped Flower Coaster Construction:
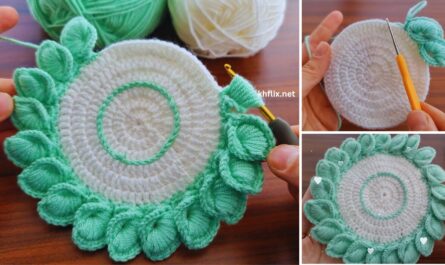
This flower achieves its “striped” and flat “coaster” quality by building in concentric layers, with each major layer or connecting round worked in a new color.
- Central Core (Color 1): The starting point of your flower.
- Inner Petals (Color 2): The first “stripe” of petals, worked into the FLO (Front Loop Only) of the previous round’s stitches. This is crucial as it leaves the BLO (Back Loop Only) available for the next layer, maintaining flatness.
- Middle Connecting Layer (Color 3): A distinct “stripe” that expands the base behind the first layer of petals. This is worked into the unworked BLOs from the very first round (or subsequent rounds), providing a clean, flat base for the next set of petals.
- Outer Petals (Color 4): The largest “stripe” of petals, defining the main dimension and final size of your coaster.
- Optional Finishing Edge (Color 1 or 4): A final border can add a neat, finished “stripe” if desired.
How to Make a Clean Color Change:
For neat, defined “stripes” (layers), it’s essential to change colors precisely at the end of the round.
- Work the last stitch of the round with the current color as usual, but stop when you have two loops left on your hook.
- Drop the current color.
- Pick up the new color, yarn over with the new color, and pull it through the remaining two loops on your hook to complete the stitch.
- You have now successfully changed colors. Sl st to the top of the initial stitch (or chain) of the round (using the new color) to join.
- Always cut the old color yarn, leaving a 4-6 inch tail to weave in securely later. For clean stripes, carrying yarn is generally not recommended as it can show through lighter colors or add bulk.
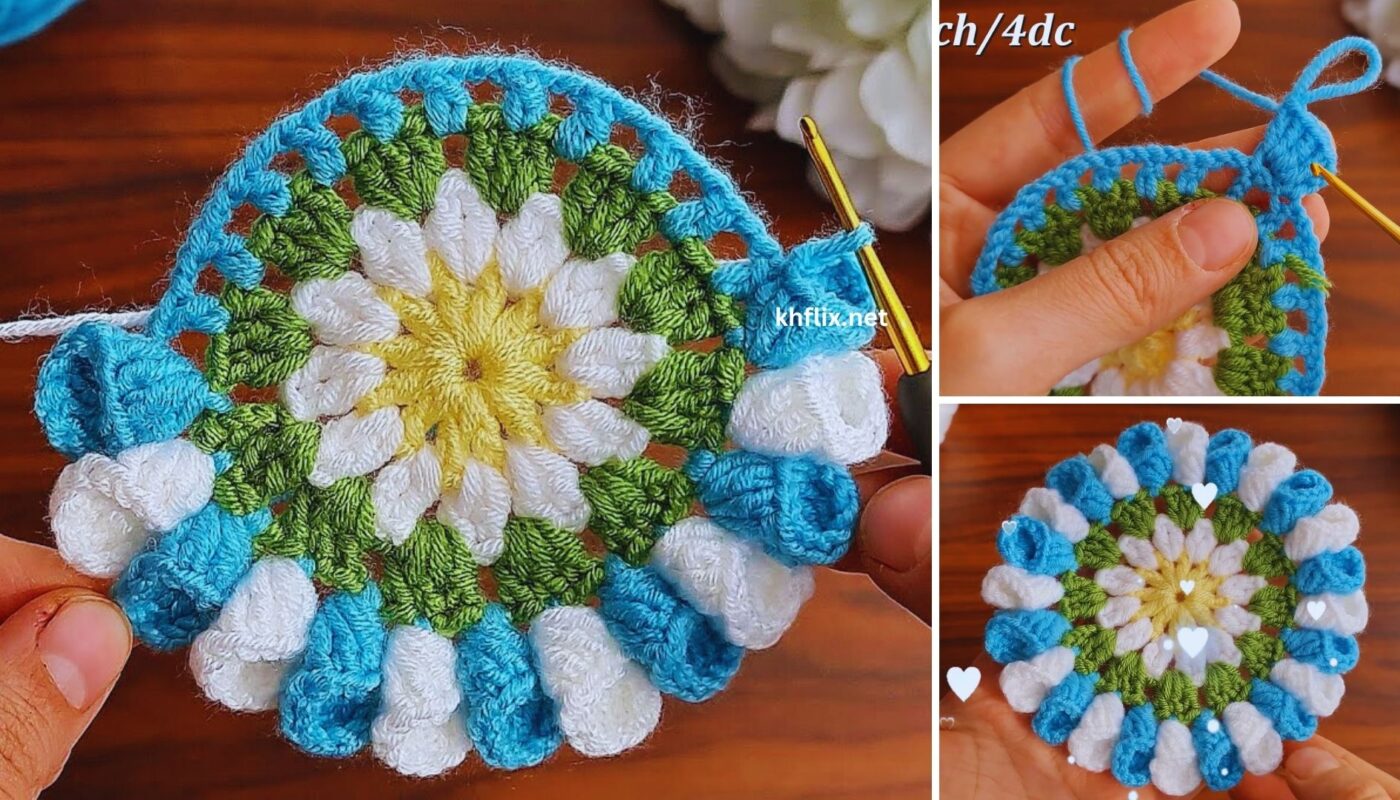
Let’s Start Crocheting Your Striped Flower Coaster!
Part 1: Flower Center (Color 1)
Option A: Magic Ring (Recommended for a tight center)
- With Color 1, make a Magic Ring (MR).
- Round 1: Ch 2 (does NOT count as a stitch). Work 12 hdc into the MR. Pull the tail tight to close the ring.
- Perform a clean color change to Color 2. Sl st to the top of the first hdc to join. (Total: 12 hdc). Cut Color 1, leaving a 4-inch tail to weave in.
Option B: Chain 4 Method (Alternative)
- With Color 1, Ch 4, sl st into the 1st ch to form a ring.
- Round 1: Ch 2 (does NOT count as a stitch). Work 12 hdc into the ring.
- Perform a clean color change to Color 2. Sl st to the top of the first hdc to join. (Total: 12 hdc). Cut Color 1, leaving a 4-inch tail to weave in.
Part 2: Inner Petal Layer (Color 2) – First “Stripe” of Petals
We’ll work this layer of petals into the FLO (Front Loop Only) of the stitches from Round 1. This is crucial as it leaves the BLO (Back Loop Only) available for the next layer, helping the coaster lie flat.
- Round 2 (Inner Petals):
- With Color 2, Ch 1 (does NOT count as a stitch).
- Work (sc in FLO of next st, hdc in FLO of next st, dc in FLO of next st, hdc in FLO of next st, sc in FLO of next st). (This petal uses 5 stitches).
- (Sl st in FLO of next st (this joins petal 1 to petal 2). Work (sc in FLO of next st, hdc in FLO of next st, dc in FLO of next st, hdc in FLO of next st, sc in FLO of next st)). Repeat from * to * 1 more time. You will have used 10 stitches from Round 1.
- Sl st in FLO of next st (this will be the 11th stitch, leaving the 12th unused for this round). Sl st to the first sc of the round (the base of your first petal) to join. (Total: 3 petals).
- FO Color 2, leaving a 6-inch tail. Weave in this tail securely on the back of your flower, being careful not to pull the petals out of shape.
You now have a central disk with 3 small petals. Gently push these petals forward to make them stand out.
Part 3: Middle Connecting Layer (Color 3) – Second “Stripe”
Now, we’ll work a round of stitches into the unworked BLOs of Round 1, which are hidden behind your inner petals. This creates the flat base for your larger outer petals.
- Round 3 (Connecting Base):
- Join Color 3 with a sl st into any unworked BLO from Round 1.
- Ch 2 (does NOT count as a stitch). Work 2 hdc (inc) in the same BLO st.
- (Hdc in the next unworked BLO, 2 hdc (inc) in the next unworked BLO). Repeat from * to * 5 more times. This expands the circle behind the inner petals while maintaining flatness.
- Perform a clean color change to Color 4. Sl st to the top of the initial ch-2 to join. (Total: 18 hdc). Cut Color 3, leaving a 4-inch tail.
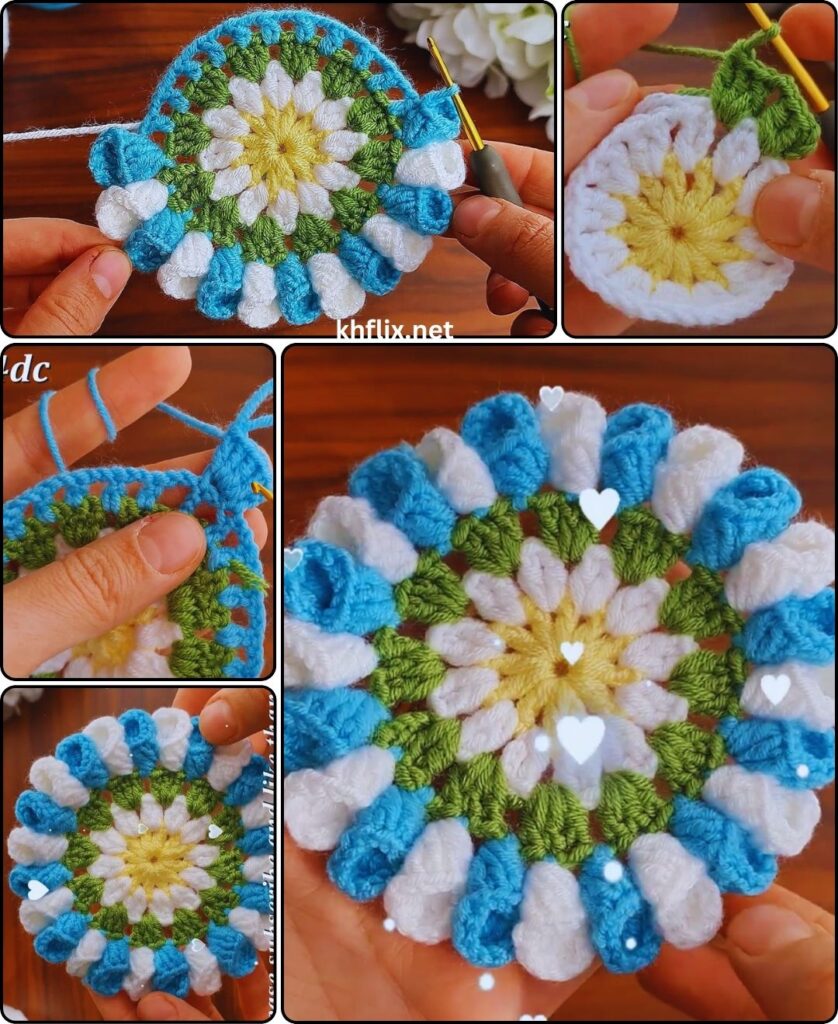
Part 4: Outer Petal Layer (Color 4) – Third “Stripe” of Petals
This layer will be larger and more prominent, defining the main size and shape of your coaster.
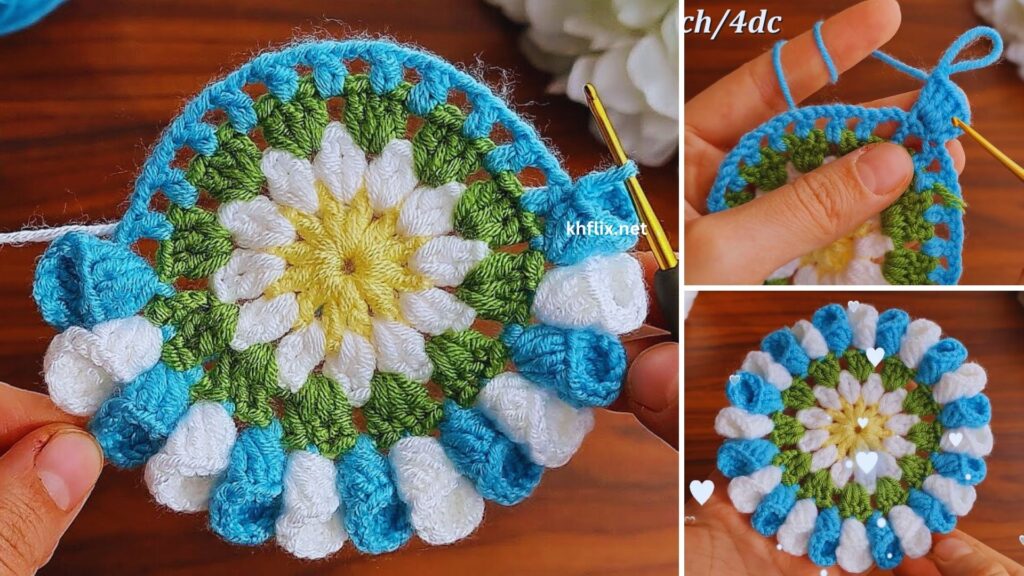
- Round 4 (Outer Petals Foundation):
- With Color 4, Ch 1 (does NOT count as a stitch). Sc in the same st as join (the base hdc).
- (Ch 3, sk 2 hdc, sc in the next hdc). Repeat from * to * 5 more times. You will have 6 sc and 6 ch-3 spaces.
- Sl st to the first sc to join.
- Round 5 (Outer Petals Construction):
- Sl st into the first ch-3 sp.
- Ch 1 (does NOT count as a stitch). Work (1 sc, 1 hdc, 2 dc, 1 tr, 2 dc, 1 hdc, 1 sc) into the same ch-3 sp. This creates your first outer petal.
- (Sl st into the next sc from Round 4 between ch-3 sps. Work (1 sc, 1 hdc, 2 dc, 1 tr, 2 dc, 1 hdc, 1 sc) into the next ch-3 sp). Repeat from * to * 5 more times, forming a total of 6 large outer petals.
- Sl st to the initial sl st (at the base of the first petal) to join.
- FO Color 4, leaving a 6-inch tail.
Part 5: Optional Final Edge (Color 1 or 4) – Final “Stripe”
To give your coaster an even more defined and finished look, you can add a subtle final “stripe” edge.
- Round 6 (Optional Edge):
- Join Color 1 (or your preferred border color) with a sl st at the back of any petal from Round 5 (preferably in the sc between two petals).
- Ch 1. Work sc in the same st.
- Sc evenly around the outer edge of the flower, trying to hide previous joins. In the peak of each outer petal (the tr from Round 5), work (sc, ch 1, sc) to define the petal tip.
- Sl st to the first sc to join.
- FO, leaving a 6-inch tail.
Part 6: Finishing & Blocking (Crucial for a Flat Coaster!)
- Weave in All Ends: This is absolutely critical for a neat and durable coaster, especially with multiple color changes. Thread each yarn tail onto your yarn needle. Carefully weave it through several stitches on the back side of your motif, securing it invisibly. Take your time to ensure all tails are well-hidden and won’t unravel.
- Shape & Define: Gently use your fingers to arrange and push the petals to lie flat. The inner petals should sit inside the outer petals.
- Blocking: This step is ABSOLUTELY CRUCIAL for any flat crochet piece, especially a coaster, to ensure it lies perfectly flat and maintains its shape. Without blocking, it might curl or appear uneven.
- Method: Gently wet your finished motif (either by misting with water or a quick dip and gentle squeeze – do not wring). Lay it perfectly flat on a blocking mat or a clean, dry towel. Gently stretch and pin the flower to its intended flat, circular shape and diameter, making sure the petals are well-defined and the edges are even. Allow it to air dry completely. For a stiffer coaster, you can use a spray starch after misting.
Your beautiful, vibrant, and sturdy Striped Flower Coaster is now complete! It’s a wonderful decorative and functional accent for your home, showcasing your creative crochet skills with its stunning striped style.