 by
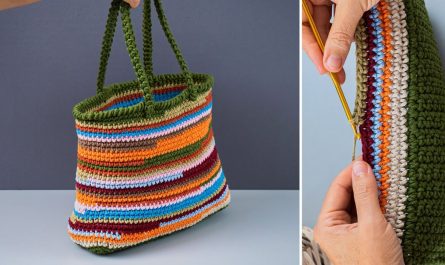
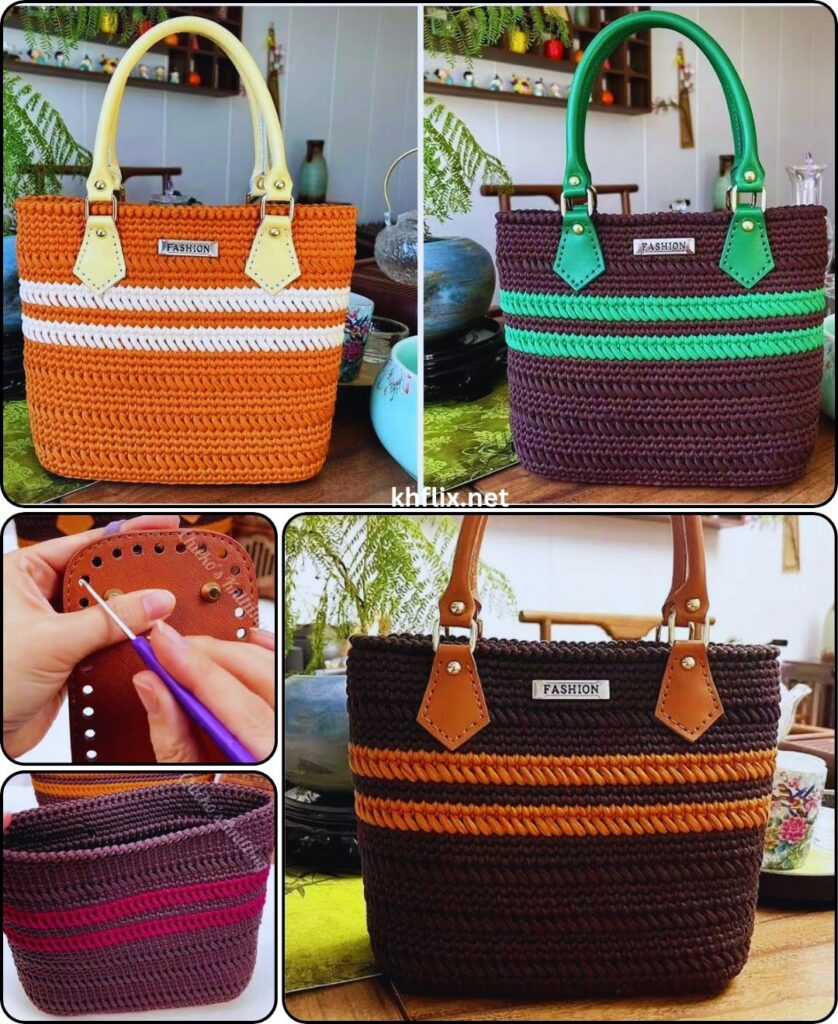
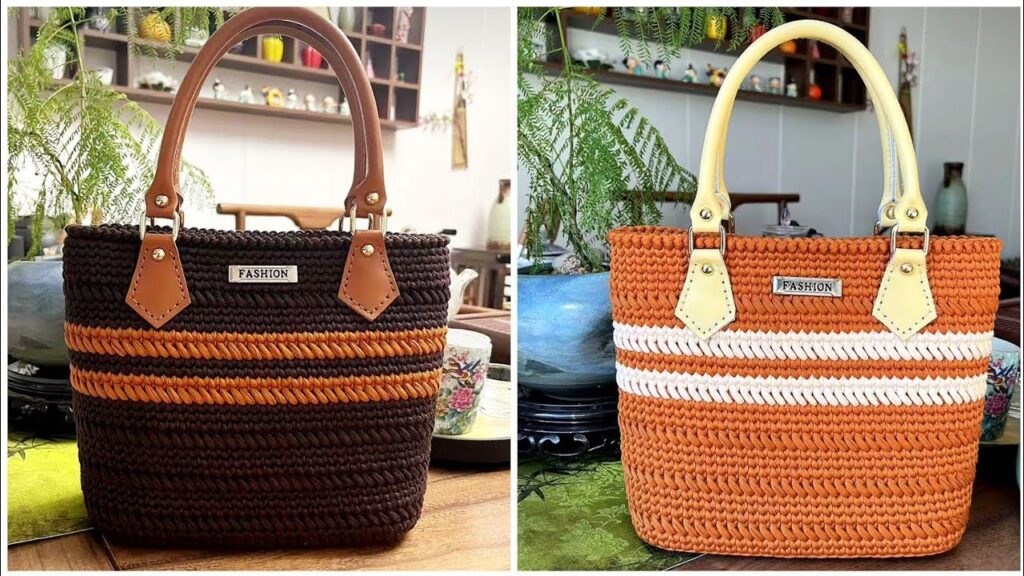
by You want to crochet a Multicolor Tote Bag! This is a fantastic project that allows for both creativity in color choice and the creation of a practical, stylish, and durable accessory. For a “multicolor” tote, stripes are a popular and effective way to incorporate multiple colors beautifully.
This tutorial will guide you through crocheting a sturdy, medium-to-large-sized tote bag with a bold striped design, worked primarily in continuous rounds for a seamless look.

How To Crochet a Multicolor Striped Tote Bag
This pattern creates a spacious and robust tote bag, perfect for groceries, books, beach essentials, or everyday carry. The striped design is achieved by alternating colors every few rounds, resulting in clear, eye-catching horizontal bands.
Skill Level: Intermediate
You should be comfortable with:
- Basic crochet stitches (ch, sl st, sc, hdc).
- Working in continuous rounds (spirals) for a seamless look, or joined rounds for cleaner color changes. We’ll use a mix to maximize the striped effect.
- Creating an oval or rectangular flat base.
- Working straight sides.
- Performing clean color changes.
Finished Tote Bag Dimensions (Approximate):
- Width (flat): 13 inches (33 cm)
- Height (without handles): 15 inches (38 cm)
- Handle Drop: 8-10 inches (20-25 cm)
Materials You’ll Need:
- Yarn:
- Worsted Weight (Medium #4) Cotton or Cotton Blend Yarn: This type of yarn is highly recommended for tote bags due to its durability, sturdiness, and washability. Avoid very stretchy or flimsy yarns.
- Total Yarn: Approximately 600-800 yards (550-730 meters).
- Colors: Choose 3-5 contrasting or coordinating colors. Plan your stripe sequence in advance!
- Color A (Main Body/Base) – Approx. 200-250 yards
- Color B, C, D, E (Stripe Colors) – Approx. 100-150 yards each, depending on how many stripes.
- Crochet Hook:
- Size H/5.0mm (or the hook size that gives you a firm, dense fabric that doesn’t stretch too much when filled. A tighter gauge is better for bags).
- Yarn Needle (Tapestry Needle): Essential for weaving in loose ends.
- Scissors
- Stitch Markers (Recommended): Very helpful for marking the beginning/end of rounds, corners of the base, and handle placement.
Gauge (Crucial for Consistent Size!):
Maintaining a consistent gauge is vital for your tote bag to achieve the intended size and shape, especially to prevent it from becoming too loose or too stiff.
- For the main body (sc stitches): 15 sc and 16 rows = 4 inches (10 cm) in single crochet.
- Adjust your hook size if necessary to meet this gauge.
Abbreviations Used:
- ch: chain
- sl st: slip stitch
- sc: single crochet
- hdc: half double crochet
- st(s): stitch(es)
- inc: increase (work 2 stitches into the same stitch)
- MR: Magic Ring (if starting with a circular base, though we’ll use a chain base here)
- FO: fasten off
- ( ): repeat instructions within parentheses a specified number of times.
- [ ]: total number of stitches at the end of the round.
Understanding Striped Tote Bag Construction:
This tote bag will be constructed in a few main parts:
- Flat Oval Base: Creates a sturdy bottom that transitions smoothly into the sides.
- Upright Sides (Striped): The main body of the bag, worked in continuous rounds (spirals) or joined rounds with regular color changes to create horizontal stripes. We’ll use joined rounds for cleaner stripes.
- Top Edging: Reinforces the opening of the bag.
- Handles: Crocheted directly onto the bag.
How to Make a Clean Color Change in Joined Rounds:
This method ensures your stripes have a crisp, clean line.
- Work the last stitch of the round with the current color as normal, but stop when you have two loops left on your hook.
- Drop the current color.
- Pick up the new color, yarn over with the new color, and pull it through the remaining two loops on your hook to complete the stitch.
- Now, sl st into the first stitch of the round (with the new color) to join.
- Always cut the old color yarn, leaving a 4-6 inch tail to weave in securely later. For a bag, do NOT carry yarn up the inside as it can add bulk or show through.
Let’s Start Crocheting Your Multicolor Striped Tote Bag!
Part 1: Base of the Tote (Color A)
We’ll create a flat oval base.
- With Color A, Ch 37.
- Round 1: Sc in the 2nd ch from hook. Sc in the next 34 ch. Work 3 sc in the last ch. (Now working down the other side of the chain). Sc in the next 34 ch. Work 2 sc in the last ch (the same one as the first sc of the round). Sl st to the first sc to join. [74 sts]
- Place stitch markers in the middle stitch of the 3-sc group at each end – these will be your “corner” stitches where you’ll increase in subsequent rounds.
- Round 2: Ch 1 (does NOT count as a st). Sc in the same st as join. Sc in the next 33 sts. Work 3 sc in the marked st (old corner). Sc in the next 34 sts. Work 3 sc in the marked st (old corner). Sc in the last 2 sts. Sl st to the first sc to join. [78 sts]
- Move stitch markers to the middle stitch of each new 3-sc group.
- Round 3: Ch 1. Sc in the same st. Sc in the next 34 sts. Work 3 sc in the marked st. Sc in the next 36 sts. Work 3 sc in the marked st. Sc in the last 2 sts. Sl st to the first sc to join. [82 sts]
- Move stitch markers.
- Round 4: Ch 1. Sc in the same st. Sc in the next 35 sts. Work 3 sc in the marked st. Sc in the next 38 sts. Work 3 sc in the marked st. Sc in the last 2 sts. Sl st to the first sc to join. [86 sts]
- Move stitch markers.
- Round 5: Ch 1. Sc in the same st. Sc in the next 36 sts. Work 3 sc in the marked st. Sc in the next 40 sts. Work 3 sc in the marked st. Sc in the last 2 sts. Sl st to the first sc to join. [90 sts]
- Your base should now be approximately 13 inches long and 4-5 inches wide.
- Perform a clean color change to Color B for the next round. Cut Color A, leaving a 6-inch tail.
Part 2: Body of the Tote (Striped – Alternating Colors)
We will now work straight up, forming the walls of the tote. We will change colors every two rounds to create neat stripes.
Important for all Body Rounds: When working these rounds, crochet into the back loop only (BLO) of the stitches in Round 5. This creates a defined edge for the base and helps the sides stand up straight. For all subsequent body rounds, work through both loops as normal.
- Round 6 (Color B): Ch 1 (does NOT count as a st). Sc in the BLO of the same st as join. Sc in the BLO of each st around. Sl st to the first sc to join. [90 sts]
- Perform a clean color change to Color C. Cut Color B, leaving a 6-inch tail.
- Round 7 (Color C): Ch 1. Sc in the same st as join. Sc in each st around. Sl st to the first sc to join. [90 sts]
- Round 8 (Color C): Ch 1. Sc in the same st. Sc in each st around. Sl st to the first sc to join. [90 sts]
- Perform a clean color change to Color D. Cut Color C, leaving a 6-inch tail.
- Round 9 (Color D): Ch 1. Sc in the same st. Sc in each st around. Sl st to the first sc to join. [90 sts]
- Round 10 (Color D): Ch 1. Sc in the same st. Sc in each st around. Sl st to the first sc to join. [90 sts]
- Perform a clean color change to Color E. Cut Color D, leaving a 6-inch tail.
- Round 11 (Color E): Ch 1. Sc in the same st. Sc in each st around. Sl st to the first sc to join. [90 sts]
- Round 12 (Color E): Ch 1. Sc in the same st. Sc in each st around. Sl st to the first sc to join. [90 sts]
- Perform a clean color change to Color A. Cut Color E, leaving a 6-inch tail.
Repeat Rounds 5-12: Continue repeating the sequence of two rounds per color (Color A, then B, then C, etc.) until your bag reaches your desired height. For a 15-inch tall bag, you’ll need approximately 50-60 rounds in total (including the base). Continue until the bag is about 14 inches tall. * End with Color A for the last two rounds of the body for a consistent top edge, or your preferred last stripe color.
Part 3: Top Edging (Color A)
This section creates a sturdy rim for the tote bag opening.
- Round (Final Body Color, e.g., Color A): Ch 1. Sc in the same st. Sc in each st around. Sl st to the first sc to join. [90 sts]
- Perform a clean color change to Color A (if not already using it). DO NOT CUT this color.
- Round (Top Edging): Ch 1. Hdc in the same st. Hdc in each st around. Sl st to the first hdc to join. [90 hdc]
- Round (Top Edging): Ch 1. Hdc in the same st. Hdc in each st around. Sl st to the first hdc to join. [90 hdc]
- FO Color A, leaving a long tail for weaving if you’re not immediately starting handles.
Part 4: Handles (Color A)
You will make two identical handles. These handles will be crocheted directly onto the bag.
Handle Design (Example – adjust length/width as desired):
- Preparation: Lay your bag flat. Mark the placement for your handles. A common placement is to count 15 stitches in from each side seam for the start of the handles, and then have them span about 15-20 stitches (this leaves a gap in the middle and a gap at the ends).
- Find the approximate center of each side of your bag. From the center, count out approximately 7-8 stitches in one direction, place a marker. Count 15-20 stitches from that marker, place another marker. Repeat for the other side of the bag.
- Alternatively, if your bag has 90 stitches, a good handle placement could be:
- Attach yarn at any point.
- Sc 20 stitches.
- Chain 40 (for first handle strap).
- Skip next 25 stitches (this forms the handle opening).
- Sc in next 20 stitches.
- Chain 40 (for second handle strap).
- Skip next 25 stitches.
- Sl st to first sc.
Let’s use the alternative method for simpler instructions:
- Round (Handle Base):
- Join Color A with a sl st to any stitch on the top edge of your bag.
- Ch 1. Sc in the same st and in the next 19 sts. [20 sc]
- Ch 40. (This will be the length of your first handle).
- Skip the next 25 sts along the bag’s top edge (this creates the opening for your arm/hand).
- Sc in the next 20 sts. [20 sc]
- Ch 40. (Length of your second handle).
- Skip the next 25 sts along the bag’s top edge.
- Sl st to the first sc of the round.
- Round (Handle Reinforcement 1):
- Ch 1. Sc in the same st and in the next 19 sts (working along the top edge of the bag).
- Sc in each of the 40 ch sts (working along the handle chain).
- Sc in the next 20 sts (working along the top edge of the bag).
- Sc in each of the 40 ch sts (working along the second handle chain).
- Sl st to the first sc to join. [120 sc – 20 bag edge + 40 handle + 20 bag edge + 40 handle]
- Round (Handle Reinforcement 2):
- Ch 1. Sc in the same st. Sc in each st around (working along bag edge and around the handle loops).
- Sl st to the first sc to join. [120 sc]
- FO, leaving a long tail.
Part 5: Finishing
- Weave in All Ends: This is the most time-consuming but crucial step for a professional-looking bag. Methodically weave in every yarn tail from your color changes and the start/end of the project. Weave them through the stitches on the inside of the bag, making them secure and invisible from the outside.
- Optional: Stiffen the Handles: If your handles feel too floppy, you can line them with a piece of cotton webbing or even carefully spray them with fabric stiffener and let them dry while stretched straight.
- Optional: Add a Fabric Lining: For even more durability and to prevent small items from falling through stitches, consider sewing a fabric lining for your tote bag. This is done after the crocheting is complete.
Your beautiful and functional Multicolor Striped Tote Bag is now complete! Enjoy your handmade creation.