 by
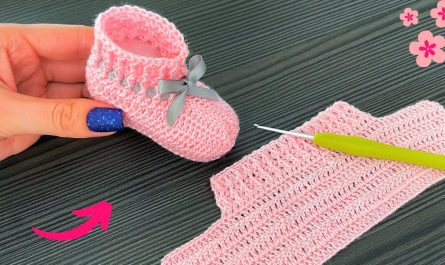
by Let’s crochet some cheerful and cozy yellow slippers! This detailed tutorial will guide you through creating a comfortable and practical pair of slippers, perfect for keeping your feet warm while adding a pop of sunny color to your loungewear. We’ll focus on a beginner-friendly approach that results in a sturdy slipper.
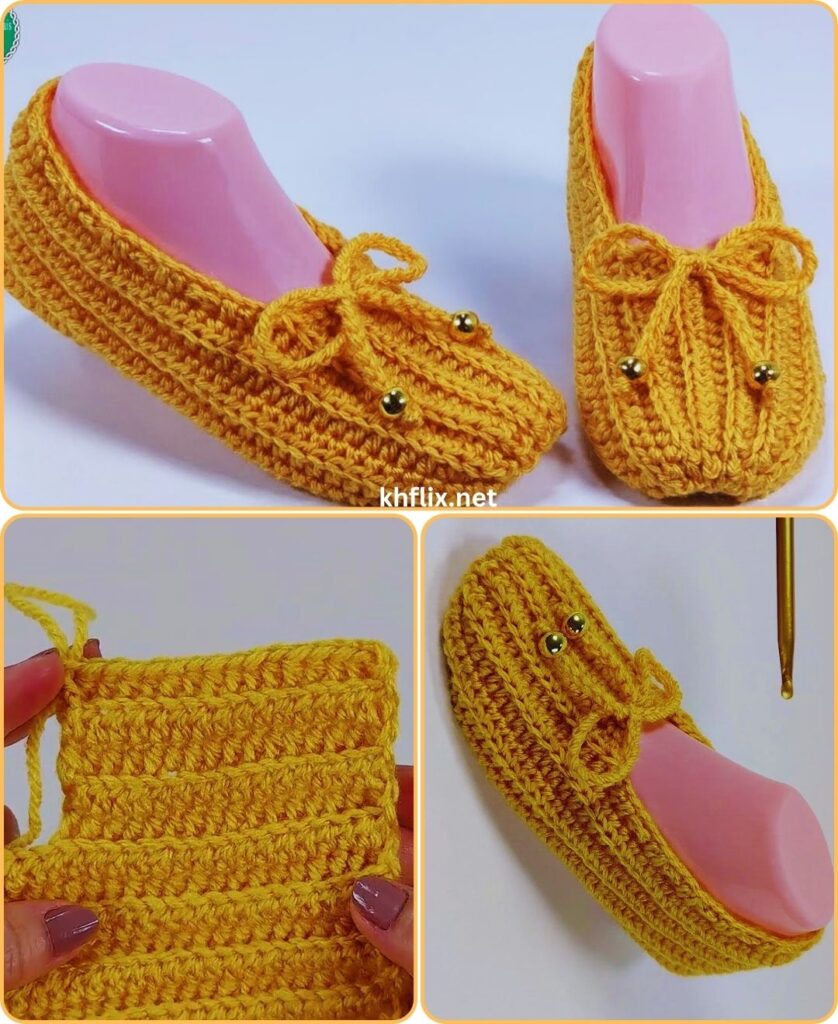
How to Crochet Yellow Slippers: A Detailed Tutorial Pattern
This pattern is designed to be straightforward, using basic stitches to create a comfortable and well-fitting slipper. You’ll work the sole, build up the sides, and shape the toe and ankle.
Skill Level: Beginner
You’ll need to know:
- Chain (ch): The foundation of most crochet projects.
- Slip Stitch (sl st): Used for joining rounds and finishing.
- Single Crochet (sc): A compact, dense stitch, great for slipper soles and sturdy fabric.
- Half Double Crochet (hdc): A stitch taller than sc but shorter than dc, often used for comfortable and slightly quicker fabric.
- Double Crochet (dc): A taller stitch for building height more rapidly (used minimally here).
- Working in rounds: Crocheting in a continuous spiral or joined circles.
- Increasing: Adding stitches to expand your work (for shaping the sole).
- Decreasing: Reducing stitches to taper your work (for shaping the toe).
Finished Slipper Dimensions (Approximate):
This pattern is primarily written for an Adult Medium (US Women’s 7-9, US Men’s 6-8). You can adjust the size by changing the starting chain length and the number of increase rounds for the sole.
- Sole Length: Approx. 9-10 inches (23-25 cm)
- Slipper Height: Approx. 3-4 inches (7.5-10 cm) at the ankle
Materials You’ll Need:
- Yarn: Approximately 150-200 yards (137-183 meters) of Worsted Weight (Medium #4) Yarn in your favorite shade of yellow!
- Recommended: A soft yet durable acrylic yarn or a wool blend. These yarns offer warmth, good stretch, and are generally easy to care for. Avoid 100% cotton as it can sometimes stretch out of shape with wear in slippers.
- Crochet Hook: Size H/5.0mm. This is a common hook size for worsted weight yarn and should give you a firm but flexible fabric, essential for comfortable slippers that hold their shape. If your stitches feel too loose or too stiff, adjust your hook size up or down accordingly.
- Yarn Needle (Tapestry Needle): Essential for seamlessly weaving in all your loose ends and for any minor seaming (though this pattern aims to minimize seams).
- Scissors: For cutting your yarn.
- Stitch Markers (Highly Recommended): At least two, to mark the beginning of your rounds and specific stitches for toe shaping. These are super helpful for beginners!
Gauge (Important for Sizing!):
Getting your gauge right is crucial to ensure your slippers fit properly. A consistent gauge means your slippers will be the correct size and won’t stretch out too much.
- In single crochet: Aim for 14 sc stitches and 16 rows = 4 inches (10 cm).
- How to check your gauge:
- Chain 16.
- Single crochet (sc) in the 2nd chain from your hook and in each chain across. You should have 15 sc stitches.
- Work 16 rows of sc (ch 1, turn, sc in each st across).
- Measure your swatch. If it’s smaller than 4×4 inches, try going up a hook size. If it’s larger, try going down a hook size. Adjust until your swatch matches the gauge.
Abbreviations Used in This Pattern:
- ch: chain
- sl st: slip stitch
- sc: single crochet
- hdc: half double crochet
- dc: double crochet
- st(s): stitch(es)
- inc: increase (work 2 stitches in the same stitch, as specified by the stitch type, e.g., sc inc means 2 sc in one stitch)
- dec: decrease (work 2 stitches together, as specified by the stitch type, e.g., sc dec means single crochet 2 together)
- rep: repeat
- BLO: back loop only
- FO: fasten off
- (): repeat instructions within parentheses a specified number of times.
- []: indicates the total number of stitches you should have at the end of a specific round or row.
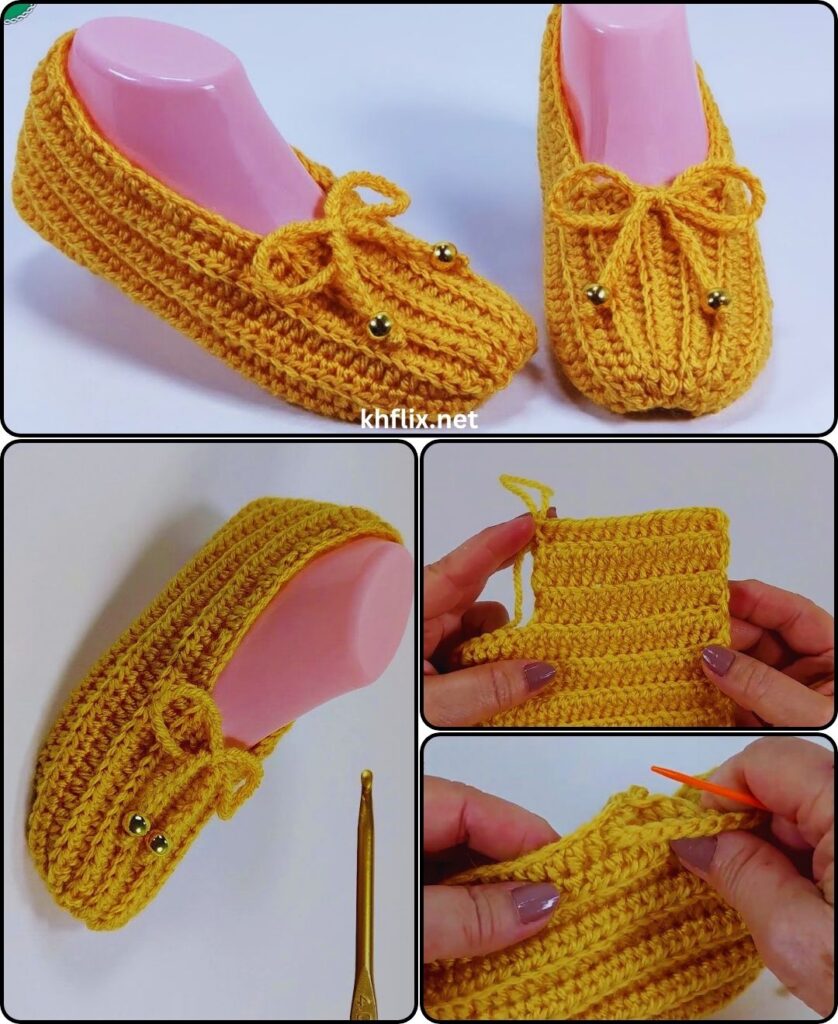
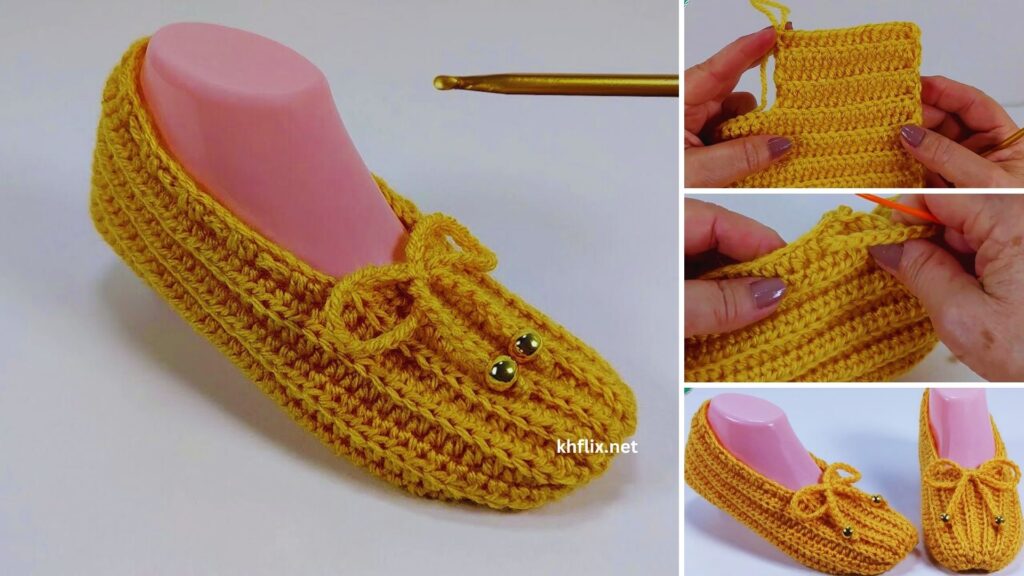
Let’s Crochet Your Yellow Slippers!
You’ll create the sole first by working in an oval, then build up the sides, and finally shape the toe and ankle opening.
Part 1: The Slipper Sole
We’ll start by creating an oval-shaped base for the sole of your slipper. This part is worked in continuous rounds (unless otherwise stated) so you’ll use a stitch marker.
- Foundation Chain:Ch 25.
- Sizing Note: For a smaller slipper, chain 2-4 stitches less. For a larger slipper, chain 2-4 stitches more. Each 2 chains roughly adds or subtracts 1 inch in length to your sole.
- Round 1:
- Work 2 sc in the 2nd chain from your hook.
- Sc in the next 22 chains (this brings you to the last chain of your foundation).
- Work 4 sc in the very last chain (this turns the corner for the heel).
- Now, rotate your work to crochet along the other side of the foundation chain.
- Sc in the next 22 stitches along the opposite side of the chain.
- Work 2 sc in the very last stitch (this completes the oval at the toe end).
- [You should have 52 sc stitches.] Do not join this round. Place your stitch marker in the first sc of this round to mark the beginning.
- Round 2:
- Work 2 sc in the next 2 stitches (increases at the toe).
- Sc in the next 22 stitches.
- Work 2 sc in the next 4 stitches (increases at the heel).
- Sc in the next 22 stitches.
- Work 2 sc in the next 2 stitches (increases at the toe).
- [You should have 60 sc stitches.] Move your stitch marker to the new first stitch.
- Round 3:
- (Sc in next st, 2 sc in next st) rep 2 times (increases for the toe curve).
- Sc in the next 22 stitches.
- (Sc in next st, 2 sc in next st) rep 4 times (increases for the heel curve).
- Sc in the next 22 stitches.
- (Sc in next st, 2 sc in next st) rep 2 times (increases for the toe curve).
- [You should have 68 sc stitches.] Move your stitch marker.
- Sizing Adjustment: If your sole isn’t wide or long enough, you can add another increase round here. For example: Round 4: (Sc in next 2 sts, 2 sc in next st) rep 2 times, sc in next 22 sts, (sc in next 2 sts, 2 sc in next st) rep 4 times, sc in next 22 sts, (sc in next 2 sts, 2 sc in next st) rep 2 times. Your goal is to create a sole that comfortably matches the length and width of the bottom of the foot you’re making the slipper for.
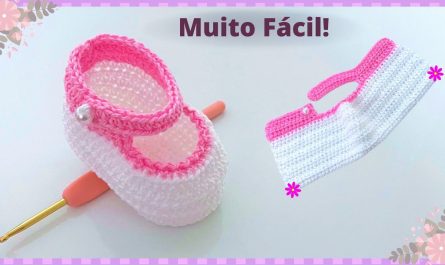
Part 2: Building the Slipper Sides
This section creates the vertical sides of your slipper, making it stand up from the sole.
- Round 4 (Creating the “Ridge”):
- Work sc in the back loop only (BLO) of each stitch around.
- [You will have the same stitch count as the previous round, e.g., 68 sc if you finished Round 3 with 68 stitches.] Move your stitch marker.
- Working in the BLO creates a neat, defined ridge around the sole, which helps the slipper sit upright and gives a clean transition from the sole to the sides.
- Round 5:
- Work hdc in each stitch around (now working through both loops again).
- [Same stitch count, e.g., 68 hdc.] Move your stitch marker.
- Round 6:
- Work hdc in each stitch around.
- [Same stitch count, e.g., 68 hdc.] Move your stitch marker.
- Round 7:
- Work hdc in each stitch around.
- [Same stitch count, e.g., 68 hdc.] Move your stitch marker.
- You can add or subtract hdc rounds here to adjust the overall height of the slipper before the toe shaping begins. Stop when the side height reaches just below where your toes start.
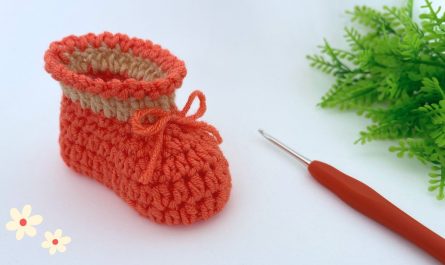
Part 3: Shaping the Toe
Now we’ll start decreasing stitches at the front of the slipper to form the toe. This will make the slipper curve inwards.
- Round 8 (Toe Decrease):
- Hdc in the first 25 stitches.
- (Hdc decrease) rep 8 times. (To hdc decrease: Yarn over, insert hook into first stitch, pull up a loop (3 loops on hook). Yarn over, insert hook into next stitch, pull up a loop (5 loops on hook). Yarn over, pull through all 5 loops. This combines 2 hdc into 1).
- Hdc in the remaining 27 stitches.
- [You should have 60 hdc stitches remaining.] Move your stitch marker.
- Round 9 (More Toe Decrease):
- Hdc in the first 24 stitches.
- (Hdc decrease) rep 6 times.
- Hdc in the remaining 24 stitches.
- [You should have 54 hdc stitches remaining.] Move your stitch marker.
- Round 10 (Final Toe Decrease):
- Hdc in the first 23 stitches.
- (Hdc decrease) rep 4 times.
- Hdc in the remaining 23 stitches.
- [You should have 50 hdc stitches remaining.] Move your stitch marker.
- At this point, try the slipper on (if possible) to check the toe fit. It should feel snug but not too tight.
Part 4: Shaping the Ankle/Top Opening
This section defines the opening for your foot, making it comfortable to slip on and off.
- Round 11:
- Hdc in each stitch around.
- [50 hdc] Move your stitch marker.
- Round 12 (Finishing Edge):
- Work sc in each stitch around. (A round of single crochet creates a firmer, neater edge around the ankle opening).
- [50 sc]
- Sl st into the first sc of this round to join. This completes the slipper.
- Fasten Off (FO), leaving a 6-inch tail.
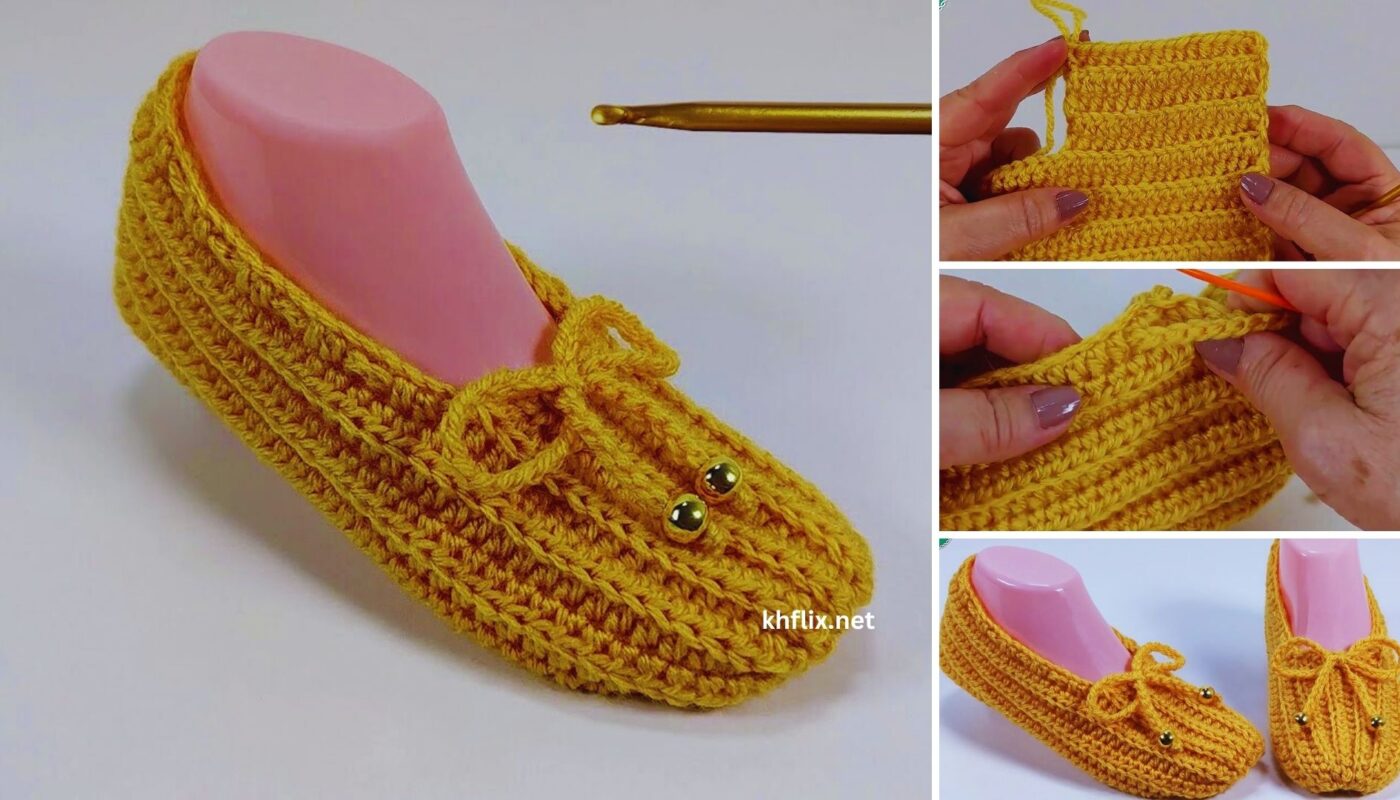
Part 5: Finishing Your Yellow Slippers
- Weave in All Ends:
- This is a crucial step for a neat, comfortable, and durable slipper. Thread any loose yarn tails onto your yarn needle.
- Carefully weave them into the stitches on the inside of your slipper. Try to go through the middle of the stitches of the same color to fully hide the tails. Weave in one direction for a few stitches, then change direction slightly and weave back through a few more stitches (this locks the tail in place and prevents it from unraveling with wear).
- Take your time with this to ensure your slippers look professional and will last.
- Make the Second Slipper:
- Repeat all steps from Part 1 through Part 4 to create your second slipper. It’s important to maintain consistent tension between both slippers so they are a matching pair!
- Optional: Add a Non-Slip Sole (Highly Recommended for Safety!):
- To prevent slipping on smooth floors (like wood or tile), you can apply liquid latex or “puffy paint” (fabric paint designed for traction) to the bottom of the soles.
- Turn your slippers inside out, then turn them right side out and put them on your feet briefly to gently stretch them to their final shape. Take them off.
- On the outside bottom of the sole, apply dots, lines, or a pattern of the non-slip product. Follow the product’s instructions for drying time. You might need multiple coats for good grip.
You’ve now created a pair of wonderfully comfortable and cheerful yellow crochet slippers! Enjoy lounging in your handmade creations. They also make fantastic, heartfelt gifts.