 by
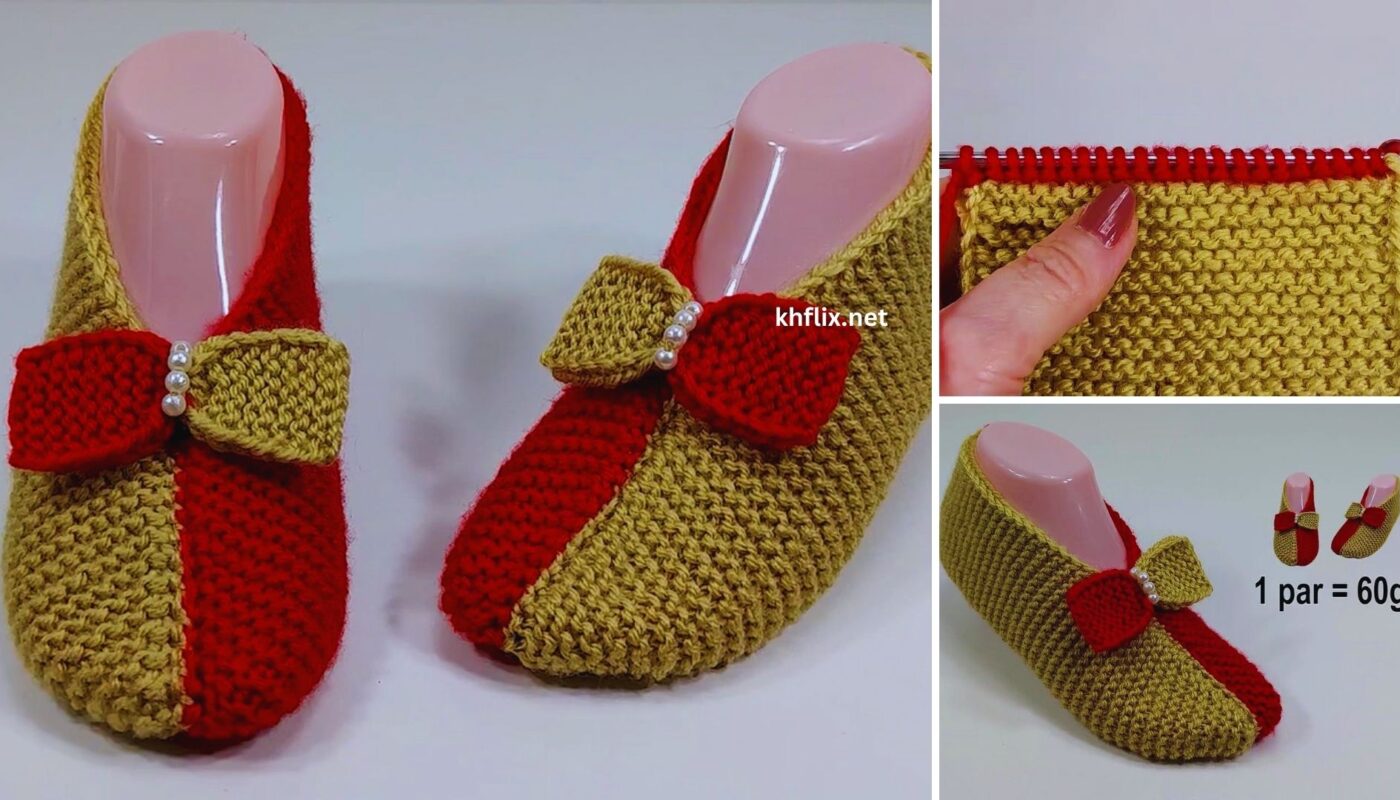
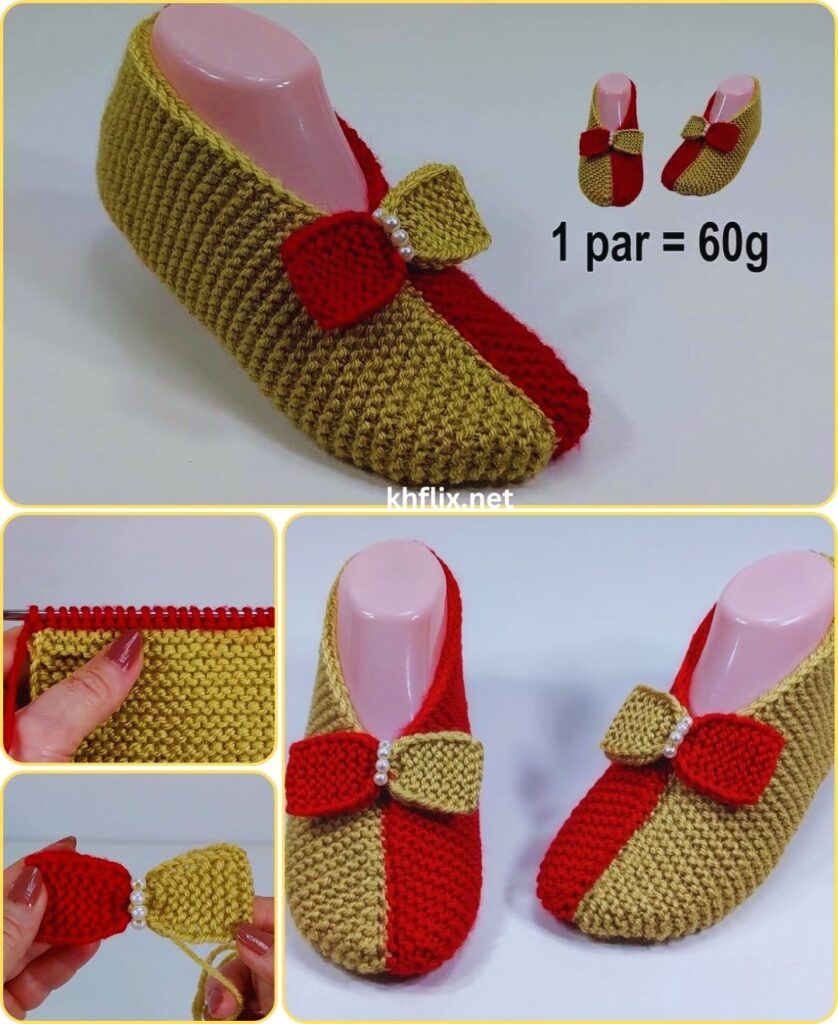
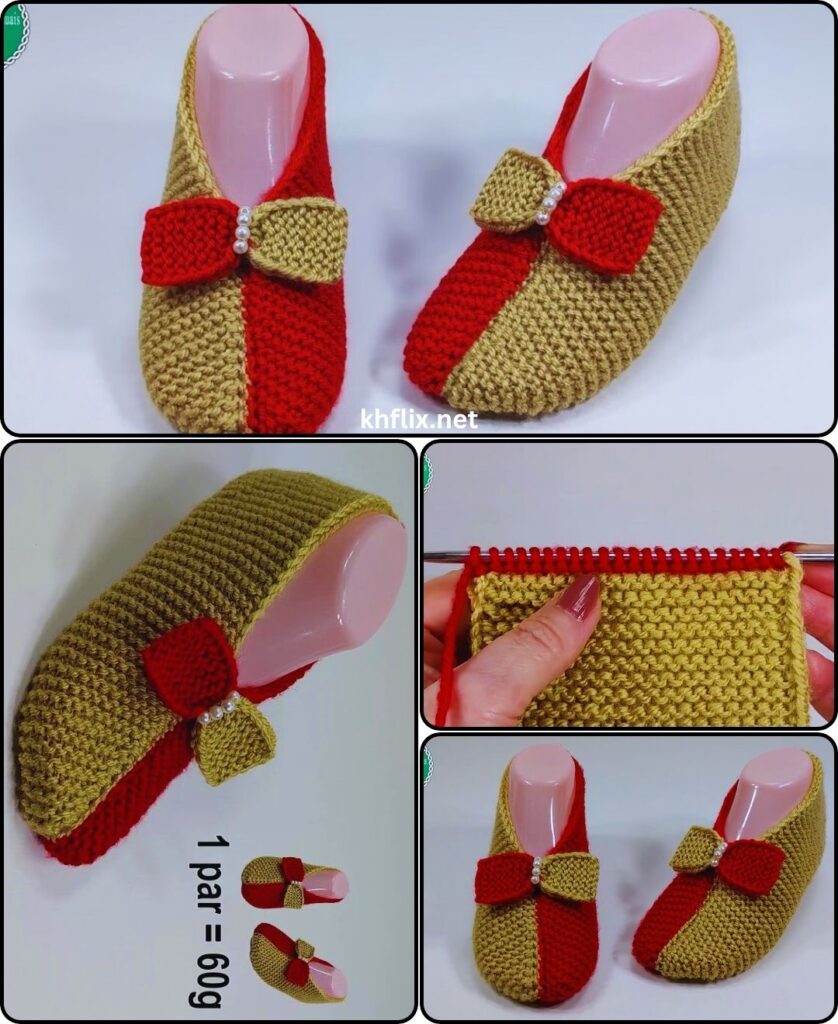
by Let’s knit some wonderfully cozy and stylish two-color knitted slippers! These are perfect for keeping your feet warm and adding a touch of handmade comfort to your home. Using two colors allows for endless creative combinations, making each pair unique.
How to Make Knitted Slippers with Two Colors: A Detailed Tutorial
This pattern will guide you through creating a comfortable and well-fitting pair of knitted slippers. You’ll knit the slipper flat in sections and then seam them together. The two-color design adds visual interest and a bit of a challenge, perfect for knitters looking to expand their skills.
Skill Level: Easy to Intermediate
You’ll need to be comfortable with:
- Casting On (CO): Starting your knitting project.
- Knit stitch (k): The basic knit stitch.
- Purl stitch (p): The basic purl stitch.
- Knit 2 Together (k2tog): A basic decrease, used for shaping.
- Purl 2 Together (p2tog): A basic decrease, used for shaping.
- Working in rows: Knitting back and forth.
- Binding Off (BO): Finishing your knitting.
- Changing colors: Seamlessly integrating your two chosen yarns.
- Seaming: Joining knitted pieces together (we’ll use mattress stitch).
Finished Slipper Dimensions (Approximate):
This pattern is written for an Adult Medium (US Women’s 7-9, US Men’s 6-8). You can adjust the size by changing your needle size or the number of rows knitted in certain sections.
- Sole Length: Approx. 9-10 inches (23-25 cm)
- Slipper Height: Approx. 3-4 inches (7.5-10 cm) at the ankle
Materials You’ll Need:
- Yarn: Approximately 150-200 yards (137-183 meters) of Worsted Weight (Medium #4) Yarn total.
- Color A (Main Color): Approx. 100-120 yards (e.g., sole, back, and part of the top).
- Color B (Accent Color): Approx. 50-80 yards (e.g., toe, cuff, or contrasting stripes).
- Recommended: A soft yet durable acrylic yarn or a wool blend. These yarns offer warmth, good stretch, and are generally easy to care for. Avoid 100% cotton as it might not be as warm or stretchy enough for slippers.
- Knitting Needles: US Size 8 (5.0mm), or the needle size that helps you achieve the correct gauge. You’ll need straight needles or a circular needle long enough to comfortably hold your stitches while working flat.
- Yarn Needle (Tapestry Needle): Essential for seamlessly weaving in all your loose ends and for seaming your slipper pieces together.
- Scissors: For cutting your yarn.
- Stitch Markers (Optional but Recommended): A few stitch markers can be helpful for marking the center stitches during shaping.
Gauge (Important for Sizing!):
Getting your gauge right is crucial to ensure your slippers fit properly. A consistent gauge means your slippers will be the correct size and won’t stretch out too much.
- In stockinette stitch (knit on right side, purl on wrong side): Aim for 18 stitches and 24 rows = 4 inches (10 cm).
- How to check your gauge:
- Cast on 20 stitches.
- Work in stockinette stitch for about 30 rows (knit one row, purl one row).
- Bind off.
- Measure a 4×4 inch square in the middle of your swatch, avoiding the edges. Count your stitches and rows. If you have more than 18 stitches or 24 rows, try a larger needle size. If you have fewer, try a smaller needle size. Adjust until your swatch matches the gauge.
Abbreviations Used in This Pattern:
- CO: Cast On
- k: knit
- p: purl
- k2tog: knit 2 stitches together (a right-leaning decrease)
- p2tog: purl 2 stitches together (a decrease)
- st(s): stitch(es)
- RS: Right Side of work
- WS: Wrong Side of work
- FO: Fasten Off
- (): repeat instructions within parentheses a specified number of times.
- []: indicates the total number of stitches you should have at the end of a specific row.
Let’s Knit Your Two-Color Slippers!
You’ll knit this slipper in three main sections: the sole, the toe, and the top/cuff. Then, you’ll seam them together.
Part 1: The Slipper Sole (Color A)
We’ll start by knitting the bottom of the slipper. This section is worked flat.
- CO 10 stitches using Color A.
- Sizing Note: For a smaller slipper, cast on 8 stitches. For a larger slipper, cast on 12 stitches. This initial cast-on determines the width of your slipper’s sole.
- Row 1 (RS): Knit all stitches. [10 sts]
- Row 2 (WS): Purl all stitches. [10 sts]
- Increase Section:
- Row 3 (RS): K1, M1 (make 1 stitch by picking up the bar between stitches and knitting into it), knit to last stitch, M1, K1. [12 sts]
- Row 4 (WS): Purl all stitches.
- Row 5 (RS): K1, M1, knit to last stitch, M1, K1. [14 sts]
- Row 6 (WS): Purl all stitches.
- Row 7 (RS): K1, M1, knit to last stitch, M1, K1. [16 sts]
- Row 8 (WS): Purl all stitches.
- You should now have 16 stitches on your needle. This wider section forms the ball of your foot.
- Straight Section:
- Work in Stockinette Stitch (knit all stitches on RS rows, purl all stitches on WS rows) for approximately 4-5 inches (10-12.5 cm). This section forms the middle of your sole. Count your rows; for an adult medium, this is usually about 20-24 rows.
- Try to measure against your foot (from the ball to just before the heel) to get a good length.
- Decrease Section (Heel):
- Next Row (RS): K1, k2tog, knit to last 3 stitches, k2tog, K1. [14 sts]
- Next Row (WS): Purl all stitches.
- Repeat these 2 rows 3 more times.[8 sts]
- This creates a gentle taper for the heel.
- Final Heel Rows:
- Work in Stockinette Stitch for 2 more rows. [8 sts]
- Bind Off all 8 stitches.
- Do NOT cut yarn yet if you plan to use this tail for seaming the back of the slipper. Leave a tail about 15-20 inches long.
Part 2: The Toe (Color B)
This section will form the tip of your slipper and will be knitted separately using your accent color.
- CO 10 stitches using Color B.
- Row 1 (RS): Knit all stitches. [10 sts]
- Row 2 (WS): Purl all stitches. [10 sts]
- Increase Section:
- Row 3 (RS): K1, M1, knit to last stitch, M1, K1. [12 sts]
- Row 4 (WS): Purl all stitches.
- Row 5 (RS): K1, M1, knit to last stitch, M1, K1. [14 sts]
- Row 6 (WS): Purl all stitches.
- Row 7 (RS): K1, M1, knit to last stitch, M1, K1. [16 sts]
- Row 8 (WS): Purl all stitches.
- You should now have 16 stitches on your needle.
- Straight Section:
- Work in Stockinette Stitch for approximately 2 inches (5 cm). This usually means about 8-10 rows.
- Bind Off all 16 stitches.
- Cut yarn, leaving a tail about 15 inches long for seaming.
Part 3: The Slipper Top/Instep (Color B or A)
This section covers the top of your foot. You can use Color B to match the toe, or Color A for contrast.
- CO 12 stitches using Color B (or your chosen color).
- Ribbing (Optional but Recommended for a snug fit):
- Row 1 (RS): (K1, P1) across to end.
- Row 2 (WS): (P1, K1) across to end.
- Repeat these 2 rows for approximately 1 inch (2.5 cm) of ribbing (4-6 rows).
- Straight Section:
- Change to Stockinette Stitch (if you did ribbing).
- Work in Stockinette Stitch for approximately 2-3 inches (5-7.5 cm). This will be about 10-15 rows.
- Bind Off all 12 stitches.
- Cut yarn, leaving a tail about 15 inches long for seaming.

Part 4: Assembling Your Two-Color Slippers
This is where all your knitted pieces come together! We’ll use the Mattress Stitch for an invisible seam.
- Sole to Toe Seam:
- Lay your Sole piece (Color A) and your Toe piece (Color B) flat, with the right sides facing up.
- Align the bound-off edge of the Toe piece with the wider (increased) end of the Sole piece.
- Using the long tail from your Toe piece and your yarn needle, carefully seam the two pieces together.
- Mattress Stitch Tip: Insert your needle under the horizontal bar between the first and second stitch on one side, then across to the other piece, picking up a bar from the corresponding stitch. Continue alternating sides, pulling the seam gently tight as you go to make it invisible.
- Top/Instep Seam:
- Align the bound-off edge of your Top/Instep piece (Color B or A) with the bound-off edge of your Toe piece. Seam these together using the mattress stitch. This creates the upper part of the slipper.
- Side Seams (Toe/Instep to Sole):
- Now, you’ll seam the sides of your combined toe/instep piece to the edges of your sole. Start from the front (toe) and work your way back.
- Match up the rows and stitches as best as you can, using the mattress stitch. This creates the sides of the slipper.
- Back Heel Seam:
- Fold the sole piece in half lengthwise, bringing the two short sides of the heel together.
- Using the long tail from the sole piece (Color A), seam the back of the heel together using the mattress stitch. This forms the closed heel of the slipper.
- Ankle Opening Seam:
- The remaining open edges will form the ankle opening of your slipper. You may need to seam the last few rows of the top/instep piece to the sides of the sole.
Part 5: Finishing Your Slippers
- Weave in All Ends:
- This is the final, crucial step for a neat, comfortable, and durable slipper. Thread any remaining loose yarn tails onto your yarn needle.
- Carefully weave them into the stitches on the inside of your slipper, making sure they are well hidden and secure. Weave in one direction for a few stitches, then change direction slightly and weave back through a few more stitches to “lock” the tail in place and prevent it from unraveling.
- Take your time with this to ensure your slippers look professional and will last.
- Make the Second Slipper:
- Repeat all steps from Part 1 through Part 4 to create your second slipper. It’s important to maintain consistent tension and follow the pattern precisely for both slippers so they are a matching pair!
- Optional: Add a Non-Slip Sole (Highly Recommended for Safety!):
- To prevent slipping on smooth floors (like wood or tile), you can apply liquid latex or “puffy paint” (fabric paint designed for traction) to the bottom of the soles.
- Turn your slippers right side out and gently try them on to stretch them to their final shape. Take them off.
- On the outside bottom of the sole, apply dots, lines, or a pattern of the non-slip product. Follow the product’s instructions for drying time. You might need multiple coats for good grip.
You’ve now created a beautiful and wonderfully comfortable pair of two-color knitted slippers! Enjoy lounging in your handmade creations. They also make fantastic, heartfelt gifts. What color combination will you try for your next pair?