by
by Let’s create a vibrant and stylish crochet tote bag featuring colorful squares! This project is a fantastic way to combine the timeless charm of individual crocheted squares with modern color play, resulting in a truly unique and personalized accessory. It’s also a great way to use up yarn scraps and explore different color combinations.
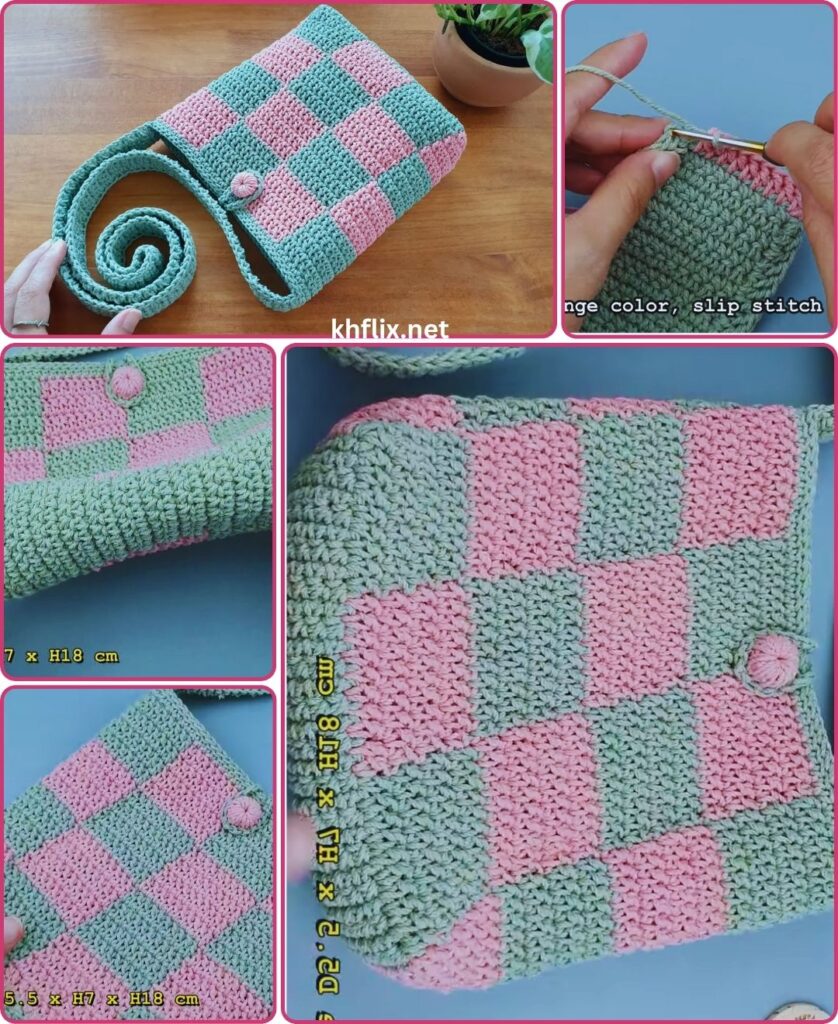
How to Crochet a Tote Bag with Colorful Squares: A Detailed Tutorial
This comprehensive guide will walk you through crocheting individual squares, assembling them into a sturdy bag, and adding essential finishing touches like a top border and handles.
Skill Level: Intermediate
This project assumes you’re comfortable with:
- Chain (ch): The basic foundation.
- Slip Stitch (sl st): For joining rounds and neatening.
- Single Crochet (sc): A dense, sturdy stitch, great for borders and handles.
- Double Crochet (dc): The primary stitch for many squares.
- Working in rounds: Crocheting in a circular motion.
- Joining new yarn colors: A key skill for colorful squares.
- Seaming techniques: For joining squares neatly.
- Weaving in ends securely.
- Basic hand sewing (for lining and attaching handles, if applicable).
Finished Bag Dimensions (Approximate):
This pattern typically creates a versatile, medium-sized tote bag, roughly 12-14 inches (30-35 cm) wide and 10-12 inches (25-30 cm) tall (excluding handles). The final size will depend on your yarn weight, hook size, and the number/size of squares you choose to make.
Materials You’ll Need:
- Yarn: Approximately 400-600 yards (365-550 meters) total of Worsted Weight (Medium #4) Cotton or Cotton Blend Yarn.
- Why Cotton? Cotton yarn is highly recommended for bags due to its durability, excellent stitch definition, and minimal stretch, all of which help the bag maintain its shape and withstand daily use.
- Color Choice: This is where the fun begins! Choose 3-6 (or more!) different colors for your squares. You could go for:
- Rainbow/Vibrant: A mix of bold, contrasting colors.
- Analogous/Gradient: Shades that are close on the color wheel (e.g., different blues, greens, or purples).
- Themed: Colors representing a season, a favorite palette, or a specific inspiration.
- Contrasting Joining Color: You might want one neutral color (e.g., cream, black, gray) specifically for joining the squares and for the handles/top border, to make the colors of the squares pop.
- Crochet Hook: Size H/5.0mm or I/5.5mm. A 5.0mm hook will generally create a denser fabric, ideal for squares that need to hold their shape for a bag.
- Yarn Needle (Tapestry Needle): Essential for seamlessly weaving in all your loose yarn tails and for seaming the squares together.
- Scissors: For cutting your yarn.
- Stitch Markers (Optional but Recommended): Useful for marking corners of squares or for positioning handles.
- Blocking Mats & Pins (Optional but Recommended): For blocking your squares to ensure uniform size and shape before assembly.
- Bag Handles (Optional): Purchase pre-made handles (leather, bamboo, plastic, or metal rings) or plan to crochet your own.
- Fabric for Lining (Optional but Highly Recommended): Cotton or poly-cotton fabric (matching or complementary), matching thread, and a sewing machine or hand-sewing needle. A lining adds significant structure, prevents stretching, and ensures small items don’t slip through any gaps.
Understanding the Square Construction & Colorwork:
We’ll use a classic Solid Granny Square pattern, which creates a dense fabric ideal for bags. For “colorful squares,” you’ll typically change colors every round or every few rounds within each square.
Color Change Tips:
To ensure your color changes are neat and virtually invisible:
- Invisible Join: When you reach the end of a round and need to change color, work the last stitch with the current color until you have two loops left on your hook. Drop the current color, pick up the new color, yarn over with the new color, and pull through the remaining two loops to complete the stitch. Then, make your slip stitch to join the round with the new color.
- Cutting Yarn: For the cleanest look and to avoid carrying colors up the side, it’s generally best to cut the old color yarn after each color change, leaving a 4-6 inch (10-15 cm) tail. Yes, this means more ends to weave in, but the result is significantly tidier.

Part 1: Crocheting Your Colorful Squares
You’ll need several squares to form your bag. The exact number depends on your desired bag size and layout. A common layout for a tote is to have a front panel, a back panel, and possibly a bottom/side strip. Let’s aim for a total of 10-12 squares (e.g., 6 for the front, 6 for the back, or 6 for front, 6 for back, and 2-4 for the bottom if you want a seamless look).
Instructions for one Solid Granny Square:
- Start (with Color A – Center):
- Make a Magic Ring (MR).
- Alternative start: Ch 4, then sl st into the first ch to form a ring.
- Round 1 (Color A):
- Ch 3 (counts as first dc).
- Work 2 dc into the MR.
- Ch 2 (this creates your first corner space).
- *(Work 3 dc into the MR, ch 2).* Repeat from * to * 2 more times. (You will have 4 groups of 3 dc and 4 ch-2 spaces).
- Sl st into the top of the beginning Ch 3 to join the round.
- [12 dc and 4 ch-2 sps]
- If using MR, pull the tail tightly to close the center hole.
- Change Color: On the final sl st, drop Color A and join Color B. Cut Color A, leaving a tail.
- Round 2 (Color B):
- Ch 3 (counts as first dc).
- Work (2 dc, ch 2, 3 dc) into the first ch-2 space (this forms your first corner).
- Ch 1 (this creates a side space between clusters).
- *(Work (3 dc, ch 2, 3 dc) into the next ch-2 space (next corner), ch 1).* Repeat from * to * 2 more times.
- Sl st into the top of the beginning Ch 3 to join.
- [24 dc, 4 ch-2 sps, 4 ch-1 sps]
- Change Color: On the final sl st, drop Color B and join Color C (or back to Color A, or a new color). Cut Color B, leaving a tail.
- Round 3 (Color C):
- Ch 3 (counts as first dc).
- Work 2 dc into the first ch-1 space.
- Ch 1.
- *(Work (3 dc, ch 2, 3 dc) into the next ch-2 space (corner).
- Ch 1.
- Work 3 dc into the next ch-1 space.
- Ch 1).* Repeat from * to * 2 more times.
- Work (3 dc, ch 2, 3 dc) into the last ch-2 space (final corner).
- Ch 1.
- Sl st into the top of the beginning Ch 3 to join.
- [36 dc, 4 ch-2 sps, 8 ch-1 sps]
- Fasten Off, leaving a 6-inch (15 cm) tail.
- Repeat: Make as many squares as you need for your chosen bag layout.
- For a simple tote: You’ll likely want 10-12 squares (e.g., 3 squares wide by 2 squares high for the front, same for the back, and 1 square wide by 2 squares long for each side/bottom if creating a rectangular bag).
Important: Blocking Your Squares (Optional but Recommended)
For a truly “neat” bag, blocking your squares is a game-changer. It ensures all your squares are the same size and lie perfectly flat, making assembly much easier and the final bag look professional.
- Method: Gently wet each square (or steam block them). Pin each square to a blocking mat (or a thick towel over a flat surface) to your desired dimensions, ensuring they are perfectly square. Let them dry completely before unpinning.
Part 2: Planning Your Bag Layout & Assembling Squares
The most common way to assemble a granny square tote bag is to create two large panels (front and back) and then potentially a separate strip for the bottom and sides, or directly seam the front and back panels together.
- Layout Planning:
- Decide how many squares you want for the front panel (e.g., 3 squares wide by 2 squares high = 6 squares).
- Decide how many for the back panel (another 6 squares).
- You can also create a strip of squares for the bottom and sides (e.g., 1 square wide by 4-6 squares long, depending on your bag’s depth and square size). For simplicity in this tutorial, we will directly seam the front and back panels, which creates a flatter bottom unless it’s designed to be folded.
- Seaming Techniques (Choose one for a neat finish):
- Mattress Stitch (Invisible, Flat): This is ideal for a truly invisible seam from the right side. Place two squares right sides up, side-by-side. Using a yarn needle and matching yarn (often your joining color), go under the horizontal bar between the stitches on one square, then under the corresponding bar on the second square, zigzagging back and forth.
- Slip Stitch Seam (Neat, Subtle Ridge): Place two squares right sides together. Insert hook through both top loops of a stitch on the first square and both top loops of the corresponding stitch on the second square. Sl st. Repeat across the row. This creates a fine, subtle ridge on the right side.
- Single Crochet Seam (Durable, Visible Ridge): Similar to sl st seam, but use sc. This creates a more visible, raised seam that adds a bit of texture and extra durability.
- Whip Stitch (Hand Sewing with Yarn Needle): Place squares right sides together. Use your yarn needle and a long piece of yarn (preferably your joining color). Pass the needle over the top edge and through both loops of both squares, repeating across. This creates a neat, flat seam.
- Assemble Front and Back Panels:
- Lay out your chosen number of squares for one side (e.g., 3 squares wide x 2 squares high).
- Using your chosen seaming method and your preferred joining color yarn, seam the squares together horizontally (row by row), then seam the rows together vertically to form one large rectangular panel.
- Repeat this process for the second panel.
- Join Front and Back Panels to Form the Bag:
- Place your two large granny square panels together, right sides facing out. Granny square bags often look great with the seams visible on the outside.
- Start at one bottom corner. Using your preferred seaming method and your chosen joining color, seam the bottom edge together.
- Continue seaming up one side.
- Repeat for the other side.
- Do not seam the top edge. This will be the opening of your bag.

Part 3: Adding the Top Edge & Handles
This section reinforces the bag’s opening and provides a way to carry it.
- Top Edge Reinforcement (Highly Recommended):
- With your chosen joining color yarn, join yarn to any stitch at the top edge of your bag opening.
- Ch 1 (does NOT count as a stitch).
- Work 1 sc in each stitch around the entire top opening of the bag. Pay attention to the corners and where squares join; aim for consistent spacing (e.g., 1 sc per dc, 1 sc in ch-1 spaces, 2-3 sc in corner ch-2 spaces if applicable).
- Sl st into the first sc to join the round.
- Repeat for 2-3 more rounds of sc for a very sturdy, non-stretchy top edge.
- Fasten off, leaving a 6-inch (15 cm) tail.
- Attaching Handles (Choose one option):
- Option A: Crocheted Straps (Make 2):
- With your chosen joining color, ch 8 (or more for a wider strap).
- Work sc into the 2nd ch from your hook and across. (You should have 7 sc).
- Ch 1, turn. Work sc in each stitch across.
- Repeat the last step (Ch 1, turn, sc across) until your strap reaches the desired length (e.g., 18-24 inches (45-60 cm) for shoulder straps, 10-12 inches (25-30 cm) for hand straps).
- Fasten off, leaving a very long tail (at least 12-18 inches / 30-45 cm) on each end of the strap for sewing.
- Attach: Lay your bag flat. Position each strap evenly on the inside of the bag’s top edge, usually about 3-4 inches (7.5-10 cm) in from the side seams. Thread one of the long tails onto your yarn needle. Firmly sew the strap end to the bag’s top sc border, going through multiple layers of stitches for maximum durability. Repeat for all four strap ends.
- Option B: Purchased Handles (Leather, Bamboo, etc.):
- Follow the specific instructions for your purchased handles. Most will have small holes for sewing or clips.
- Attach: Position them evenly on the top edge of your bag. Use strong sewing thread (matching your joining yarn or a clear nylon/polyester thread) and a regular sewing needle to firmly stitch them to the top sc border of the crochet fabric. Stitch through multiple times for strong security.
- Option A: Crocheted Straps (Make 2):
Part 4: Finishing Touches (Highly Recommended for a “Beautiful” Bag!)
These final steps are critical for a professional, durable, and truly beautiful finished product.
- Weave in ALL Ends: This is often the most time-consuming part, but it’s crucial for a clean, neat, and durable bag. Use your yarn needle to meticulously weave in all tails from your square beginnings, color changes, and seaming.
- How to Weave Neatly: Weave the tails into the stitches of the same color as the tail. Weave in one direction for about 1.5-2 inches (4-5 cm), then subtly change direction and weave back through some of the same stitches. This “locks” the tail in place and prevents it from unraveling. Be patient and thorough; well-woven ends are virtually invisible and significantly contribute to your bag’s longevity and appearance.
- Blocking the Finished Bag (Optional but Very Helpful): Even if you blocked the individual squares, blocking the assembled bag can help it take on its final shape and drape beautifully.
- Gently stuff your bag with towels, old t-shirts, or crumpled paper to fill it to its desired shape.
- Using a spray bottle, lightly mist the entire bag evenly with water (if using cotton yarn). For some synthetic fibers, you can gently hover a steamer or an iron (on a low, steam setting) over the fabric without touching it.
- Gently shape the bag with your hands while it’s damp, ensuring the base is flat, the sides are even, and the handles are positioned correctly.
- Allow the bag to air dry completely and thoroughly before removing the stuffing. This can take 24-48 hours.
- Lining the Bag (Highly Recommended for Durability & Functionality): A fabric lining dramatically improves the functionality and longevity of any crochet bag. It provides significant structure, prevents the bag from stretching out, helps it hold its shape even when filled, and, crucially, ensures small items (like keys, pens, or coins) don’t slip through any tiny gaps in your crochet stitches.
- Measure: Carefully measure the finished dimensions of your crochet bag (its height, its width, and its depth once assembled).
- Cut Fabric: Cut fabric pieces to match the inside dimensions of your bag. You’ll typically need a main body piece (a large rectangle that will wrap around the inside) and a separate bottom piece. Remember to add a generous seam allowance (e.g., 1/2 inch or 1.2 cm) to all edges of your fabric pieces.
- Sew Fabric Lining: Stitch the fabric pieces together (right sides facing each other) to create a fabric “bag” that will fit snugly inside your crochet bag. Press all seams open for a neat finish. Create a neat hem around the top edge of the fabric lining.
- Insert and Secure: Carefully place the completed fabric lining inside your crochet bag. Align the top edges of both the crochet bag and the lining. Fold the hemmed top edge of the lining over the top edge of the crochet bag slightly (if needed) to create a clean finish. Then, using matching thread and a hand-sewing needle, hand-stitch the lining securely to the inside top edge of the crochet bag. Stitch carefully so the stitches are not visible from the outside of your beautiful bag.
- Closure (Optional): If you want to add a closure to your bag, consider a magnetic snap (sewn between the lining and crochet fabric at the top center), a simple button and loop, or even a zipper (typically sewn into the lining).
Congratulations! You’ve now created a truly unique, beautiful, and functional crochet tote bag with colorful squares! This handmade accessory is a fantastic way to express your creativity and will be a cherished addition to your collection. What delightful color combinations will you use for your next square bag?