 by
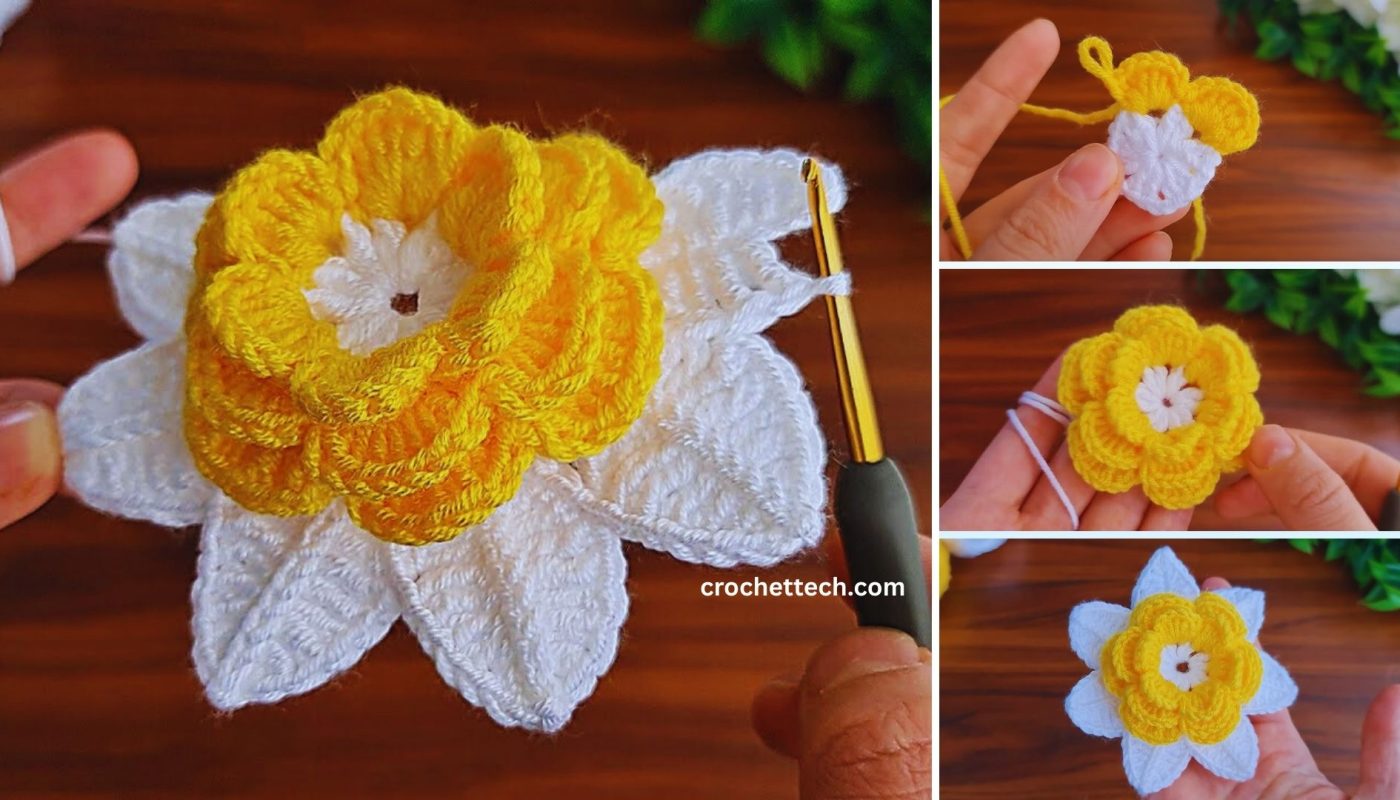
by Let’s create a beautiful crochet leaf rose flower! This combines the classic elegance of a spiraled rose with delicate green leaves for a truly complete and natural look. This detailed guide will walk you through making both the rose and its accompanying leaves, showing you how to assemble them into a charming, lifelike bloom.
How to Crochet a Leaf Rose Flower: A Detailed Step-by-Step Guide
This tutorial focuses on crafting a traditional spiraling rose and pairing it with realistically shaped leaves. You’ll learn how to build the rose in layers and then integrate the green elements to create a lovely, finished flower perfect for embellishments or decor.
Skill Level: Intermediate
This project assumes you’re comfortable with:
- Chain (ch): The basic foundation.
- Slip Stitch (sl st): For joining and neatening.
- Single Crochet (sc): A dense stitch.
- Half Double Crochet (hdc): An intermediate stitch.
- Double Crochet (dc): A common stitch for height.
- Treble Crochet (tr) / Triple Crochet: A taller stitch for larger petals.
- Working into specific stitches or chain spaces.
- Weaving in ends securely.
Finished Flower Dimensions (Approximate):
A finished rose with leaves, using worsted weight yarn, will typically be about 2.5-4 inches (6.5-10 cm) in diameter and 1-1.5 inches (2.5-4 cm) tall, depending on your tension and how tightly you roll the rose.
Materials You’ll Need:
- Yarn:
- Color A (Rose Petals): Approximately 15-25 yards (14-23 meters) of Worsted Weight (Medium #4) Yarn in your chosen rose color (red, pink, white, yellow, etc.). Cotton or acrylic blends work well.
- Color B (Leaves): A small amount (5-10 yards) of Worsted Weight (Medium #4) Yarn in Green for the leaves.
- Crochet Hook: Size G/4.0mm or H/5.0mm. A 4.0mm hook will give a slightly denser rose and leaves, while a 5.0mm will result in a softer, slightly larger flower.
- Yarn Needle (Tapestry Needle): Essential for seamlessly weaving in all your loose yarn tails and for sewing the rose components together.
- Scissors: For cutting your yarn.
Understanding the Flower Construction:
You’ll create this charming flower in two main parts, then assemble them:
- Rose Petal Strip: A long, flat piece that gradually increases in height, which will then be rolled into the rose shape.
- Leaves: Individual leaf shapes crocheted separately.
- Assembly: Rolling the rose, securing it, and then attaching the leaves to the base.
Let’s Crochet Your Leaf Rose Flower!
Part 1: Crocheting the Rose Petal Strip (Color A)
This strip forms the core of your rose. The length of your starting chain determines the size and fullness of your rose. A longer chain creates a fuller rose.
- Starting Chain:
- With your rose color yarn (Color A), make a slip knot and place it on your hook.
- Chain (ch) 40. (This will make a medium-sized rose. For a smaller rose, chain fewer stitches, e.g., 30. For a larger, fuller rose, chain more, e.g., 50-60.)
- Row 1 (Base Row – Back Bumps):
- We’ll work into the back bumps of the chain stitches. This creates a neat, finished edge that’s perfect for the base of your rose when rolled.
- Work 1 single crochet (sc) into the 2nd chain from your hook (working into the back bump).
- Work 1 sc into the back bump of each remaining chain across.
- [Total: 39 sc]
- Ch 1, turn.
- Row 2 (Petal Foundation):
- Work 1 sc into the first sc.
- Work 1 sc into each sc across the row.
- [Total: 39 sc]
- Ch 1, turn.
- Row 3 (Smallest Petals – Inner Layer):
- Work (1 sc, ch 1) into the first sc.
- *Skip 1 sc. Work (1 sc, ch 1) into the next sc.*
- Repeat from * to * across the row.
- [Total: Approximately 20 (sc, ch 1) pairs]
- Ch 2, turn.
- Row 4 (Medium Petals):
- Work (2 half double crochet (hdc), ch 1) into the first ch 1 space from the previous row.
- *Work (2 hdc, ch 1) into the next ch 1 space.*
- Repeat from * to * across the row.
- [Total: 20 (2hdc, ch 1) groups]
- Ch 3, turn.
- Row 5 (Larger Petals):
- Work (3 double crochet (dc), ch 1) into the first ch 1 space from the previous row.
- *Work (3 dc, ch 1) into the next ch 1 space.*
- Repeat from * to * across the row.
- [Total: 20 (3dc, ch 1) groups]
- Ch 4, turn.
- Row 6 (Largest Petals – Outer Layer):
- Work (4 treble crochet (tr), ch 1) into the first ch 1 space from the previous row. (To make a treble crochet (tr): Yarn over twice, insert hook into stitch/space, yarn over, pull up a loop [4 loops on hook], *yarn over, pull through 2 loops* twice.)
- *Work (4 tr, ch 1) into the next ch 1 space.*
- Repeat from * to * across the row.
- [Total: 20 (4tr, ch 1) groups]
- Fasten off, leaving a very long tail (at least 18-24 inches / 45-60 cm) for sewing the rose together. This long tail is critical!
Part 2: Crocheting the Leaves (Color B)
You’ll make two or three individual leaves to accompany your rose.
- Leaf Pattern (Repeat for 2-3 leaves):
- With your green yarn (Color B), make a slip knot.
- Chain (ch) 8.
- Work 1 sc into the 2nd chain from your hook.
- Work 1 hdc into the next chain.
- Work 1 dc into the next 2 chains.
- Work 1 hdc into the next chain.
- Work 1 sc into the last chain.
- Chain 2 (this acts as a turning chain and a little point for your leaf).
- Now, working down the opposite side of your starting chain (into the unused loops):
- Work 1 sc into the very first stitch (same as the last sc you made on the other side).
- Work 1 hdc into the next hdc.
- Work 1 dc into the next 2 dc.
- Work 1 hdc into the next hdc.
- Work 1 sc into the last sc.
- Slip stitch (sl st) into the first sc you made at the beginning of the round to join the leaf.
- Fasten off, leaving a tail about 8-10 inches (20-25 cm) long for sewing.
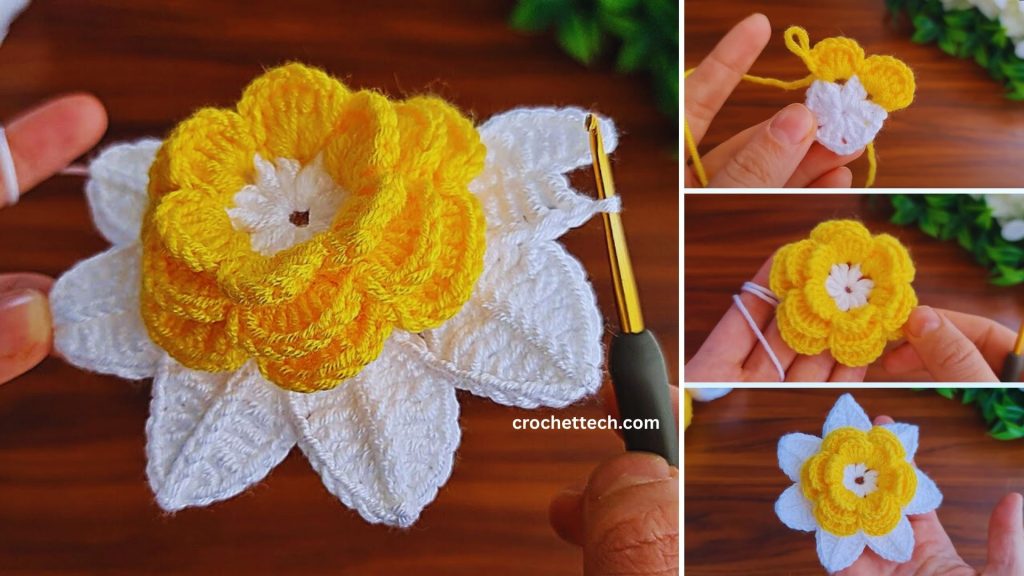
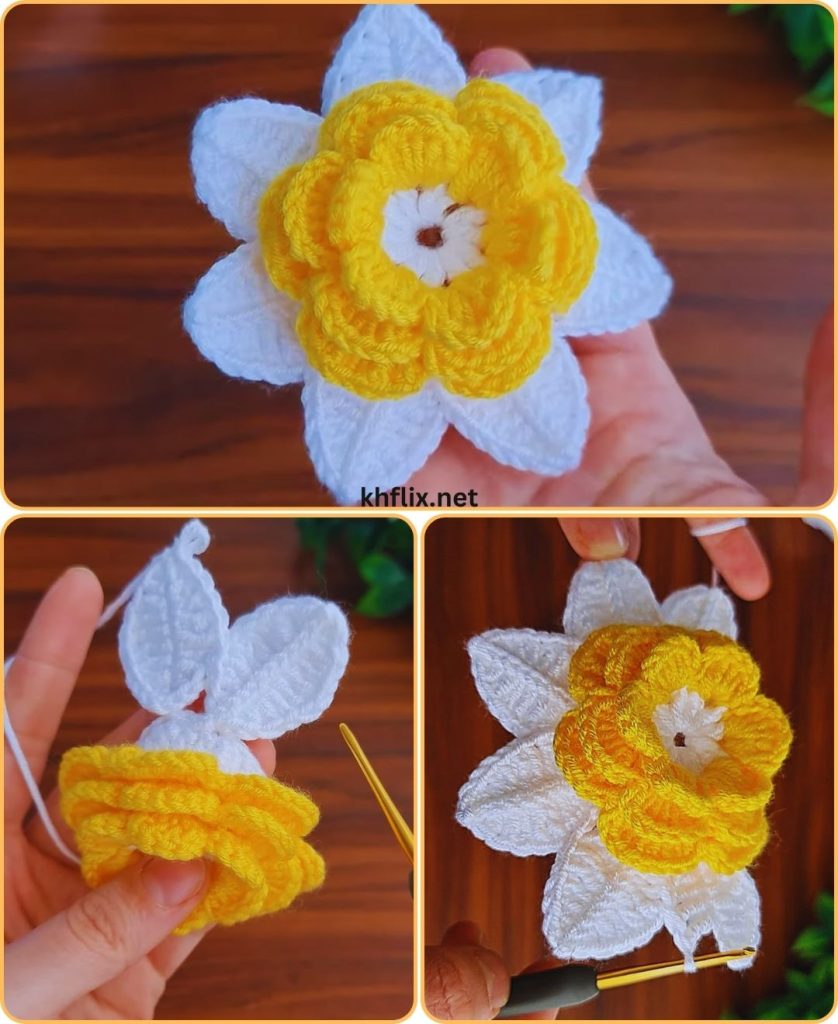
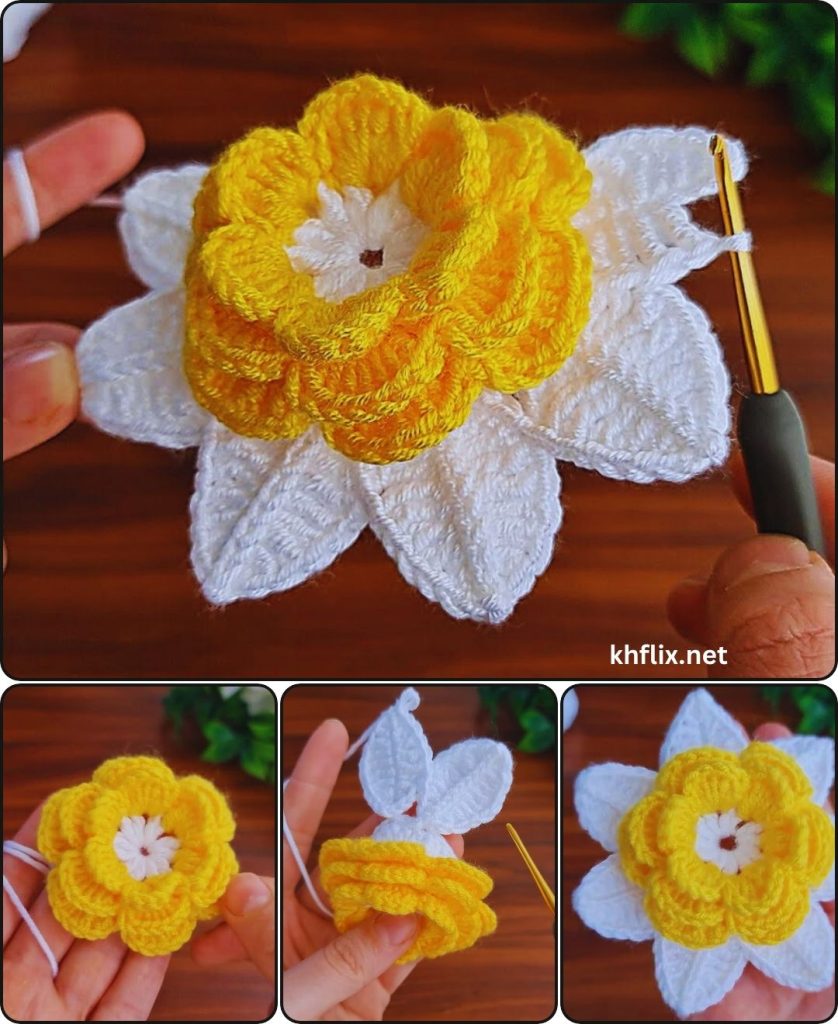
Part 3: Assembling Your Leaf Rose Flower
This is where your individual components come together to form the complete flower.
- Roll and Shape the Rose:
- Take the end of the rose strip with the smallest petals (Row 3, the end where you started your initial chain).
- Roll this end tightly inwards a few times to form the center bud of the rose. Use your fingers to keep it snug.
- As you continue to roll the strip, slightly angle it downwards. This will naturally create the spiral effect, with the larger petals (from Rows 4, 5, and 6) flaring out more than the tighter inner ones.
- Let the petals overlap naturally as you roll. Don’t pull too tightly; allow the petals to sit somewhat loosely for a natural look.
- Once you’ve rolled the entire strip into a rose shape, you can use a few sewing pins to temporarily hold the base of the rose together.
- Sew the Rose Base:
- Thread the long tail you left from Row 6 of the rose onto your yarn needle.
- Starting from the very center of the rose’s base, pass your yarn needle repeatedly through all layers of the rolled fabric, going from one side of the base to the other.
- Stitch across the entire base, making sure to catch every layer to secure the spiral. Aim to create strong, tight stitches at the base that are not visible from the front of the rose.
- Work your way back and forth across the base several times to ensure it’s very sturdy and won’t unravel.
- As you sew, you can gently shape the petals with your fingers, puffing them out slightly if desired.
- Attach the Leaves:
- Position your crocheted leaves at the base of your rose, arranging them to your liking (e.g., two leaves slightly overlapping, or three spaced out).
- Using your yarn needle and the tails from the leaves, carefully sew each leaf onto the underside of the rose’s base. Pass the needle through a part of the leaf and into the rose’s base, securing it firmly.
- Ensure the leaves are firmly attached and lie flat against the base.
Final Touches:
- Weave in ALL Remaining Ends:
- This is the final, crucial step for a neat, durable flower. You’ll have several tails from your color changes and leaf attachments. Use your yarn needle to meticulously weave in every single loose yarn tail.
- How to Weave Neatly: Weave the tails into the stitches of the same color as the tail. Go back and forth through the stitches for at least 1.5-2 inches (4-5 cm), making sure to pass through the fibers of the yarn to secure it. Subtly change direction at least once (e.g., weave along a row, then weave back through some of the same stitches diagonally or perpendicularly) to “lock” the tail in place and prevent it from unraveling. Trim any excess yarn close to the fabric.
- Gently Shape:
- With your fingers, gently fluff and adjust the petals and leaves to achieve your desired rose shape. You can slightly curl individual petals outwards or adjust the angle of the leaves for a more natural appearance.
Congratulations! You’ve successfully crocheted a beautiful leaf rose flower! This charming handmade embellishment is now ready to adorn a wide range of projects, from hats and bags to blankets and home decor.