 by
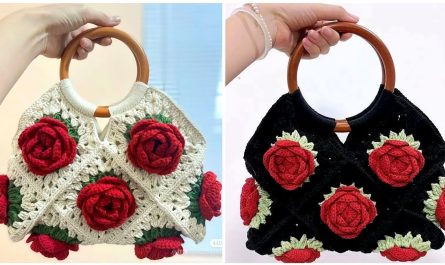
by Let’s create a truly stunning crochet handbag with a large, statement rose flower! This project is a fantastic way to showcase your crochet skills, combining the practicality of a beautiful bag with the striking elegance of an oversized, handmade bloom. It’s a statement piece that’s sure to draw compliments.
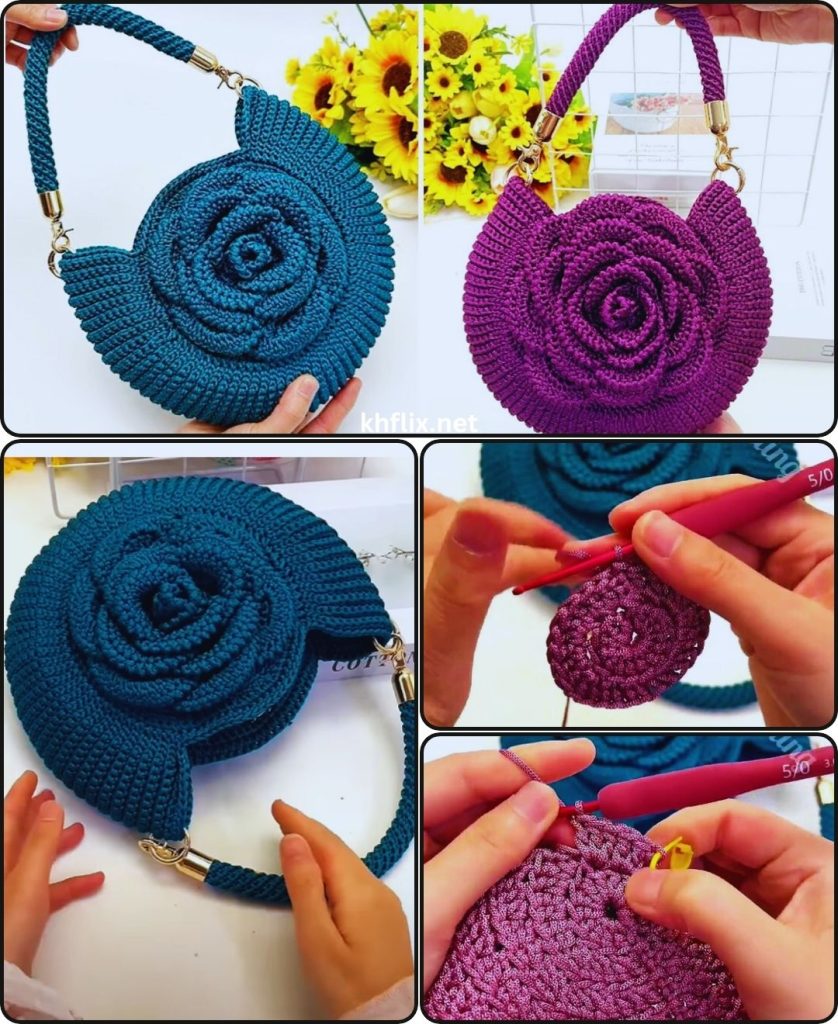
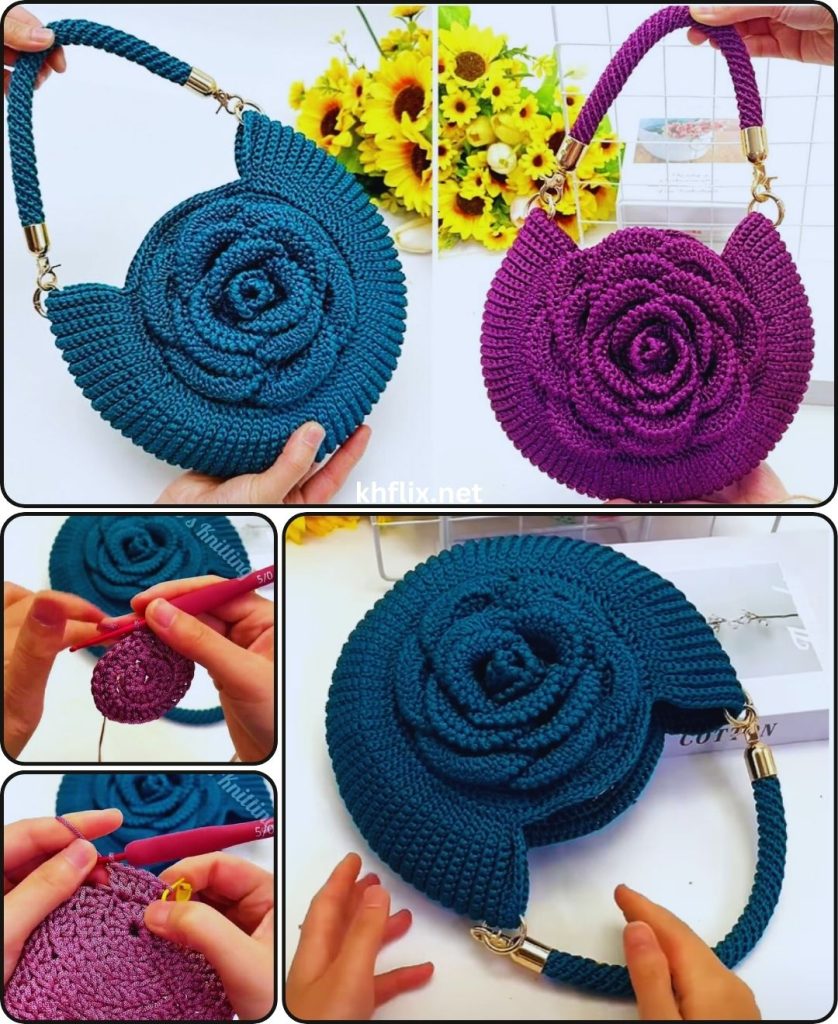
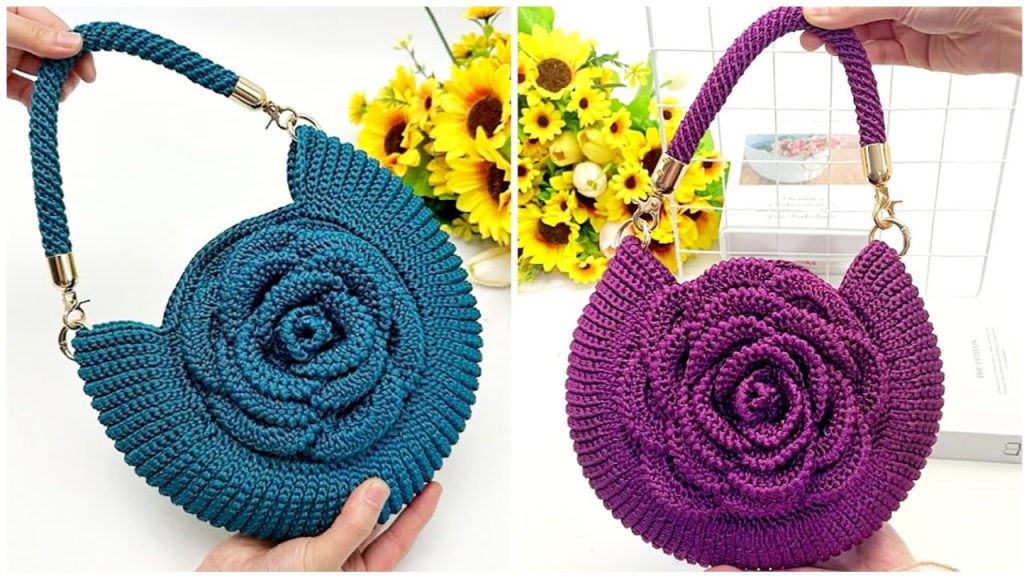
How to Make a Beautiful Crochet Handbag with a Large Rose Flower
This comprehensive guide will walk you through crocheting a sturdy and stylish handbag, then instruct you on how to create a magnificent, large crochet rose to be the bag’s focal point. We’ll ensure both the bag and the flower are well-structured and beautifully finished.
Skill Level: Intermediate
This project is ideal if you’re comfortable with:
- Chain (ch): The basic foundation.
- Slip Stitch (sl st): For joining rounds and neatening.
- Single Crochet (sc): A dense stitch, great for sturdy bag fabric.
- Half Double Crochet (hdc): A versatile stitch for height.
- Double Crochet (dc): A common stitch for taller elements.
- Magic Ring (MR): An adjustable ring to start circular projects neatly (an alternative start is also provided).
- Working in rounds/rows: Crocheting in a circular/oval manner and back-and-forth.
- Working into specific stitches or chain spaces.
- Creating a strong, even tension.
- Fastening off: Securing your work.
- Weaving in ends securely.
Finished Bag & Rose Dimensions (Approximate):
This pattern creates a medium-to-large-sized handbag, typically around 12-14 inches (30-35 cm) wide and 10-12 inches (25-30 cm) tall (excluding handles). The large crocheted rose will be about 4-6 inches (10-15 cm) in diameter, making it a truly prominent and eye-catching feature.
Materials You’ll Need:
Gathering your materials before you begin makes for a smoother crocheting experience.
- Yarn:
- Main Bag Color: Approximately 600-800 yards (550-730 meters) of Worsted Weight (Medium #4) Cotton or Cotton Blend Yarn. Cotton is highly recommended for bags due to its durability, minimal stretch, and excellent stitch definition. Choose a classic, versatile color (e.g., black, cream, grey, navy, or a deep jewel tone) that will complement your rose.
- Rose Color: Approximately 30-50 yards (27-45 meters) of Worsted Weight (Medium #4) Yarn in your desired rose color (e.g., classic red, vibrant pink, soft ivory, or deep burgundy).
- Green Yarn (Optional for leaves): A few yards of Worsted Weight (Medium #4) Yarn in a shade of green for large leaves.
- Crochet Hook: Size H/5.0mm. This size creates a dense fabric suitable for a sturdy bag and works well for the large rose too.
- Yarn Needle (Tapestry Needle): Essential for seamlessly weaving in all your loose yarn tails and for securely sewing the rose (and optional leaves) onto the bag.
- Scissors: For cutting your yarn.
- Stitch Marker (Optional but Highly Recommended): Very helpful for marking the beginning of your rounds.
- Bag Handles (Optional): A pair of ready-made bag handles (bamboo, leather, or sturdy plastic rings) or you can crochet your own straps (instructions provided for crocheted handles).
- Fabric Lining (Optional but Highly Recommended): About 1 yard (0.9 meters) of coordinating sturdy fabric (e.g., cotton twill, duck cloth), needle, and matching thread/sewing machine for a more professional finish, added durability, and to prevent stretching.
- Magnetic Snap Closure (Optional): For a secure closing mechanism.
Understanding the Bag & Rose Construction:
We’ll approach this project in two main phases:
- Crocheting the Handbag Body: This forms the sturdy and spacious base for your floral artistry. It will be built seamlessly from an oval base.
- Crocheting and Attaching the Large Rose (and optional leaves): You’ll create the substantial rose separately and then carefully sew it onto the finished bag, making it a prominent feature.
Let’s Crochet Your Handbag with a Large Rose Flower!
Part 1: Crocheting the Handbag
We’ll use a simple yet strong stitch pattern (single crochet) to ensure your bag is durable and holds its shape well.
- Crocheting the Sturdy Oval Base (Main Bag Color):
- Make a slip knot and chain 41. (This will make a wider base for a larger bag. Adjust if needed; an odd number here will give you an even stitch count after the first round.)
- Round 1: Work 2 sc into the 2nd ch from your hook. Work 1 sc into each of the next 38 chains across. Work 3 sc into the very last chain. Working down the opposite side of the foundation chain: Work 1 sc into each of the next 38 chains across. Work 1 sc into the very first chain (the one where you initially put 2 sc). Sl st into the first sc to join. [Total: 82 sc]
- Round 2: Ch 1 (does not count as a stitch). Work 2 sc into the first stitch. Work 1 sc into the next 39 stitches. Work 2 sc into each of the next 3 stitches. Work 1 sc into the next 39 stitches. Work 2 sc into each of the last 2 stitches. Sl st into the first sc to join. [Total: 88 sc]
- Round 3: Ch 1. Work 2 sc into the first stitch. Work 1 sc into the next 40 stitches. Work 2 sc into each of the next 3 stitches. Work 1 sc into the next 40 stitches. Work 2 sc into each of the last 2 stitches. Sl st into the first sc to join. [Total: 94 sc]
- Base Check: Your base should be a flat oval and roughly the size you want the bottom of your bag to be. If it curls up, your tension might be too tight, or you need more increases. If it ruffles, you might have too many increases, or your tension is too loose. Adjust as needed. Do not fasten off.
- Building the Bag Body (Main Bag Color):
- Transition Round: Ch 1. Work 1 single crochet in the Back Loop Only (BLO) of each stitch around. Sl st into the first sc to join. [Total: 94 sc] (This creates a defined edge, helping the bag stand upright and forming a nice corner.)
- Body Rounds: Ch 1. Work 1 sc into each stitch around (now working through both loops). Sl st into the first sc to join. Repeat this round for approximately 25-30 more rounds, or until your bag reaches the desired height (e.g., 10-12 inches / 25-30 cm).
- Maintain consistent tension for an even, dense fabric. Do not fasten off.
- Adding the Top Border (Main Bag Color):
- Border Rounds: Ch 1. Work 1 sc into each stitch around. Sl st into the first sc to join. Repeat this round for 4-5 more times. This creates a very dense and firm top edge for the bag.
- Optional Firm Edge (Crab Stitch): For an exceptionally firm and decorative top edge, add a final round of Crab Stitch (Reverse Single Crochet). Ch 1. Work 1 sc into the stitch to your right (working backward) in each stitch around. Sl st into the first crab stitch to join.
- Fasten off, leaving a 6-inch (15 cm) tail for weaving in.
- Crafting and Attaching the Handles (Main Bag Color or Purchased):
- A. If using purchased handles: Position your handles evenly on the top rim of the bag. Use your yarn needle and a matching yarn tail (or strong thread) to firmly stitch the handles to the bag’s top border. Go through multiple times for security.
- B. If crocheting handles (Make 2):
- Ch 70-80 (adjust for desired strap length for a shoulder bag).
- Row 1: Work 1 sc into the 2nd ch from hook. Work 1 sc into each remaining ch across. [Total: 69-79 sc]
- Ch 1, turn.
- Row 2: Work 1 sc into each sc across the row. [Total: 69-79 sc]
- Repeat Row 2 for 3-4 more rows until your handle reaches the desired width and sturdiness (e.g., 5-6 rows total for a firm handle).
- Fasten off, leaving a very long tail (at least 20-25 inches / 50-64 cm) at each end of the strap for sewing.
- Make a second identical strap.
- Attaching Crocheted Handles: Lay your bag flat. Position the handles on the inside of the bag’s top border. Typically, each handle is centered over the side curve, approximately 3-4 inches (7.5-10 cm) in from the side edges. Thread a long tail from a handle onto your yarn needle. Stitch firmly back and forth through the handle end and the bag’s top border multiple times to ensure a very strong attachment. Repeat for all four handle ends. Weave in any remaining handle tails very securely.
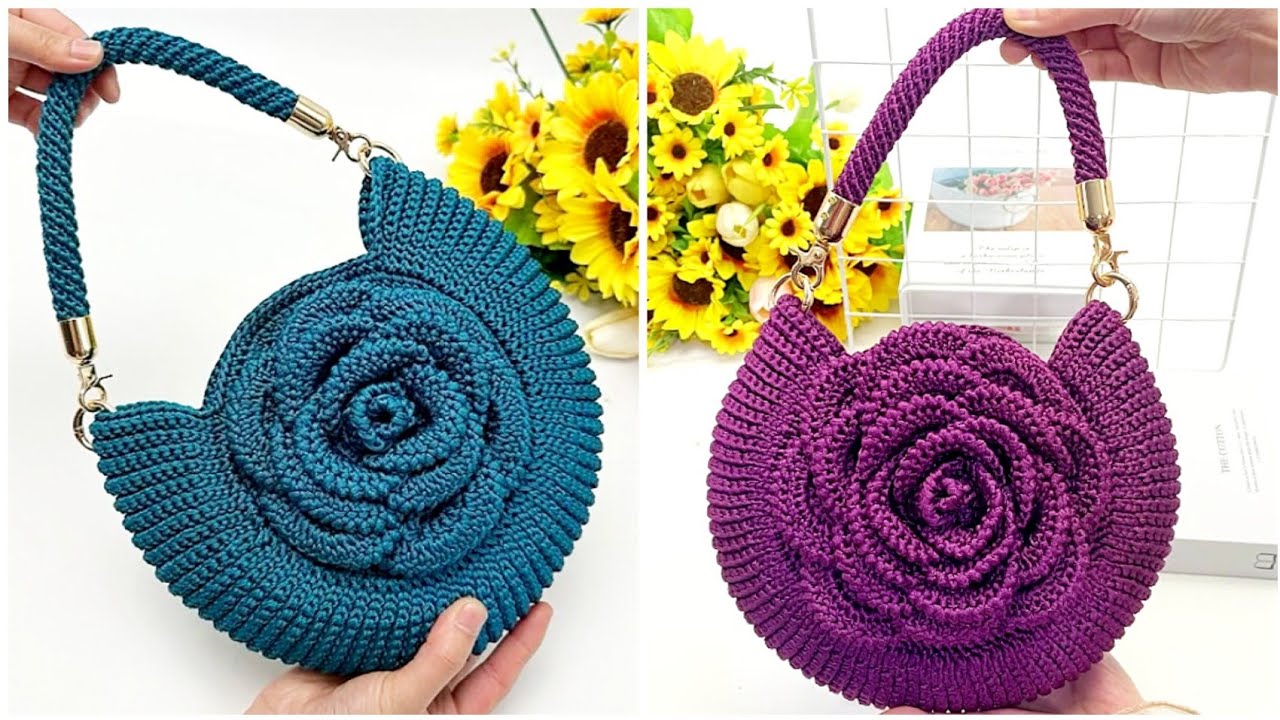
Part 2: Crocheting and Attaching the Large Rose (and Optional Leaves)
This is the show-stopping element of your bag!
- Crocheting the Large Rose Strip (Rose Color):
- Make a slip knot with your rose color yarn and chain 50-60 (the longer the chain, the fuller and larger the rose). For a large, impressive rose, ch 55.
- Row 1 (Foundation): Work 1 sc into the 2nd ch from your hook. Work 1 sc into each remaining ch across. [Total: 54 sc for ch 55 example]. Ch 1, turn.
- Row 2 (Petal Formation – Inner Layer): Work 1 hdc into the first stitch. Work 2 hdc into the next stitch. Repeat this pattern: * 1 hdc into the next stitch, 2 hdc into the next stitch * across the row. This creates the wavy inner petals. Ch 2, turn.
- Row 3 (Petal Formation – Mid Layer): Work 1 dc into the first stitch. Work 2 dc into the next stitch. Repeat this pattern: * 1 dc into the next stitch, 2 dc into the next stitch * across the row. Ch 3, turn.
- Row 4 (Petal Formation – Outer Layer): Work 1 treble crochet (tr) into the first stitch. Work 2 tr into the next stitch. Repeat this pattern: * 1 tr into the next stitch, 2 tr into the next stitch * across the row. This creates the very tall, prominent outer petals. Ch 1, turn.
- Row 5 (Base Edge): Work 1 sc into the first stitch. Work 1 sc into each stitch across the row. This creates a clean, straight edge that will be the base of your rose.
- Fasten off, leaving a very long tail (at least 25-30 inches / 64-76 cm) for assembling the rose.
- Assembling the Large Rose:
- Lay your crocheted strip flat. One side (from Row 5) will be relatively straight, and the other side (from Rows 2-4) will be very wavy and varied in height.
- Take the starting end of the strip (the short tail end) and begin to tightly roll it inward towards the first few stitches. This forms the tight center bud of your rose.
- As you continue to roll, loosen your tension significantly with each successive turn. You want the outer layers to be much looser and more open, like natural, full rose petals. Keep rolling the strip around the central bud, allowing the wavy, taller edges to naturally create the petal layers. The
scedge (Row 5) should form the bottom base of your rose as you roll. - Once you’ve rolled the entire strip into a rose shape, hold it firmly with one hand so it doesn’t unravel.
- Thread the long tail you left onto your yarn needle.
- Secure the Rose (Crucial Step): Stitch firmly through all the layers of the rose at its base to secure them. Insert your needle from one side of the base, pass it through all the layers, and bring it out the other side. Continue stitching back and forth through the base of the rose, going through all the layers. Do this multiple times (8-10 stitches) in different directions across the base to ensure it’s very firmly secured and won’t come apart. The stitches should be on the underside of the rose, out of sight. Weave in any remaining tail securely into the base of the rose. Weave in the short starting tail too.
- Crocheting Optional Large Leaves (Green Yarn – Make 2-3):
- Make a slip knot with green yarn and chain 12-15.
- Work 1 sl st into the 2nd ch from hook.
- Work 1 sc into the next ch.
- Work 1 hdc into the next 2 ch.
- Work 1 dc into the next 3-5 ch (depending on desired length).
- Work 1 hdc into the next 2 ch.
- Work 1 sc into the next ch.
- Work 1 sl st into the last ch.
- Ch 2 (this creates a little point for the leaf tip).
- Working down the opposite side of the foundation chain:
- Work 1 sl st into the same last ch.
- Work 1 sc into the next ch.
- Work 1 hdc into the next 2 ch.
- Work 1 dc into the next 3-5 ch.
- Work 1 hdc into the next 2 ch.
- Work 1 sc into the next ch.
- Work 1 sl st into the next ch.
- Fasten off, leaving a tail for sewing. Make a second identical leaf. Weave in ends.
- Attaching the Large Rose (and Leaves) to the Handbag:
- Decide on the perfect prominent placement for your large rose on the front of your handbag. It often looks best slightly off-center, or on one of the lower corners of the front panel.
- Use your yarn needle and a yarn tail from the rose’s base to securely stitch the rose onto the bag. Go through the very base of the rose and into the stitches of the bag. Make sure your stitches are invisible from the front of the rose. Stitch all around the base to ensure it’s firmly attached.
- If you made leaves, position them strategically at the base or slightly peeking out from under the rose. Stitch them securely to the bag as well. Weave in all remaining tails very neatly.

Part 3: Final Finishing Touches
- Weave in ALL Remaining Ends:
- This is paramount for a professional-looking and durable handbag. You’ll have tails from your bag construction, handle attachments, and the rose/leaves. Use your yarn needle to meticulously weave in every single loose yarn tail.
- Technique: Weave into stitches of the same color. Go in one direction for 1.5-2 inches (4-5 cm), then change direction and weave back through some of the same stitches to “lock” the tail. Trim excess close to the fabric.
- Blocking (Optional but Highly Recommended):
- Blocking can significantly improve the shape, drape, and overall finish of your crocheted bag and help the rose sit beautifully.
- Method (Wet Blocking – Ideal for Cotton/Acrylic):
- Gently stuff your bag with clean towels or crumpled paper to fill it to its desired shape. Avoid overstuffing.
- Using a spray bottle, lightly mist the entire bag and rose evenly with water until damp but not soaking wet.
- Carefully shape the bag, ensuring the base is flat, sides are even. Gently open and arrange the petals of your rose as desired. You can even use pins to hold petals in place for more definition while drying.
- Allow the bag to air dry completely and thoroughly in a well-ventilated area before removing the stuffing. This can take 24-48 hours.
- Add a Fabric Lining (Optional for Professional Finish and Durability):
- A fabric lining provides a smooth interior, hides all your yarn tails, prevents small items from slipping through stitches, and adds significant durability and structure, especially for a larger bag.
- Measure the inside dimensions of your finished bag precisely. Cut fabric pieces (typically two main body pieces and one bottom oval piece) adding a seam allowance (e.g., 0.5 inches / 1.25 cm) to all edges.
- Sew the fabric pieces together to create an inner lining bag.
- Insert the fabric lining into your crocheted bag.
- Fold over the top raw edge of the fabric lining (using your seam allowance) and hand-stitch it neatly to the inside top border of your crocheted bag using a needle and matching strong thread.
- Add a Magnetic Snap Closure (Optional):
- If you want a closure, purchase a magnetic snap. Position the two halves on the inside of the bag’s top border, making sure they align. Use a needle and strong thread to sew them securely to the inside of the crocheted fabric or the fabric lining if you added one.
Congratulations! You’ve successfully created a truly unique and beautiful crochet handbag adorned with a magnificent large rose flower! This handmade creation is not just a practical accessory; it’s a piece of wearable art, showcasing your impressive skill and creativity. Enjoy carrying your exquisite new bag wherever you go!