by
by Let’s crochet an absolutely fabulous easy striped tote bag! This tutorial is designed specifically for beginners, focusing on straightforward stitches and a simple construction method that’s both quick and incredibly satisfying. You’ll learn how to create a durable, attractive bag with eye-catching stripes, perfect for groceries, beach trips, or just as a stylish everyday carry-all.
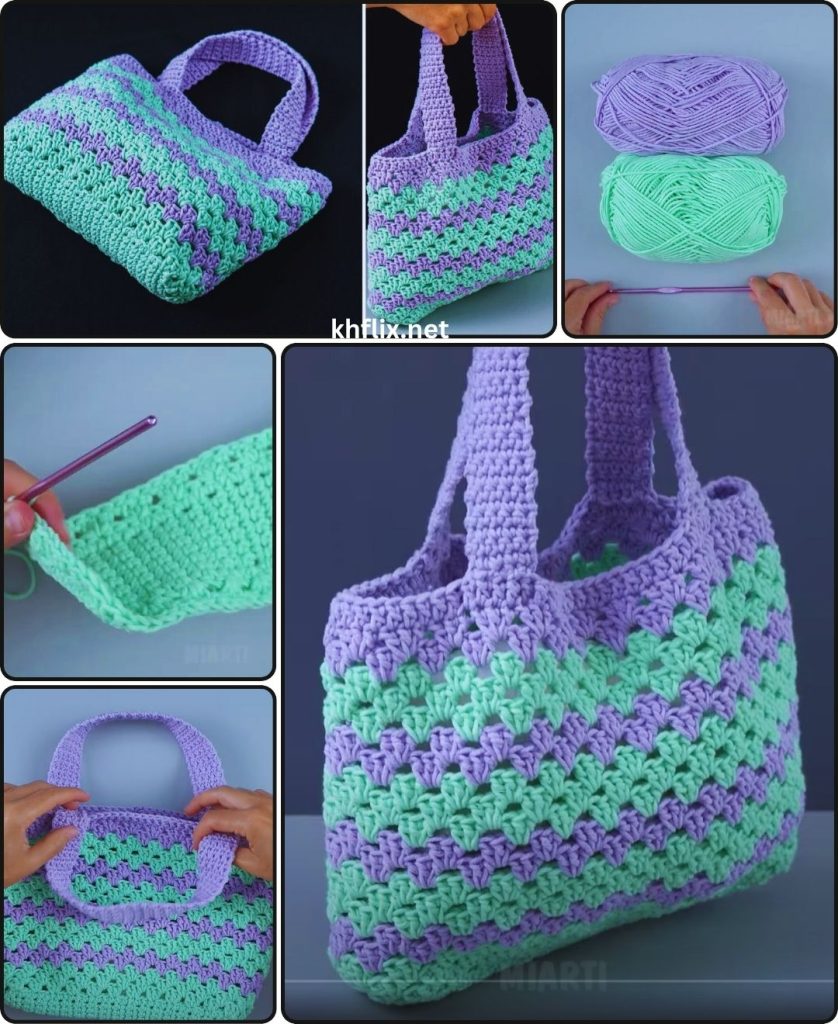
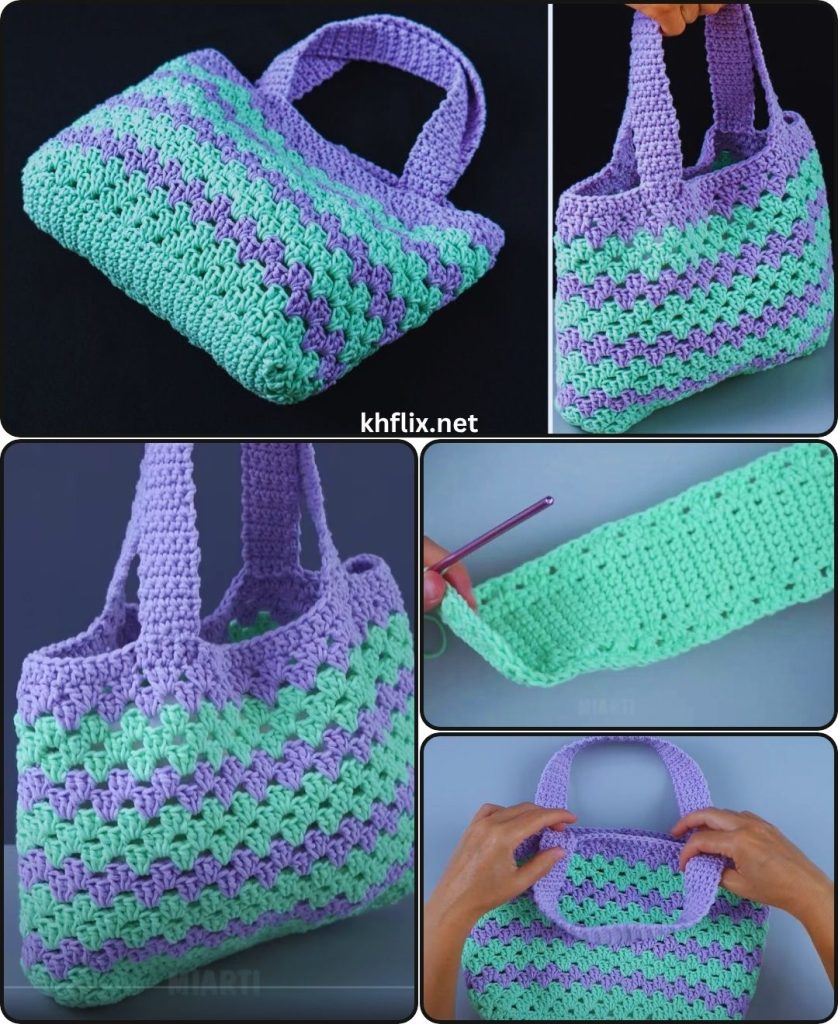
How to Crochet an Easy Striped Tote Bag (Beginner Tutorial)
This detailed guide will walk you through making a practical and visually appealing striped tote bag. We’ll concentrate on fundamental crochet techniques and clear instructions to ensure a successful project, even if you’re just starting your crochet journey.
Skill Level: Beginner
This project is ideal if you’re comfortable with (or ready to learn!):
- Chain (ch): The foundation of crochet.
- Single Crochet (sc): A dense, sturdy stitch.
- Slip Stitch (sl st): For neat joining and finishing.
- Changing colors: A simple technique to create stripes.
- Working in rows: Crocheting back and forth.
- Fastening off: Securing your yarn.
- Weaving in ends: The essential finishing touch.
- Basic seaming: Connecting pieces with a yarn needle.
Finished Tote Bag Dimensions (Approximate):
Using worsted weight yarn and the suggested hook, your finished tote will typically measure around 12-14 inches (30-35 cm) wide and 14-16 inches (35-40 cm) tall (excluding the strap). This is a versatile size for various uses.
Materials You’ll Need:
Gathering your materials beforehand ensures a smooth and enjoyable crocheting session.
- Yarn: Approximately 400-500 yards (365-457 meters) of Worsted Weight (Medium #4) Cotton or Cotton Blend Yarn.
- Why Cotton? Cotton is highly recommended for bags because it’s durable, has minimal stretch (important for a bag that will carry items), and provides excellent stitch definition. It’s also washable, making it practical for a tote. Acrylic can work, but may stretch more over time.
- Color Choices: Select two or three colors for your stripes. Contrasting colors create a bold statement, while analogous colors offer a softer look.
- Color A (Main/Base Color): Approx. 200-250 yards (183-228m) – e.g., a neutral like cream, grey, or black.
- Color B (Stripe Color 1): Approx. 100-125 yards (91-114m) – e.g., a bright blue or red.
- Color C (Stripe Color 2 – Optional): Approx. 100-125 yards (91-114m) – e.g., a sunny yellow or deep green.
- Crochet Hook: Size H/5.0mm. This hook size creates a nice, dense fabric that’s perfect for a sturdy bag.
- Yarn Needle (Tapestry Needle): Essential for seamlessly weaving in all your loose yarn tails and for joining the bag pieces. It has a blunt tip and a large eye, making it easy to thread yarn.
- Scissors: Any sharp pair of scissors will do for cutting your yarn.
- Stitch Marker (Optional): Helpful for marking the end of your rows, especially when you’re just starting out and getting used to maintaining straight edges. A small safety pin or a scrap of contrasting yarn works perfectly.
Understanding the Tote Bag Construction: Simple Panels
This tote bag is constructed using a very straightforward method:
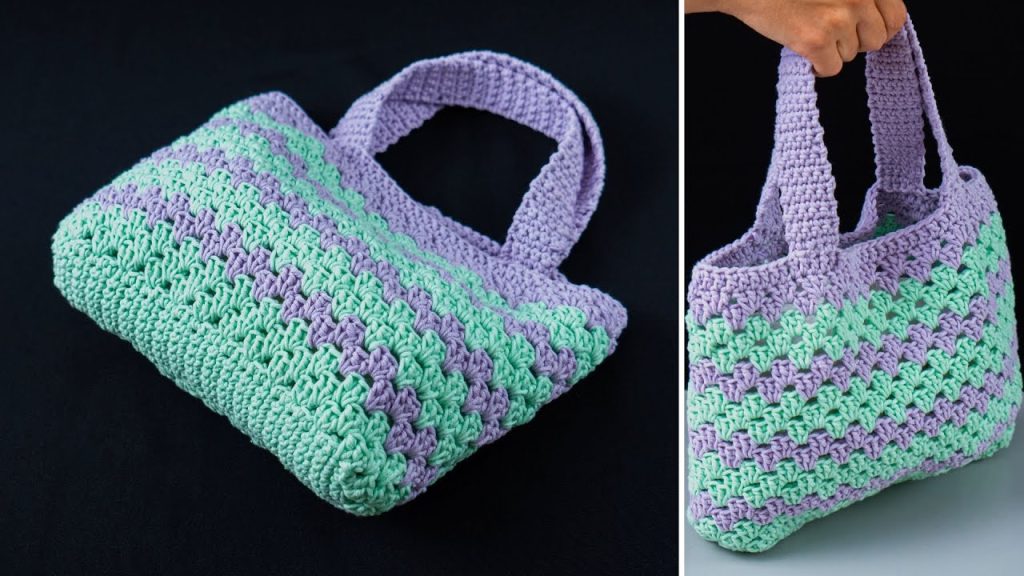
- Two Identical Panels: You’ll crochet two flat rectangular panels that will form the front and back of your bag. These will feature your chosen stripe pattern.
- Seaming: The two panels will be sewn together along three sides (bottom and two sides) to create the bag’s body.
- Strap: A sturdy crocheted strap will be added to the top edges for carrying.
This “panel construction” method is beginner-friendly because you’re always working in flat rows, which is often easier to manage than working in the round when you’re starting out.
Let’s Crochet Your Striped Tote Bag!
Follow these steps carefully. Maintaining consistent tension and practicing neat color changes are key to a professional-looking finished bag.
Part 1: Crocheting the Front and Back Panels (Make 2)
These are the main pieces of your bag where your vibrant stripes will appear. We’ll use single crochet (sc) throughout for a strong, durable fabric.
- Starting Chain (with Color A):
- Make a slip knot with Color A and place it onto your H/5.0mm crochet hook.
- Chain (ch) 41. (This chain determines the width of your bag. If you want a wider bag, chain more; for a narrower bag, chain less. Your stitch count in the following rows will be one less than your starting chain.)
- Row 1 (Color A):
- Work 1 single crochet (sc) into the 2nd chain from your hook. (Remember, the loop directly on your hook doesn’t count; count the first actual chain stitch after that.)
- Continue to work 1 sc into each remaining chain across the entire row. You should end up with a total of 40 single crochet stitches.
- Chain 1 (ch 1) (this turning chain does NOT count as a stitch; it simply gives height for the next row).
- Turn your work. This means flipping your crocheted piece over, like turning a page in a book, so your hook is ready to work into the first stitch of the new row.
- Color Changing Technique (at the end of a row):
- To create clean, distinct stripes, you’ll change colors on the last yarn over of the very last stitch of the row before you want the new color to begin.
- Let’s say you’re about to finish a row using Color A, and the next row should be Color B.
- Work the last single crochet stitch of the current row as normal, but stop when you have two loops left on your hook.
- Drop Color A. Pick up Color B.
- With Color B, yarn over and pull through both loops on your hook to complete the stitch. Color B is now active on your hook.
- Chain 1 (using Color B), then turn your work. You are now ready to work the entire next row in Color B.
- Stripe Pattern for Panels (Approximate for 35 rows total):
- We’ll use an easy 4-row stripe repeat for a classic look. You can adjust the number of rows per stripe as you like!
- Rows 2-5 (4 rows in Color A): Work 1 sc into each sc across. At the end of Row 5, change to Color B. Chain 1, turn.
- Rows 6-9 (4 rows in Color B): Work 1 sc into each sc across. At the end of Row 9, change to Color A. Chain 1, turn.
- Rows 10-13 (4 rows in Color A): Work 1 sc into each sc across. At the end of Row 13, change to Color B. Chain 1, turn.
- Rows 14-17 (4 rows in Color B): Work 1 sc into each sc across. At the end of Row 17, change to Color A. Chain 1, turn.
- Rows 18-21 (4 rows in Color A): Work 1 sc into each sc across. At the end of Row 21, change to Color B. Chain 1, turn.
- Rows 22-25 (4 rows in Color B): Work 1 sc into each sc across. At the end of Row 25, change to Color A. Chain 1, turn.
- Rows 26-29 (4 rows in Color A): Work 1 sc into each sc across. At the end of Row 29, change to Color B. Chain 1, turn.
- Rows 30-33 (4 rows in Color B): Work 1 sc into each sc across. At the end of Row 33, change to Color A. Chain 1, turn.
- Rows 34-35 (2 rows in Color A): Work 1 sc into each sc across. Chain 1, turn.
- Tip for carrying yarn: For short stripes like these (2-4 rows), you can gently carry the non-working yarn up the side of your work. To do this, simply lay the dropped yarn color along the top of the stitches of the previous row and crochet over it with your new color. This avoids cutting and rejoining yarn constantly, which saves time and weaving in ends. Just don’t pull it too tight or it will pucker your edge.
- Fasten Off:
- After completing your last row (Row 35 in Color A), cut your yarn, leaving a tail about 6-8 inches (15-20 cm) long.
- Yarn over with your hook, pull the cut tail completely through the loop left on your hook, and gently tug to secure the knot.
- Repeat all these steps to make a second identical panel. You should now have two striped rectangles.
Part 2: Assembling the Bag Body
This is where your two flat, striped rectangles transform into a 3D bag!
- Align the Panels:
- Lay your two crocheted panels on top of each other, making sure the stripes align neatly and they are facing the same way (if there’s a right/wrong side, have the “right” sides facing inward so your seam is on the inside).
- Align all the edges perfectly.
- Seaming the Sides and Bottom:
- Thread a new, long length of yarn onto your yarn needle. Start with Color A if that was the last color of your stripe, or a neutral color that blends well. Make sure the tail is at least 40-50 inches (100-125 cm) long – it’s better to have too much than too little for seaming.
- Starting from one of the bottom corners (where the width of the panel meets the height), begin to stitch the two panels together.
- Use a simple whip stitch (insert your needle from front to back through both loops of both panels, then repeat, wrapping the yarn around the edge) or a mattress stitch (which creates an invisible seam). For beginners, the whip stitch is usually easier.
- Stitch all the way up one side of the bag, across the bottom edge, and then up the other side. Aim to go through both loops of the stitches on both panels for a strong, sturdy seam.
- Ensure your corners are neat and square. You might make an extra stitch or two in the corners to reinforce them and help them turn smoothly.
- Continue stitching until the entire three sides (both vertical sides and the horizontal bottom) of your bag are securely joined.
- When you reach the end of your seam, secure the yarn by making a small knot close to the fabric, then weave in the remaining tail neatly into the seam itself or into the fabric. If you run out of yarn during seaming, simply join a new long piece and continue.
- Tip: Take your time with seaming. Neat seams make a huge difference in the finished look of your bag. Using stitch markers to hold the panels together before you start sewing can also be very helpful.
Part 3: Crocheting and Attaching the Shoulder Strap
A comfortable and sturdy strap is essential for carrying your tote. For simplicity, we’ll suggest a solid strap in your main Color A, but you could definitely stripe it too if you feel adventurous!
- Crocheting the Strap (with Color A):
- Make a slip knot with Color A.
- Chain (ch) 101. (This will create a strap of about 25-30 inches / 64-76 cm, which is a good length for a shoulder bag. Adjust this chain length for a longer or shorter strap if desired.)
- Row 1: Work 1 sc into the 2nd ch from your hook. Work 1 sc into each remaining ch across. You should have 100 sc.
- Chain 1, turn.
- Rows 2-4: Work 1 sc into each sc across the row. You will still have 100 sc in each row.
- Chain 1, turn. (You can make more rows here if you want an even wider, thicker strap.)
- Fasten off, leaving a very long tail (at least 15-20 inches / 38-50 cm) at each end of the strap for sewing.
- Attaching the Strap to the Bag:
- Lay your bag flat and find the top opening.
- Position the ends of your crocheted strap on the inside of the bag’s top opening. A good placement is to align them with where the side seams are, or slightly inward (about 1-2 inches / 2.5-5 cm in from the top corners of the bag).
- Thread one of the long tails from the strap onto your yarn needle.
- Stitch firmly back and forth, going through the strap end and into the top edge of the bag. Make sure to go through multiple stitches and layers for a very strong attachment. Work your needle in a way that the stitches are discreet from the outside.
- Repeat this process for the other end of the strap, ensuring the strap is not twisted before you stitch it down.
- Weave in all remaining strap tails very securely into the top edge of the bag.
Part 4: Final Finishing Touches
- Weave in ALL Remaining Ends:
- This is the most crucial step for a professional-looking, durable bag. You’ll have tails from your starting chains, color changes, and the final fasten-offs.
- Use your yarn needle to meticulously weave in every single loose yarn tail.
- How to Weave Neatly: Thread the yarn tail onto your yarn needle. Weave the tail into the stitches of the same color as the tail. Go in one direction for at least 1.5-2 inches (4-5 cm). To truly secure it, subtly change direction (e.g., weave along a row, then turn and weave back through some of the same stitches diagonally or perpendicularly) to “lock” the tail in place and prevent it from unraveling. Trim any excess yarn close to the fabric, being careful not to cut any of your actual stitches.
- Blocking (Optional but Highly Recommended):
- Blocking can significantly improve the shape, even out any tension inconsistencies, and give your bag a more polished, professional look. It makes a big difference with cotton yarn!
- Method (Wet Blocking – Ideal for Cotton/Cotton Blends):
- Gently mist your entire bag evenly with cool water using a spray bottle until it’s damp but not soaking wet.
- Carefully stuff your bag with clean towels or crumpled paper to help it hold its desired shape while drying.
- Smooth out any wrinkles and gently shape the bag, ensuring the seams lay flat and the stripes look even.
- Allow the bag to air dry completely and thoroughly in a well-ventilated area. This can take several hours to a full day, depending on humidity and ventilation. Ensure it’s bone dry before handling or using it.
Congratulations! You’ve successfully crocheted a beautiful and functional easy striped tote bag! This handmade accessory is perfect for carrying your daily essentials and showcases your fantastic new crochet skills. Enjoy your stylish new creation!