 by
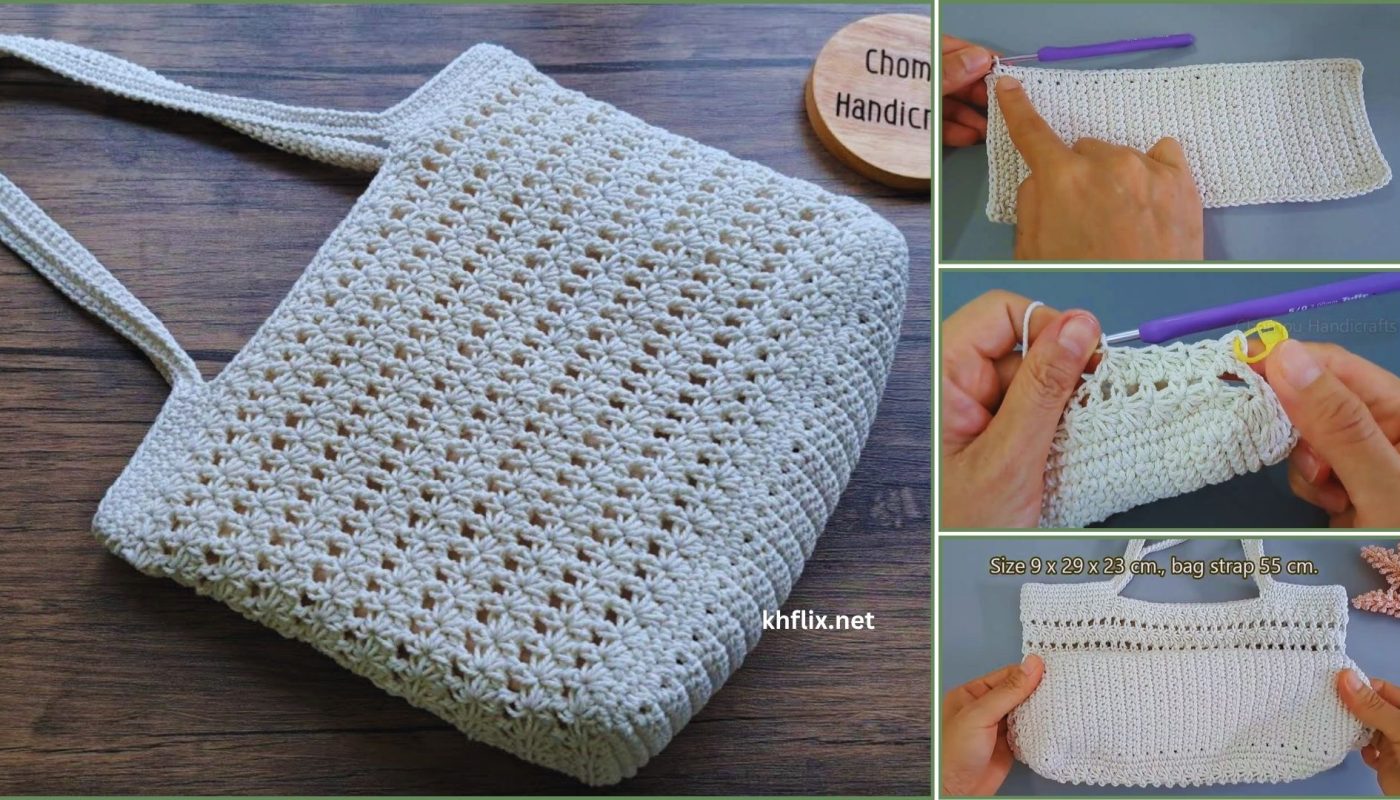
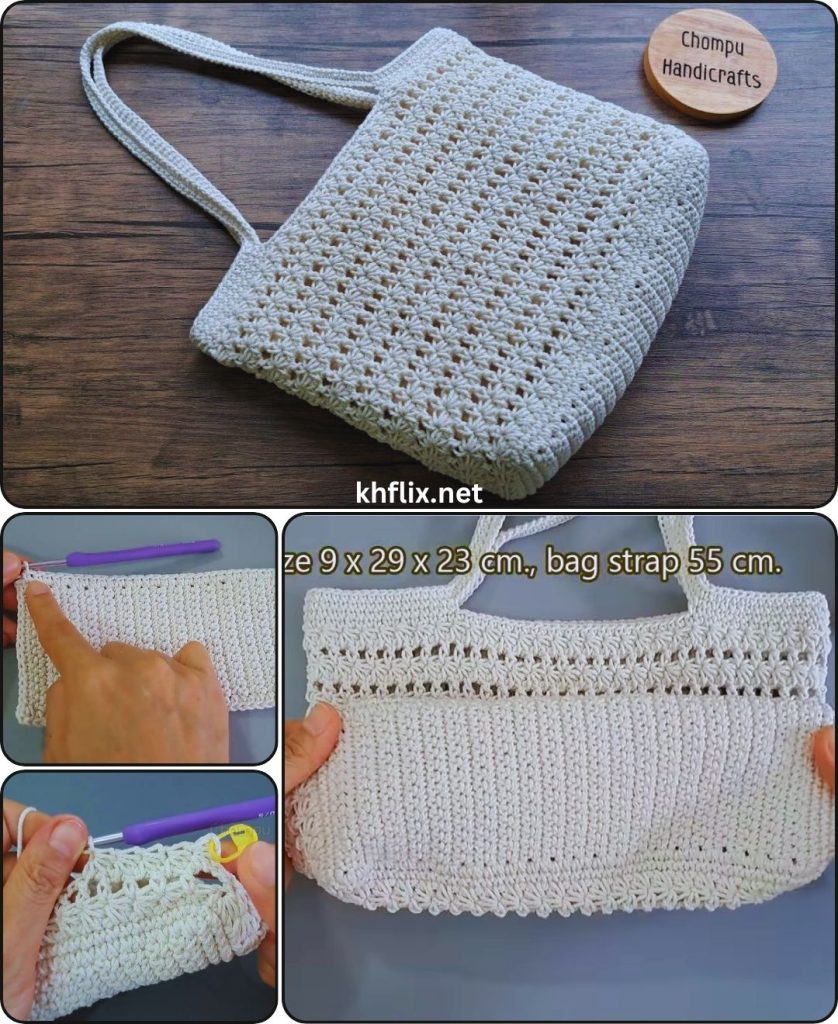
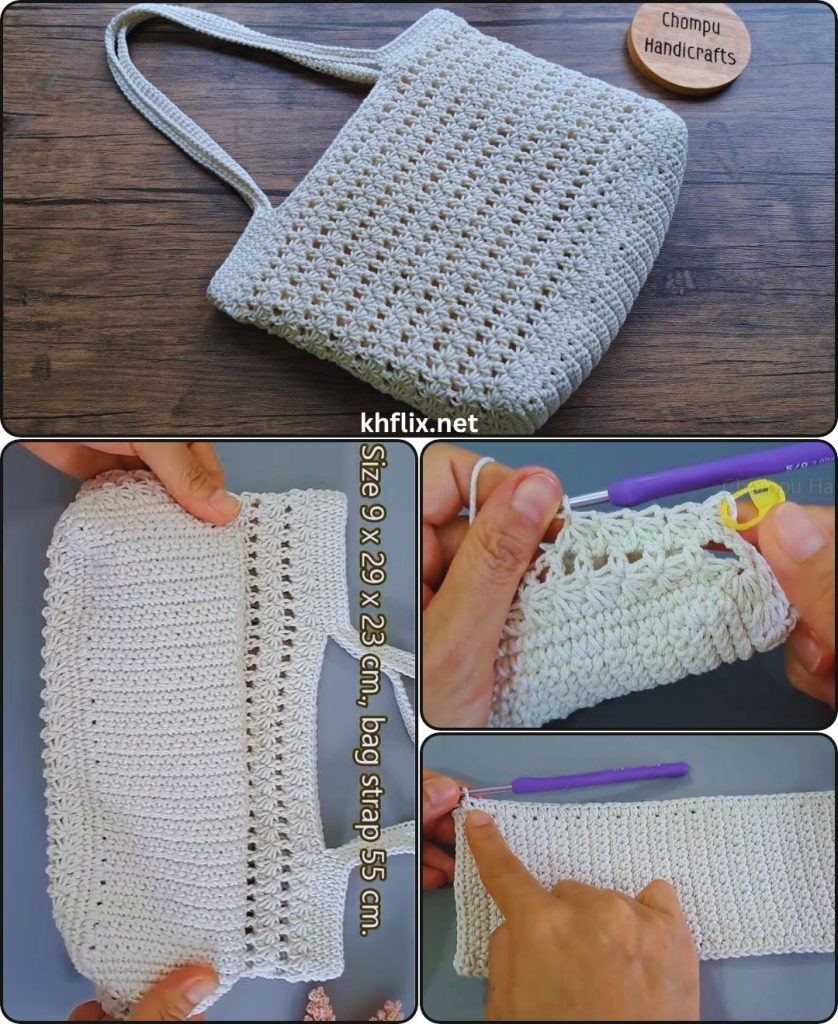
by This tutorial will guide you through creating a beautiful and trendy tote bag using the Air Star Stitch. This stitch creates a stunning, textured fabric that is both dense and durable, making it perfect for a bag. While the Star Stitch might look a little complicated, this step-by-step guide is designed for beginners and will break down each part of the process, from the simple oval base to the beautiful body and sturdy handles.
Skill Level: Confident Beginner
This project is a great challenge if you’re comfortable with:
- Chain (ch)
- Slip Stitch (sl st)
- Single Crochet (sc)
- Half Double Crochet (hdc)
- Working in Rounds
- Increasing for the bag base.
- Fastening Off and weaving in ends.
The Air Star Stitch itself is worked over two rows, so we’ll walk through those steps in detail.
Finished Tote Bag Dimensions (Approximate):
Using worsted weight yarn (Medium #4) and the suggested hook, your finished tote bag will typically be:
- Base: 12 inches (30 cm) long by 4 inches (10 cm) wide (oval shape).
- Height: 12-14 inches (30-35 cm) (excluding handles).
- Handles: 20-24 inches (50-60 cm) tall loop (from bag edge to top of handle).
Materials You’ll Need:
- Yarn: Approximately 300-400 yards (275-365 meters) of Worsted Weight (Medium #4) Cotton or a sturdy cotton blend.
- Crochet Hook: Size I/5.5mm or J/6.0mm. A slightly larger hook can help you pull up the loops for the Star Stitch more easily.
- Yarn Needle (Tapestry Needle): For weaving in ends.
- Scissors: For cutting yarn.
- Stitch Marker (Optional but Recommended): To mark the beginning of your rounds.
Let’s Crochet Your Air Star Stitch Tote Bag!
We’ll build this tote bag in three main parts:
- The Oval Base: A flat, single crochet foundation.
- The Body: The star stitch pattern worked in two-row repeats.
- The Handles: Simple, sturdy single crochet straps.
Part 1: The Oval Base
The base of your bag will be a sturdy single crochet oval, which provides a firm foundation for the star stitch body.
- Starting Chain:
- Make a slip knot.
- Chain (ch) 26.
- Round 1 (Working Around the Chain):
- Work 2 single crochet (sc) stitches into the 2nd chain from your hook.
- Work 1 sc into each of the next 23 chains.
- In the last chain, work 4 sc stitches.
- Now, work back down the other side of your starting chain. Work 1 sc into each of the next 23 stitches.
- In the last stitch, work 2 sc.
- Do NOT join with a slip stitch. You will work in a continuous spiral for the base. Use your stitch marker to mark the first stitch of the next round.
- Round 2 (Continuing the Oval Shape):
- Work 2 sc into the first stitch.
- Work 1 sc into the next stitch.
- Work 1 sc into each of the next 23 stitches.
- Work 2 sc into each of the next 3 stitches.
- Work 1 sc into the next stitch.
- Work 1 sc into each of the next 23 stitches.
- Work 2 sc into each of the next 2 stitches.
- You should now have 60 sc stitches. Continue in continuous rounds.
- Round 3 (Final Base Round):
- Work 2 sc into the first stitch.
- Work 1 sc into each of the next 24 stitches.
- Work 2 sc into each of the next 3 stitches.
- Work 1 sc into each of the next 24 stitches.
- Work 2 sc into each of the next 2 stitches.
- You should now have 66 sc stitches. Do not join yet. Remove your stitch marker.
- Slip stitch (sl st) into the next stitch to join, completing your oval base.
Part 2: The Air Star Stitch Body
This is the main part of the bag and where we’ll create the beautiful star stitch texture. The pattern is a two-row repeat: a row of “star stitches” and a row of half double crochet.
- Row 1 (The Star Stitch Row):
- Chain 3 (ch 3).
- Insert your hook into the 2nd chain from the hook and pull up a loop (2 loops on hook).
- Insert your hook into the 3rd chain from the hook and pull up a loop (3 loops on hook).
- Insert your hook into the first stitch of the row and pull up a loop (4 loops on hook).
- Insert your hook into the next stitch and pull up a loop (5 loops on hook).
- Insert your hook into the next stitch and pull up a loop (6 loops on hook).
- Yarn over and pull through all 6 loops on your hook.
- Chain 1 to close the star and form the “eye”.
- To make the next star, you’ll repeat the process, but the first three loops are pulled up from the previous star stitch:
- Insert hook into the eye of the previous star and pull up a loop (2 loops on hook).
- Insert hook into the last loop you pulled up from the previous star (the “leg” of the star) and pull up a loop (3 loops on hook).
- Insert hook into the same stitch as the last leg and pull up a loop (4 loops on hook).
- Insert hook into the next stitch and pull up a loop (5 loops on hook).
- Insert hook into the next stitch and pull up a loop (6 loops on hook).
- Yarn over and pull through all 6 loops, then ch 1.
- Repeat this process all the way around the bag.
- Slip stitch (sl st) to the top of the first star stitch to join the round.
- Row 2 (The Half Double Crochet Row):
- Chain 2 (ch 2 – counts as your first hdc).
- Work 1 half double crochet (hdc) into the same space (the top of the last star).
- Work 2 hdc into the eye of each star stitch around the entire round.
- Work 1 hdc into the top of the chain-3 from the beginning of the previous row.
- Slip stitch (sl st) to the top of the beginning ch 2 to join the round.
- Repeat Row 1 and Row 2 until your bag reaches the desired height.

Part 3: The Handles
The handles are created with a simple single crochet to provide a sturdy and durable strap.
- Handle Placement Round:
- After your last star stitch round, slip stitch to join.
- Chain 1 (ch 1).
- Work 1 sc into the first 10 stitches.
- Chain 40 (ch 40 – the length of your handle).
- Skip the next 13 stitches on the bag’s top edge.
- Work 1 sc into the next 20 stitches.
- Chain 40.
- Skip the next 13 stitches.
- Work 1 sc into the next 10 stitches.
- Slip stitch (sl st) into the first sc of the round to join.
- Handle Strengthening Round:
- Chain 1.
- Work 1 sc into each sc stitch along the top edge of the bag.
- When you reach a chain-handle loop, work 1 sc into each of the 40 chains of the loop.
- Continue working sc stitches into the bag top and around the second handle loop.
- Slip stitch (sl st) into the first sc of the round to join.
- Fasten Off (FO), leaving a tail of about 6 inches.
Final Finishing Touches
- Weave in All Ends:
- Thread your yarn tails onto your yarn needle.
- Weave each tail into existing stitches on the inside of your bag for at least 3-4 inches.
- Trim any excess yarn close to the fabric.
- Blocking (Optional but Recommended):
- Gently mist the bag with cool water.
- Stuff the bag lightly with towels to help it hold its rectangular shape.
- Allow the bag to air dry completely in a well-ventilated area.
Congratulations! You’ve successfully crocheted a beautiful Air Star Stitch Tote Bag. This is a fantastic accomplishment, and you now have a unique and sturdy handmade accessory. What will be the first thing you carry in your new tote?