by
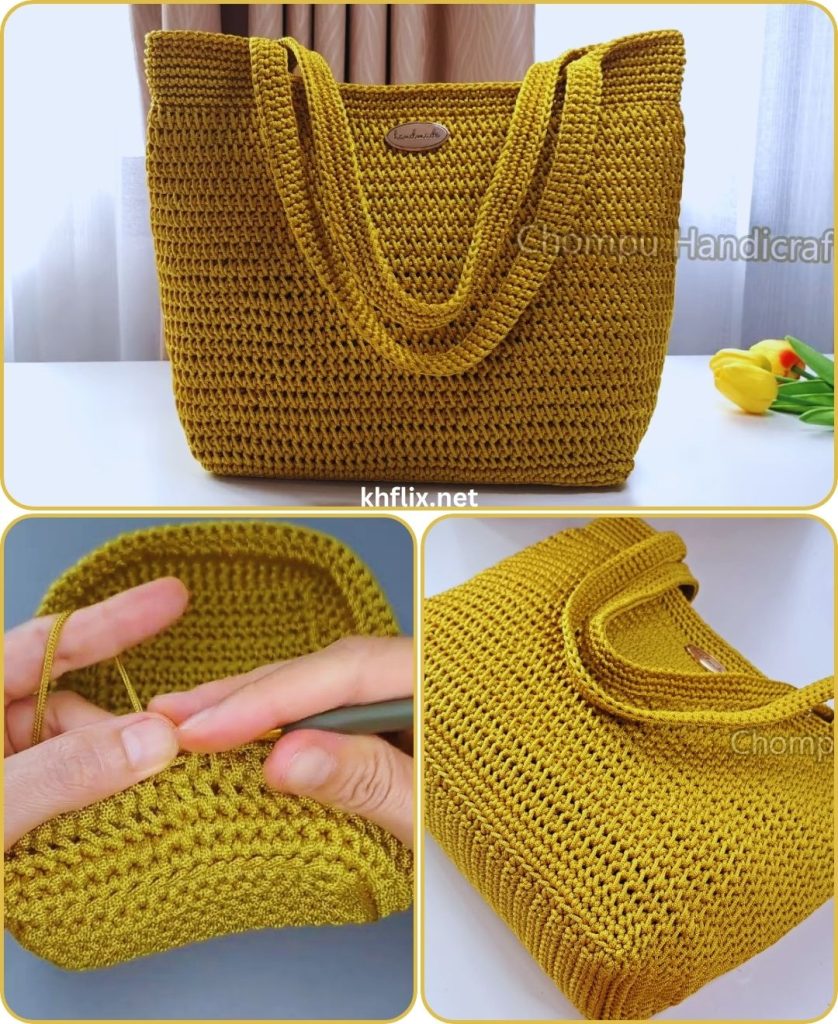
by There is arguably no bag more versatile or well-loved than the tote. It’s our trusted companion for trips to the farmer’s market, a day at the beach, carrying books to the library, or simply managing the delightful chaos of daily life. While store-bought totes are a dime a dozen, a handmade crochet tote bag is a statement piece—a blend of practicality, personal style, and the quiet pride of creating something both beautiful and useful.
This comprehensive guide will walk you through every step of creating your own essential crochet tote bag. We will build this bag from the ground up, starting with a sturdy, solid granny square base—a fantastic technique that ensures your bag sits flat and holds its shape. From there, we’ll build up the walls with a simple, elegant stitch and finish with robust, comfortable straps that won’t let you down.
Designed for the adventurous beginner, this pattern is the perfect project to elevate your skills beyond simple scarves and blankets. We’ll break down each section in detail, so you can confidently crochet a durable, stylish, and endlessly practical tote bag.
Why a Handmade Crochet Tote is a Must-Have
- Unmatched Durability: By choosing the right yarn and stitch, you can create a bag far sturdier than many fast-fashion alternatives.
- Complete Customization: You are the designer! Choose colors that match your wardrobe, adjust the size to fit your laptop, or add pockets for your phone and keys.
- Eco-Friendly and Sustainable: A reusable, washable crochet tote is a chic way to reduce your reliance on plastic bags.
- The Joy of Making: This project is incredibly rewarding. With every stitch, you are building a functional piece of art that you can use and admire every day.
Step 1: Gathering Your Supplies (The Toolkit)
For a tote bag that needs to be strong, your material choices are important. We’re aiming for a fabric that is dense and has minimal stretch.
- Yarn: 100% Cotton yarn is the gold standard for tote bags. It’s incredibly strong, holds its shape, is machine washable, and has very little stretch.
- Weight: Worsted Weight (Category 4). This is the most common and versatile yarn weight, perfect for creating a solid fabric.
- Quantity: Approximately 500 – 600 yards (460 – 550 meters). This usually equates to 3-4 skeins of a standard cotton yarn like Lily Sugar’n Cream or Lion Brand 24/7 Cotton. It’s always best to buy a little extra just in case.
- Crochet Hook: A 5.0mm (H-8) or 5.5mm (I-9) hook. Using a hook that is slightly smaller than the yarn label recommends can help you create a tighter, denser fabric, which is ideal for a bag.
- Essential Notions:
- Tapestry Needle: A large, blunt-tipped needle for weaving in ends and sewing on the straps. This is non-negotiable for a polished finish.
- Scissors: A sharp pair for clean cuts.
- Stitch Markers: Highly recommended! These will be used to mark the corners of your base, making it much easier to know where to place your corner stitches.
- Measuring Tape: To check the dimensions of your base and the height of your bag.
Step 2: The Crochet Language (Stitches & Abbreviations)
This pattern is written in standard US crochet terms. Here’s a quick rundown of the stitches we’ll be using.
- ch: chain
- sl st: slip stitch
- sc: single crochet
- hdc: half double crochet
- dc: double crochet
- sp: space
- BLO: back loop only
- st(s): stitch(es)
- (…): stitches worked in the same space
Key Stitches Explained:
- Magic Ring (or Magic Circle): An adjustable starting ring for working in the round. If you’re not comfortable with this, the
ch 4, sl st to joinmethod is a great alternative. - Double Crochet (dc): Yarn over, insert hook into stitch, yarn over and pull up a loop (3 loops on hook), yarn over and pull through 2 loops (2 loops on hook), yarn over and pull through the remaining 2 loops.
- “Cluster” or “Shell”: In this pattern, it refers to 3 double crochet stitches worked into the same space (
3 dc).
Step 3: The Pattern – Step-by-Step Construction
Our bag will be constructed in four main parts: the square base, the body, the straps, and the final assembly.
Part A: The Solid Granny Square Base
This base will give our bag a flat, stable bottom. We’ll be working in the round.
To Start: Create a magic ring, OR alternatively, ch 4 and slst to the first ch to form a ring.
Round 1:
- Ch 3 (this counts as your first dc).
- Inside the ring, work 2 more dc. Then, ch 2.
- Work
[3 dc, ch 2]three more times into the ring. - Join with a slst to the top of the initial ch-3.
- Result: You should have 4 clusters of 3 dc, and 4 corner spaces of ch-2. Place a stitch marker in each ch-2 corner space.
Round 2:
- Slst in the next 2 stitches to move over to the first corner space.
- In that corner space, work
(ch 3, 2 dc, ch 2, 3 dc). This is your first new corner. - In the next corner space, work
(3 dc, ch 2, 3 dc). - Repeat this in the remaining two corner spaces.
- Join with a slst to the top of the initial ch-3.
- Result: Your square is now larger, with two clusters on each side, separated by a corner. Move your stitch markers up to the new ch-2 corner spaces.
Round 3:
- Slst to the first corner space.
- In that corner space, work
(ch 3, 2 dc, ch 2, 3 dc). - Work
3 dcin the space between the clusters from the previous round. - In the next corner space, work
(3 dc, ch 2, 3 dc). - Repeat this pattern around:
3 dcin each side space, and(3 dc, ch 2, 3 dc)in each corner space. - Join with a slst to the top of the initial ch-3.
Rounds 4 and beyond:
- Continue to repeat the pattern from Round 3. Each round, you will have one more side space to work a
3 dccluster into. The corners will always be(3 dc, ch 2, 3 dc). - Continue working in this pattern until your square base reaches your desired size. A good size for a tote bag is 10×10 inches (25×25 cm) to 12×12 inches (30×30 cm).
Do not fasten off the yarn.
Part B: Building the Walls of the Bag
Now we will stop increasing and start working upwards to create the body of the bag. We’ll use a simple stitch like Half Double Crochet (hdc) for a dense and sturdy fabric.
Transition Round: This round is key to creating a defined edge between the base and the sides.
- Ch 1. Work 1 hdc in the back loop only (BLO) of each stitch around the entire square. When you get to the ch-2 corner spaces, work 2 hdc in the space itself (not into the chains).
- Join with a slst to the first hdc.
- Note: This BLO round creates a neat fold line. You should now see the base starting to turn upwards.
Body Round 1:
- Ch 1. Work 1 hdc in both loops of every single stitch from the previous round.
- Join with a slst to the first hdc.
Body Rounds 2 and beyond:
- Repeat “Body Round 1” over and over. You are no longer increasing, just crocheting in a continuous spiral or joined rounds. Your bag walls will grow taller with each round.
- Continue until the body of your bag reaches your desired height, typically around 13-15 inches (33-38 cm) tall.
Final Round (optional but recommended):
- To create a clean, firm top edge, work one final round of single crochet (sc) or slip stitches (slst) around the top opening of the bag.
- Fasten off and weave in your end.
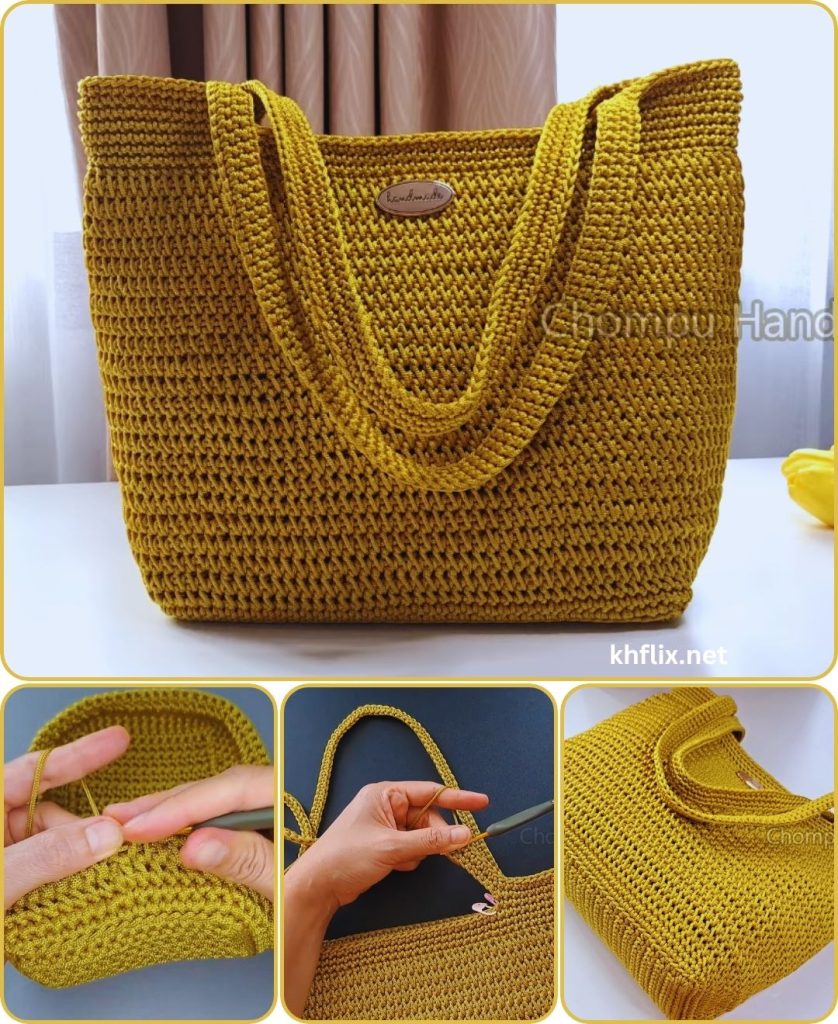
Part C: Creating Sturdy Straps (Make 2)
A common pitfall with crochet bags is stretchy straps. This method creates a double-thick, very sturdy strap that will hold up to use.
Step 1: Create a long rectangle.
- Ch 9.
- Row 1: Sc in the 2nd ch from the hook and in each ch across. (8 sc)
- Row 2: Ch 1, turn. Sc in each stitch across. (8 sc)
- Repeat Row 2 until the strap measures your desired length. A comfortable shoulder strap is typically 22-25 inches (55-64 cm). Drape it over your shoulder to test the fit.
Step 2: Make it double-thick.
- Do not fasten off. Fold the long rectangle in half lengthwise.
- Insert your hook through the stitches of both layers simultaneously and join them with a round of slip stitches or single crochets all along the open edge.
- Fasten off, leaving a very long tail (about 15-20 inches) for sewing.
Repeat all of Part C to make a second identical strap.
Part D: Finishing and Assembly
The final touches are what make your project look professional.
- Strap Placement: Lay your bag flat. Position the ends of one strap on one side of the bag, about 3-4 inches in from the side edges and 1.5-2 inches down from the top rim. Use stitch markers to hold them in place. Ensure the strap is not twisted. Repeat on the other side with the second strap, making sure the placement is symmetrical.
- Sewing the Straps: Thread the long yarn tail onto your tapestry needle. For maximum security, sew the strap onto the bag by stitching a square, and then stitching an “X” inside the square. This distributes weight and prevents tearing. Sew all four strap ends securely to the inside of the bag.
- Weave in All Ends: This is the most crucial final step. Meticulously weave in any remaining yarn tails from your work. This secures your stitches and gives your tote a clean, finished look.
Pro Tips & Customization Ideas
- Add an Internal Pocket: Crochet a small rectangle (e.g., 6 inches by 5 inches) and sew it onto the inside of the bag before you attach the straps.
- Play with Color: Use one color for the base and another for the body. Or, create stripes on the body of the bag by changing colors every few rounds.
- Add a Closure: Sew a large button to the front center of the bag and create a simple chain loop on the other side to act as a closure.
- Add a Fabric Lining: For the ultimate professional finish, hand-sew a fabric lining to the inside. This prevents small items from poking through and adds another layer of durability.
You’ve done it! You have created a beautiful, durable, and highly functional crochet tote bag from scratch. You’ve mastered working in the round, creating a 3D object, and finishing a project with professional techniques. Now, all that’s left to do is fill it up and show it off!