 by
by Here is a detailed, long-form guide to creating a vibrant and textured tote bag that is specifically designed to be beginner-friendly while looking incredibly impressive. This pattern is all about the joy of playing with color and stitch, creating a truly one-of-a-kind accessory.
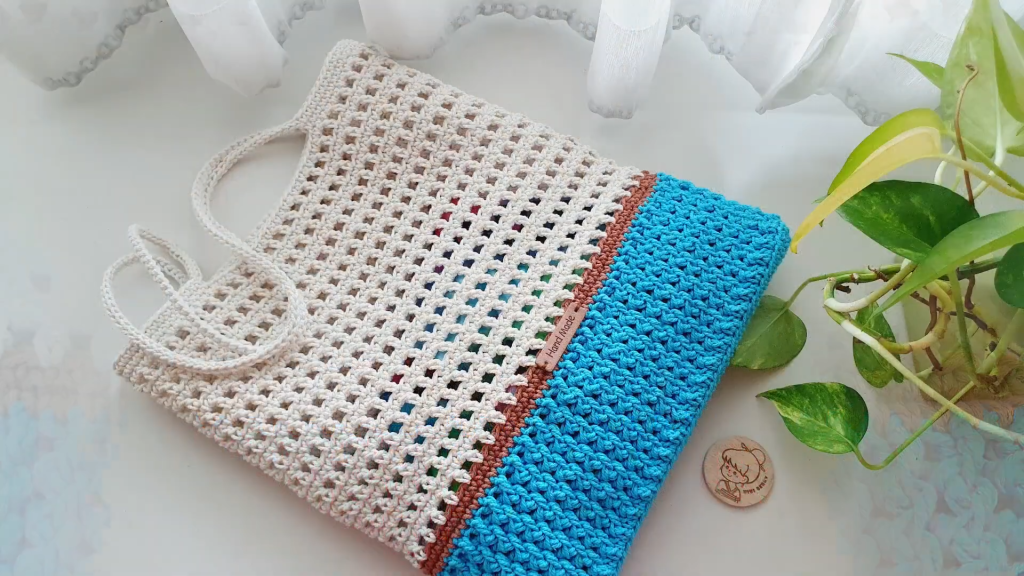
Create Your Masterpiece: The “Amazing Mix” Crochet Tote Bag for Beginners
Are you ready to dive into a crochet project that’s bursting with personality, texture, and vibrant color? This “Amazing Mix” Tote Bag is the perfect project for the confident beginner who is eager to create something truly special. Forget boring, single-colored projects! We are going to combine several simple, beautiful stitches with a playful color palette to build a bag that looks complex and artistic, but is surprisingly easy and fun to make.
This step-by-step guide is designed to hold your hand through the entire process. We’ll start with a super simple rectangular base, build up the body using fun stitch sections that will teach you new textures, and finish with sturdy, integrated handles. By the end, you won’t just have a gorgeous, functional tote bag—you’ll have a new set of crochet skills and the confidence to take on any project.
Why This Project is Perfect for Beginners
- Skill-Building Stitches: You’ll learn the Granite Stitch (also called the Moss Stitch) and the Granny Stripe Stitch. Both are iconic, beautiful, and created using only the most basic stitches: single crochet, double crochet, and chains!
- Simple Construction: We start with a straightforward rectangular base and work our way up in the round, minimizing confusing steps and sewing.
- Creative Freedom: The three-color design is just a suggestion. You can use two colors, five colors, or even use up your yarn scraps to make a truly unique bag.
- Forgiving Pattern: The mix of textures and colors is very forgiving of small mistakes that beginners sometimes make. It’s all part of the handmade charm!
Project Overview & Specifications
- Skill Level: Confident Beginner
- Finished Dimensions (Approximate):
- Base: 14 inches (35.5 cm) long x 4 inches (10 cm) wide
- Height: 13 inches (33 cm)
- Gauge: Gauge is not critical for this project, as a bag’s size can be flexible. The goal is to create a sturdy fabric.
Materials & Tools
- Yarn: Worsted weight (Category 4) cotton or acrylic yarn. Cotton is recommended for its sturdiness and lack of stretch.
- Color A (Base, Top & Handles): Approx. 250 yards (e.g., Navy Blue)
- Color B (Granite Stitch Sections): Approx. 200 yards (e.g., Teal)
- Color C (Granny Stripe Sections): Approx. 200 yards (e.g., Coral)
- Crochet Hook: 5.0mm (H−8) hook.
- Stitch Markers: At least two are very helpful for marking corners.
- Scissors: A sharp pair for cutting yarn.
- Tapestry Needle: Essential for weaving in your colorful ends neatly.
- Measuring Tape: To check your base size and bag height.
Stitches & Abbreviations (US Crochet Terms)
- ch: chain
- st(s): stitch(es)
- sl st: slip stitch
- sc: single crochet
- hdc: half double crochet
- dc: double crochet
- sk: skip
- sp: space
- […]: repeat instructions within brackets as directed
The Pattern: Let’s Begin Your Amazing Tote!
Part 1: The Super Simple Rectangular Base
We’ll start with your main color (Color A) to create a solid and sturdy base. We will be working in joined rounds.
With Color A:
Foundation: Chain 31 (ch 31).
Rnd 1:
- Work 2 hdc in the 2nd ch from the hook.
- Hdc in the next 28 chains.
- Work 5 hdc in the last chain. This will curve your work around to the other side.
- Continue on the opposite side of the foundation chain: Hdc in the next 28 chains.
- Work 3 hdc in the last stitch (which is the same stitch you started in).
- Join with a slst to the top of the first hdc.
- (Total: 66 sts)
Rnd 2:
- Ch 1 (does not count as a stitch here and throughout).
- Work 2 hdc in each of the first 2 stitches.
- Hdc in the next 28 sts.
- Work 2 hdc in each of the next 5 stitches (this is the curve at the end).
- Hdc in the next 28 sts.
- Work 2 hdc in each of the last 3 stitches.
- Join with a slst to the top of the first hdc.
- (Total: 76 sts)
Rnd 3:
- Ch 1.
- [Hdc in next st, 2 hdc in next st] repeat 2 times.
- Hdc in the next 28 sts.
- [Hdc in next st, 2 hdc in next st] repeat 5 times.
- Hdc in the next 28 sts.
- [Hdc in next st, 2 hdc in next st] repeat 3 times.
- Join with a slst to the top of the first hdc.
- (Total: 86 sts)
Your base should be a flat, neat rectangle. You can do one more round of increases if you’d like a wider base. For now, we will proceed with 86 stitches.
Part 2: Building the Body – The Color & Stitch Mix!
This is the fun part! We will work in sections, changing colors and stitches to create our unique design.
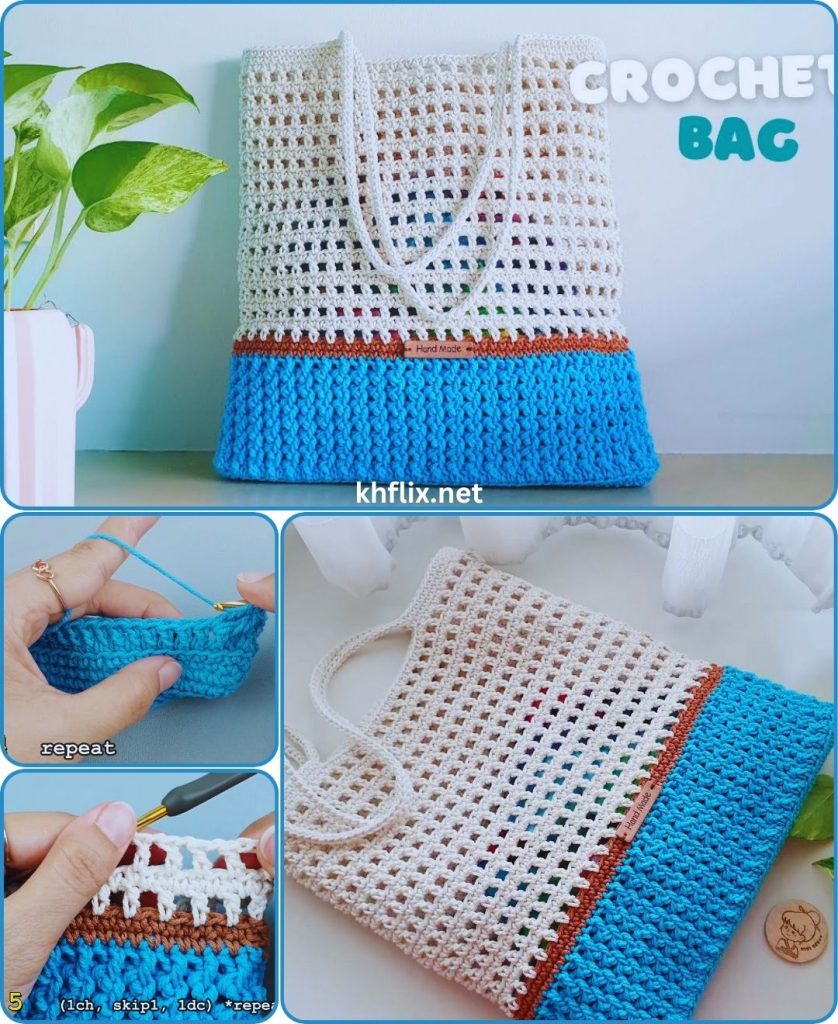
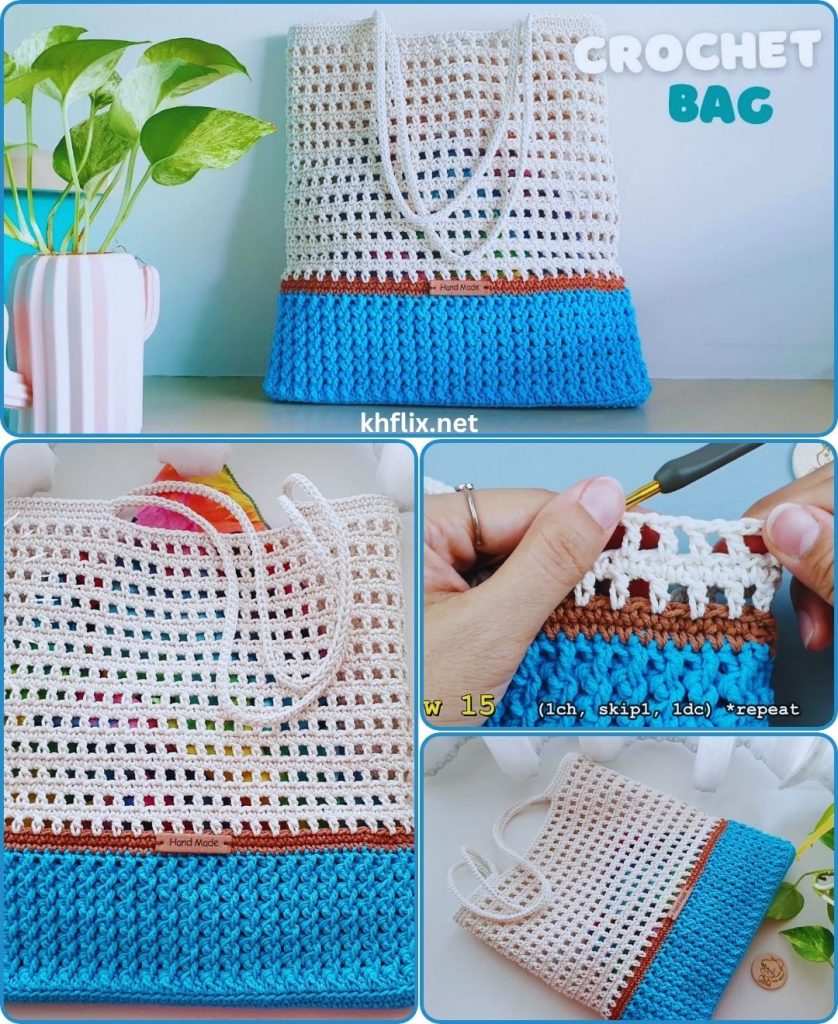
A Quick Tip: How to Change Color Seamlessly On the last stitch of a round before a color change (usually the final slip stitch), insert your hook, pull up a loop with the old color. You will have two loops on your hook. Drop the old color, yarn over with the new color, and pull it through both loops to complete the stitch. You are now ready to start the next round with your new color!
Section 1: Textured Wall Foundation (Color A)
Rnd 4-7:
- Continuing with Color A, ch 1.
- Hdc in the same stitch and in every stitch around.
- Join with a slst to the first hdc. Repeat for 4 rounds total.
- At the end of Rnd 7, change to Color B.
Section 2: The Granite Stitch (Color B)
The Granite Stitch (or Moss Stitch) creates a beautiful, dense, woven-like texture. It’s made by alternating single crochet and chain-1 stitches.
Rnd 8:
- With Color B, ch 1.
- Sc in the first st, ch 1, sk the next st.
- [Sc in the next st, ch 1, sk the next st] repeat all the way around.
- Join with a slst to the first sc.
Rnd 9:
- With Color B, slst into the first ch-1 space.
- Ch 1, sc in that same ch-1 space. Ch 1, sk the next sc.
- [Sc in the next ch-1 sp, ch 1, sk the next sc] repeat all the way around.
- Join with a slst to the first sc.
Rnd 10-13: Repeat Rnd 9 for 4 more rounds. At the end of Rnd 13, change to Color C.
Section 3: The Granny Stripe Stitch (Color C)
This stitch creates lovely texture and works up quickly. It consists of clusters of 3 double crochet stitches.
Rnd 14:
- With Color C, ch 3 (counts as your first dc).
- Work 2 dc in the same first stitch. Sk the next 2 stitches.
- [Work 3 dc in the next stitch, sk the next 2 stitches] repeat all the way around. Note: You may need to skip 1 or 3 stitches at the very end to make the pattern fit. This is okay and will not be noticeable.
- Join with a slst to the top of the beginning ch-3.
Rnd 15:
- With Color C, slst over to the first space between the 3-dc clusters.
- Ch 3 (counts as your first dc). Work 2 dc in that same space.
- [Work 3 dc in the next space between clusters] repeat all the way around.
- Join with a slst to the top of the beginning ch-3.
Rnd 16-18: Repeat Rnd 15 for 3 more rounds. At the end of Rnd 18, change back to Color A.
Continue the Pattern Sequence:
Now, simply repeat the sections to build the height of your bag.
- Rnds 19-22: 4 rounds of Half Double Crochet with Color A. Change to Color B.
- Rnds 23-28: 6 rounds of Granite Stitch with Color B. Change to Color C.
- Rnds 29-33: 5 rounds of Granny Stripe Stitch with Color C. Change to Color A.
Your bag should now be the desired height. If you want it taller, you can add another section! We will now finish the top and add the straps.
Part 3: Top Edging and Straps (Color A)
We will use single crochet for a clean, sturdy top edge and strong straps.
Rnd 34-36:
- With Color A, ch 1.
- Sc in the same stitch and in every stitch around.
- Join with a slst to the first sc. Repeat for 3 rounds total. Do not fasten off.
Rnd 37 (Strap Foundation Round):
- First, lay your bag flat and find the placement for your straps. We have 86 stitches. A good placement would be to have 28 stitches on the front and back, with two 15-stitch gaps for the handles.
- Place a marker 15 stitches in from each side on both the front and back of the bag.
- Ch 1, sc in the first 14 stitches.
- Chain 70 for the strap (or your desired length).
- Skip the next 15 stitches.
- Sc in the next 28 stitches (this is the other side of the bag).
- Chain 70 for the second strap.
- Skip the next 15 stitches.
- Sc in the remaining 14 stitches.
- Join with a slst to the first sc.
Rnd 38-40:
- Ch 1.
- Sc in every single stitch around, including each chain of the straps. This makes the straps thicker and much more comfortable and durable.
- Join with a slst to the first sc. Repeat for 3 rounds total.
After the final round, cut your yarn, leaving a long tail. Fasten off and use your tapestry needle to weave in the end securely.
Finishing Touches: The Final Polish
- Weave In All Ends: This is the most important step for a multi-color project! Take your time with your tapestry needle and weave each color-change tail into stitches of the same color on the inside of the bag.
- Add a Tassel or Pom-Pom: Use scraps of all three colors to make a big, fluffy tassel or a few pom-poms to hang from one of the straps. This is a fun way to tie the whole look together.
- Consider a Lining: While not necessary, adding a simple fabric lining can give your bag a professional finish and protect the crochet fabric.
Congratulations! You have just created a stunning, unique, and incredibly useful tote bag. Be proud of the beautiful mix of colors and stitches you mastered, and enjoy all the compliments you’re sure to receive!