by
by Absolutely! 💖 Below is a detailed, beginner-friendly, step-by-step article on how to crochet the Madeline Baby Dress (2025 Edition) for babies aged approximately 0–6 months. This guide covers everything — from materials and stitches to shaping, design, and finishing touches — so even a beginner can follow along with confidence.
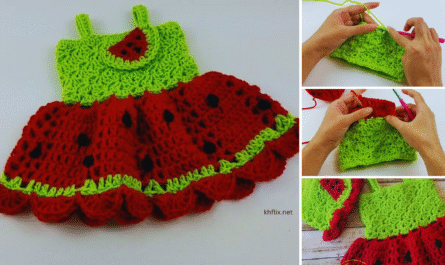
👗 How to Crochet Baby Dress “Madeline 2025” | Size: 0–6 Months (Full Step-by-Step Guide)
Crocheting a baby dress is one of the sweetest and most rewarding handmade projects you can make. The Madeline 2025 Baby Dress is a modern yet timeless pattern designed to fit a baby from newborn to 6 months. It features a soft, textured yoke, a flowing skirt, and delicate edging — perfect for any occasion, from baby showers to birthdays.
This project is gentle, simple, and full of charm — ideal for beginners or intermediate crocheters looking to make a memorable handmade gift.
💕 Why Choose the Madeline 2025 Baby Dress?
- Timeless style: Classic top-down construction that never goes out of fashion.
- Customizable: Easily change colors, add lace trims, or lengthen the skirt.
- Practical: Lightweight, comfortable, and easy to put on a baby.
- Beginner-friendly: Uses only basic stitches with easy shaping.
- Quick project: You can finish it in a weekend!
🧶 Materials You’ll Need
Before you begin, gather your materials. Having everything ready makes your crocheting smoother and more enjoyable.
✅ Yarn
- Type: Soft baby yarn (cotton, bamboo, or acrylic blend)
- Yarn Weight: Light (Category 3 – DK)
- Color: You can choose pastel shades or modern tones.
- For the Madeline 2025 version, we’ll use peach pink as the main color and white for edging.
✅ Crochet Hook
- Size 3.5 mm (E-4) or 4 mm (G-6)
(Use the size that gives you a soft but firm fabric.)
✅ Other Supplies
- Scissors
- Yarn needle (for weaving ends)
- Stitch markers
- 2 small buttons (for the back closure)
- Measuring tape
📏 Size and Measurements
This pattern fits babies approximately 0–6 months.
| Part | Measurement |
|---|---|
| Chest | 16–17 inches (40–43 cm) |
| Dress length | 12–13 inches (30–33 cm) |
| Armhole depth | 3.5 inches (9 cm) |
If you want a larger size (6–12 months), simply use a 4.5 mm hook and add an extra round to the yoke.
🧩 Stitches Used
Here are the basic stitches you’ll use for this pattern:
| Abbreviation | Stitch Name | Description |
|---|---|---|
| ch | Chain | Foundation stitch |
| sl st | Slip Stitch | Join stitches or move along row |
| sc | Single Crochet | Tight, short stitch |
| hdc | Half Double Crochet | Slightly taller than sc |
| dc | Double Crochet | Tall stitch used for most of the dress |
| inc | Increase | 2 stitches in the same stitch |
| sp | Space | Chain or gap between stitches |
That’s it! You only need a few basic stitches to create this beautiful design.
🎀 Construction Overview
The Madeline Baby Dress is made from the top down:
- Yoke: Begins with a foundation chain and increases to form the shoulders.
- Body: Worked in the round to create a flared skirt.
- Finishing: Edging, sleeves, and button band.
🧶 Step-by-Step Instructions
Let’s get started!
🌸 Step 1: Crochet the Yoke (Top Part)
- Foundation Chain:
- Ch 64 (this will form the neckline).
- Row 1:
- Dc in 4th chain from hook (counts as 2 dc in same stitch).
- Dc in next 8 sts, 2 dc in next st — repeat around.
- (You’ll have small increases forming a gentle curve.)
- Row 2:
- Ch 3, turn.
- Dc in each stitch until you reach an increase point, (dc, ch 1, dc) in that same stitch.
- Continue this pattern across to create the yoke shaping.
- Row 3–7:
- Repeat Row 2, ensuring you increase at the 4 corner points (these will form the front, back, and sleeves).
- After Row 7, your yoke should measure approximately 3.5–4 inches deep.
🪡 Tip: Use stitch markers at each corner to help you keep track of where to increase.
🌸 Step 2: Forming the Armholes
Now we’ll join the yoke to form the armholes.
- Measure the yoke width — it should easily fit around a baby’s chest.
- On your last increase row:
- Dc across the front, skip the sleeve stitches, chain 5–6, then continue dc across the back.
- Repeat for the other side.
- Join with a sl st.
This connects the front and back, forming the armholes. Now you’ll work in rounds for the body.
🌸 Step 3: Crocheting the Skirt (Body)
Now for the fun part — the flared skirt!
- Round 1:
- Ch 3 (counts as dc).
- Dc in each stitch and chain space around. Join with sl st.
- Round 2–3:
- Work 1 dc in each dc, ch 1, skip next stitch — repeat around for a slightly open, lace-like texture.
- Round 4–12 (or desired length):
- Continue working in dc clusters for a full skirt: (2 dc, ch 1, 2 dc) in each ch-1 space.
- Join at the end of each round.
- Optional Flair:
- For a more decorative look, increase slightly every 3–4 rows by adding extra dc clusters to widen the skirt.
🧡 By now, your dress will be taking shape beautifully — soft, airy, and flowy!
🌸 Step 4: Edging and Hem
- Bottom Edge:
- Work one round of sc in each stitch.
- Then, for a scalloped edge: (skip 1, 5 dc in next st, skip 1, sl st) — repeat all around.
- Fasten off.
- Neckline and Armholes:
- Attach white yarn (or contrast color).
- Work 1 round of sc evenly around each armhole and neckline.
- For a neater look, add a second round of reverse sc (crab stitch).
- Back Opening:
- The first 2 inches of the back should remain open for ease of dressing.
- Work 2 sc rows along each side to create a button band.
- Sew 2 small buttons on one side and make button loops (ch 6) on the opposite side.
🌸 Step 5: Finishing Touches
- Weave in all yarn ends securely with a tapestry needle.
- Lightly steam or block your dress to relax stitches and enhance drape.
- Add a small crocheted bow, flower, or ribbon at the waist for decoration.
Optional: Crochet a matching headband using leftover yarn!
💡 Tips for Success
- Always check your tension — baby garments should be soft, not stiff.
- Use lightweight yarn for comfort and breathability.
- For newborns, make the yoke slightly smaller; for 6 months, add one extra round of increases.
- Change colors between yoke and skirt for a modern two-tone effect.
- Wash gently by hand or on delicate cycle before gifting.
🌷 Design Variations
Once you’ve mastered the base pattern, you can customize your Madeline Baby Dress easily:
- Lacy Version: Use openwork stitches (like shell or V-stitch) for the skirt.
- Striped Dress: Alternate two colors every two rows for a playful pattern.
- Ribbon Waist: Weave satin ribbon through a row of dc near the waistline.
- Ruffled Sleeves: Add a row of shell stitches around each armhole.
- Matching Set: Crochet a matching hat, booties, or diaper cover for a full baby outfit.
🧵 Yarn & Color Inspiration
Here are a few modern combinations inspired by the Madeline 2025 design trend:
- Peach & Cream – classic and sweet
- Lilac & White – elegant and soft
- Mint Green & Butter Yellow – fresh and gender-neutral
- Rose Pink & Ivory – timeless and vintage-inspired
🧺 Care Instructions
- Hand wash or machine wash on delicate setting in cold water.
- Use gentle baby detergent.
- Lay flat to dry — do not hang, as it may stretch.
- Lightly steam with a low-heat iron if needed.
💖 Final Thoughts
Crocheting the Madeline Baby Dress 2025 is more than just making a garment — it’s creating a keepsake. Each stitch carries warmth, care, and love for the little one who’ll wear it.
This charming dress combines simplicity with beauty, making it ideal for beginners yet elegant enough to impress even experienced crocheters. Whether it’s for your baby, a grandchild, or a special gift, the Madeline Baby Dress is sure to be cherished for years.
So grab your hook, pick your favorite soft yarn, and start crocheting — stitch by stitch — your very own little masterpiece. 💕