 by
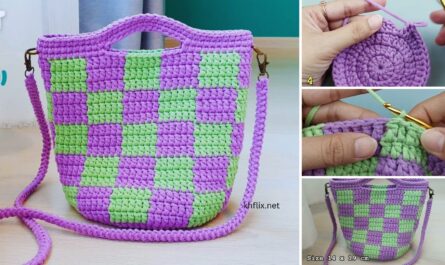
by This beginner-friendly tutorial will guide you through creating a chic and sturdy mini bag. This pattern is designed to be simple, fast, and incredibly satisfying. The finished bag is the perfect size for your phone, keys, a small wallet, and lip gloss—all your daily essentials!
We’ll use a simple stitch that works up quickly and creates a dense, modern-looking fabric, so your bag will be as durable as it is cute.
Materials You’ll Need
- Yarn: Approximately 150-200 grams of worsted weight (aran/10-ply) yarn.
- Best Choice: Cotton or a cotton-blend yarn. Cotton is highly recommended because it’s sturdy, doesn’t stretch much, and creates a clean, defined stitch.
- Crochet Hook: A 5.0mm (H/8) hook, or the size recommended for your yarn.
- A Button: One medium-sized button (about 1-inch / 2.5 cm).
- Stitch Marker: One stitch marker to mark the beginning of your rounds.
- Yarn Needle (Tapestry Needle): For weaving in ends and sewing on the button/strap.
- Scissors
Key Stitches (US Terms)
This pattern uses US crochet terminology.
| Abbreviation | Stitch Name | How-To (A Quick Refresher) |
| ch | Chain | Yarn over, pull up a loop. |
| sl st | Slip Stitch | Insert hook, yarn over, pull loop through stitch and loop on hook. |
| sc | Single Crochet | Insert hook, yarn over, pull up a loop (2 loops on hook). Yarn over, pull through both loops. |
| hdc | Half Double Crochet | Yarn over, insert hook, yarn over, pull up a loop (3 loops on hook). Yarn over, pull through all 3 loops. |
| BLO | Back Loop Only | Work the stitch into the back loop of the “V” only, not both. |
Why Half Double Crochet (hdc)? We are using the hdc stitch for the body of this bag. It’s the perfect “mini bag” stitch because it’s taller than a single crochet (so it works up faster) but denser than a double crochet (so your items won’t fall through the holes!).
Step-by-Step Pattern
We will make this bag from the bottom up, starting with an oval base and working up the sides in one seamless piece.
Part 1: The Bag Base (The Oval)
This oval base will give your bag a stable bottom.
- Foundation: Start by chaining 16 (ch 16).
- Round 1:
- Work 2 hdc into the 3rd chain from the hook (the 2 skipped chains count as your first hdc).
- Work 1 hdc in each of the next 12 chains.
- Work 5 hdc into the very last chain (this will turn you around the corner).
- Now, working down the other side of the foundation chain:
- Work 1 hdc in each of the next 12 chains.
- Work 3 hdc into the last chain (which already has your starting stitches).
- Join with a sl st to the top of the starting ch-2.
- (You should have 34 hdc stitches in total)
- Round 2:
- Ch 2 (counts as 1 hdc). Work 1 hdc into the same first stitch.
- Work 2 hdc into the next stitch.
- Work 1 hdc in each of the next 12 stitches.
- Work 2 hdc into each of the next 5 stitches (this is the toe-end).
- Work 1 hdc in each of the next 12 stitches.
- Work 2 hdc into each of the last 3 stitches (this is the heel-end).
- Join with a sl st to the top of the starting ch-2.
- (You should have 44 hdc stitches in total)
Your flat oval base is now complete.
Part 2: The Bag Body (The Walls)
Now we will build the walls of the bag.
- Round 3 (The “Upturn” Round):
- Ch 2 (counts as 1 hdc).
- Work 1 hdc into the Back Loop Only (BLO) of every stitch around.
- Join with a sl st to the top of the starting ch-2.
- (This BLO round creates a defined, crisp edge between the base and the walls of your bag.)
- (44 hdc stitches)
- Round 4 (Body Height):
- Ch 2 (counts as 1 hdc).
- Work 1 hdc into both loops of every stitch around.
- Join with a sl st to the top of the starting ch-2.
- (44 hdc stitches)
- Rounds 5 – 15:
- Repeat Round 4 for 11 more rounds, or until your bag is your desired height. A mini bag is typically about 6-7 inches tall.
Do not fasten off your yarn! We will move straight into the top edge.
Part 3: The Top Edge & Button Loop
We’ll add a clean edge and a simple button loop.
- Round 16 (Clean Edge):
- Ch 1 (does not count as a stitch).
- Work 1 sc into the same stitch and in every stitch around.
- Join with a sl st to the first sc.
- (44 sc stitches)
- Round 17 (Button Loop):
- Ch 1. Work 1 sc in the first 20 stitches.
- Now, create the loop: Ch 10 (or more/less to fit your button).
- Skip 4 stitches on the bag (this creates the top of the flap).
- Work 1 sc in the next stitch and in each remaining stitch around.
- Join with a sl st to the first sc.
- Round 18 (Finishing):
- Ch 1. Work 1 sl st in each stitch around the top of the bag.
- When you reach the ch-10 loop, work 12 sc into the chain space (this makes it sturdy and neat).
- Continue working 1 sl st in the remaining stitches.
- Join with a final sl st to the first slip stitch.
Fasten off and weave in your end.
Part 4: The Strap
This strap is designed to be sturdy and non-stretchy.
- Foundation: Chain 5 (ch 5).
- Row 1: Work 1 sc in the 2nd chain from the hook and in each of the next 3 chains. (4 sc)
- Row 2: Ch 1, turn. Work 1 sc in each of the 4 stitches.
- Repeat Row 2 over and over until your strap is the desired length.
- Shoulder Bag: approx. 25-30 inches.
- Crossbody Bag: approx. 40-45 inches.
- Fasten off, leaving a very long tail (about 12 inches) for sewing.
Part 5: Final Assembly 🎀
You’re almost done! Let’s put all the pieces together.
- Attach the Strap:
- Thread the long tail of your strap onto your yarn needle.
- Position one end of the strap on the inside of the bag, right at the side seam.
- Sew it securely in place, going through the strap and the bag several times. A small rectangle of stitches is strongest.
- Repeat with the other end of the strap on the opposite side of the bag.
- Attach the Button:
- On the front of the bag, find the spot directly opposite your button loop.
- Using your yarn needle and a piece of matching yarn, sew your button securely in place.
- Tip: Sew it on very tightly so it can handle the use!
- Weave in All Ends: This is the final, most important step! Go back and find any remaining yarn tails (from the base, top, etc.) and use your yarn needle to weave them securely into the inside of the bag.
Congratulations! You’ve just made an adorable and functional crochet mini bag, perfect for everyday use.