 by
by Crochet bags are one of the most satisfying projects you can make — fast, functional, and endlessly customizable. Whether you’re looking for a cute everyday pouch, a tiny gift bag, or your first-ever crochet project, this Small Crochet Bag tutorial is simple enough for beginners yet lovely enough for experienced crocheters to enjoy.
This guide covers everything: materials, stitch explanations, step-by-step photos-in-words, strap ideas, embellishments, and helpful tips to make your finish neat and professional. Let’s create something beautiful handmade with love! 💗✨
🌸 Why You’ll Love Making This Small Bag
Before we start stitching, here’s why this pattern is perfect for beginners:
- Quick project — can be finished in under 2 hours
- Uses minimal yarn — great for scrap yarn
- Simple stitches — chains and single crochet only
- Customizable size — just change the starting chain
- Functional & cute — perfect for essentials
- Makes a lovely handmade gift 🎁
This small bag is sweet, practical, and adorable — ideal for keeping small treasures or adding a soft handmade touch to your outfit.
🧶 Materials You Will Need
To keep things beginner-friendly, you only need basic supplies:
✔ Yarn
- Worsted weight / Medium (4) cotton or acrylic
- Cotton gives structure
- Acrylic creates a softer, flexible bag
✔ Hook
- 5.0 mm (H/8) crochet hook
(Use 4 mm if you want tighter stitches)
✔ Notions
- Yarn needle
- Scissors
- Stitch marker (optional but helpful)
- Optional: Button, beads, bow, appliqué, or small charm 🎀
💗 Beginner Stitches Used
You only need to know these basics:
- CH – Chain
- SC – Single Crochet
- SL ST – Slip Stitch
- INC – Increase (2 SC in the same stitch)
If you’ve never crocheted before — don’t worry! This pattern repeats the same simple stitch over and over.
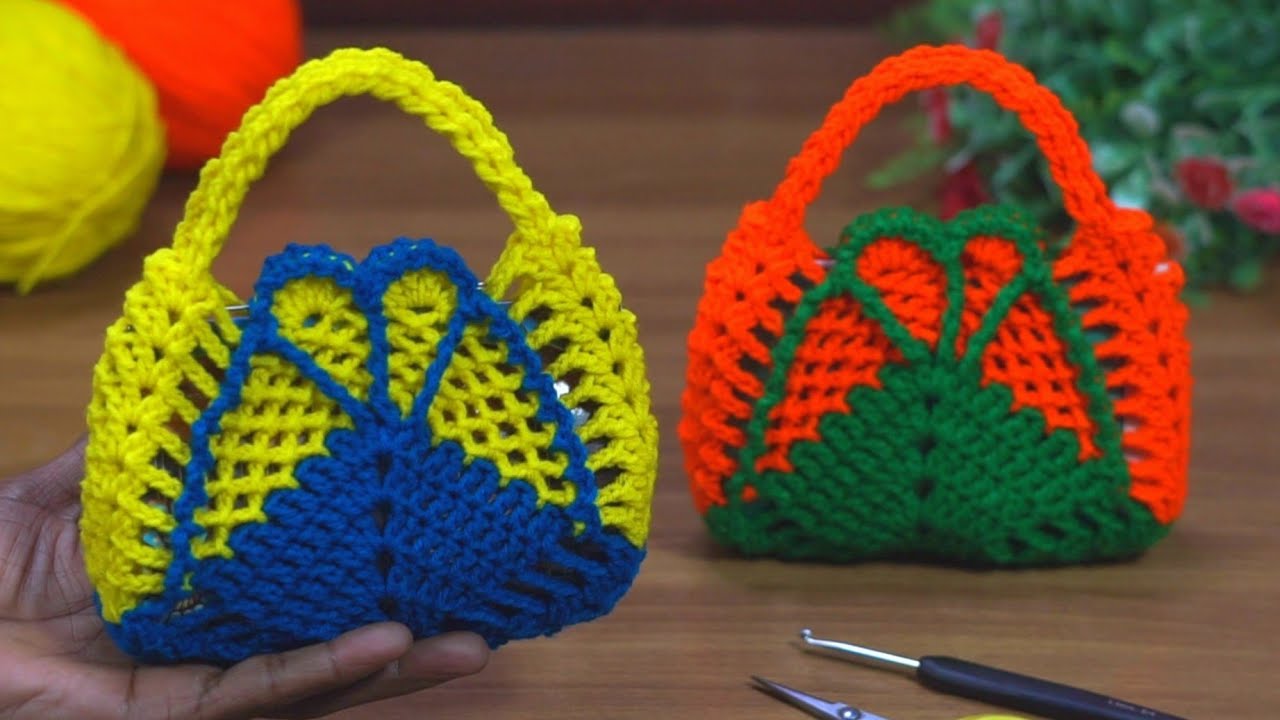
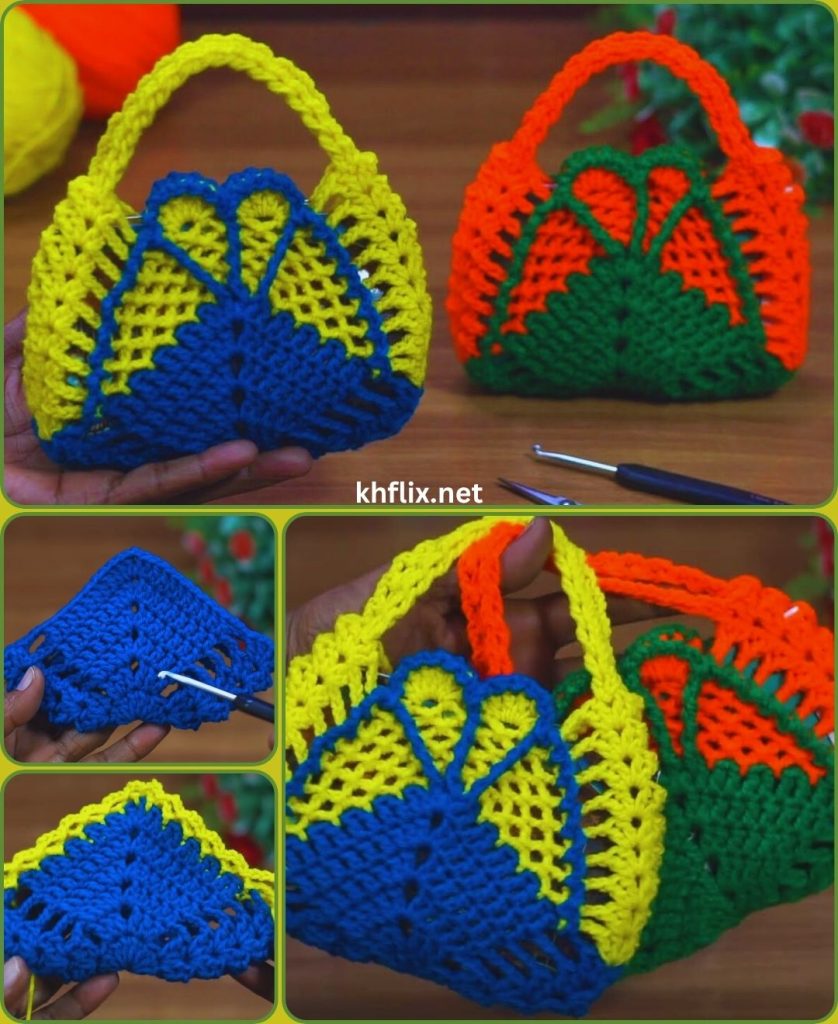
🎀 Step-by-Step Tutorial: Crochet Small Bag
We’ll crochet a flat rectangle first, then work upward in the round to form the body. The method is forgiving and beginner-friendly.
📍 Step 1: Create the Base Rectangle
The base determines the width and depth of your small bag.
- CH 20
(Feel free to chain more or fewer depending on desired size) - Row 1: SC in the 2nd chain from hook and across (19 SC).
- Row 2–12: CH 1, turn, SC across.
This creates a neat rectangle — about the size of your palm.
✔ Tips:
- More rows = deeper bag
- Fewer rows = small pouch size
📍 Step 2: Crochet Around the Rectangle
We’ll turn the flat base into a 3D shape.
- Do not fasten off.
- Continue working SC around the entire rectangle, placing:
- 3 SC in each corner (to keep it flat)
- SL ST to the first stitch to join.
This gives you a rounded rectangular base.
📍 Step 3: Build the Bag Wall (Working in Rounds)
Now your bag will start taking shape!
- Round 1–15: SC all the way around.
- Use a stitch marker to track the first stitch
- Do not increase
- Join each round with a SL ST
The bag grows upward like a little basket.
✔ Optional Texture:
- Work 1–2 rounds in Back Loop Only (BLO) for a ridge line
- Add stripes every 3 rounds
📍 Step 4: Finishing the Top Edge
To give your small bag a polished look:
- Final Round: SL ST loosely around the top.
- Fasten off.
- Weave yarn ends with a needle.
This keeps the edge stable and prevents stretching.
🎀 Step 5: Adding a Strap or Handle
Choose your favorite strap style below — each one gives the bag a different personality!
💕 Option A: Simple Chain Strap (Easiest)
- Attach yarn to one side of the bag.
- CH 120–150 (depending on length).
- Attach to the opposite side with SL ST.
- You may SC back along the chain to thicken it (optional).
This creates a casual, lightweight shoulder strap.
💕 Option B: Sturdy Flat Strap
- CH 60
- SC in each stitch for 4–5 rows
- Sew both sides to the bag
This strap is durable and elegant.
💕 Option C: Wrist Strap (Mini Bag Style)**
- CH 35
- SC across for 2 rows
- Sew ends to one side
Cute and perfect for quick trips!
✨ Step 6: Add Decoration (Handmade With Love!)
Here’s where your creativity shines. Add any of the following:
🌸 Appliqués
- Crochet heart 💗
- Flower 🌼
- Butterfly 🦋
- Initial letter charm
🌸 Edging
- Picot edge
- Shell stitch edging
- Contrasting color SL ST finish
🌸 Accessories
- Button closure
- Beads along the strap
- Ribbon bow 🎀
- Embroidered flowers
These little touches make your small bag truly handmade with love.
🌈 Ways to Use Your Crochet Small Bag
This cute little bag is surprisingly practical!
- Everyday essentials (lip balm, keys, earbuds)
- Gift bag for jewelry or handmade goodies
- Kids’ mini purse
- Craft fair item
- Bag charm (attach a key ring)
- Storage for crochet hooks or small tools
- Passport/travel pouch
The possibilities are endless!
💡 Beginner Tips for Best Results
- Keep tension even—relax your hands
- Cotton yarn gives a cleaner look
- Count stitches occasionally to avoid accidental increases
- If the bag leans, use stitch markers to keep track
- Block the finished bag if you want a sharper shape
💗 FAQ: Crochet Small Bag
Q: How can I make the bag larger?
Increase the starting chain and add more rows to the base.
Q: Can beginners do this pattern?
Absolutely — it’s one of the easiest crochet bag projects!
Q: Which yarn is best?
Cotton for structure, acrylic for softness.
Q: Can I line the bag?
Yes! A simple fabric rectangle hand-sewn inside gives it extra durability.
💗🎀 Final Thoughts: Handmade With Love
Crocheting a small bag is a joyful and rewarding project — simple enough for beginners yet full of opportunities for creativity. Whether you’re crafting for yourself or making a thoughtful gift for someone special, this little bag holds more than belongings… it holds your time, effort, and love.
If you’d like, I can also create:
- A PDF version
- A stitch chart / diagram
- A Kawaii-themed small bag pattern
- A video-style script
- A larger tote version
Just tell me! 💗🎀