by
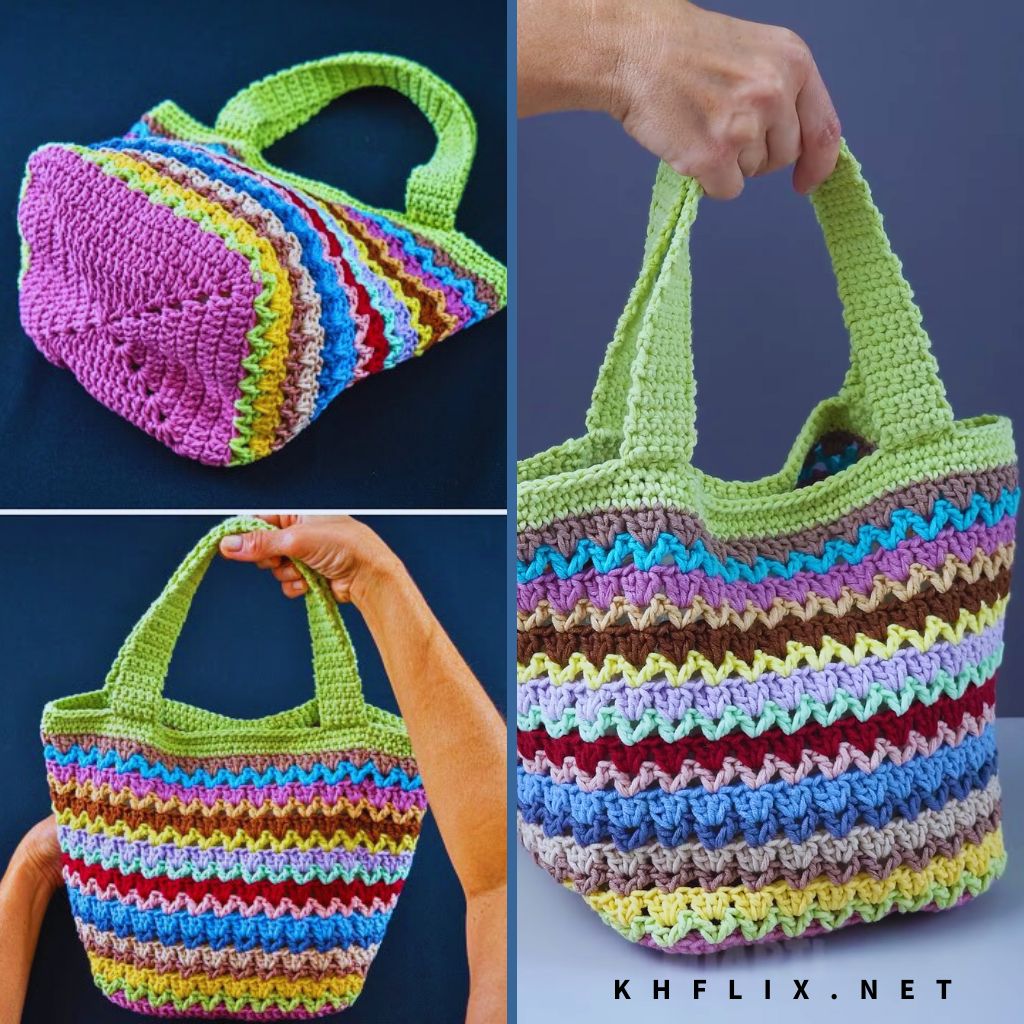
by If you’re a crochet enthusiast, you probably have a basket (or two!) full of yarn scraps — those leftover bits from past projects that are too short for something big but too pretty to throw away. One of the best ways to turn that pile of colorful chaos into something useful is to make a multicolor tote bag.
Crocheting a tote from yarn scraps is not just fun; it’s eco-friendly, budget-friendly, and a great way to flex your creativity. Whether you’re a beginner or an experienced crocheter looking for a relaxing weekend project, this tutorial will guide you through every step.

🌈 Why Make a Multicolor Tote Bag?
- Eco-Friendly: Use up your leftover yarn instead of letting it go to waste.
- Budget Project: No need to buy new supplies — just gather what you already have.
- Custom & Unique: Each bag will look completely different depending on your color combinations.
- Practical: Great for groceries, beach trips, books, or everyday use.
- Beginner-Friendly: Uses basic crochet stitches and simple shaping.
🧺 Materials You’ll Need
Before we dive into the steps, let’s get everything ready.
Yarn:
- Yarn scraps of various colors.
- Any fiber type works (cotton, acrylic, blends), but try to stick to similar weights — worsted weight or medium (4) yarns are ideal.
- If your scraps are different thicknesses, you can double up thinner yarns to match.
Crochet Hook:
- Size H/8 (5 mm) or size that matches your yarn weight.
Other Supplies:
- Scissors
- Yarn needle (for weaving in ends)
- Stitch markers (optional, but useful)
✨ Design Choices
You can crochet your tote in several styles:
- Granny Squares: Make many colorful squares and join them together.
- Continuous Rounds: Crochet a solid body in rounds, changing colors as you go.
- Striped Rows: Crochet flat panels with colorful stripes, then seam them together.
For simplicity and speed, this tutorial will show you the continuous-round method, which gives a sturdy, seamless tote and lets your colors blend naturally.
🧶 Step-by-Step Instructions
Step 1: Prepare Your Yarn Scraps
Gather your yarn pieces and roll them into mini balls.
You can tie small scraps together using a magic knot or a simple square knot and trim the ends short. Don’t worry — the color changes will add a charming, patchwork look to your tote.

Step 2: Crochet the Base
You’ll start with an oval base for the tote.
Foundation:
- Chain (ch) 25 (you can adjust this for a wider or narrower bag).
- Single crochet (sc) in the second chain from the hook and in each chain across (24 sc).
- When you reach the last chain, make 3 sc in the last stitch to curve around.
- Continue crocheting on the opposite side of the chain, working 1 sc in each stitch across.
- At the end, make 2 sc in the same stitch where you started (to mirror the other end).
You now have an oval shape.
Step 3: Build Up the Sides
From here, you’ll crochet in rounds to form the body.
- Place a stitch marker in the first stitch of the round.
- Crochet 1 sc in each stitch around.
- Do not increase anymore — this will make the sides grow upward instead of outward.
- Keep crocheting around in continuous rounds until your tote reaches the desired height (usually 12–14 inches).
Color Changes:
When you run out of one color, simply tie in the next scrap. Mix colors randomly for a boho look, or create planned stripes for a more structured design.
Step 4: Add Handles
Once your bag body is done, it’s time to create sturdy handles.
- Lay your tote flat and find the side centers.
- Mark where you want the handles to begin and end — usually about 5–6 inches apart.
- Continue crocheting in rounds until you reach a handle marker, then:
- Chain 35 (or desired handle length).
- Skip 10 stitches below (this creates the handle gap).
- Resume single crochet across the rest of the round.
- Repeat for the second handle on the opposite side.
Step 5: Reinforce the Handles
To make your handles stronger:
- Crochet another 2–3 rounds of single crochet, working into both the handle chains and bag edge stitches.
- This will make the handles thick and durable.
Step 6: Finishing Touches
- Fasten off and weave in all loose ends with a yarn needle.
- For extra neatness, you can line your tote with fabric (optional).
- You can also add a button, snap, or drawstring if you want a closure.
💡 Tips for Success
- Consistent Tension: Try to keep your stitches even, especially when changing yarn thickness.
- Play with Texture: Mix matte, shiny, fuzzy, or metallic yarns for a stunning effect.
- Edge Decoration: Add a row of crab stitch (reverse single crochet) or scallops for a fancy finish.
- Wash Gently: If using mixed yarns, hand-wash in cold water to prevent stretching or color bleeding.
🎨 Creative Variations
- Granny Square Tote: Make 13–15 colorful granny squares, join them, and add a border and handles.
- Striped Market Bag: Work in double crochet for a lighter, stretchier tote perfect for groceries.
- Patchwork Tote: Join rectangles or hexagons for a modern, geometric look.
🌿 Final Thoughts
A multicolor tote bag from yarn scraps is more than just a craft project — it’s a celebration of creativity and sustainability. Each stitch tells a story from your past projects, blending memories and colors into something new and useful.
Whether you use it for shopping, picnics, or carrying your next crochet project, your handmade tote will be unique — no one else in the world will have the same one!
So grab those yarn bits, pick up your hook, and start stitching your rainbow tote today. 🌈🧵