 by
by 🧶 Welcome to My Crochet Corner! 🌸
A cozy space for creativity, comfort, and colorful yarn.
Hello there, fellow yarn lover! 👋
I’m so happy you’ve found your way to my little corner of the internet — a place where loops, stitches, and patterns come together to create something beautiful.
Here at My Crochet Corner, you’ll discover:
- Easy and beautiful crochet patterns
- Step-by-step tutorials perfect for beginners and experienced crafters
- Inspiring crochet ideas for gifts, home décor, and more
- A growing community of people who love handmade things as much as you do
Whether you’re just starting out or you’ve been crocheting for years, there’s always something new to learn, try, or fall in love with here. 💕
So grab your favorite hook, a cup of tea, and let’s create something wonderful together — one stitch at a time.
Happy Crocheting!

Sure! Here’s a detailed, tutorial on how to make a crochet baby blanket, perfect for beginners and intermediate crocheters alike. This guide covers all the essential steps, including choosing yarn, tools, patterns, stitches, and finishing touches.
🧶 How to Make a Crochet Baby Blanket: A Complete Step-by-Step Tutorial
Crocheting a baby blanket is a thoughtful and creative project, perfect for baby showers, newborn gifts, or simply a cozy project to work on during your spare time. Whether you’re a beginner or have some crochet experience, this tutorial will walk you through everything you need to know to create a beautiful, soft, and cuddly baby blanket from start to finish.
🧵 What You’ll Need
1. Yarn
Choosing the right yarn is crucial for a baby blanket. It needs to be soft, washable, and gentle on a baby’s skin.
Recommended Yarn Types:
- Acrylic (Hypoallergenic, durable, machine washable)
- Cotton (Breathable and soft, but heavier)
- Bamboo blends (Silky and eco-friendly)
Yarn Weight:
- DK (Double Knitting/Light Worsted, #3) – Great for a lightweight blanket
- Worsted Weight (#4) – Standard and versatile
- Bulky (#5) – For a thicker, faster blanket
Amount Needed:
Typically 900–1500 yards depending on the size and stitch used.
2. Crochet Hook
Check the yarn label for a recommended hook size. Common hook sizes for baby blankets:
- 4.5 mm – 6.0 mm (US G–J)
Tip: A larger hook will give you a looser, softer drape, while a smaller hook creates tighter stitches.
3. Scissors & Tapestry Needle
- Scissors for trimming yarn
- Tapestry needle (blunt-ended) for weaving in ends
4. Measuring Tape
To ensure your blanket dimensions are accurate.
🖐️ Step-by-Step Instructions
🪡 Step 1: Choose a Pattern or Stitch
If you’re a beginner, choose a simple stitch pattern. Here are a few great options:
1. Single Crochet Blanket
Very basic and dense; best for tighter, warmer blankets.
2. Half Double Crochet Blanket
A bit looser than single crochet, great for soft texture.
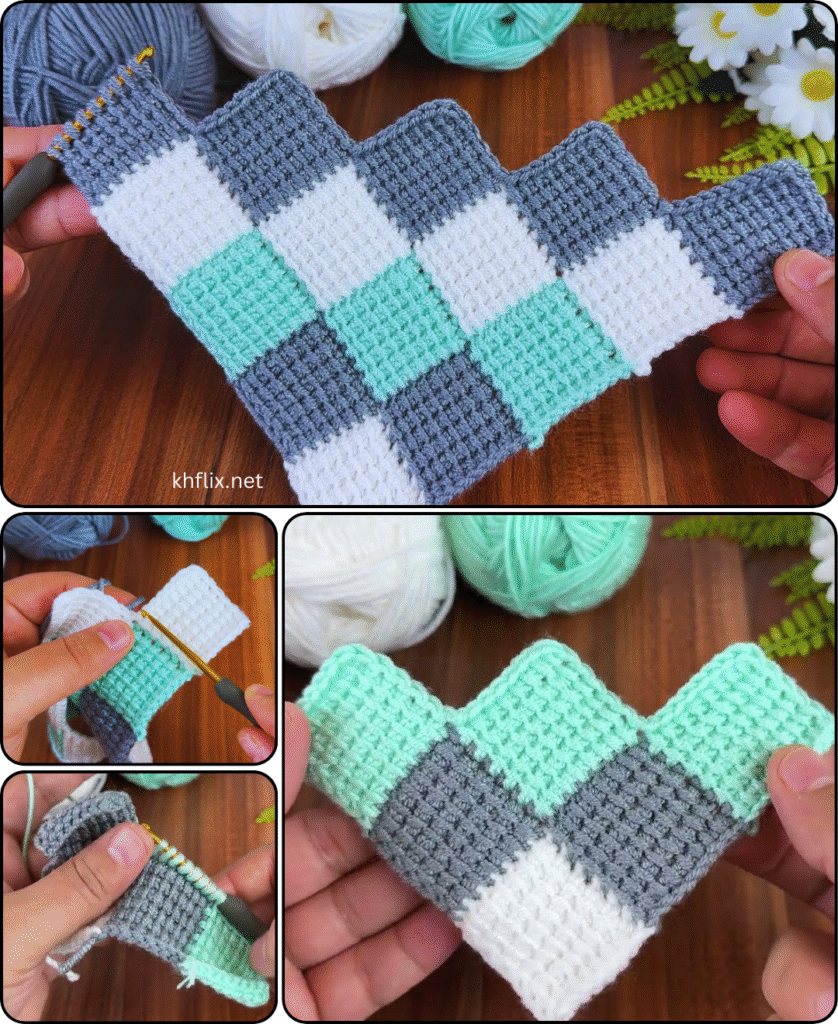
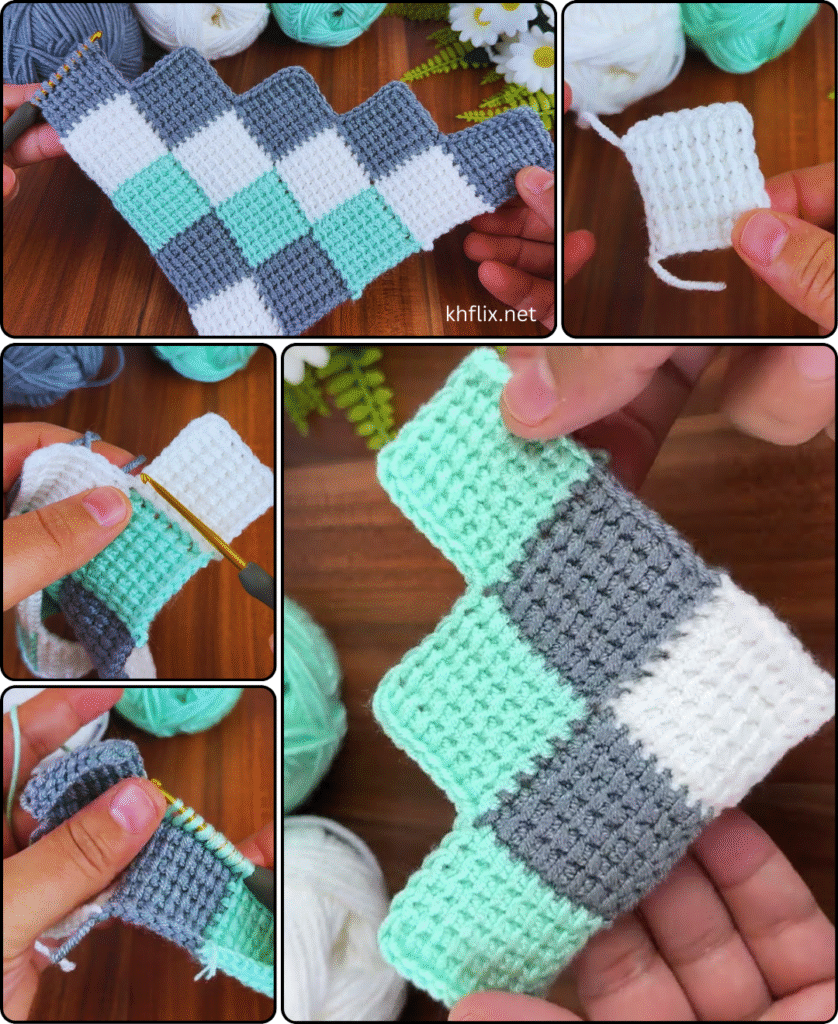
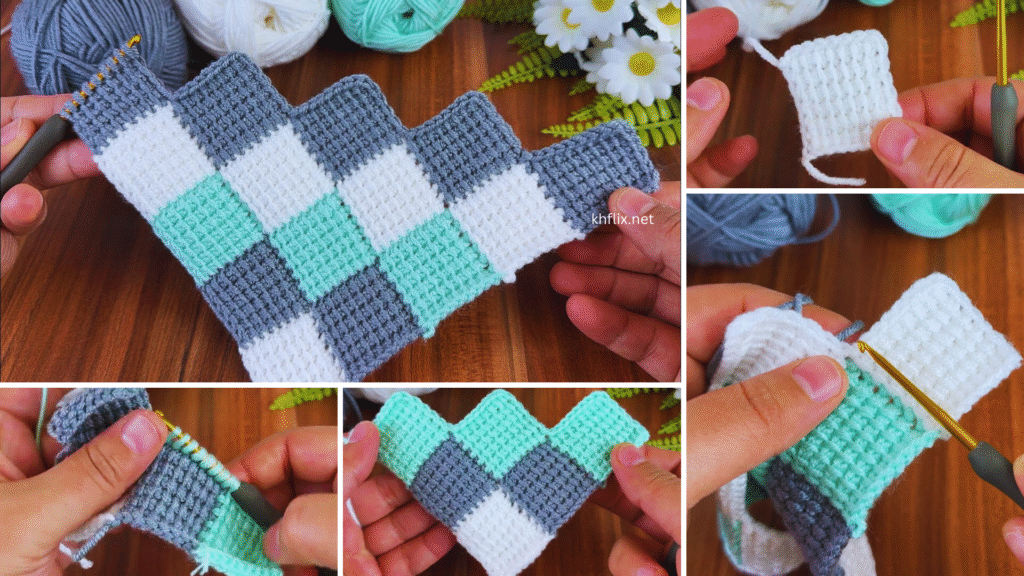
3. Granny Square Blanket
Made by creating squares and joining them; very customizable.
4. Corner-to-Corner (C2C)
Worked diagonally; creates a modern look.
5. Shell Stitch or V-Stitch
Adds texture and visual interest.
We’ll use the Half Double Crochet (HDC) stitch for this tutorial.
🧶 Step 2: Crochet a Foundation Chain
Determine the size of your blanket. Common baby blanket sizes:
| Blanket Type | Size (inches) |
|---|---|
| Lovey | 12 x 12 |
| Stroller | 30 x 35 |
| Receiving | 40 x 40 |
| Crib | 45 x 60 |
Let’s make a 30″ x 35″ stroller blanket with worsted weight yarn and a 5.5 mm hook.
Chain Count:
To estimate how many chains:
- Measure your gauge (e.g., 14 stitches = 4 inches)
- Use this to calculate total chain count:
(30 / 4) * 14 = 105 chains
Start:
bashCopyEditChain 105 (or a multiple of your stitch count)
🔁 Step 3: Begin Crocheting Rows
Row 1:
- Yarn over, insert into the third chain from the hook
- Pull through, yarn over, pull through all three loops on the hook (Half Double Crochet made)
- Continue HDC in each chain across the row
Row 2 and Onward:
- Chain 2 (counts as first HDC)
- Turn your work
- HDC in each stitch across
- Repeat this row until you reach 35 inches in height
📝 Tip: Always count your stitches at the end of each row to ensure consistency.
🎨 Optional: Add a Color Pattern or Stripes
Changing colors is a great way to customize your baby blanket. To add stripes:
- Complete a row.
- At the last yarn-over of the last stitch, pull through the new color.
- Continue crocheting with the new color.
- Carry or weave in yarn ends neatly.
🧵 Step 4: Add a Border (Optional but Recommended)
Borders make the blanket look polished and help prevent curling edges.
Simple Border:
- Switch to a new color or continue with the same yarn.
- Single crochet evenly around all four edges of the blanket.
- Place 3 single crochets in each corner to keep it flat.
- Do 2–3 rows depending on preference.
Fancy Borders:
- Shell stitch
- Picot edging
- Crab stitch (reverse single crochet)
🧼 Step 5: Finishing Touches
Weaving in Ends
Using your tapestry needle, weave all yarn tails securely into the stitches to prevent unraveling.
Washing and Blocking
- Gently wash the blanket (check yarn label for instructions)
- Lay flat to dry and shape if needed (especially for natural fibers)
📏 Pattern Summary
Here’s a quick summary for our Half Double Crochet Baby Blanket:
- Hook: 5.5 mm (I-9)
- Yarn: Worsted weight (approx. 1000 yards)
- Size: 30″ x 35″
- Stitches: Half Double Crochet throughout
- Border: Single crochet with optional shell or crab stitch
💡 Tips for Success
- Swatch First: Make a small sample to check your gauge and tension.
- Stay Consistent: Keep your stitch tension even throughout.
- Choose Soft Yarn: Test yarn against your skin before starting.
- Make it Personal: Add a name or initials with surface slip stitching or embroidery.
- Keep it Washable: Babies are messy—ensure the yarn is machine washable.
🧸 Final Thoughts
Creating a handmade crochet baby blanket is not only rewarding but becomes a treasured keepsake. Whether you’re making one for a loved one or donating it to charity, the time and care you put into each stitch are what truly count. Once you’ve mastered the basic pattern, you can explore more complex stitches, motifs, and customizations.
Happy crocheting!