by
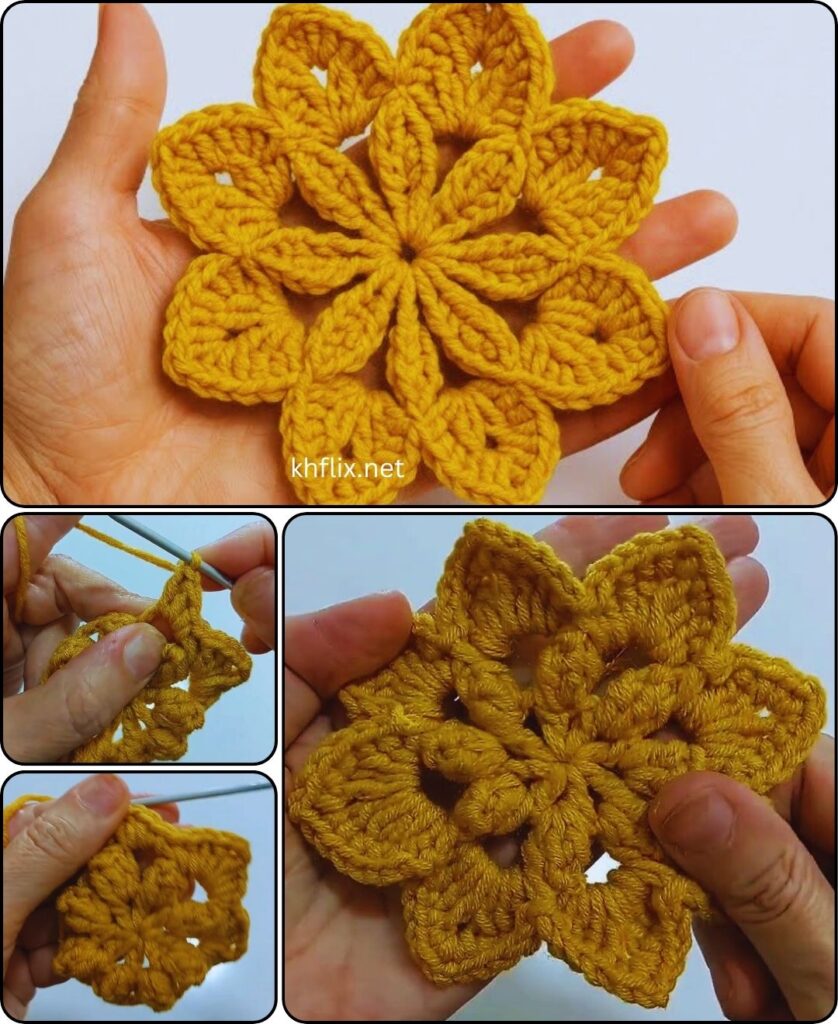
by That’s a wonderful idea! A gorgeous yellow crochet flower can brighten up any project. For a more “gorgeous” and less flat look than a basic beginner flower, we’ll create a layered flower using simple stitches. This pattern is still beginner-friendly but introduces working into different spaces for layered effects.
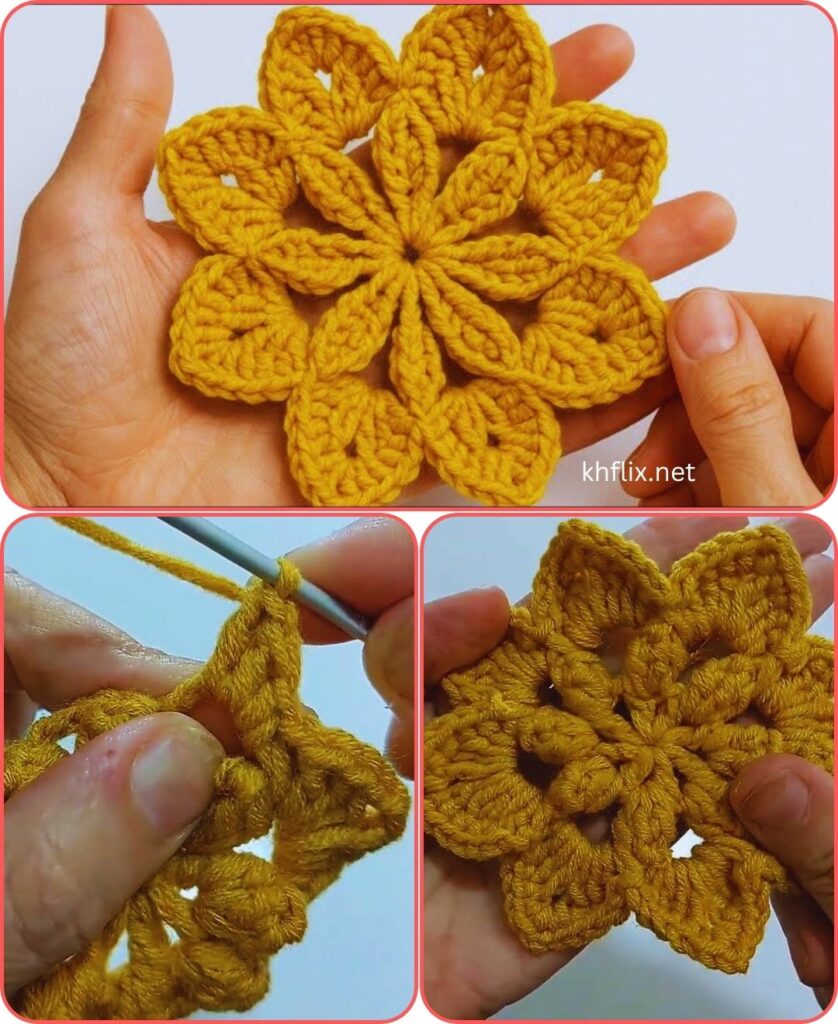
Pattern: Gorgeous Layered Crochet Flower in Yellow Color
This tutorial will guide you through creating a beautiful, multi-layered crochet flower, emphasizing a vibrant yellow hue. The layering gives it depth and a fuller, more “gorgeous” appearance.
Goal: To create a visually appealing, dimensional flower with distinct layers of petals, primarily in yellow.
Materials You’ll Need:
- Yarn:
- Yellow Worsted Weight (Medium #4) Yarn: This will be your main color for the petals.
- Small amount of Green Worsted Weight Yarn (Optional): For leaves, if you wish to add them.
- Small amount of Brown or Dark Yellow Yarn (Optional): For a contrasting flower center.
- Crochet Hook:
- Size H/5.0mm (or a size suitable for your chosen yarn).
- Yarn Needle (Tapestry Needle): For weaving in ends.
- Scissors
Abbreviations Used:
- ch: chain
- sl st: slip stitch
- sc: single crochet
- hdc: half double crochet
- dc: double crochet
- tr: treble crochet (or triple crochet)
- st(s): stitch(es)
- sp: space
- ch-sp: chain space
- MR: magic ring (or magic circle)
- FO: fasten off
Understanding the Layered Flower Structure
This gorgeous flower will be built in several rounds, with each round adding a new element or layer of petals:
- Round 1 (Center): A tight circle forms the flower’s heart.
- Round 2 (Small Petals): The first, smaller layer of petals.
- Round 3 (Larger Petals): The second, fuller layer of petals, worked behind the first layer. This creates the beautiful layered effect.
- Optional Round (Leaves): Adding simple leaves at the back for a complete look.
Let’s Start Crocheting!
Part 1: The Flower Center (Optional Brown/Dark Yellow)
You can choose to make the very center a different color for a realistic touch, or stick with yellow.
Option A: Chain Ring (Beginner Friendly)
- With Brown/Dark Yellow yarn (or Yellow), ch 4.
- Sl st into the first chain you made to form a ring.
Option B: Magic Ring (Tighter Center)
- With Brown/Dark Yellow yarn (or Yellow), create a Magic Ring.
- Ch 1 (does NOT count as a stitch, just secures the ring).
Round 1 (Center – continued):
- Into the center ring (from Option A or B), ch 1 (does not count as a stitch).
- Work 10 sc (single crochet) into the center ring.
- Sl st into the first sc to join the round. (10 sc).
- FO (Fasten Off) your current color, leaving a tail to weave in. If using Magic Ring, pull the tail tight to close the center hole. You should now have a small, tight circle for the center of your flower.
Part 2: First Layer of Petals (Yellow Yarn)
Now we’ll add the first set of petals directly onto the stitches of Round 1.
- Join Yellow Yarn with a sl st into any sc stitch from Round 1.
- Round 2 (Small Petals):
- Ch 2 (counts as first hdc).
- Work 1 hdc into the same stitch where you joined.
- Ch 2.
- Sl st into the next sc stitch from Round 1.
- (This completes your first small petal. It’s built on two stitches of the previous round.)
- Repeat the following 4 more times:
- Sl st into the next sc stitch (this repositions you for the next petal).
- Ch 2.
- Work 2 hdc into the same stitch you just slip stitched into.
- Ch 2.
- Sl st into the next sc stitch.
- After your 5th petal, sl st into the first sl st you made at the very beginning of this round.
- FO Yellow Yarn, leaving a tail to weave in. You should now have 5 small, slightly rounded petals forming the inner layer of your flower.
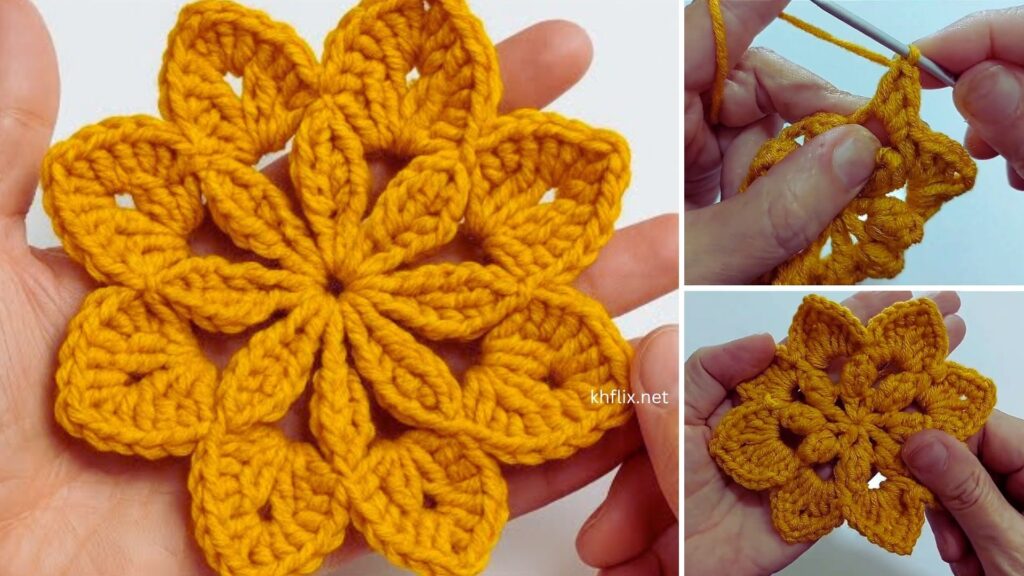
Part 3: Second Layer of Petals (Yellow Yarn)
This is the key to the “gorgeous” layered look. We’ll work into the slip stitches (sl sts) or back loops of Round 1, behind the petals you just made, to create a new, larger layer.
- Important Note for Beginners: This step requires finding the slip stitches or working into the back loops of the initial round.
- Carefully fold your first layer of petals forward.
- You’ll see the original 10 sc stitches from Round 1.
- Look closely at the back of these stitches, or where you made the slip stitches in Round 2. We want to work between the previous petals.
- Join Yellow Yarn with a sl st into any unworked loop or space behind a petal from Round 2, ideally aiming for the space where a sl st from Round 2 was made or where you joined Round 2 to Round 1. (This can be a little tricky, just try to pick a consistent spot behind each small petal).
- Alternatively, you can join into any of the 10 sc stitches from Round 1, ensuring you work into the back loop only (BLO) or the space where the previous sl st was made, to keep the front petals free.
- Round 3 (Larger Petals):
- Ch 2 (counts as first hdc).
- Work 1 hdc into the same space where you joined.
- Ch 2.
- Work 1 sc into the next available space/stitch behind a petal (or next sc from Round 1).
- Ch 2.
- Work 2 hdc into the next available space/stitch behind a petal.
- Ch 2.
- Sl st into the next available space/stitch behind a petal.
- (This completes one larger petal segment. It’s designed to be fuller.)
- Repeat the following 4 more times (total of 5 larger petals):
- Sl st into the next available space/stitch behind a petal (or next sc from Round 1).
- Ch 2.
- Work 2 hdc into the same space you just slip stitched into.
- Ch 2.
- Sl st into the next available space/stitch behind a petal.
- After your 5th larger petal, sl st into the first sl st you made at the very beginning of this round.
- FO Yellow Yarn, leaving a tail to weave in. You should now have a fuller, second layer of petals peeking out from behind the first layer, giving your flower beautiful dimension!
Part 4: Optional Leaves (Green Yarn)
Adding simple leaves at the back can really make your flower pop, especially when using yellow yarn!
- Join Green Yarn with a sl st into any unworked loop or space at the very back of the flower, ideally behind where the second layer of petals finished. You’ll be working into the same “foundation” as the second layer, but even further back.
- Leaf Pattern (make 2-3 leaves):
- Ch 5.
- Sl st into the 2nd ch from hook.
- Sc into the next ch.
- Hdc into the next ch.
- Sl st into the last ch.
- Sl st into a nearby stitch or space on the back of the flower to anchor the leaf.
- Ch 5 for the next leaf and repeat the leaf pattern, spacing them evenly.
- After the last leaf, sl st to secure.
- FO Green Yarn, leaving a tail to weave in.
Finishing Your Gorgeous Crochet Flower
- Weave in All Ends: This is essential for a neat and professional finish.
- Thread each yarn tail onto your yarn needle.
- Carefully weave the tail through several stitches on the back of your flower, going in different directions to secure it.
- Trim any excess yarn close to the fabric, being careful not to cut the flower itself.
- Take your time with this step, as neatly woven ends make a big difference!
- Shape Gently: Gently push and arrange the petals with your fingers to give your flower the desired full and “gorgeous” shape.
Tips for Beginners:
- Patience with Layering: Working into the “back” or “behind” stitches can be a bit challenging at first. Take your time, feel for the loops, and don’t get frustrated. It gets easier with practice!
- Consistent Tension: This will make your flower look even and professional.
- Count Your Stitches: Double-check your stitch counts for each petal to ensure consistency.
- Use Stitch Markers: If you’re having trouble locating where to start a new layer, use a stitch marker.
- Video Tutorials: If any part of the layering or specific stitches is confusing, search for video tutorials on “layered crochet flowers” or specific stitches like “hdc” or “tr.”
- Experiment with Yarn: While yellow is specified, try different shades of yellow or even add a touch of orange or cream for variegation on subsequent flowers.
Ideas for Using Your Gorgeous Yellow Crochet Flower:
- Appliqué: Sew it onto hats, headbands, scarves, bags, blankets, or even a plain t-shirt or jacket.
- Hair Accessories: Attach it to hair clips, elastic bands, or barrettes.
- Brooches/Pins: Sew a pin back onto the back of the flower for an instant accessory.
- Gift Toppers: Use it instead of a bow on a wrapped gift for a handmade touch.
- Home Decor: Adorn throw pillows, curtains, or create a floral garland.
- Fashion Accent: Add it to a belt, a plain handbag, or a hat for a sunny pop of color.
Enjoy making your stunning yellow crochet flower! It’s a truly rewarding project.