 by
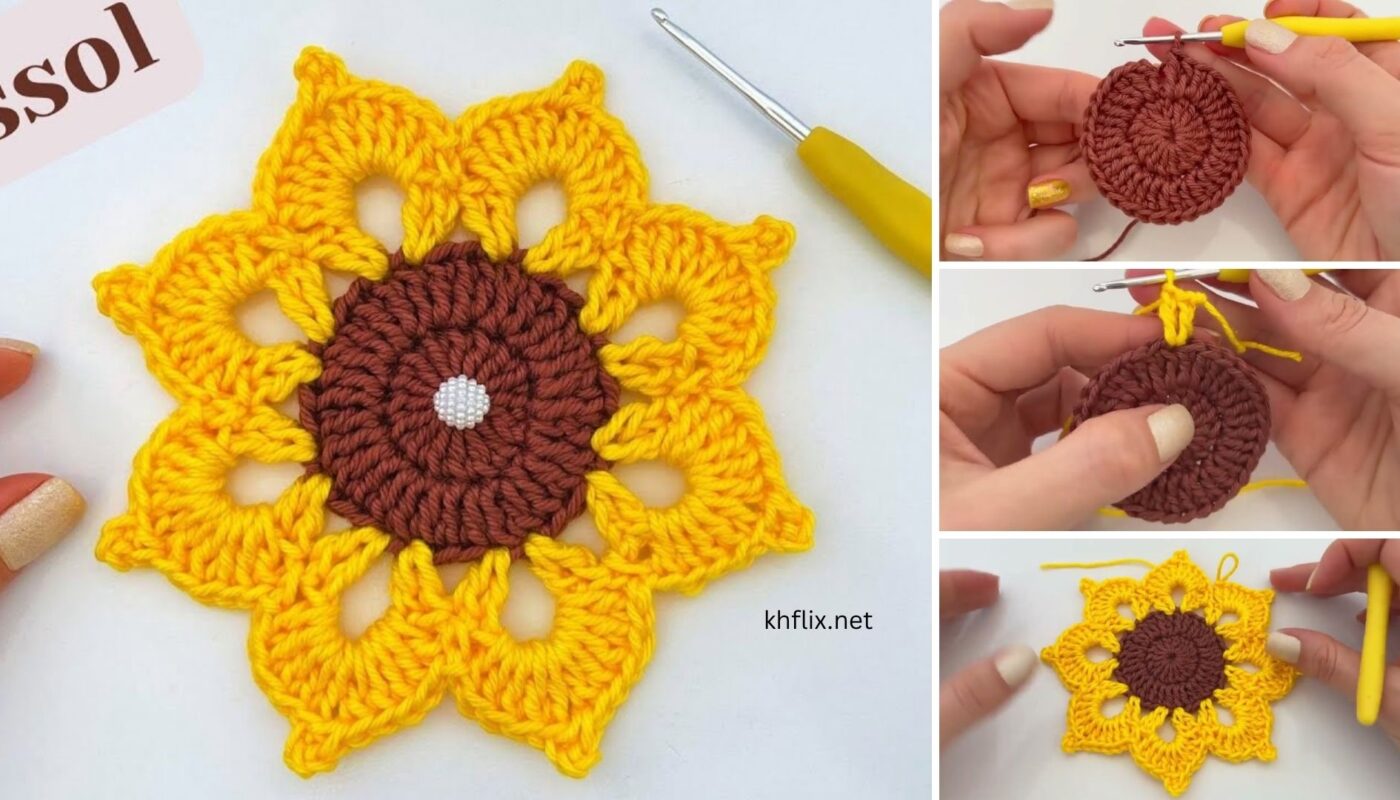
by Okay, let’s make a cheerful and functional yellow crochet coaster flower! This pattern will combine the practicality of a coaster with the beauty of a blooming flower, using a solid base and distinct petal-like edges. Cotton yarn is key for its absorbency and heat resistance, making it perfect for holding hot beverages.
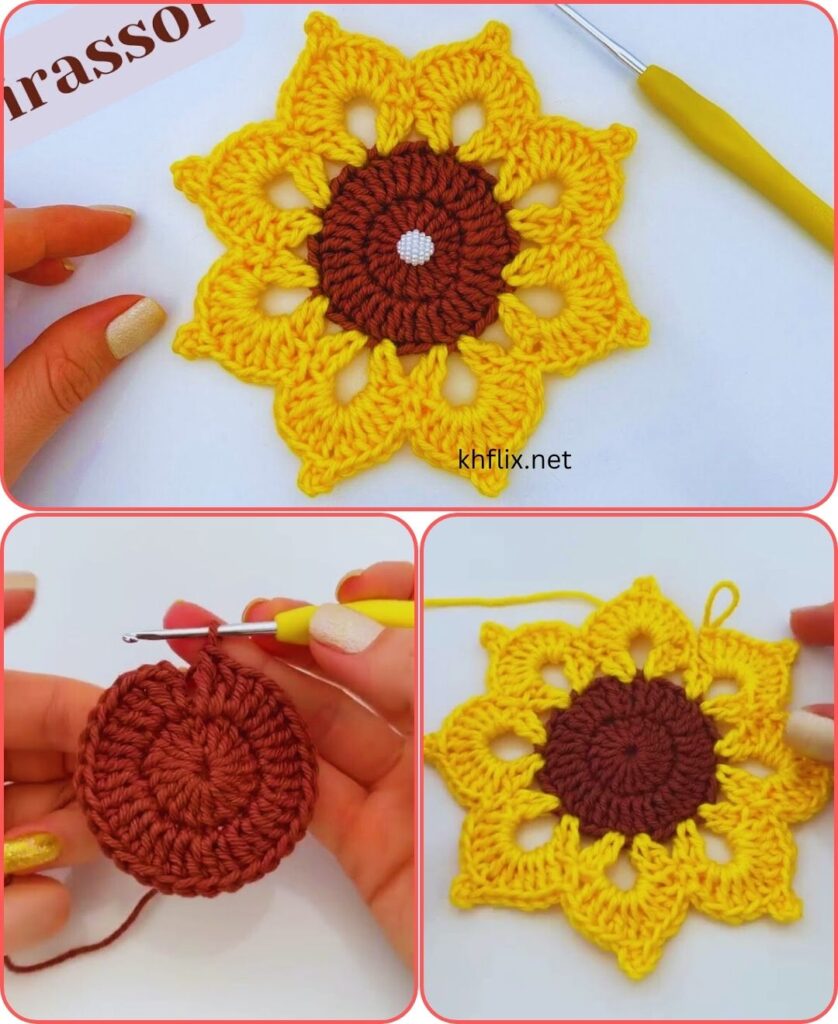
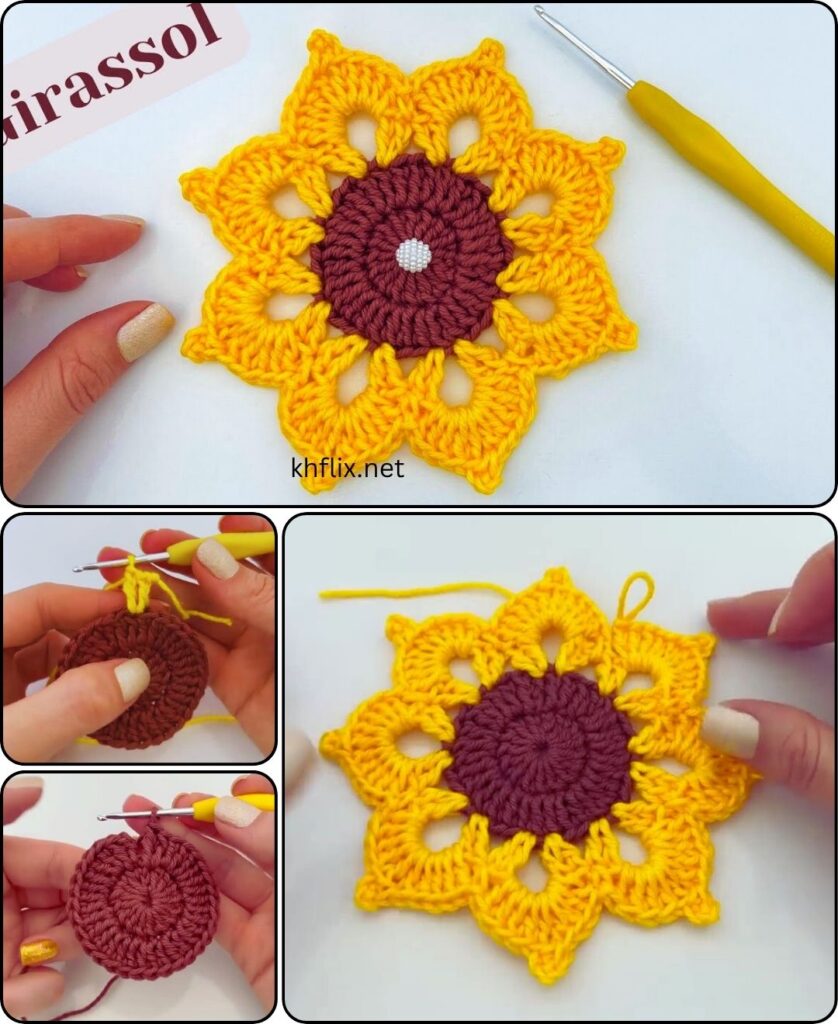
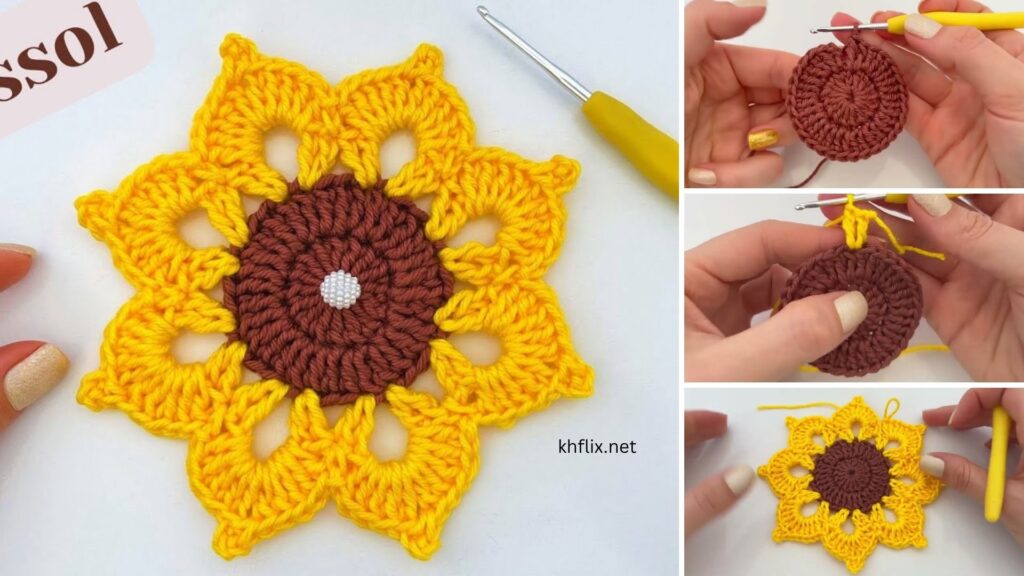
Pattern: Beautiful Crochet Coaster Flower Tutorial (Yellow Color)
This tutorial will guide you through creating a charming and functional flower-shaped coaster, primarily in a bright yellow hue. It’s designed to be sturdy enough for holding drinks while still featuring distinct, beautiful petal edges.
Goal: To crochet a flat, durable, and aesthetically pleasing flower-shaped coaster, approximately 4-5 inches in diameter, in yellow.
Materials You’ll Need:
- Yarn:
- 100% Cotton Worsted Weight (Medium #4) Yarn: This is crucial for coasters as it’s absorbent and heat-resistant. Acrylic yarn can melt under hot mugs.
- Main Color: Yellow Yarn (Choose your favorite sunny shade!).
- Optional: A small amount of a contrasting color for the center (e.g., brown, orange) if you want a more realistic flower look.
- Crochet Hook:
- Size H/5.0mm (or a size that gives you a dense, flat fabric with your chosen cotton yarn. Adjust as needed to prevent curling or rippling).
- Yarn Needle (Tapestry Needle): For weaving in ends.
- Scissors
- Stitch Marker (Optional, but helpful): To mark the beginning of rounds.
Abbreviations Used:
- ch: chain
- sl st: slip stitch
- sc: single crochet
- hdc: half double crochet
- dc: double crochet
- tr: treble crochet (or triple crochet)
- st(s): stitch(es)
- sp: space
- ch-sp: chain space
- MR: magic ring (or magic circle)
- FO: fasten off
- BLO: back loop only (we won’t use this extensively here, but it’s good to know)
Understanding the Coaster Flower’s Structure
This flower coaster will be worked in the round, building from the center outwards. We’ll create a solid base and then add “petals” that form the decorative edge. The primary goal is flatness and density for proper coaster functionality.
- Round 1 (Center Base): A compact starting circle.
- Round 2 (Expanding Base): Increase stitches to create a flat, growing circle.
- Round 3 (Establishing Petal Base): Create a foundation of loops or spaces for the distinct petals.
- Round 4 (Petals): Work the decorative petals into the spaces from the previous round.
- Round 5 (Outer Border/Stabilizer – Optional): An optional final round to firm up the edge and add a polished look.
Let’s Start Crocheting Your Yellow Coaster Flower!
Part 1: The Coaster Base (Yellow Yarn or Optional Contrasting Center)
We need a solid, flat center for your cup to rest on.
Option A: Chain Ring (Beginner-Friendly Start)
- With Yellow Yarn (or your chosen contrasting color for the center), ch 3.
- Sl st into the first chain you made to form a ring.
Option B: Magic Ring (MR / Magic Circle – Recommended for a no-hole center)
- With Yellow Yarn (or your chosen contrasting color for the center), create a Magic Ring.
- Ch 1 (does NOT count as a stitch; it just secures the ring).
Round 1 (Center Base – continued):
- Into the center ring (from Option A or B), ch 1 (does not count as a stitch).
- Work 8 sc (single crochet) into the center ring.
- Sl st into the first sc to join the round. (8 sc).
- If using Magic Ring, gently pull the starting yarn tail to close the center hole tightly.
- If you used a contrasting color for the center, FO here and weave in ends. Then join Yellow Yarn for Round 2.
Round 2 (Expanding Base):
- Join Yellow Yarn (if you changed colors) with a sl st into any sc from Round 1.
- Ch 1 (does not count as a stitch).
- Work 2 sc in each sc around (sc increase in every stitch). (16 sc).
- Sl st into the first sc to join the round.
- You should now have a flat, solid yellow circle approximately 2 inches in diameter.
Part 2: Establishing the Petal Base (Yellow Yarn)
This round creates the framework into which our decorative petals will be worked.
- Ch 1 (does not count as a stitch).
- Work 1 sc in the first st.
- Ch 3.
- Skip 1 st.
- Sc in the next st.
- You are creating a [sc, ch 3, skip 1] pattern around the circle.
- Repeat steps 3-5 around. You should end with a ch 3 and then sl st into the first sc of the round to join. (You will have 10 sc stitches and 10 ch-3 spaces).
- This round will look a bit “bumpy” or “loopy” – this is normal! These ch-3 spaces are where your yellow petals will form.
Part 3: Crocheting the Yellow Petals
Now for the beautiful petals! We’ll work groups of stitches into each ch-3 space.
- Sl st into the first ch-3 space to position your hook.
- Round 4 (Petals):
- Ch 2 (counts as first hdc).
- Work 4 hdc into the same ch-3 space. (Total 5 hdc, including the beginning ch 2).
- Sl st into the next ch-3 space.
- (This completes your first yellow petal. It’s a full, rounded shape).
- Repeat the following 9 more times (for a total of 10 petals):
- Ch 2.
- Work 4 hdc into the same ch-3 space.
- Sl st into the next ch-3 space.
- After your 10th petal, sl st into the initial sl st you made at the very beginning of this round (the one you used to enter the first ch-3 space).
- FO Yellow Yarn, leaving a tail to weave in.
- You should now have a beautiful, flat yellow flower shape with 10 distinct petals forming the edge of your coaster!
Part 4: Optional Outer Border/Stabilizer (Yellow Yarn or Contrasting Color)
This round helps to firm up the edge and give the coaster an even more polished look.
- Join Yellow Yarn (or a contrasting color like white or a darker yellow) with a sl st into any sl st between two petals from Round 4.
- Round 5 (Border):
- Ch 1 (does not count as a stitch).
- Work 1 sc in the same sl st.
- Work 1 sc into each of the 5 hdc stitches of the first petal.
- Work 1 sc into the sl st between the current petal and the next petal.
- Repeat this pattern around the entire coaster. (You’ll be working 1 sc into each hdc of the petals and 1 sc into each sl st between petals).
- Sl st into the first sc to join the round.
- FO, leaving a tail to weave in.
Finishing Your Beautiful Yellow Crochet Coaster Flower
- Weave in All Ends: This is crucial for a neat and durable coaster.
- Thread each yarn tail onto your yarn needle.
- Carefully weave the tail through several stitches on the back of your coaster, making sure it’s secure and doesn’t show through on the front.
- Trim any excess yarn close to the fabric.
- Blocking (Highly Recommended for Flatness):
- Gently wet your coaster (or spray it with water until damp).
- Pin the coaster flat onto a foam blocking mat, a towel-covered surface, or a corkboard, gently stretching it to its desired flat, round shape. Make sure the petals are evenly spaced.
- Let it air dry completely. Blocking makes a huge difference in how professional and flat your coaster looks.
Tips for Beginners:
- Cotton Yarn is Key: Don’t substitute acrylic if you want a functional coaster that can handle hot mugs!
- Consistent Tension: Aim for a relatively tight tension so your coaster is dense and sturdy, not too floppy. If it’s too loose, go down a hook size.
- Counting Stitches: Always count your stitches at the end of each round. This is the #1 way to ensure your coaster grows evenly and stays flat.
- Identifying Stitches/Spaces: In Round 3, finding the “ch-3 spaces” is straightforward. In Round 4, ensuring you work into the “next ch-3 space” (not an actual stitch) is important for the petal formation.
- Video Tutorials: If you’re unsure about any stitch (hdc, sc) or technique (Magic Ring, joining rounds), search for quick video tutorials on YouTube.
- Make a Set! These yellow coasters work up quickly and make fantastic gifts. They look beautiful on their own or mixed with other colors.
Enjoy making your beautiful, functional, and cheerful yellow crochet coaster flower!