by
by Creating a crochet coaster shaped like a flower is a delightful project! It’s a functional item that also serves as a beautiful piece of decor. This tutorial will guide you through making a flat, sturdy coaster with distinct petals, perfect for adding a touch of charm to your home.
How to Make a Beautiful Crochet Coaster Cup Flower
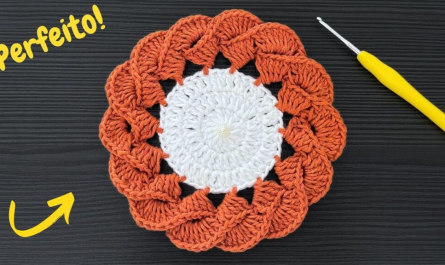
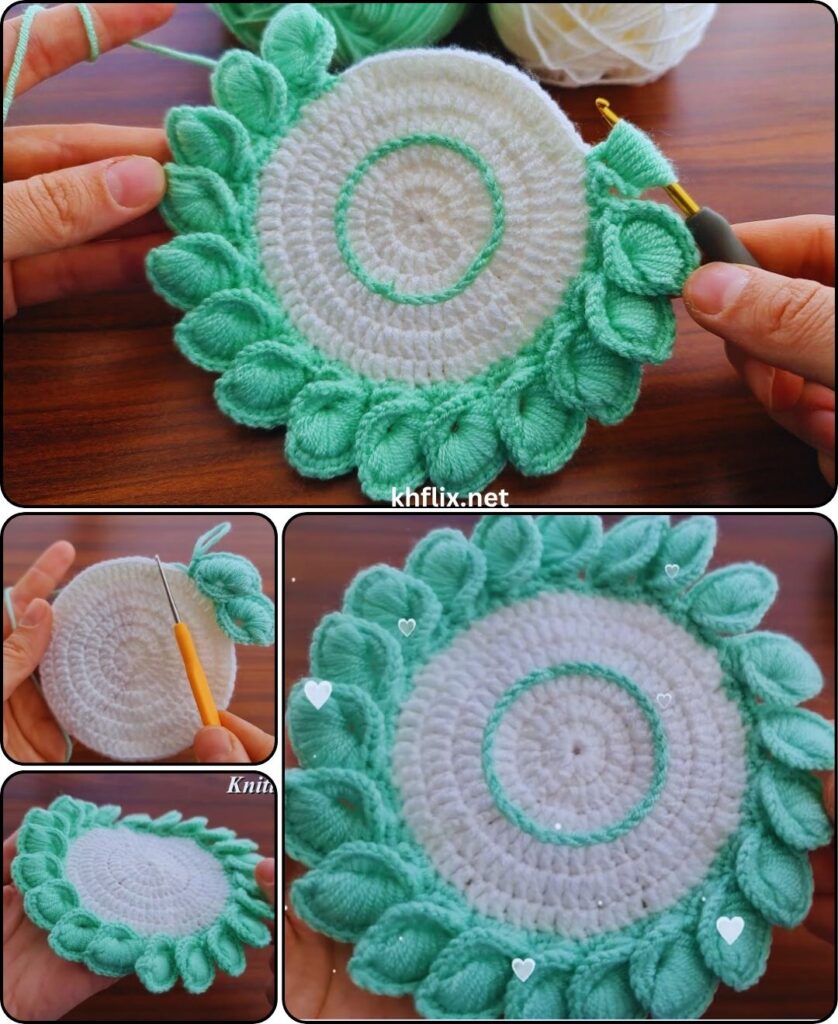
Project Overview: This pattern creates a charming flower-shaped coaster designed to be both pretty and practical. We’ll start with a solid circular center and then build out individual petals around the edge, resulting in a unique and sturdy base for your cups.
Skill Level: Beginner-Intermediate (Requires knowledge of chain, slip stitch, single crochet, double crochet, and working in the round).
Finished Coaster Dimensions (Approximate):
- Diameter (from petal tip to tip): 4.5 – 5.5 inches (11.5 – 14 cm), depending on tension and yarn.
Materials You’ll Need:
- Yarn:
- Worsted Weight (Medium #4) Cotton Yarn: Approximately 25-35 yards (23-32 meters) per coaster.
- Color A (Center/Primary Petal Color): Approx. 20-25 yards (e.g., Yellow, White, Bright Pink).
- Color B (Outer Petal/Edging – Optional): Approx. 5-10 yards (e.g., A complementary or contrasting color for a layered look).
- Why cotton? Cotton is highly absorbent, durable, and can withstand heat better than acrylic, making it ideal for coasters. It also creates a nice, firm fabric.
- Crochet Hook:
- Size H/5.0mm (or the hook size that gives you a dense, firm fabric without large gaps. This is important for a functional coaster).
- Yarn Needle (Tapestry Needle): Essential for weaving in loose yarn ends neatly.
- Scissors
- Stitch Marker (Optional but Recommended): To mark the beginning of each round.
Gauge (Helps with Consistent Sizing):
While not strictly necessary for a coaster, aiming for a consistent gauge will ensure your coasters are all the same size and lie flat.
With your H/5.0mm hook, working in single crochet:
- Approximately 6 sc stitches across 2 inches (5 cm)
- Your fabric should be dense and firm.
Abbreviations Used:
- ch: chain
- sl st: slip stitch
- sc: single crochet
- hdc: half double crochet
- dc: double crochet
- tr: treble crochet
- st(s): stitch(es)
- inc: increase (work 2 stitches into the same stitch)
- sk: skip
- FO: fasten off
- MR: Magic Ring (also known as Magic Circle or Adjustable Ring)
Understanding Flower Coaster Construction:
We’ll build this flower coaster in a few stages:
- Center: A solid circular base forms the middle of the flower.
- Petal Base: A round of stitches that creates the foundation for the petals.
- Petals: Individual petal shapes are created in a final round using taller stitches and clusters.
How to make neat Color Changes (if using multiple colors):
- When you are working the very last stitch of the round with the current color, stop when you have 2 loops left on your hook.
- Drop the current color.
- Pick up the new color, yarn over with the new color, and pull it through the remaining 2 loops on your hook to complete the stitch.
- Continue working the next round with the new color.
- After completing the color change, you can cut the old color yarn, leaving a tail of about 4-6 inches (10-15 cm) to weave in securely.
Let’s Start Crocheting Your Flower Coaster!
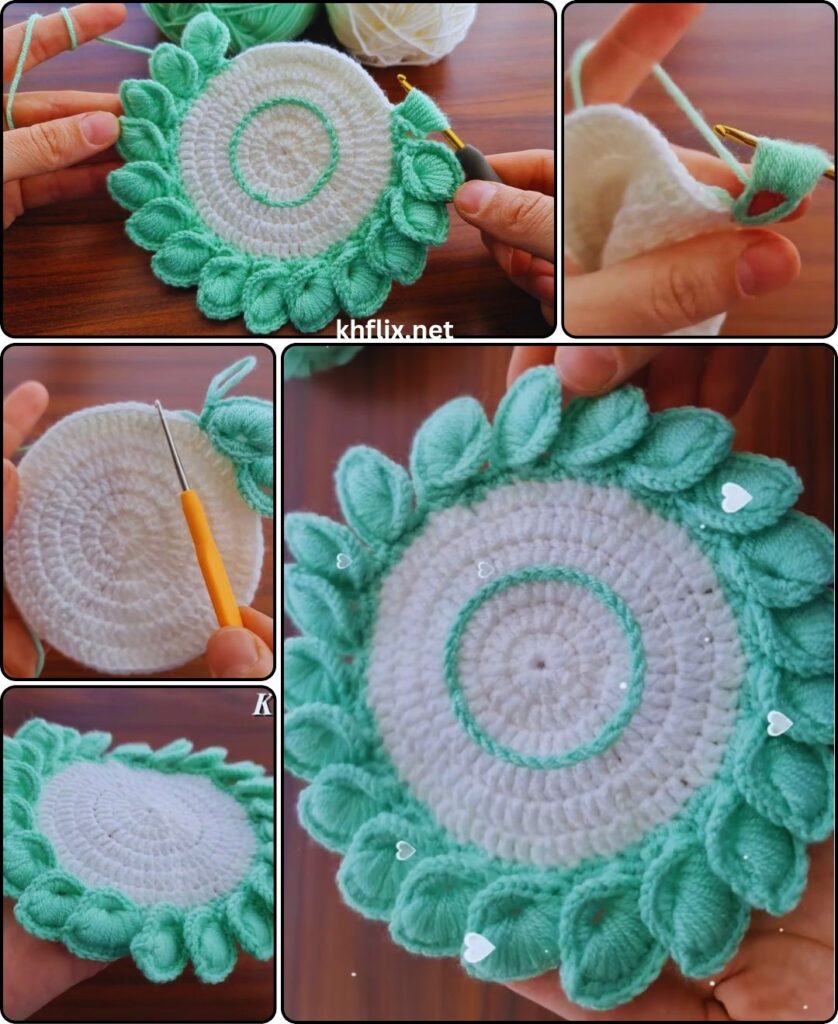
Part 1: The Coaster Center (Color A)
You’ll start with a Magic Ring (recommended) or Chain 2 method for a tight center.
Option A: Starting with a Magic Ring (Recommended)
- Start: Make a Magic Ring (MR).
- Round 1: Ch 1 (does NOT count as a stitch). Work 8 sc into the MR. Pull the tail tight to close the ring. Sl st to the first sc to join. (Total: 8 sc).
Option B: Starting with Chain 2 Method (Alternative)
- Start: Ch 2.
- Round 1: Work 8 sc into the first chain (the 2nd chain from your hook). Sl st to the first sc to join. (Total: 8 sc).
Continuing for Both Options A & B (Working in Joined Rounds):
Round 2: Ch 1. Inc (work 2 sc) in each stitch around. Sl st to the first sc to join. (Total: 16 sc).
Round 3: Ch 1. (Sc in the next st, inc in the next st). Repeat from * to * around. Sl st to the first sc to join. (Total: 24 sc).
Round 4: Ch 1. (Sc in the next 2 sts, inc in the next st). Repeat from * to * around. Sl st to the first sc to join. (Total: 32 sc). * At the end of Round 4, if you want your petals to be a different color, change to Color B on the last pull-through of the final sl st.
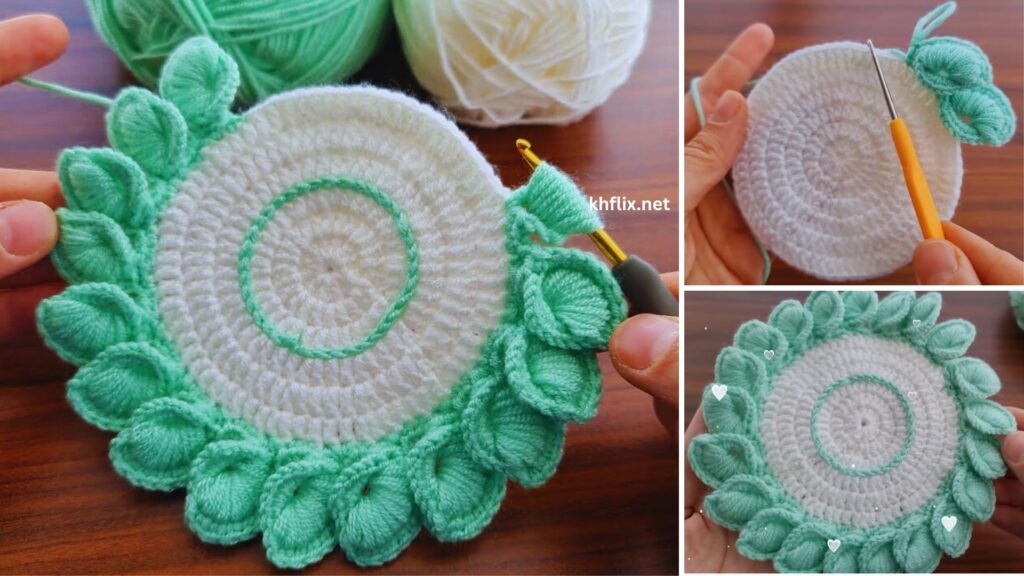
Part 2: Creating the Petals (Color A or Color B)
This round creates the distinct flower petals. We will be working clusters of taller stitches into specific stitches and skipping others to shape the petals. This pattern makes 8 petals.
Round 5 (Petal Round):
- Ch 1. (Does NOT count as a stitch).
- Petal 1: (Sc in the next st, hdc in the next st, dc in the next st, tr in the next st, dc in the next st, hdc in the next st, sc in the next st) all into the first stitch of the round. (Yes, all 7 stitches into ONE stitch).
- Sk next 3 sts.
- Sl st into the next stitch.
- Repeat Petal: (Sc in the next st, hdc in the next st, dc in the next st, tr in the next st, dc in the next st, hdc in the next st, sc in the next st) all into the same stitch where you just made the sl st.
- Sk next 3 sts.
- Sl st into the next stitch.
- Repeat steps 5-7 for a total of 8 petals around your coaster.
- After making your last petal and sl st, sl st one more time into the very first sc of the round (the base of your first petal) to secure the round.
Your coaster should now have a distinct flower shape with 8 petals.
Part 3: Finishing Your Coaster
- Fasten Off: After completing the last stitch and making your final sl st, cut your yarn, leaving a tail about 4-6 inches (10-15 cm) long.
- Weave in Ends: Thread the yarn tail onto your yarn needle. Carefully weave the tail through several stitches on the back side of your coaster, especially around the base of the petals, to secure it invisibly. If you used a Magic Ring, ensure the starting tail is pulled very tight and also woven in securely.
Congratulations! You’ve made a beautiful crochet flower coaster.
Tips for Success & Customization:
- Yarn Choice is Key: Always use cotton yarn for coasters. It’s absorbent, heat-resistant, and washable. Acrylic can melt or warp with heat, making it unsuitable for hot beverages.
- Consistent Tension: Maintain even tension throughout your work. This helps the coaster lie flat and look uniform. If your coaster starts to curl, gently flatten it out. Steam blocking (see below) can also help.
- Making it Flatter: If your coaster tends to “cup” (curl upwards), try using a slightly larger hook size for the entire project, or add an extra increase round (e.g., a Round 4.5 between Round 4 and 5 where you sc in next 3 sts, inc in next st once more before starting petals). If it’s too “wavy” or “ruffly,” you might need to go down a hook size.
- Blocking (Recommended): For the best possible shape, wet your finished coaster (or mist it with water), gently squeeze out excess water, and then lay it flat on a clean surface or blocking mat. Pin out the petals to define their shape. Allow it to air dry completely. This will ensure your coaster lays perfectly flat.
- Color Variations:
- Solid Color: Use just one color for the entire coaster for a minimalist look.
- Two-Tone: Use one color for the center (Rounds 1-4) and a contrasting or complementary color for the petals (Round 5).
- Multi-Color: Use a different color for each round, or switch colors after a few rounds in the center before adding the petals.
- Different Petal Definition:
- Less defined petals: Use smaller clusters or all the same stitch height (e.g., all DC, all HDC).
- More defined petals: Increase the number of stitches in your petal cluster (e.g., adding another TR or DTR at the peak), or work a ch-1 or sl st between petals to create more space.
- Adding Embellishments: Once complete, you could embroider small French knots in the center for seeds, or sew on a small bead.
Enjoy making a lovely set of these functional and decorative crochet flower coasters!