 by
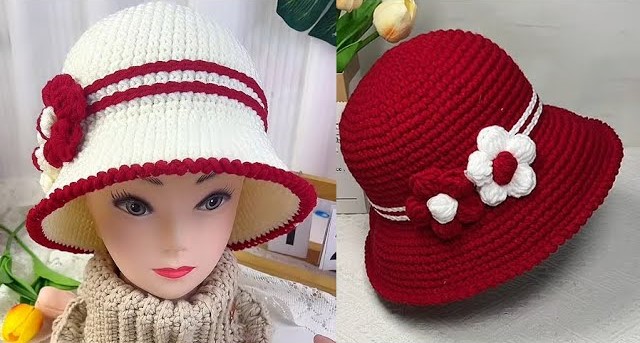
by This sounds like a wonderfully creative and charming project! A Crochet Puff Flower Bucket Hat combines a classic hat style with delightful, three-dimensional floral embellishments, making it a unique and personalized accessory.
This tutorial will guide you through creating a sturdy basic bucket hat and then crocheting separate puff flower motifs to adorn it. This method offers the most flexibility for color combinations and flower placement.
How to Crochet a Puff Flower Bucket Hat
This project involves two main parts: crocheting the foundational bucket hat and then creating the individual puff flower motifs to sew onto it. The result is a stylish and textured hat perfect for adding a handmade touch to any outfit.
Skill Level: Intermediate
You should be comfortable with:
- Basic crochet stitches (chain, slip stitch, single crochet, half double crochet, double crochet).
- Working in joined rounds.
- Increasing and decreasing stitches.
- Understanding the basic construction of a hat (crown, sides, brim).
- Learning new stitches like the puff stitch.
Finished Hat Dimensions (Approximate for an Adult Medium):
- Head Circumference: 21-22 inches (53-56 cm)
- Crown Diameter: 7 inches (18 cm)
- Hat Height (excluding brim): 3.5-4 inches (9-10 cm)
- Brim Width: 2-2.5 inches (5-6.5 cm)
Materials You’ll Need:
- Yarn:
- For the Hat Body: Approximately 150-200 yards (137-183 meters) of Worsted Weight (Medium #4) Cotton or Cotton Blend Yarn. Cotton is highly recommended for its excellent stitch definition and ability to hold shape, which is crucial for a bucket hat.
- For the Puff Flowers: Small amounts (approx. 10-20 yards per color) of Worsted Weight (Medium #4) Cotton or Acrylic yarn in various contrasting or complementary colors. You’ll want at least 2-3 colors for the flowers (one for the center, one for petals).
- Crochet Hook:
- Size H/5.0mm: This is a common size for worsted weight yarn. However, it’s crucial to select the hook size that helps you achieve a firm, dense fabric that will give your hat structure. If your stitches are too loose, go down to a G/4.0mm.
- Yarn Needle (Tapestry Needle): Essential for weaving in ends and securely attaching the flowers.
- Scissors
- Stitch Markers (Recommended): Helpful for marking the beginning of rounds and specific stitch placements.
- Measuring Tape: To check your hat’s dimensions and fit.
Gauge (Crucial for Hat Sizing!):
Achieving the correct gauge is very important to ensure your hat fits well.
- For the Hat Body (using sc): After Round 4 of the hat crown, your flat circle should measure approximately 3 inches (7.5 cm) in diameter.
- Adjust your hook size if necessary to meet this gauge. If your circle is too small, use a larger hook; if too large, use a smaller hook.
Abbreviations Used:
- ch: chain
- sl st: slip stitch
- sc: single crochet
- hdc: half double crochet
- dc: double crochet
- tr: treble crochet (or triple crochet)
- st(s): stitch(es)
- inc: increase (work 2 stitches into the same stitch)
- BLO: back loop only
- FLO: front loop only
- MR: Magic Ring (also known as Magic Circle or Adjustable Ring)
- puff st: puff stitch (explained below)
- FO: fasten off
- (\ ): repeat instructions within parentheses a specified number of times.
- [ ]: indicates the total number of stitches at the end of a round.
Part 1: Crochet the Basic Bucket Hat (Main Body)
We’ll use Color A for the hat body. This pattern uses single crochet for a dense, sturdy fabric.
A. Hat Crown (Flat Top)
The crown is worked in continuous rounds (spirals) for a seamless look. Use a stitch marker to mark the first stitch of each round and move it up as you go.
- Start: Make a Magic Ring (MR).
- Round 1: Ch 1 (does NOT count as a stitch). Work 8 sc into the MR. Pull the tail tight to close the ring. [8 sc]
- Round 2: Sc inc (2 sc in one stitch) in each stitch around. [16 sc]
- Round 3: (Sc in next st, Sc inc in next st) repeat 8 times around. [24 sc]
- Round 4: (Sc in next 2 sts, Sc inc in next st) repeat 8 times around. [32 sc]
- Round 5: (Sc in next 3 sts, Sc inc in next st) repeat 8 times around. [40 sc]
- Round 6: (Sc in next 4 sts, Sc inc in next st) repeat 8 times around. [48 sc]
- Round 7: (Sc in next 5 sts, Sc inc in next st) repeat 8 times around. [56 sc]
- Round 8: (Sc in next 6 sts, Sc inc in next st) repeat 8 times around. [64 sc]
- Round 9: (Sc in next 7 sts, Sc inc in next st) repeat 8 times around. [72 sc]
- Check your crown diameter: It should be approximately 7-7.5 inches (18-19 cm) for an average adult head. If it’s too small, add another increase round (Sc in next 8 sts, Sc inc in next st) for 80 stitches. If too large, remove the last increase round.
B. Hat Sides (Straight Section)
Now we’ll work without increases to form the upright walls of the hat.
- Round 10: Sc in the back loop only (BLO) of each stitch around. [72 sc]
- This BLO round creates a defined edge where the top of the hat transitions to the sides.
- Round 11 – 25 (or until desired height): Sc in each stitch around (working through both loops as normal). [72 sc]
- Continue until the side of your hat measures approximately 3.5-4 inches (9-10 cm) from the BLO round (Round 10). Try it on to check the fit and depth. It should sit comfortably on your head before the brim flares out.
C. Hat Brim (Flared Section)
Now, we’ll introduce increases again to create the brim that flares outwards.
- Round 26: (Sc in next 8 sts, Sc inc in next st) repeat 8 times around. [80 sc]
- Round 27: Sc in each stitch around. [80 sc]
- Round 28: (Sc in next 9 sts, Sc inc in next st) repeat 8 times around. [88 sc]
- Round 29: Sc in each stitch around. [88 sc]
- Round 30: (Sc in next 10 sts, Sc inc in next st) repeat 8 times around. [96 sc]
- Round 31: Sc in each stitch around. [96 sc]
- Round 32 (Optional Wider Brim): (Sc in next 11 sts, Sc inc in next st) repeat 8 times around. [104 sc] (Only do this round if you want a wider brim. If not, proceed to Round 33 from Round 31).
- Round 33 (Final Edge): Sl st in each stitch around. [96 or 104 sl sts] (This creates a neat, firm edge).
- FO Color A, leaving a 6-inch tail. Weave in this tail securely.
Part 2: Crochet the Puff Flower Motifs
You’ll make several of these, depending on how many you want to adorn your hat. A common number is 5-7 flowers. Use Color B for the center and Color C for the petals for a two-tone flower.
Puff Stitch (puff st) Explanation: Yarn over, insert hook into stitch, pull up a loop (3 loops on hook). (Yarn over, insert hook into same stitch, pull up a loop) repeat 2 more times (total 7 loops on hook). Yarn over, pull through all 7 loops on hook. Ch 1 to secure the puff.
Single Puff Flower Motif Pattern:
- Start (Flower Center – Color B): Make a Magic Ring (MR).
- Round 1: Ch 1. Work 6 sc into the MR. Pull the tail tight to close. Sl st to the first sc to join. [6 sc]
- FO Color B, leaving a 4-inch tail. Weave in the starting tail.
- Round 2 (Petals – Color C):
- Join Color C with a sl st into any sc from Round 1.
- (Ch 2, work 1 puff st in the same sc, Ch 2, sl st in the same sc). This completes one petal.
- (Sl st into the next sc. Ch 2, work 1 puff st in the same sc, Ch 2, sl st in the same sc). Repeat from * to * 4 more times. You will have 6 petals in total, with each petal worked into its own sc from Round 1.
- Sl st to the first sl st to join. [6 petals]
- FO Color C, leaving a long tail (at least 10-12 inches) for sewing the flower onto the hat.
Make as many puff flowers as you desire for your hat! Varying sizes of flowers (by using hdc or dc instead of sc for the center, or more loops for the puff stitch) can also add visual interest.
Part 3: Assembly & Finishing
- Weave in All Ends: This is a crucial step! For both your hat and all your individual puff flowers, carefully weave in every single yarn tail using your yarn needle. This ensures a neat, durable finish.
- Blocking (Optional for Hat, Recommended for Structure):
- Gently wet your crocheted hat (either by misting it or a quick dip in water and gentle squeeze – do not wring).
- Lay it flat on a blocking mat or a clean towel. Gently shape the crown and flatten the brim, pinning it down to ensure it dries flat and maintains its desired shape.
- Allow it to air dry completely (this can take 24-48 hours depending on humidity). Blocking helps define stitches and sets the shape.
- Attaching the Puff Flowers:
- Placement: Try on your hat. Arrange your finished puff flowers on the hat body to visualize your desired layout. You can cluster them, place them evenly around the band, or create a cascading effect. Use stitch markers or pins to temporarily hold them in place once you’re happy with the arrangement.
- Sewing: Using the long tail you left on each flower (or a separate piece of matching yarn), thread it onto your yarn needle. Carefully sew each flower securely onto the hat. Make small, discreet stitches that pass through the back of the flower and catch a few stitches on the hat, ensuring they are firmly attached and won’t detach with wear. Work your way around the base of each flower, hiding your stitches.
- When one flower is securely sewn, weave in any remaining tail.
Tips for Success & Customization:
- Yarn Choice: Cotton or cotton blend yarn is ideal for bucket hats because it provides excellent stitch definition and won’t stretch out as much as acrylic when wet or worn.
- Tension: Maintain consistent tension throughout the hat body to ensure an even fabric and a good fit.
- Hat Sizing: To adjust the hat size, remember that each increase round adds 8 stitches. You can add or remove increase rounds on the crown to make it larger or smaller before working the sides. Similarly, adjust the side height and brim rounds to fit your preference.
- Flower Variety: Experiment with different colors for the center and petals of your puff flowers. You could also try different sizes of flowers by adjusting the starting chain/ring of the flower center or the number of loops in your puff stitch.
- Embellishments: Consider sewing a small bead or button to the center of some of your puff flowers for extra detail.
- Care: Hand wash your finished hat and lay it flat to dry to maintain its shape and the integrity of the flowers.
Your unique and charming Puff Flower Bucket Hat is now complete! Enjoy wearing your beautiful handmade creation.