 by
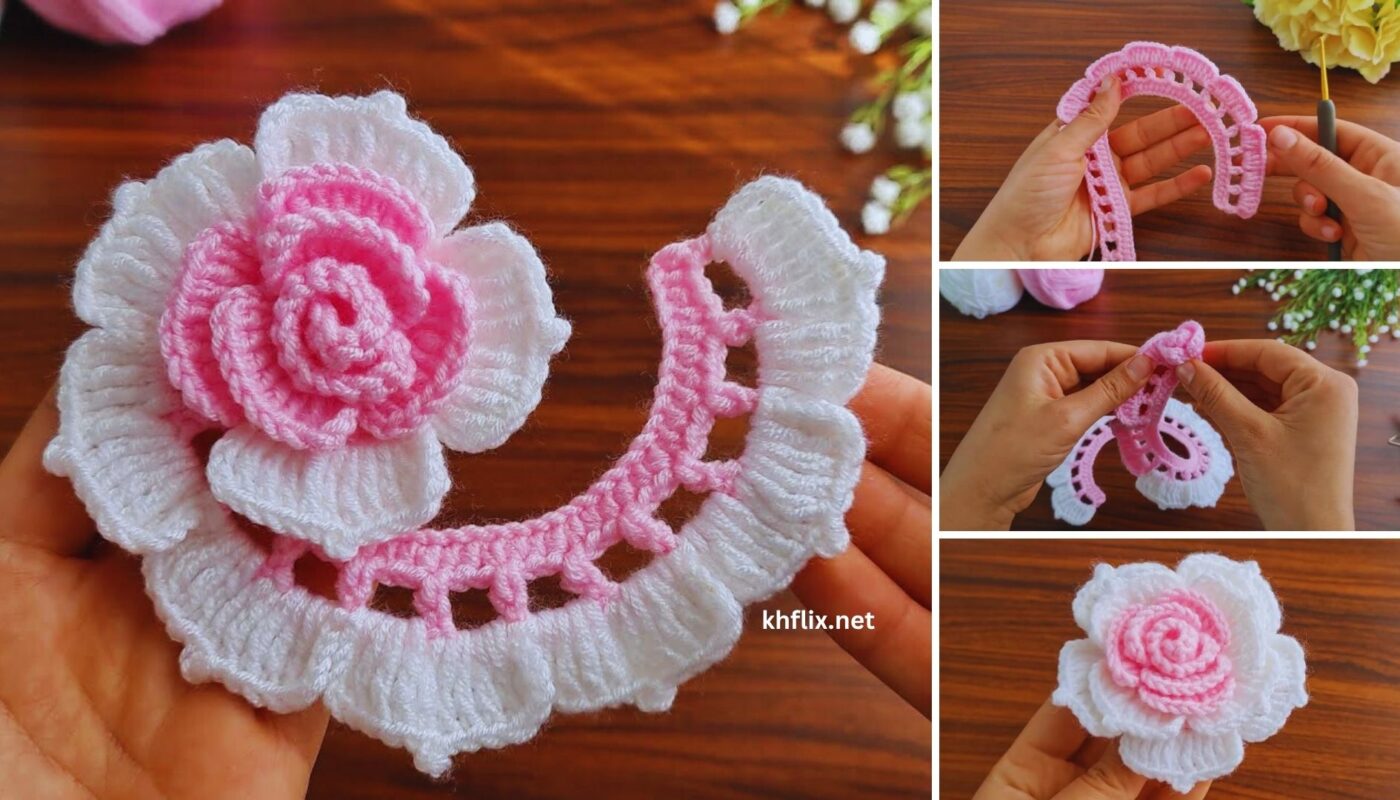
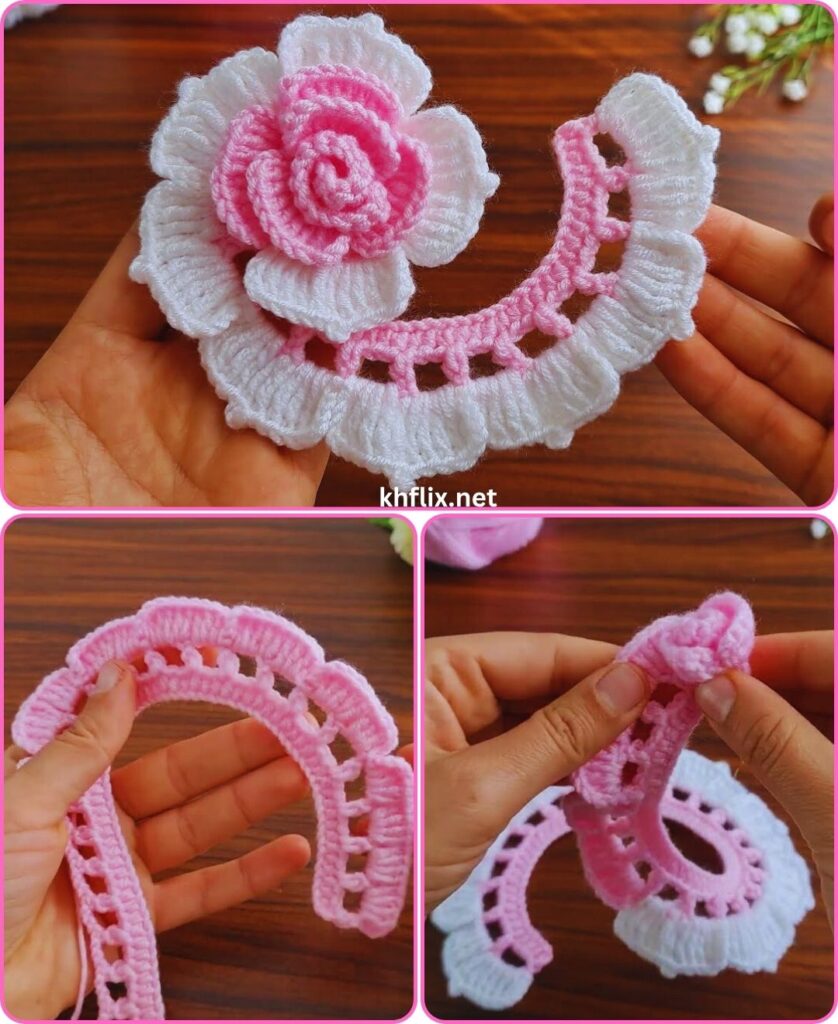
by Let’s create a stunning two-color crochet rose flower! This isn’t just a flat appliqué; we’re going to build a beautiful, multi-layered bloom that truly pops with dimension and vibrant contrast. Using two colors will highlight the intricate structure of the petals, making your rose incredibly eye-catching.
How to Crochet a Beautiful Two-Color Rose Flower: Detailed Tutorial
This pattern will guide you through creating a realistic, dimensional rose by building it up in several layers of petals. We’ll strategically use two colors to emphasize the depths and highlights of the flower.
Skill Level: Intermediate
You’ll need to be comfortable with:
- Chain (ch): The basic foundation.
- Slip Stitch (sl st): For joining and neatening.
- Single Crochet (sc): A compact stitch.
- Half Double Crochet (hdc): A medium-height stitch.
- Double Crochet (dc): A taller stitch.
- Treble Crochet (tr): An even taller stitch (sometimes called triple crochet).
- Working in rows: Crocheting back and forth to create strips that will be rolled.
- Color changes: Seamlessly integrating your two chosen yarns.
- Sewing: Using a yarn needle to assemble the rose.
Finished Rose Dimensions (Approximate):
This can vary based on your yarn and hook, but this pattern generally creates a rose about 2-3 inches (5-7.5 cm) in diameter and 1-1.5 inches (2.5-3.8 cm) in height. You can adjust the size by using different yarn weights and hook sizes.
Materials You’ll Need:
- Yarn: Approximately 15-25 yards (14-23 meters) total of Worsted Weight (Medium #4) Yarn.
- Color A (Inner Petals/Core): Choose a lighter or brighter shade for the inner part of your rose (e.g., light pink, yellow, cream).
- Color B (Outer Petals/Contrast): Choose a darker or contrasting shade for the outer, larger petals (e.g., deep red, fuchsia, burgundy).
- Yarn Fiber: Acrylic is versatile, comes in many colors, and holds shape well. Cotton gives good stitch definition. Both are suitable.
- Crochet Hook: Size G/4.0mm or H/5.0mm. A slightly smaller hook can create denser petals that hold their shape better.
- Yarn Needle (Tapestry Needle): Essential for weaving in ends and, most importantly, for sewing the rose together.
- Scissors: For cutting yarn.
- Small amount of Green Yarn (Optional): For crocheting a small leaf or two to attach to the base.
Gauge:
Gauge isn’t critical for a flower motif. However, consistent tension is key to ensuring your petals are uniform and your rose rolls up nicely without buckling.
Abbreviations Used in This Pattern:
- ch: chain
- sl st: slip stitch
- sc: single crochet
- hdc: half double crochet
- dc: double crochet
- tr: treble crochet (yarn over twice before inserting hook)
- st(s): stitch(es)
- sk: skip
- FO: Fasten Off
- (): repeat instructions within parentheses a specified number of times.
- []: indicates the total number of stitches at the end of a specific row.
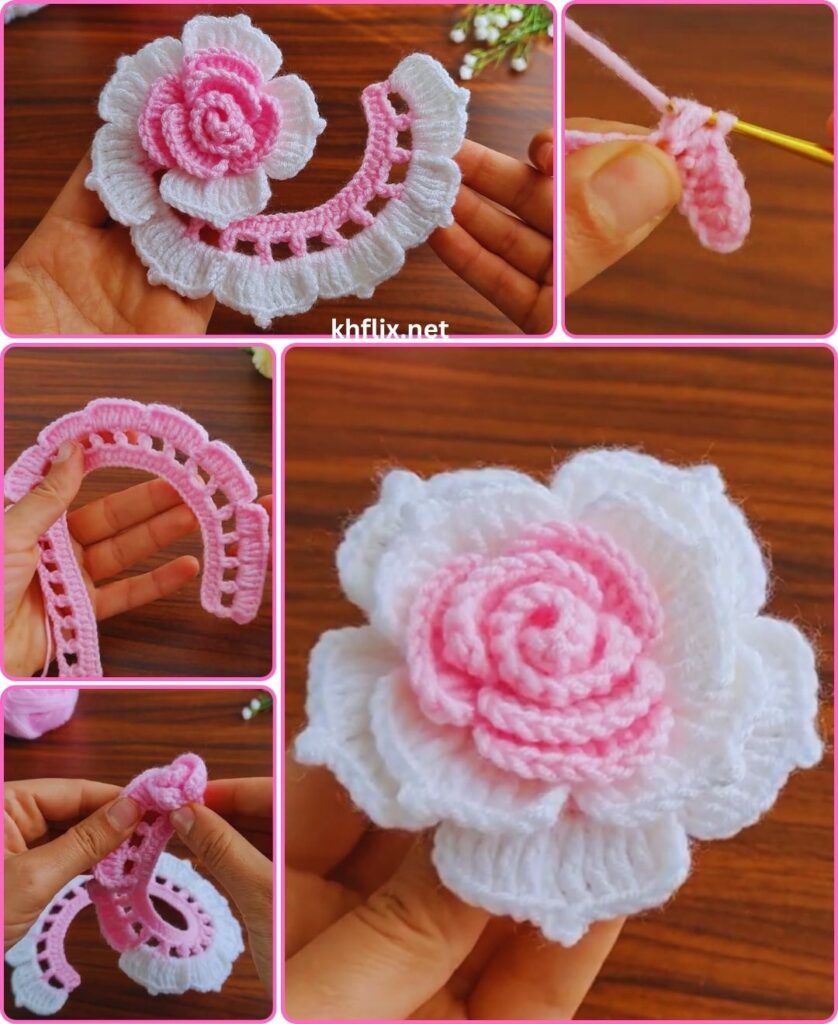
The Secret to a Two-Color Rose: Building in Strips
Instead of working in traditional rounds for each layer of petals, this rose is made by crocheting a long strip that’s then rolled and sewn into shape. The color changes happen at different points in the strip, allowing each “petal section” to feature a different color as it emerges.
Let’s Crochet Your Beautiful Two-Color Rose!
We’ll crochet a single long strip, incorporating color changes, and then roll it up and sew it to create the rose.
Part 1: Starting the Strip (Color A)
This forms the core and innermost petals of your rose.
- Start: With Color A, ch 40. (This chain forms the central “spine” of your rose. For a larger rose, chain more stitches; for a smaller one, chain fewer.)
- Row 1 (Working into the chain):
- Work 1 hdc into the 3rd ch from hook (the 2 skipped chs count as ch-2 sp).
- Work 1 hdc in each of the next 4 chs.
- Work 1 sc in each of the remaining 34 chs across.
- [40 sts total: 2 skipped chs + 4 hdc + 34 sc]
- Row 2 (Petal Foundation – turning chain):
- Ch 1, turn your work.
- Work sc in the first stitch.
- Work sc in each of the next 39 stitches across.
- [40 sc]
- Clean Color Change: On the last sc of this row, stop when you have two loops left on your hook. Drop Color A, pick up Color B, yarn over with Color B, and pull through the remaining two loops to complete the stitch. Now, using Color B, ch 1 and turn.
Part 2: Building the Outer Petals (Color B)
This section will create the larger, more prominent outer petals of your rose.
- Row 3 (First Outer Petal Layer):
- With Color B now attached, ch 1, turn.
- *(Sl st in the first stitch. Ch 2, work 3 dc into the next stitch, ch 2, sl st into the next stitch, sl st into the next stitch).*
- Repeat from * to * 6 more times (for a total of 7 petals). You’ll be working these clusters across the next 28 stitches.
- [7 petals]
- Row 4 (Second Outer Petal Layer – using longer stitches):
- Ch 1, turn.
- *(Sl st into the first stitch. Ch 3, work 1 dc into the next stitch, 2 tr (treble crochet) into the next stitch, 1 dc into the next stitch, ch 3, sl st into the next stitch, sl st into the next stitch).*
- Repeat from * to * 4 more times (for a total of 5 larger petals). You’ll be working these clusters across the next 20 stitches.
- [5 petals]
- Fasten off (FO) Color B, leaving a long tail (at least 20-24 inches / 50-60 cm) for sewing.

Part 3: Assembling Your Two-Color Rose
This is where your flat strip transforms into a beautiful 3D flower!
- Prepare for Rolling: Lay your crocheted strip flat, with the “wrong side” facing up (the side where your starting chain tail is more prominent). The shorter, sc-only side (from Row 2 in Color A) should be at the top, and the longer tr-petal side (from Row 4 in Color B) at the bottom.
- Start Rolling the Center:
- Take the very beginning of the strip (the end with the Color A hdc stitches).
- Tightly roll this end inward, creating the very center bud of your rose. Roll it for about 1-1.5 inches (2.5-3.8 cm) or until you feel the center looks right. The hdc section of Color A should form a tight spiral.
- Hold the rolled center firmly at the base with one hand.
- Continue Rolling the Petals:
- As you continue to roll the strip, slightly loosen your tension. Allow the petals to naturally flare out a bit as they wrap around the center.
- The petals from Row 3 (Color B) will wrap first, creating the next layer.
- Then, the larger petals from Row 4 (Color B) will wrap around, creating the outermost layer, which should naturally cup around the inner petals.
- Keep rolling until you reach the end of your strip.
- Secure with Sewing:
- Once you’ve rolled the entire strip into a rose shape, hold the base firmly.
- Thread your yarn needle with the long tail from Color B that you left at the end of Row 4.
- Begin to stitch through all layers of the rose’s base, from one side to the other, to secure it. Make several stitches, going through the center of the base and out the other side. Think of it like tacking all the layers together.
- Periodically check the front of your rose to ensure your stitches aren’t too visible and that the petals are holding their desired shape.
- Work your way around the entire base of the rose, securing all the layers down. You want the base to be flat and stable, not allowing the rose to unravel.
- Make sure to pull your stitches snug but not so tight that they distort the top of the rose.
Part 4: Finishing Touches (Optional Leaf & Weaving)
- Weave in All Ends:
- This is crucial for a clean, professional finish. Thread any remaining yarn tails (from your starting chain, color changes, and the sewing tail if you have excess) onto your yarn needle.
- Carefully weave them into the stitches on the back side of your rose. For the color change tails, weave them into the stitches of the same color.
- Take your time to ensure all tails are securely hidden.
- Crochet a Leaf (Optional):
- With green yarn, ch 8.
- Sl st in 2nd ch from hook, sc in next ch, hdc in next ch, dc in next ch, hdc in next ch, sc in next ch, sl st in last ch.
- Ch 2, then work on the other side of the initial chain: sl st in next ch (base of first sl st), sc in next ch, hdc in next ch, dc in next ch, hdc in next ch, sc in next ch, sl st in last ch.
- FO, leaving a long tail. Use this tail to sew the leaf securely to the back base of your rose.
- Shape Your Rose:
- Gently use your fingers to fluff out the petals. The inner petals should be tighter, while the outer ones should open up more. Adjust them until your rose looks natural and beautiful.
You’ve now created a truly gorgeous and eye-catching two-color crochet rose flower! These dimensional beauties are perfect for embellishing scarves, hats, bags, headbands, or even as decorative accents on gift wrapping. What lovely color combinations will you try for your next blooming creation?