 by
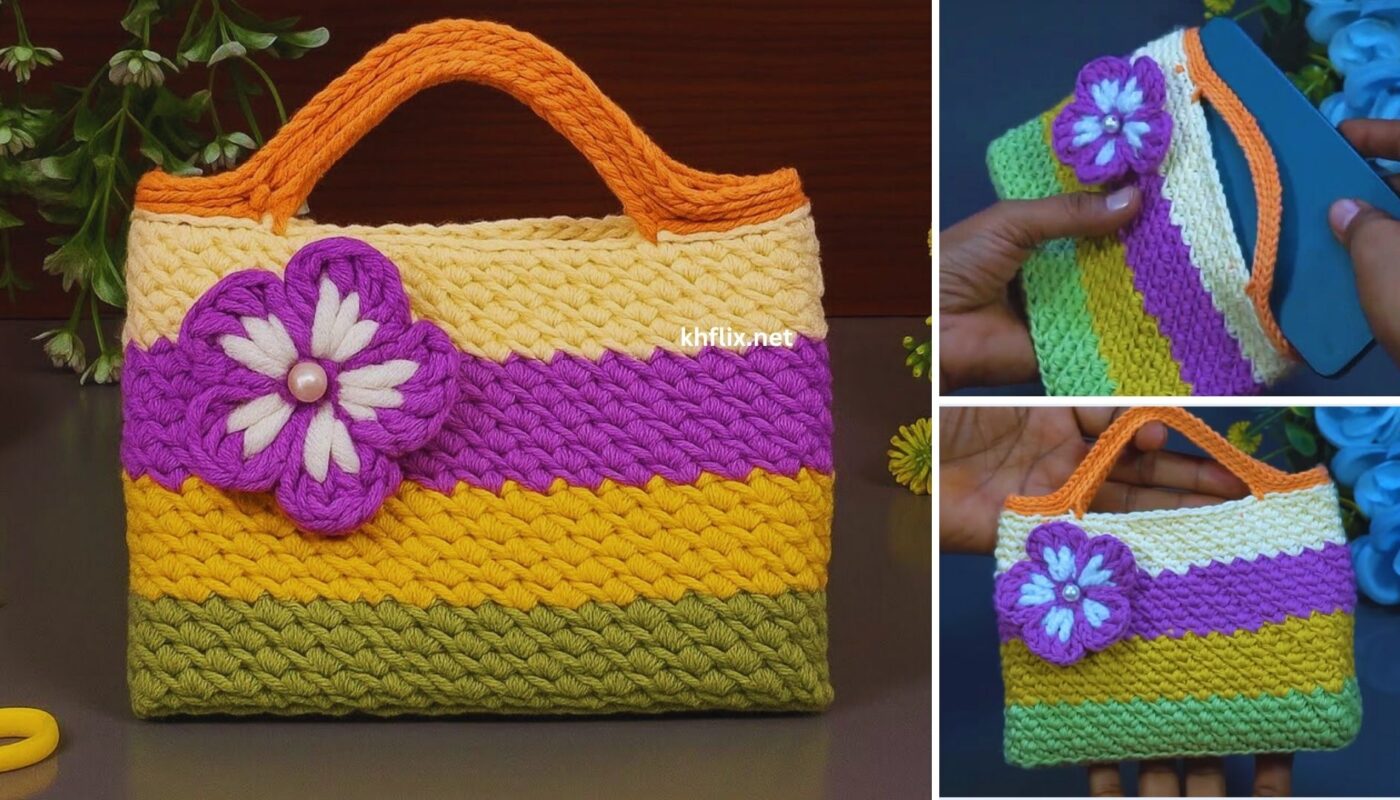
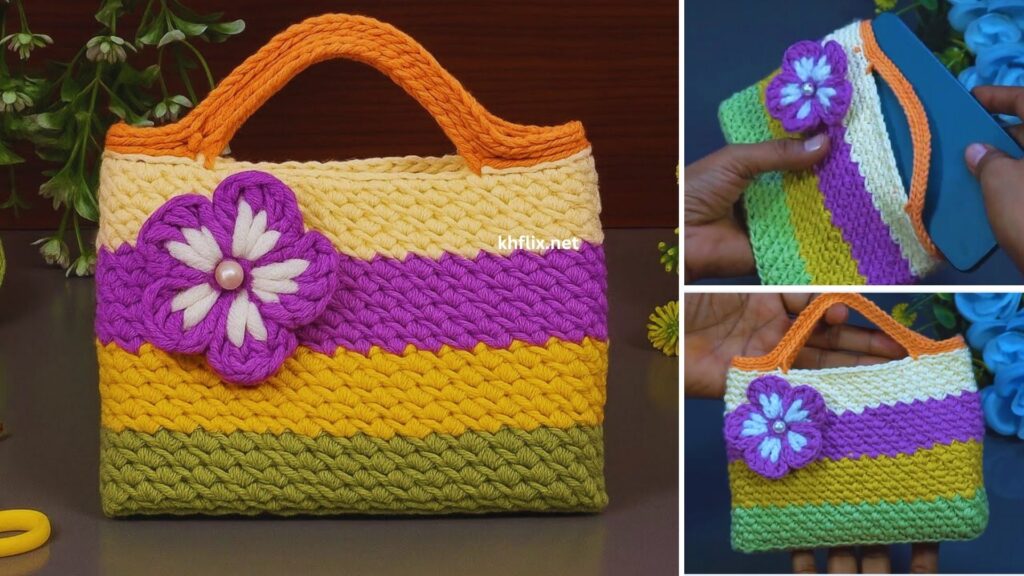
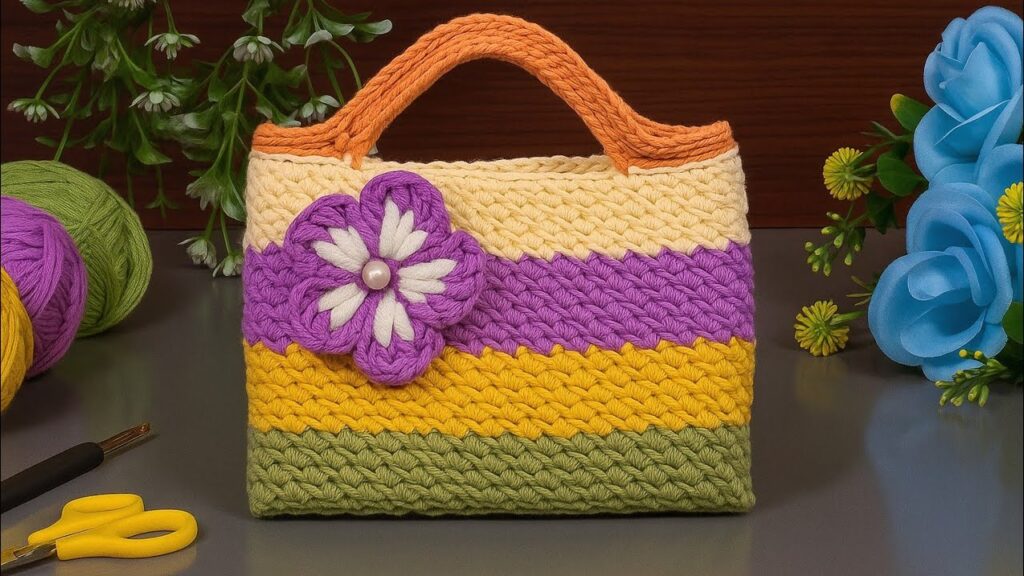
by Let’s create an adorable and practical crochet mini handbag with striped colors! This project is perfect for adding a pop of handmade charm to your outfit, carrying essentials like your phone, keys, and lip balm, or even as a cute gift. We’ll focus on creating clean stripes and a sturdy, compact bag.

How to Make a Neat Striped Crochet Mini Handbag: Detailed Tutorial
This step-by-step guide will walk you through crocheting a small, sturdy handbag with clean, defined stripes. The key to a polished “mini” bag lies in thoughtful color changes, consistent tension, and careful finishing.
Skill Level: Easy to Intermediate
This project is accessible for confident beginners but assumes you’re comfortable with:
- Basic crochet stitches (ch, sl st, sc, hdc).
- Working in the round.
- Increasing stitches to create a flat base.
- Making clean color changes.
- Weaving in ends securely.
- Basic hand sewing for handles (optional).
Finished Bag Dimensions (Approximate):
This pattern will guide you to make a mini handbag, roughly 6-8 inches (15-20 cm) wide and 5-7 inches (12.5-18 cm) tall (excluding handles). You can easily adjust the size by changing your starting chain and the number of rows/rounds.
Materials You’ll Need:
- Yarn: Approximately 100-150 yards (90-137 meters) total of Worsted Weight (Medium #4) Cotton or Cotton Blend Yarn.
- Why Cotton? Cotton yarn is durable, holds its shape well for bags, and creates excellent stitch definition for crisp stripes. It also has less stretch than acrylic, making for a sturdier mini bag.
- Colors: Choose 2-3 complementary or contrasting colors for your stripes.
- Color A (Base/Main Color): Often a neutral or a dominant color.
- Color B, C (Stripe Colors): Your accent colors.
- Crochet Hook: Size G/4.0mm or H/5.0mm. A slightly smaller hook than the yarn label recommends often creates a denser, sturdier fabric ideal for bags.
- Yarn Needle (Tapestry Needle): Essential for weaving in ends neatly and securely.
- Scissors: For cutting yarn.
- Stitch Markers (Optional but Recommended): Helpful for marking the beginning of rounds.
- Bag Handles (Optional): You can crochet your own straps, or use small pre-made rings/clips.
Key to Neat Stripes: Clean Color Changes & Consistent Tension
The secret to a professional-looking striped mini bag lies in how you change colors.
- The “Invisible” Color Change: When working the last stitch of the current round, stop when you have two loops left on your hook. Drop the current color, pick up the new color, yarn over with the new color, and pull through the remaining two loops to complete the stitch. Then, make your slip stitch to join the round with the new color.
- Cutting Yarn at Each Change: For the neatest stripes, it’s generally best to cut the old color yarn after each color change, leaving a 4-6 inch tail. This avoids carrying yarn up the inside, which can create bulk or show through in a smaller bag. Yes, this means more ends to weave in, but the result is much cleaner!
- Consistent Tension: Maintain an even tension throughout your work, especially as you switch colors. This prevents uneven stitches, pulling, or puckering at the color changes.

Bag Construction Method: Seamless Oval Base & Body
We’ll create the bag as a seamless piece, starting with a mini oval base and then working the striped body upwards. This method creates a very sturdy and polished bag.
Part 1: Crocheting the Mini Oval Base (Color A)
A sturdy, flat base helps a mini handbag hold its shape. We’ll create a small oval in single crochet (sc).
- Starting Chain: With Color A, Ch 16. (This will be the approximate length of your mini bag’s base. For a slightly wider bag, add more chains, keeping the number even. For a shorter bag, subtract chains.)
- Round 1:
- Work 2 sc into the 2nd ch from your hook.
- Sc in each of the next 13 chs.
- Work 3 sc into the very last ch. (This turns you around the end of the chain).
- Now, working down the opposite side of the foundation chain: Sc in each of the next 13 chs.
- Work 1 sc into the very first ch (the same one where you put the initial 2 sc).
- Sl st into the first sc to join the round.
- [32 sc]
- Round 2:
- Ch 1 (does NOT count as a stitch).
- Work 2 sc into the first st (increase).
- Sc in the next 14 sts.
- Work 2 sc into each of the next 3 sts (increases around the curve).
- Sc in the next 14 sts.
- Work 2 sc into the last 2 sts (increases around the curve).
- Sl st into the first sc to join.
- [38 sc]
- Round 3 (Optional for slightly larger base):
- Ch 1.
- Work 2 sc into the first st.
- Sc in the next 16 sts.
- Work 2 sc into each of the next 3 sts.
- Sc in the next 16 sts.
- Work 2 sc into the last 2 sts.
- Sl st into the first sc to join.
- [44 sc]
Part 2: Crocheting the Bag Body with Stripes
Now, we’ll start working straight up to form the bag’s sides, introducing our stripes. We’ll primarily use single crochet (sc) for a dense and sturdy fabric, perfect for a mini bag.
- Round (Transition/First Body Round – Color A):
- Ch 1 (does NOT count as a stitch).
- Work 1 sc in the back loop only (BLO) of each stitch around. (Working into BLO for this first round creates a defined ridge at the bottom of your bag, making the transition from base to side look very neat).
- Sl st into the first sc to join.
- [44 sc] (Or whatever your final base stitch count was)
- Clean Color Change: On the last sl st, switch to Color B. Cut Color A, leaving a tail to weave in.
- Round (Stripe 1 – Color B):
- Ch 1.
- Work 1 sc in each stitch around (working through both loops now).
- Sl st into the first sc to join.
- [44 sc]
- Clean Color Change: On the last sl st, switch to Color C (if using, otherwise back to Color A). Cut Color B, leaving a tail.
- Round (Stripe 2 – Color C):
- Ch 1.
- Work 1 sc in each stitch around.
- Sl st into the first sc to join.
- [44 sc]
- Clean Color Change: On the last sl st, switch to Color A (or next color in your sequence). Cut Color C, leaving a tail.
- Continue Stripe Pattern:
- Repeat the previous round, alternating your chosen colors, until your bag reaches the desired height (e.g., 10-14 rounds of stripes, or about 5-7 inches tall).
- Stripe Options: For a mini bag, thin or medium stripes usually look best.
- Thin Stripes: Change color every single round.
- Medium Stripes: Work 2 rounds of each color before changing.
- Important: Always use the “Invisible Color Change” method described above, and cut the previous color yarn after each change.
Part 3: Finishing the Top Edge
Once your mini bag body reaches the desired height, finish the top edge for stability and handle attachment.
- Final Rounds (use one of your main stripe colors, or Color A):
- Ch 1.
- Work 1 sc in each stitch around for 2-3 rounds. This creates a neat, flat, and sturdy edge.
- Sl st to join.
- Fasten off, leaving a tail for weaving.
Handles/Strap
For a mini handbag, simple crocheted straps or small rings often work best.
- Option A: Crocheted Wrist Strap or Small Handle:
- With your chosen color (e.g., matching the top edge or one of your stripe colors), ch 40-60 (adjust for desired length of wristlet or short handle).
- Work sl st into the 2nd ch from your hook and in each ch across. This creates a neat, flat, non-stretchy strap.
- Fasten off, leaving a long tail.
- Attach: Loop the strap ends onto two small D-rings or O-rings that you can then attach to the sides of your bag. Or, you can sew each end of the strap directly to the inside top corners of the bag’s opening, going through multiple layers for security.
- Option B: Small Fixed Handle (Make 2):
- With your chosen color, ch 25-30.
- Work sc in the 2nd ch from hook and across.
- Ch 1, turn, work sc in each stitch across for 1-2 more rows (for a slightly wider strap).
- Fasten off, leaving a long tail for sewing.
- Attach: Lay your bag flat. Position each strap evenly on the inside of the bag’s top edge, about 1.5-2 inches (3-5 cm) in from the side edges. Use your yarn needle and the long tail (or matching extra yarn) to firmly sew the strap ends in place, stitching through multiple layers of the bag’s top edge for durability.
Finishing Touches (Highly Recommended for a “Neat” Bag!)
- Weave in ALL Ends: This is the most crucial step for a professional-looking and durable bag. Use your yarn needle to meticulously weave in all the tails from your starting chain, color changes, and finishing rounds.
- How to Weave Neatly: Weave the tails into the stitches of the same color for about 1-2 inches (2.5-5 cm). Go in one direction, then reverse direction slightly (going back through some of the same stitches) to lock the tail in place and prevent it from unraveling. Take your time! Well-woven ends are practically invisible.
- Blocking (Optional but helpful): Lightly block your mini bag to help the stitches even out and the bag hold its shape better.
- You can gently stuff your bag with tissue paper or a small cloth to define its shape.
- Using a spray bottle, mist the bag lightly with water (for cotton yarn). Or, hover a steamer or an iron (on a low, steam setting) over the fabric without touching it.
- Gently shape the bag with your hands while it’s damp, ensuring the base is flat and the sides are even. Let it air dry completely.
- Lining (Optional but good for mini bags): A fabric lining makes your bag much sturdier, prevents stretching, and stops small items from falling through crochet gaps.
- Measure: Carefully measure the finished dimensions of your crochet mini bag (height, width, and the depth of the base).
- Cut Fabric: Cut fabric pieces to match the inside dimensions of your bag, adding a generous seam allowance (e.g., 1/2 inch or 1.2 cm) to all edges. You’ll typically need a piece for the main body (a rectangle that wraps around) and a separate oval piece for the bottom.
- Sew Fabric Lining: Stitch the fabric pieces together (right sides together) to create a bag shape that fits snugly inside your crochet bag. Press seams open. Create a neat hem around the top edge of the lining.
- Insert and Secure: Place the fabric lining inside your crochet bag. Align the top edges. Fold the hemmed top edge of the lining over the top edge of the crochet bag slightly (if needed) and hand-stitch the lining securely to the inside top edge of the crochet bag using matching thread and a hand-sewing needle. Stitch carefully so the stitches aren’t visible from the outside.
- Closure (Optional): Add a magnetic snap, a small zipper, or a button-and-loop closure to the top of your mini bag if desired.
Your neat and stylish striped crochet mini handbag is now complete! This is a super cute and functional accessory that’s perfect for a quick outing. What delightful color combinations will you use for your next mini bag?