 by
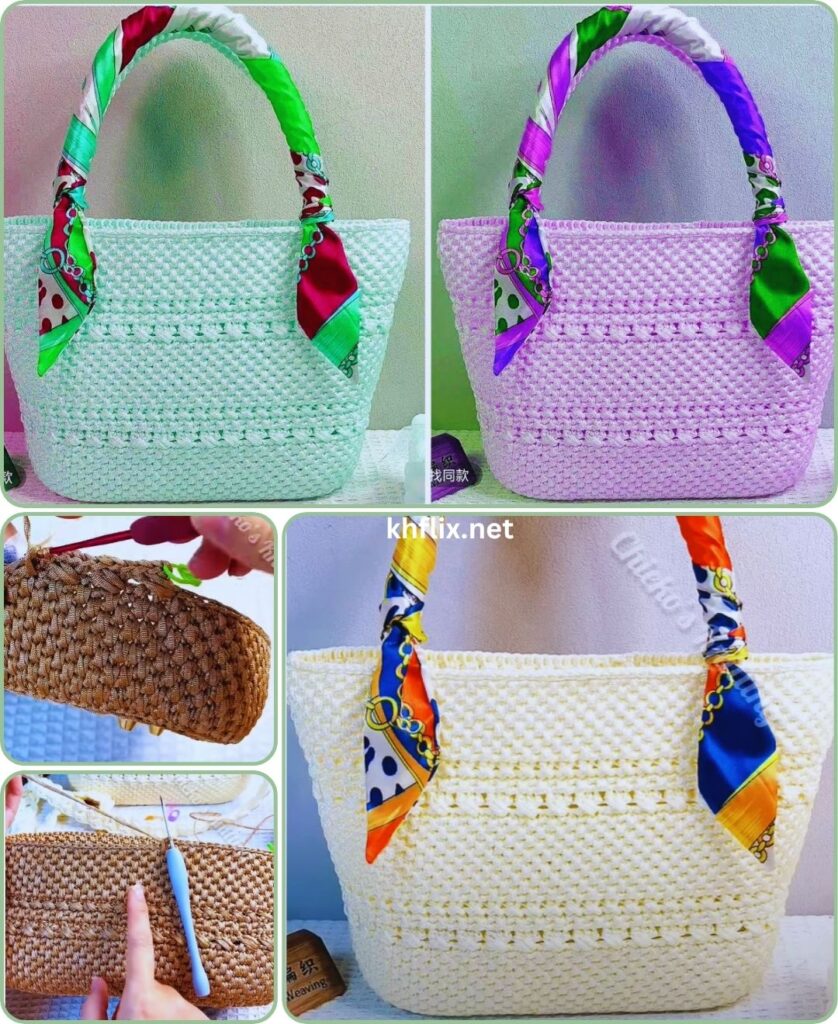
by Let’s dive into making a beautiful, fully color crochet handbag! This project is fantastic because it allows you to play with a single, rich color to highlight the stitch texture, or create subtle shading with different tones of the same hue. The key to a truly beautiful bag is a combination of sturdy construction, neat stitches, and thoughtful finishing.

How to Make a Beautiful Crochet Handbag with Solid Color
This detailed tutorial will guide you through creating a stylish and functional handbag, focusing on techniques that ensure a neat finish and a durable structure, all in your chosen solid color.
Skill Level: Intermediate
This project assumes you’re comfortable with:
- Basic crochet stitches: chain (ch), slip stitch (sl st), single crochet (sc), half double crochet (hdc), and double crochet (dc).
- Working in rounds.
- Increasing stitches to create a flat base.
- Working into back loop only (BLO) and front loop only (FLO) for specific effects.
- Seaming (if opting for a flat construction).
- Weaving in ends securely.
- Basic hand sewing for lining and attaching handles (optional but highly recommended).
Finished Bag Dimensions (Approximate):
This pattern is designed for a medium-sized tote bag, typically around 10-12 inches (25-30 cm) wide and 10-12 inches (25-30 cm) tall (excluding handles). You can easily adjust the size by changing your starting chain and the number of rows/rounds.
Materials You’ll Need:
- Yarn: Approximately 350-500 yards (320-457 meters) of Worsted Weight (Medium #4) Cotton or Cotton Blend Yarn.
- Why Cotton? Cotton yarn is excellent for bags because it’s durable, has good stitch definition, and less stretch than acrylic, which helps the bag maintain its shape. It’s also sturdy for daily use.
- Color Choice: Select one beautiful, rich color that you love! Think about whether you want a bold statement color (like deep red, emerald green, or royal blue), a versatile neutral (like charcoal gray, beige, or cream), or a soft pastel.
- Crochet Hook: Size H/5.0mm or I/5.5mm. A slightly smaller hook (like a 5.0mm for worsted weight) will create a denser fabric, which is ideal for a bag that needs to hold its shape.
- Yarn Needle (Tapestry Needle): Essential for weaving in ends.
- Scissors: For cutting yarn.
- Stitch Markers (Optional but Recommended): Useful for marking the beginning of rounds or handle placement.
- Bag Handles (Optional): Pre-made handles (leather, bamboo, metal rings) can elevate your bag’s look. Alternatively, you can crochet your own.
- Fabric for Lining (Optional but Highly Recommended): Cotton or poly-cotton fabric (matching or complementary color), matching thread, and a sewing machine or hand-sewing needle. A lining adds structure, prevents stretching, and keeps small items from slipping through gaps.
Bag Construction Method: Seamless Oval Base & Body (Recommended)
This method creates a strong, self-standing bag with a clean finish, as there are no side seams to join later.
Part 1: Crocheting the Oval Base
A solid, flat base is crucial for your handbag to sit properly and carry contents without sagging. We’ll use single crochet (sc) for a dense foundation.
- Starting Chain: With your chosen color, Ch 36. (This chain forms the initial length of your bag’s base. Adjust this number—keeping it even—to change the bag’s overall length.)
- Round 1:
- Work 2 sc into the 2nd chain from your hook.
- Sc in each of the next 33 chains.
- Work 3 sc into the very last chain. (This forms the curved end of your oval).
- Now, working down the opposite side of the foundation chain: Sc in each of the next 33 chains.
- Work 1 sc into the very first chain (the same chain where you placed the initial 2 sc).
- Sl st into the first sc to join the round.
- [72 sc]
- Round 2:
- Ch 1 (does NOT count as a stitch).
- Work 2 sc into the first stitch (increase).
- Sc in the next 34 stitches.
- Work 2 sc into each of the next 3 stitches (increases around the curve).
- Sc in the next 34 stitches.
- Work 2 sc into each of the last 2 stitches (increases around the curve).
- Sl st into the first sc to join.
- [78 sc]
- Round 3:
- Ch 1.
- Work 2 sc into the first stitch.
- Sc in the next 36 stitches.
- Work 2 sc into each of the next 3 stitches.
- Sc in the next 36 stitches.
- Work 2 sc into each of the last 2 stitches.
- Sl st into the first sc to join.
- [84 sc]
- Sizing Note: Your base should now be a flat oval. If it starts to curl up, add another round of increases following the pattern (sc evenly, then 2 sc in specific stitches at the ends). If it ruffles, you’ve increased too much, and might need to undo a round or adjust. The goal is a perfectly flat base.
Part 2: Crocheting the Bag Body
Now we’ll work straight up to form the sides of the bag. We’ll use a stitch that provides good texture and density. The single crochet (sc) or half double crochet (hdc) are excellent choices for a sturdy bag. Let’s use half double crochet (hdc) for a slightly faster project with good drape.
- Round 4 (Transition to Body):
- Ch 1 (does NOT count as a stitch).
- Work 1 hdc in the back loop only (BLO) of each stitch around. (Working into the BLO creates a neat, defined ridge where the bag’s sides begin, separating the base from the body cleanly.)
- Sl st into the first hdc to join.
- [84 hdc]
- Round 5 onwards (Body of Bag):
- Ch 1 (does NOT count as a stitch).
- Work 1 hdc in each stitch around (now working through both loops).
- Sl st into the first hdc to join.
- [84 hdc]
- Repeat Round 5 until your bag reaches the desired height (e.g., 15-20 rounds of hdc, or about 8-10 inches tall from the base ridge).
Part 3: Finishing the Top Edge
A neat and sturdy top edge is essential for the bag’s structure and for attaching handles.
- Final Rounds:
- After completing the body rounds, work 2-3 rounds of single crochet (sc). This creates a tight, dense top border, preventing stretching and providing a firm surface for handle attachment.
- For each round: Ch 1 (does NOT count as a stitch), work 1 sc in each stitch around, sl st into the first sc to join.
- Fasten off, leaving a 6-inch tail for weaving in.

Handles/Strap (Crucial for a Finished Look)
You have several great options for handles. Choose what best suits your style and how you intend to use the bag.
- Crocheted Handles:
- Simple Strap (Make 2): With your main yarn color, ch 8 (or more for a wider strap). Work sc in the 2nd chain from your hook and across (7 sc). Ch 1, turn, then work sc in each stitch across. Repeat this row until your strap reaches the desired length (e.g., 18-24 inches for shoulder straps, 10-12 inches for hand straps). Fasten off, leaving a long tail for sewing.
- Attach: Lay your bag flat. Position each strap evenly on the inside of the bag’s top edge, typically about 2-3 inches (5-7.5 cm) in from the side edges (where the bag naturally folds). Use your yarn needle and the long tail (or matching extra yarn) to firmly sew the strap ends in place, stitching through multiple layers of the bag’s top sc border for maximum durability.
- Purchased Handles (Leather, Bamboo, etc.):
- These add a professional, polished touch.
- Follow the specific instructions that come with your purchased handles. Most will have small holes for sewing or clips.
- Attach: Position them evenly on the top edge of your bag. Use strong sewing thread (matching your yarn or a clear nylon thread) and a regular sewing needle to firmly stitch them to the top sc border of the crochet fabric. Stitch through multiple times for security.
Finishing Touches (Highly Recommended for a “Beautiful” Bag!)
These steps elevate your handmade bag from good to gorgeous.
- Weave in ALL Ends: This is arguably the most critical step for a professional-looking and durable bag. Use your yarn needle to meticulously weave in all tails (starting chain, finishing tails).
- How to Weave Neatly: Weave tails into the stitches on the inside of the bag. Go in one direction for about 1.5-2 inches (4-5 cm), then reverse direction slightly (going back through some of the same stitches) to lock the tail in place and prevent it from unraveling. Be patient; well-woven ends are virtually invisible and make your bag last.
- Blocking (Optional but very helpful): Blocking helps your bag take on its intended shape, evens out stitches, and makes the fabric less prone to stretching.
- Gently stuff your bag with towels or crumpled paper to fill it to its desired shape.
- Using a spray bottle, mist the bag lightly with water (if using cotton yarn). For some fibers, you can hover a steamer or an iron (on a low, steam setting) over the fabric without touching it.
- Gently shape the bag with your hands while it’s damp, ensuring the base is flat and the sides are even. Let it air dry completely and thoroughly before removing the stuffing.
- Lining the Bag (Highly Recommended for Durability & Functionality): A fabric lining provides significant structure, prevents stretching, helps the bag hold its shape, and ensures small items don’t fall through crochet gaps.
- Measure: Carefully measure the finished dimensions of your crochet bag (height, width, and the depth/length of the base).
- Cut Fabric: Cut fabric pieces to match the inside dimensions of your bag, adding a generous seam allowance (e.g., 1/2 inch or 1.2 cm) to all edges. You’ll typically need a main body piece (a rectangle that wraps around the inside) and a separate oval piece for the bottom.
- Sew Fabric Lining: Stitch the fabric pieces together (right sides together) to create a bag shape that fits snugly inside your crochet bag. Press seams open. Create a neat hem around the top edge of the lining.
- Insert and Secure: Place the fabric lining inside your crochet bag. Align the top edges. Fold the hemmed top edge of the lining over the top edge of the crochet bag slightly (if needed) and hand-stitch the lining securely to the inside top edge of the crochet bag using matching thread and a hand-sewing needle. Stitch carefully so the stitches aren’t visible from the outside.
- Closure (Optional): Consider adding a magnetic snap, a zipper, or a button-and-loop closure to the top of your bag for security.
You’ve now created a truly beautiful and functional solid color crochet handbag! This handmade accessory is a testament to your skill and will be a unique addition to your wardrobe. Enjoy using your lovely creation!