by
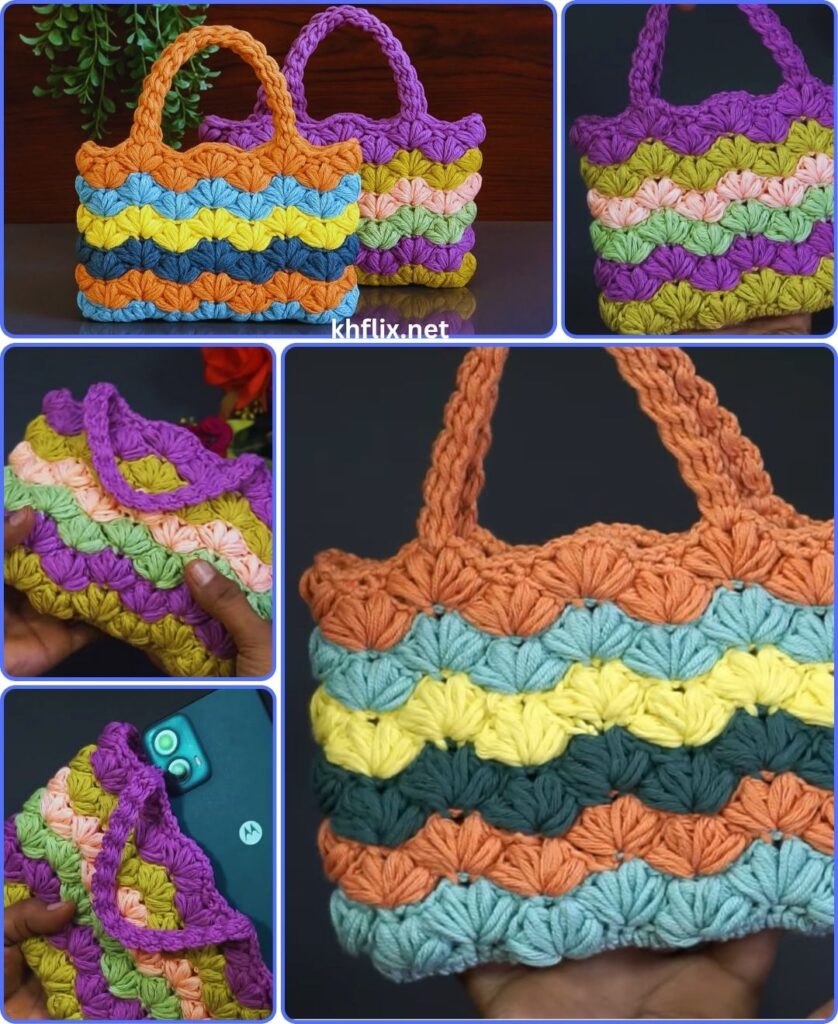
by hat’s a fantastic project! The Ocean Wave Stitch is perfect for a multi-color handbag because it naturally creates a beautiful ripple effect, mimicking ocean waves, which looks even more striking with changing colors. It adds amazing texture and visual interest.
Crafting a handbag involves a few key components:
- The Ocean Wave Stitch Pattern: Understanding the stitch itself.
- The Bag Body: Crocheting the main part of the bag in the round or as a flat piece sewn together.
- The Base (Optional but Recommended): A sturdy base helps the bag hold its shape.
- The Handles/Strap: Functional and aesthetic additions.
- Finishing Touches: Lining, closures, etc.
Since you asked for detail, I’ll provide a comprehensive guide.
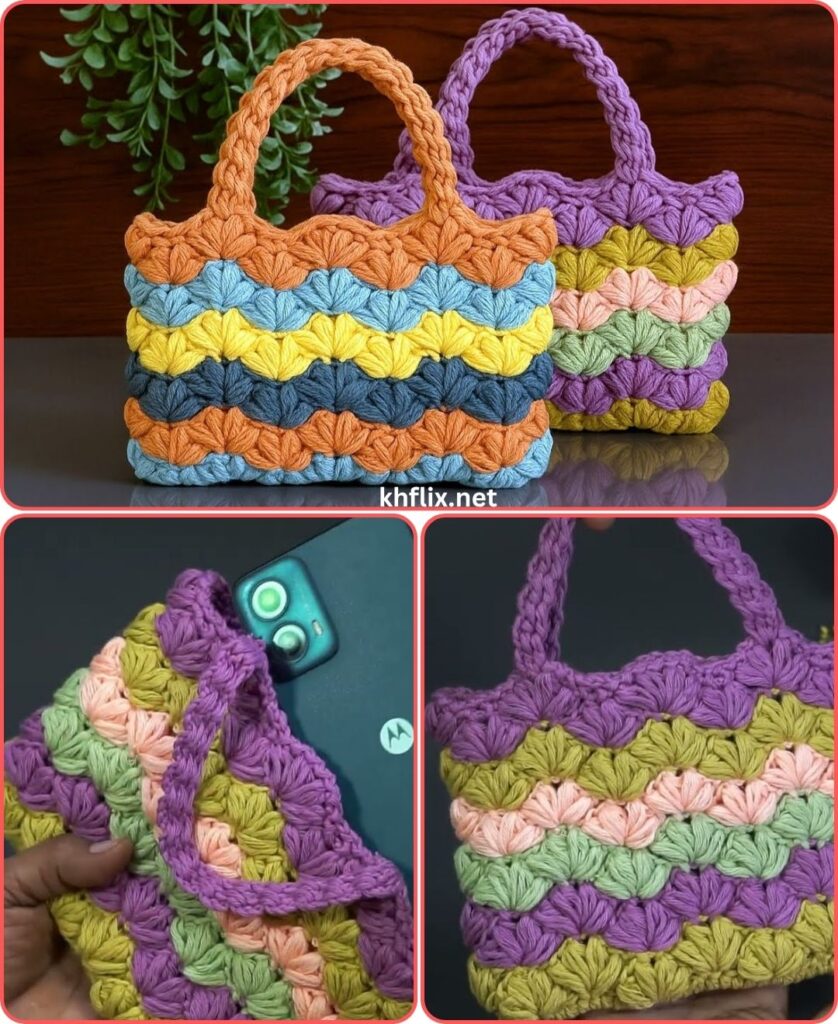
How to Crochet a Multicolor Handbag with the Ocean Wave Stitch Pattern
The Ocean Wave stitch (also known as Ripple, Chevron, or Wave Stitch, though specific variations exist) typically involves a repetition of increasing and decreasing stitches to create peaks and valleys. When changing colors every row or every few rows, it creates a stunning striped, wavy effect.
Skill Level: Intermediate
This project assumes you’re comfortable with:
- Basic crochet stitches (ch, sc, hdc, dc, sl st).
- Working in rows and possibly in the round.
- Increasing and decreasing stitches.
- Changing colors neatly.
- Basic sewing (for handles/lining if applicable).
Finished Bag Dimensions (Approximate):
This pattern will guide you to make a medium-sized tote bag, roughly 10-12 inches wide and 10-12 inches tall (excluding handles). You can easily adjust the size by changing your starting chain and the number of rows.
Materials You’ll Need:
- Yarn:Worsted Weight (Medium #4) Cotton or Cotton Blend Yarn.
- Why Cotton? Cotton yarn is durable, holds its shape well for bags, and creates great stitch definition for the wave pattern.
- Colors: Choose 3-5 complementary or contrasting colors that evoke an “ocean wave” feel (e.g., blues, greens, sandy beige, white, turquoise). You’ll need approximately 150-250 grams (5-9 ounces) total yarn, depending on the bag size. Allocate more for your main colors, less for accent stripes.
- Crochet Hook: Size H/5.0mm or I/5.5mm. A slightly smaller hook than recommended for your yarn can create a denser, sturdier fabric for the bag.
- Yarn Needle (Tapestry Needle): For weaving in ends.
- Scissors: For cutting yarn.
- Stitch Markers (Optional but Recommended): Helpful for marking the beginning of rounds or pattern repeats.
- Bag Handles (Optional): Leather, bamboo, or plastic handles can be sewn on, or you can crochet your own.
- Fabric for Lining (Optional): Cotton fabric for a sturdy lining, matching thread, sewing machine or needle.
Understanding the Ocean Wave Stitch Pattern (Ripple/Chevron)
There are many variations of the “Ocean Wave” or “Ripple” stitch. The most common involves a repeat unit where you:
- Decrease stitches in the “valleys” to pull the fabric down.
- Increase stitches at the “peaks” to push the fabric up.
For a handbag, we want a stitch count that allows the wave pattern to lay relatively flat when the bag is filled, so a classic “scalloped” wave that lays flat is often preferred over very deep, pointed ripples.
A common repeat for the Ocean Wave stitch is a multiple of 12 or 14 stitches. We’ll use a multiple of 14 for this pattern.
Key Stitches Used in Ocean Wave:
- sc2tog (single crochet 2 together): A decrease stitch. Insert hook into first stitch, pull up a loop. Insert hook into next stitch, pull up a loop. Yarn over, pull through all 3 loops on hook.
- dc2tog (double crochet 2 together): A decrease stitch. (Yarn over, insert hook into next stitch, yarn over, pull up a loop, yarn over, pull through 2 loops) twice. Yarn over, pull through all 3 loops on hook.
- 2 dc in same st: An increase stitch.
Preparing for Multicolor Stripes and Clean Color Changes:
- Color Scheme: Plan your color rotation (e.g., Color A, Color B, Color C, Color A, Color D, etc.).
- Carrying Yarn: For a bag, it’s generally best to cut the yarn at the end of each color stripe. This prevents the colors from showing through or creating bulk on the side seam if working in rows, or up the side of the bag if working in the round. If working in the round, you’ll have a seam where the color changes happen, which is normal for a project like this.
- Neat Color Change: To change colors cleanly, work the last stitch of the current row/round with the current color until you have two loops left on your hook. Drop the current color, pick up the new color, yarn over with the new color, and pull through the remaining two loops to complete the stitch. Then, work your turning chain with the new color.
Bag Construction Method:
We’ll make the bag body as a flat rectangle first, then seam the sides and bottom, or create a simple oval base and then work the wave pattern in the round for a seamless body. A seamless body is often preferred for bags.
Option 1: Seamless Oval Base & Body (Recommended for a sturdier bag)
Part 1: Crocheting the Oval Base (Starting with one of your main colors, e.g., Light Blue)
A sturdy, flat base is crucial for a handbag. We’ll create an oval in single crochet (sc).
- Chain: With Color 1, Ch 32. (This will be the length of your bag’s base. For a wider bag, add more chains in multiples of 2. For a longer bag, add more chains.)
- Round 1:
- Work 2 sc into the 2nd ch from hook.
- Sc in each of the next 29 chs.
- Work 3 sc into the last ch. (This creates a turn around the end of the chain).
- Now, working down the opposite side of the foundation chain: Sc in each of the next 29 chs.
- Work 1 sc into the very first ch (where you put the initial 2 sc).
- Sl st into the first sc to join.
- [64 sc]
- Round 2:
- Ch 1 (does NOT count as a stitch).
- Work 2 sc into the first st.
- Sc in next 30 sts.
- Work 2 sc into each of the next 3 sts.
- Sc in next 30 sts.
- Work 2 sc into each of the last 2 sts.
- Sl st into the first sc to join.
- [72 sc]
- Round 3:
- Ch 1.
- Work 2 sc into the first st.
- Sc in next 32 sts.
- Work 2 sc into each of the next 3 sts.
- Sc in next 32 sts.
- Work 2 sc into each of the last 2 sts.
- Sl st into the first sc to join.
- [80 sc]
- Round 4 (Optional for larger base):
- Ch 1.
- Work 2 sc into the first st.
- Sc in next 34 sts.
- Work 2 sc into each of the next 3 sts.
- Sc in next 34 sts.
- Work 2 sc into each of the last 2 sts.
- Sl st into the first sc to join.
- [88 sc]
Part 2: Crocheting the Bag Body with Ocean Wave Stitch
Now, we’ll start the beautiful wave pattern. You’ll change colors every 1-2 rows for a striped effect.
Ocean Wave Stitch Pattern (working in rows, turning each time):
- Foundation Chain: Ensure your base has a multiple of 14 stitches. Our example is 84 stitches.
- Stitch Key:
- DC Decrease: dc2tog over 2 stitches.
- DC Increase: 2 dc in same stitch.
- Cluster/Peak: 3 dc in same stitch.
Setup for first wave row (working into the BLO of the last base round for a defined edge):
- Round 5 (First Wave Row – Color 2):
- Change to Color 2 (e.g., Dark Blue).
- Ch 3 (counts as first dc).
- Work 1 dc into the BLO of the same stitch (this is your first increase for the peak).
- 1 dc into the BLO of the next 3 stitches.
- (Dc2tog over next 2 BLO) twice (2 decreases in the valley).
- 1 dc into the BLO of the next 3 stitches.
- Work (2 dc into next BLO) twice (2 increases for the peak).
- 1 dc into the BLO of the next 3 stitches.
- (Dc2tog over next 2 BLO) twice.
- Repeat from * to * around the round.
- Sl st to top of beginning Ch 3.
- [84 dc – stitch count remains the same in wave pattern]
Repeat Pattern for subsequent waves (working through both loops unless specified otherwise):
This pattern will alternate between rows that create the peaks/valleys and rows that flatten slightly to define the wave.
- Row A (Peak/Valley Row – Change Color for each A row):
- Change to New Color.
- Ch 3 (counts as first dc).
- Work 1 dc in the same stitch.
- 1 dc in next 3 stitches.
- (Dc2tog over next 2 stitches) twice.
- 1 dc in next 3 stitches.
- (2 dc in next stitch) twice.
- 1 dc in next 3 stitches.
- (Dc2tog over next 2 stitches) twice.
- Repeat from * to * around.
- Sl st to top of beginning Ch 3.
- Row B (Connecting Row – Use same color as previous A row OR a new color):
- Ch 1 (does NOT count as a stitch).
- Work 1 sc in each stitch around.
- Sl st to first sc.
- This row can be in the same color as the previous wave row for a subtle stripe, or a new color for a more defined stripe. For a very multi-color bag, you’ll change colors every Row A.
Continue repeating Rows A and B for the height of your bag, changing colors as desired. For vibrant stripes, change color before every Row A. For a more subtle effect, use two rows of the same color (Row A then Row B) before changing.
- Example Color Sequence for a Striped Bag:
- Round 5 (Base for Waves): Color 1 (e.g., Sand) – BLO dc
- Round 6 (Wave Row A): Color 2 (e.g., Light Blue) – Wave Stitch Pattern
- Round 7 (Wave Row B): Color 2 (e.g., Light Blue) – sc in each st
- Round 8 (Wave Row A): Color 3 (e.g., Teal) – Wave Stitch Pattern
- Round 9 (Wave Row B): Color 3 (e.g., Teal) – sc in each st
- Round 10 (Wave Row A): Color 4 (e.g., Navy) – Wave Stitch Pattern
- Round 11 (Wave Row B): Color 4 (e.g., Navy) – sc in each st
- … continue until desired height, finishing with a Row A or Row B.
- Important: Keep your tension consistent, especially when changing colors. Always cut the previous color yarn, leaving a 4-6 inch tail to weave in later.

Part 3: Finishing the Top Edge
Once your bag body reaches the desired height (e.g., 15-20 rows of the wave pattern), finish the top edge for stability.
- Final Round (Color of your choice, perhaps one of your main wave colors or a contrasting one):
- Ch 1.
- Work sc in each stitch around for 1-2 rounds. This creates a flat, sturdy edge for attaching handles.
- Sl st to join.
- Fasten off, leaving a tail for weaving.
Handles/Strap
You have several options for handles:
- Crocheted Handles:
- Simple Strap: With your desired color, ch 6 (or more for a wider strap). Sc in 2nd ch from hook and across. Ch 1, turn, sc in each st across. Repeat for desired length (e.g., 18-24 inches). Make two straps.
- Attach: Position straps evenly on the inside of the bag’s top edge (about 2-3 inches from the side seams/edges). Use a yarn needle and matching yarn to firmly sew them in place, going through multiple layers of stitches for durability.
- Purchased Handles (Leather, Bamboo, etc.):
- Follow the instructions for the specific handles you buy. Most will have holes for sewing or clips. Position and sew them securely to the top edge of your bag using strong thread or matching yarn.
Finishing Touches (Highly Recommended)
- Weave in All Ends: This is critical for a professional-looking and durable bag. Use your yarn needle to meticulously weave in all the tails from your color changes and starting/finishing points. Weave them securely into the same color section of the fabric to hide them effectively.
- Blocking (Optional but helpful): Lightly steam block your bag to help the stitches even out and the bag hold its shape better. Don’t press down too hard, just hover a steamer or iron (on steam setting) over the fabric, then gently shape the bag with your hands and let it dry completely.
- Lining (Recommended for Functionality): A fabric lining makes your bag much sturdier, prevents stretching, and stops small items from falling through crochet gaps.
- Measure: Measure the dimensions of your finished crochet bag (height, width, and depth of the base).
- Cut Fabric: Cut fabric pieces for the main body and bottom of the bag, adding a seam allowance (e.g., 1/2 inch) to all edges. If your bag has an oval base, you’ll cut an oval for the bottom and a rectangle for the body.
- Sew: Stitch the fabric pieces together to create a bag shape that fits snugly inside your crochet bag. Hem the top edge of the lining.
- Insert and Secure: Place the fabric lining inside your crochet bag. Fold the top edge of the lining over the top edge of the crochet bag. Hand-stitch the lining securely to the inside top edge of the crochet bag using matching thread.
- Closure (Optional): Add a magnetic snap, a zipper, or a button-and-loop closure to the top of your bag if desired.
Your multicolor ocean wave stitch handbag is now complete! This is a beautiful and unique accessory that will surely turn heads. Enjoy carrying your handmade masterpiece!