by
by Crocheting a tote bag from scrap yarn is one of the most satisfying and eco-friendly projects a crafter can undertake. It’s a wonderful way to use up those leftover balls of yarn from previous projects, turning them into a functional and unique accessory. A scrap yarn tote bag is a statement piece—a beautiful, one-of-a-kind creation that tells a story of all your past projects.
This detailed guide will walk you through the entire process, from preparing your materials to finishing your bag with a professional touch.
Part 1: Why Use Scrap Yarn for a Tote Bag?
- Sustainability: It’s the ultimate stash-busting project. Instead of letting small balls of yarn collect dust, you give them a new life. This reduces waste and makes you feel great about using what you already have.
- Unique Design: No two scrap yarn bags are ever the same. The random assortment of colors, textures, and fiber types creates a “planned chaos” effect that is visually stunning and entirely personal to you.
- Creative Freedom: There are no rules! You can work in stripes, squares, or a freeform mosaic. You can experiment with color combinations you might not have tried otherwise.
- Great for Beginners: A tote bag is a simple shape—often just a flat base and a tube for the body. This makes it an excellent project for practicing basic stitches and learning how to change colors on the fly.
Part 2: Preparing Your Materials
The key to a successful scrap yarn project is good preparation.
- Gather Your Yarn: Collect all your leftover yarn. Don’t be afraid to mix and match.
- Yarn Weight: While you can mix yarn weights, it’s best to use yarns of a similar weight (e.g., all worsted weight or all DK weight). If you have a thin yarn you want to use, you can hold it together with another strand to match the thickness of the rest of your yarn.
- Fiber Content: Cotton yarn is highly recommended for tote bags. It’s durable, doesn’t stretch as much as acrylic, and creates a sturdy fabric that can hold up to daily use. If you’re mixing fibers, consider that the stretch and drape will be different.
- Choose a Hook: The hook size will depend on the weight of your yarn. A good starting point for worsted weight yarn is a 5mm or 5.5mm hook. A slightly smaller hook than you would normally use can help create a denser, sturdier fabric for the bag.
- Other Supplies: You’ll need scissors and a tapestry needle for weaving in your ends. A stitch marker is also helpful for marking the beginning of each round.
Part 3: Choosing a Pattern or Method
There are several ways to approach a scrap yarn tote bag.
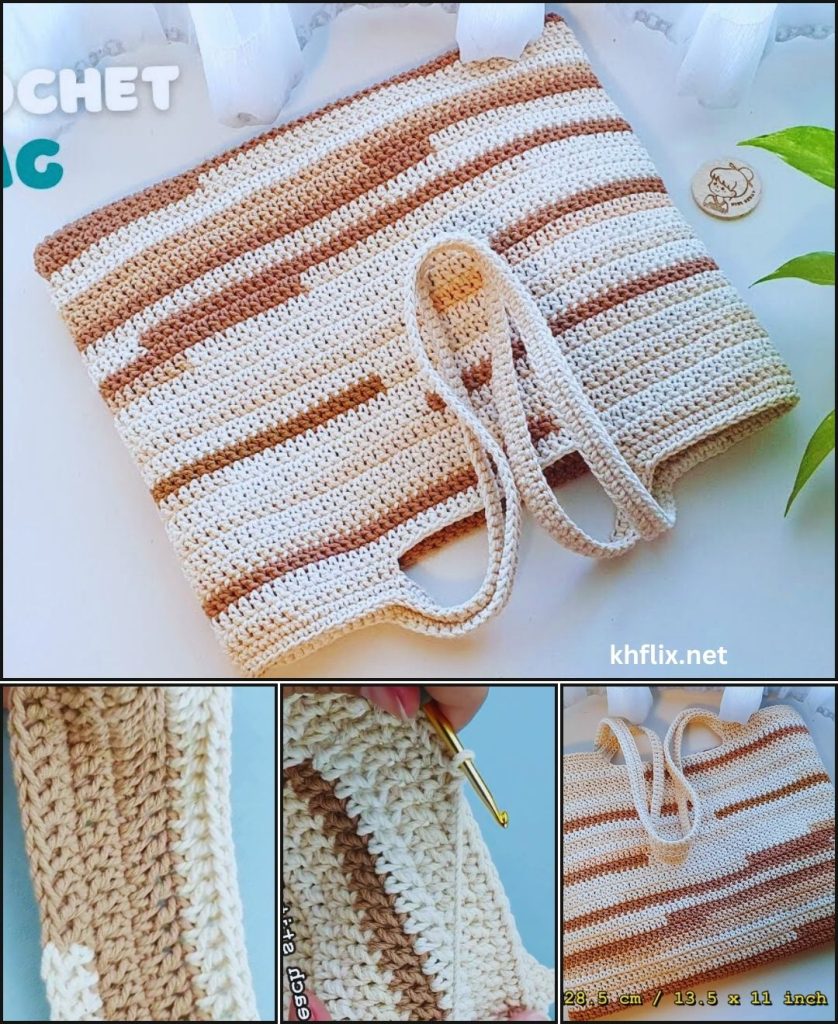
- The Striped Tote: This is the most common and simplest method. You simply work in rounds, changing colors whenever you like.
- The Granny Square Bag: This involves creating multiple individual granny squares from your scrap yarn and then joining them together. This is a great way to use very small bits of yarn and can create a beautiful, patchwork-like effect.
- The “Held Together” Method: This technique involves holding two or more strands of yarn together as you crochet, creating a unique color-blended effect and a very thick, sturdy fabric. This is perfect for using up many small, thin scraps at once.
- The Solid Stitch Tote: This uses a single crochet (sc) or half-double crochet (hdc) stitch throughout the bag. It’s a simple and effective method for showcasing the different colors and textures of your yarn.
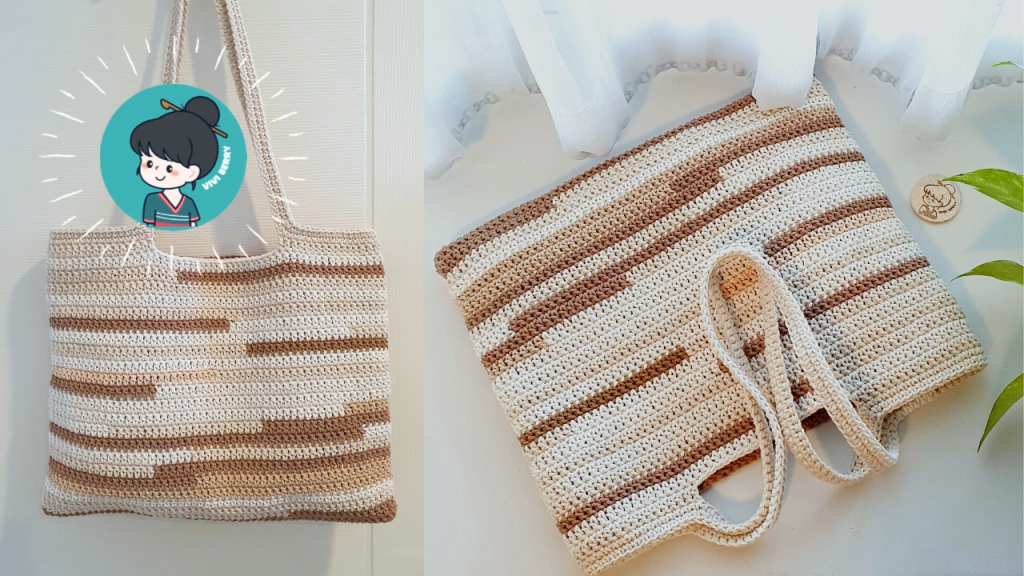
This guide will focus on a simple, striped tote bag using the single crochet stitch, which is a great starting point for beginners.

Part 4: Step-by-Step Tutorial: The Simple Scrap Yarn Tote Bag
Gauge: Your gauge isn’t critical for this project, but aiming for a dense fabric is key. A single crochet stitch should feel firm and not too floppy.
Instructions:
Step 1: The Base of the Bag
The base is worked in an oval shape to create a flat bottom.
- Start with your first color. Ch 21 (or any odd number of chains for a wider base).
- Round 1: Sc in the 2nd ch from the hook and in each ch across until you reach the last ch. Work 3 sc in the last ch. Now, working along the other side of the starting chain, sc in each stitch until you reach the last stitch. Work 2 sc in the last stitch. Do not join. You have now created a semi-oval. Place a stitch marker in the last stitch.
- Round 2: Sc in each stitch around the oval, placing 3 sc in the stitches at the curved ends to keep the shape flat. Continue this until your base is the desired size. You can add more rounds as needed. A good size for a tote bag base is around 8-10 inches wide.
Step 2: The Body of the Bag
Now, we will work in continuous rounds to create the sides of the bag.
- Work in the Back Loop Only (BLO) for the first round: To create a defined edge between the base and the body of the bag, work one full round of sc in the back loop only of each stitch.
- Continue with the Body: From this point on, work in continuous rounds, doing 1 sc in each stitch around. Do not join at the end of each round unless you want to create a seam. Working in a spiral (without joining) creates a seamless tube.
- Changing Colors: This is where the fun begins! You can change colors whenever you want.
- The Standard Join: To change colors, work the last stitch of your current color almost all the way. On the final yarn over, drop the old color and yarn over with the new color to complete the stitch.
- Weaving in as you go: As you work with the new color, you can hold the tail of the old color along the top of your stitches and crochet over it. This “hides” the tail and saves you from weaving in a lot of ends later.
- Continue crocheting in rounds, changing colors as you please, until the body of your bag reaches the desired height. Aim for around 12-15 inches for a standard tote bag.
Step 3: The Handles
The handles are a crucial part of the bag and need to be sturdy.
- Mark the handle placement: Lay your bag flat and mark the placement of your handles. You want them to be centered on the front and back of the bag. A good starting point is to count an equal number of stitches from the side seam and mark the start and end of each handle. For a wide bag, you might have a handle that spans 20-30 stitches.
- Create the Handles:
- Continue working sc stitches until you reach the first marker for the handle.
- Chain a number of stitches to create your handle (e.g., ch 50 for a short shoulder bag handle, or more for a longer one).
- Skip the stitches for the handle and join the chain to the bag at the second marker with a sl st.
- Continue sc stitches until you reach the marker for the next handle and repeat the process.
- Strengthen the Handles: Work at least two more rounds of sc around the entire bag and along the chains of the handles. This will make them much stronger and more comfortable. You can continue adding more rounds for even sturdier handles.
Step 4: Finishing Touches
- Weave in all ends: Take your time to carefully weave in all your yarn tails using a tapestry needle. Weave them into the back of your stitches for at least 2 inches, going back and forth to secure them.
- Add a Liner (Optional but Recommended): A fabric liner is a great way to add structure, prevent stretching, and make the bag more functional. You can hand-stitch a simple fabric pouch to the inside of your finished crochet bag.
- Add Closures (Optional): You can add a button and loop, a magnetic snap, or a zipper to the top of your bag for added security.
Part 5: Tips for Success
- Embrace the Imperfections: The beauty of a scrap yarn project is its unique, funky, and sometimes uneven appearance. Don’t worry about perfect tension or matching colors—the randomness is part of the charm.
- Keep Your Yarn Organized: As you work, keep your different yarn scraps in a small container or bag so they don’t get tangled.
- Secure Your Joins: When you change colors, make sure your new yarn is securely attached. A small, secure knot can be made on the inside of the bag if you’re worried about it coming undone.
- Don’t Be Afraid to Experiment: Try a different stitch, like a half-double crochet or a moss stitch (alternating sc and ch 1), to see how it changes the look and feel of your bag.
By following these steps, you can transform your forgotten yarn scraps into a beautiful, functional, and deeply personal tote bag that you’ll be proud to carry everywhere.