 by
by Welcome! Here is a detailed, step-by-step guide to creating a beautiful and cozy crochet hat using a simple relief stitch pattern. This article is designed for a confident beginner or intermediate crocheter who is comfortable with basic stitches and ready to add some gorgeous texture to their work.
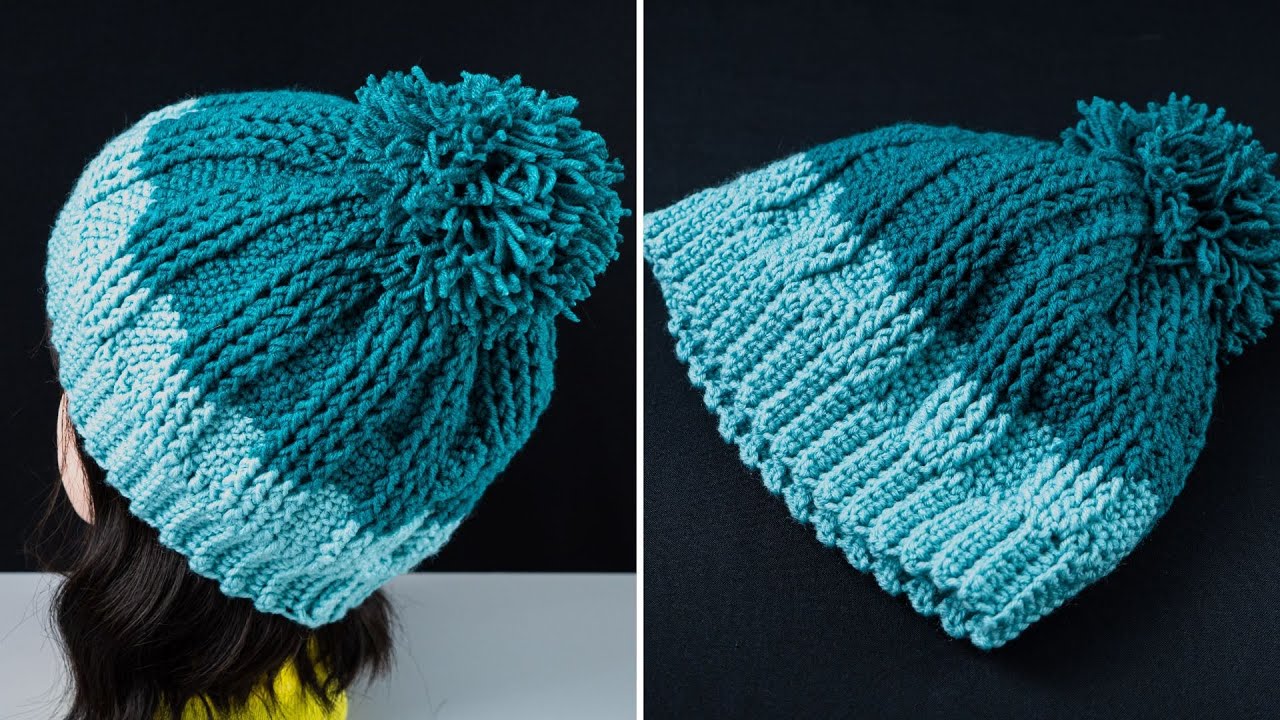
How to Make a Simple Crochet Hat with a Beautiful Relief Stitch Pattern: A Detailed Step-by-Step Guide
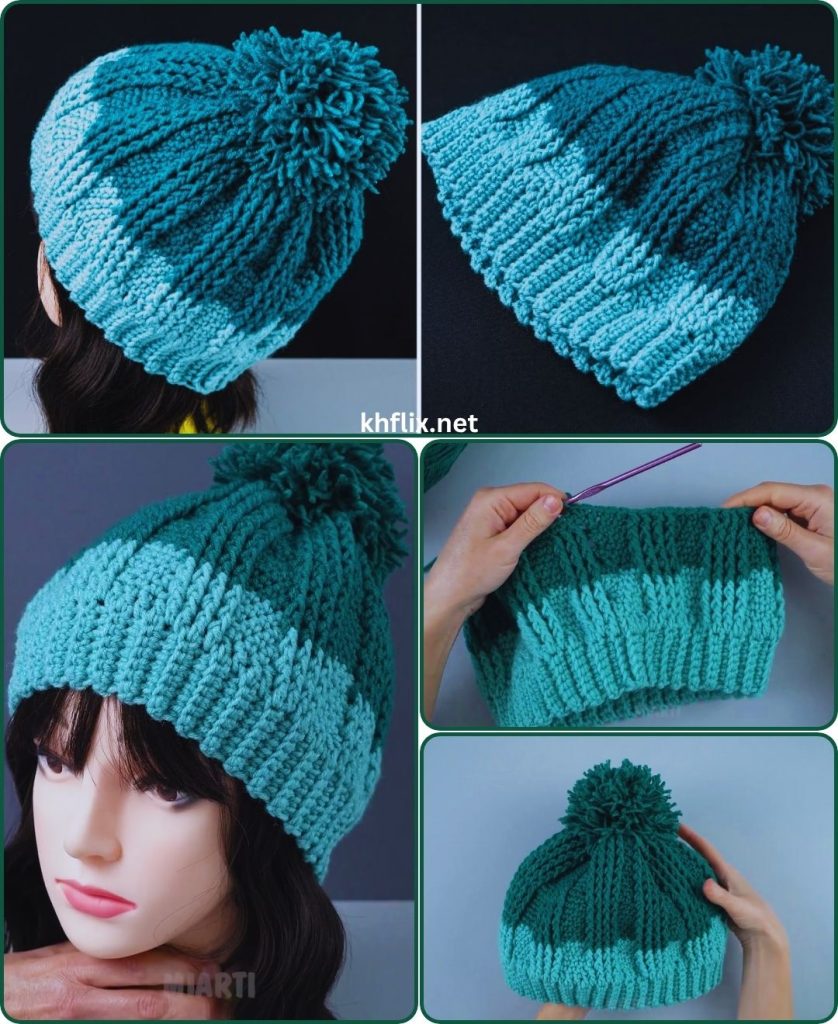
There’s nothing quite like a handmade hat. It’s a project that is both practical and wonderfully creative. While a simple beanie is a great start, learning to incorporate textured stitches can elevate your project from basic to boutique-quality. This guide will walk you through creating a classic, unisex ribbed hat using front and back post stitches—the building blocks of crochet relief patterns.
This pattern creates a wonderfully stretchy, thick, and warm fabric, making it perfect for cold weather. Don’t be intimidated by the terms “Front Post” or “Back Post”; they are simple variations of a standard double crochet stitch that are incredibly easy to master.
Let’s gather our materials and begin!
Part 1: Before You Begin
Preparation is key to a successful and enjoyable crochet experience. Here’s what you’ll need to know and gather before you start your first stitch.
Materials Needed
- Yarn: Approximately 200-220 yards (180-200 meters) of Worsted Weight (Category 4) yarn. A smooth, solid-colored yarn is recommended for your first attempt, as it will make the textured stitches easy to see. Wool or an acrylic/wool blend will provide excellent warmth and stretch.
- Crochet Hook: A 5.0mm (H-8) crochet hook. This is a standard size for worsted weight yarn, but you may need to adjust to meet the gauge.
- Scissors: For cutting your yarn.
- Yarn Needle (or Tapestry Needle): Essential for weaving in the ends neatly for a professional finish.
- Stitch Marker (Optional but Recommended): To mark the beginning of your rounds, which can be very helpful.
- Pom-Pom Maker (Optional): If you wish to top your hat with a yarn pom-pom.
Required Skills (Prerequisites)
You should be comfortable with the following basic crochet techniques:
- Magic Ring (MR) or Chain 4 and join method
- Chain (ch)
- Slip Stitch (sl st)
- Double Crochet (dc)
Gauge – The Key to a Perfect Fit!
Gauge refers to the density of your stitches. Matching the gauge is crucial for ensuring your hat fits an average adult head.
- Gauge Swatch: After completing Round 4 of the crown, your flat circle should measure approximately 4 inches (10 cm) in diameter.
- If your circle is too small: Your tension is too tight. Try again with a larger hook (e.g., 5.5mm).
- If your circle is too large: Your tension is too loose. Try again with a smaller hook (e.g., 4.5mm).
Abbreviations (US Crochet Terms)
- ch: chain
- sl st: slip stitch
- dc: double crochet
- st(s): stitch(es)
- FPDC: Front Post Double Crochet
- BPDC: Back Post Double Crochet
- inc: increase (working 2 stitches in the same stitch)
- * … *: repeat the instructions between the asterisks
Part 2: Understanding the Relief Stitches (FPDC & BPDC)
The entire texture of this hat comes from two special stitches. Instead of working into the top ‘V’ of the stitch from the previous round, you will be working around the post (the vertical body) of the stitch.
Front Post Double Crochet (FPDC)
This stitch pushes the post of the stitch below it forward, creating a raised rib on the front of your work.
- Yarn over your hook.
- Insert your hook from the front of your work to the back, and then bring it back to the front again, going around the post of the designated double crochet from the previous round. The post of the stitch should now be lying in front of your hook.
- Yarn over and pull up a loop (you’ll have 3 loops on your hook).
- Complete the double crochet as you normally would: yarn over, pull through two loops. Yarn over again, pull through the remaining two loops.
![Diagram or image of FPDC stitch being worked]
Back Post Double Crochet (BPDC)
This stitch pushes the post of the stitch below it backward, creating a recessed rib on the front of your work.
- Yarn over your hook.
- From the back of your work, insert your hook toward the front, and then push it to the back again, going around the post of the designated double crochet from the previous round. The post of the stitch should now be lying behind your hook.
- Yarn over and pull up a loop (you’ll have 3 loops on your hook). This can feel a little awkward at first.
- Complete the double crochet as you normally would: yarn over, pull through two loops. Yarn over again, pull through the remaining two loops.
![Diagram or image of BPDC stitch being worked]
By alternating these two stitches, you create the classic ribbed texture that gives this hat its beautiful look and incredible stretch.
Part 3: The Step-by-Step Crochet Hat Pattern
This pattern is for an average adult size hat (fitting a head circumference of 21-23 inches).
Section A: The Crown (Increasing)
We begin by creating a flat circle. The increases in each round are crucial for making the hat lay flat and grow to the correct size.
Round 1: Start with a magic ring. Ch 3 (this counts as your first dc here and throughout the pattern). Work 11 more dc into the ring. Join with a sl st to the top of the beginning ch-3. (Total: 12 sts) Pull the tail to close the ring tightly.
Round 2: Ch 3. Work 1 dc in the same stitch as the chain. Work 2 dc (an increase) in every stitch around. Join with a sl st to the top of the beginning ch-3. (Total: 24 sts)
Round 3: Ch 3. Work 2 dc in the next stitch. *Work 1 dc in the next st, then 2 dc in the next st.* Repeat from * to * all the way around. Join with a sl st to the top of the beginning ch-3. (Total: 36 sts)
Round 4: Ch 3. Work 1 dc in the next st. Work 2 dc in the next st. *Work 1 dc in each of the next 2 sts, then 2 dc in the next st.* Repeat from * to * all the way around. Join with a sl st to the top of the beginning ch-3. (Total: 48 sts) CHECK YOUR GAUGE HERE! Your circle should now measure about 4 inches across.
Round 5: Ch 3. Work 1 dc in each of the next 2 sts. Work 2 dc in the next st. *Work 1 dc in each of the next 3 sts, then 2 dc in the next st.* Repeat from * to * all the way around. Join with a sl st to the top of the beginning ch-3. (Total: 60 sts)
Round 6: Ch 3. Work 1 dc in each of the next 3 sts. Work 2 dc in the next st. *Work 1 dc in each of the next 4 sts, then 2 dc in the next st.* Repeat from * to * all the way around. Join with a sl st to the top of the beginning ch-3. (Total: 72 sts)
The flat circle of your crown should now measure approximately 6.5 to 7 inches (16.5 – 18 cm) in diameter. This is the correct size for an average adult. If you need a smaller or larger hat, you would stop increasing earlier or continue for one more round, respectively.
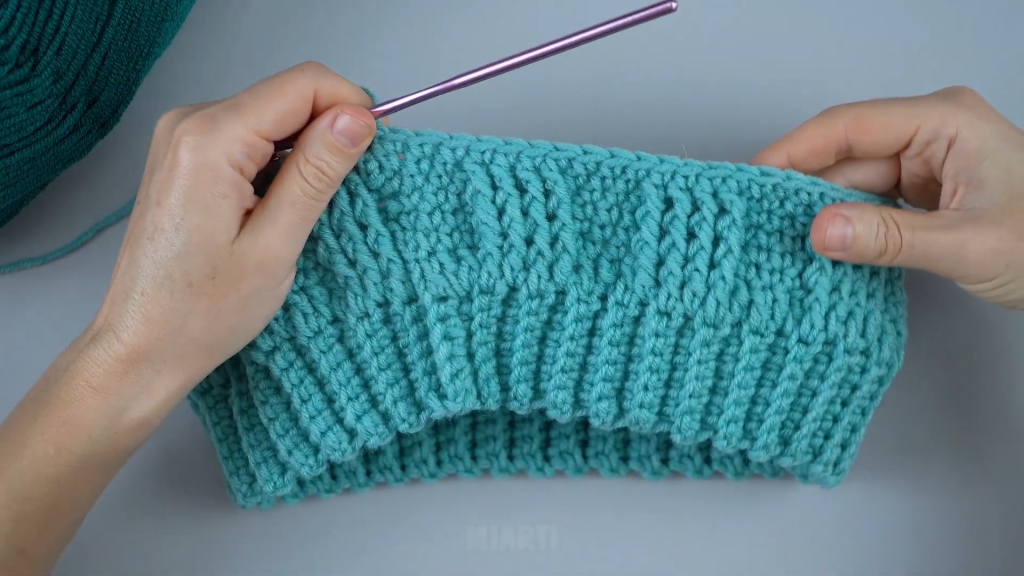
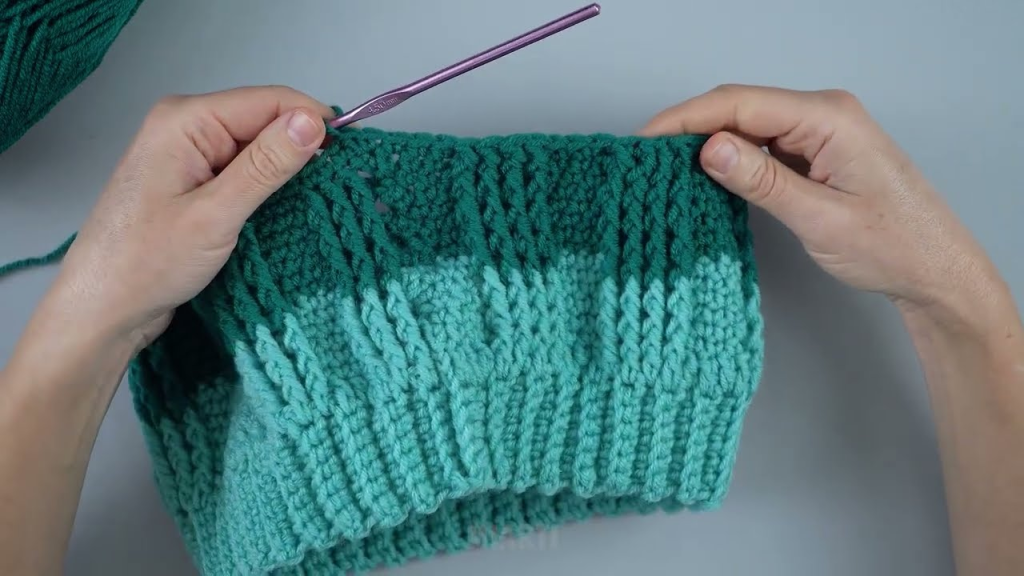
Section B: The Body (Creating the Ribbed Pattern)
Now we stop increasing and begin working down the sides of the hat, establishing our beautiful relief stitch pattern.
Round 7 (Establishing the Pattern): Ch 3 (counts as your first stitch, which we will treat as a BPDC in the following rounds). Work 1 BPDC around the post of the very next st. *Work 1 FPDC around the post of each of the next 2 sts, then work 1 BPDC around the post of each of the next 2 sts.* Repeat from * to * all the way around. You should end with 2 FPDC stitches. Join with a sl st to the top of the beginning ch-3. (Total: 72 sts)
Round 8: Ch 3. Look at the stitch below. It should be a BPDC. Work 1 BPDC around that post. Now look at the next two stitches; they should be raised FPDC stitches. *Work 1 FPDC around the post of each of the next 2 FPDC sts. Then, work 1 BPDC around the post of each of the next 2 BPDC sts.* Repeat from * to * all the way around. Join with a sl st to the top of the beginning ch-3. (Total: 72 sts)
The Key is to “Stack” Your Stitches: You will always work an FPDC on top of an FPDC from the round below, and a BPDC on top of a BPDC from the round below. This is what creates the clean, continuous ribs.
Rounds 9 – 18 (or until desired length): Repeat Round 8.
Continue repeating Round 8 until the hat measures about 8 inches (20 cm) from the top of the crown to the bottom edge. For a more “slouchy” fit, add another 2-3 rounds. For a snug beanie, you might stop a round or two earlier. Try it on as you go!
Section C: The Brim (A Clean Finish)
To give the hat a nice, snug brim that won’t flare out, we will work a few rounds of single crochet stitches.
Round 19: Ch 1 (does not count as a stitch). Work 1 single crochet (sc) in the same stitch and in every stitch around. Join with a sl st to the first sc. (Total: 72 sts)
Rounds 20 – 22: Ch 1. Work 1 sc in every stitch around. Join with a sl st to the first sc. (Total: 72 sts) You can add more or fewer rounds for the brim depending on your preference.
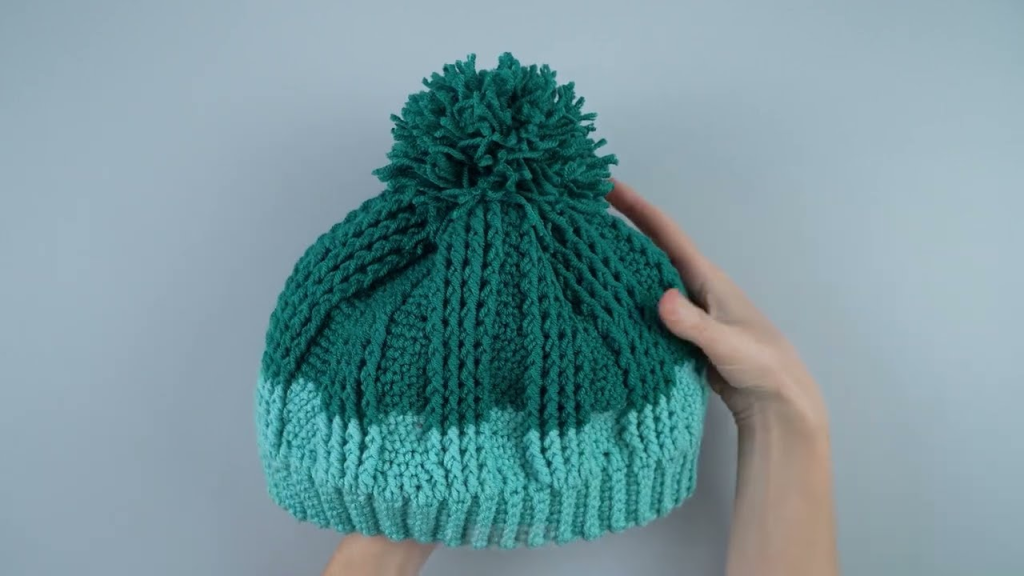
Part 4: Finishing Touches
You’re almost there! A clean finish is what separates a good project from a great one.
- Fasten Off: After your final slip stitch on the brim, cut your yarn, leaving a 6-inch tail. Yarn over and pull the tail completely through the loop on your hook to create a secure knot.
- Weave in Ends: Thread the yarn tail onto your yarn needle. Weave the tail in and out of the stitches on the inside of the hat. Go in one direction for an inch, then reverse direction and go back through a slightly different path. This locks the end in place so it won’t unravel. Do the same for the starting tail at the top of the hat.
- Add a Pom-Pom (Optional): Using a pom-pom maker or a piece of cardboard, create a fluffy pom-pom with your yarn. Leave long tails on the pom-pom. Use your yarn needle to thread these tails through the very top of the hat’s crown and tie them securely on the inside.
Congratulations! You have now created a beautiful, textured, and incredibly warm crochet hat. This simple 2×2 ribbing pattern is a fantastic skill to have, opening the door to creating sweaters, cuffs, and blankets with the same professional-looking texture. Wear it with pride or gift it to someone special!