by
by If you love handmade accessories that are both trendy and timeless, the crochet daisy tote bag is the perfect project for you. With its charming floral motif and eco-friendly appeal, this bag combines fashion and function beautifully. Whether you’re heading to the market, beach, or café, a crochet daisy tote adds a cheerful, boho-chic touch to any outfit.
In this detailed tutorial, you’ll learn exactly how to create your own crochet daisy tote bag from start to finish — even if you’re a beginner. We’ll cover all the materials, stitches, steps, and finishing details you need to make a sturdy and stylish tote you’ll adore carrying everywhere.
🌸 Why You’ll Love This Project
The crochet daisy tote bag is:
- 💛 Eco-friendly: Reusable and sustainable alternative to plastic bags.
- 🌼 Fashionable: Floral motifs never go out of style.
- 🧶 Customizable: Change colors, size, or handle length to suit your taste.
- 🌿 Beginner-friendly: Built from simple granny squares, making it easy to learn.
You’ll be amazed at how quickly it comes together once you’ve mastered one daisy square — then it’s just a matter of joining them!
🧶 Materials You’ll Need
Before starting, gather these supplies:
Yarn:
- Cotton Yarn (Worsted / Medium #4 weight) — durable and holds shape well.
- Color A (Center): Yellow
- Color B (Petals): White or Cream
- Color C (Background): Green, Beige, or any favorite tone
Hook:
- 4 mm (G-6) crochet hook (or size recommended on your yarn label).
Other Tools:
- ✂️ Scissors
- 🪡 Tapestry needle (for sewing and weaving in ends)
- 📏 Measuring tape
- Optional: Lining fabric and sewing needle if you want to add a cloth interior
🪡 Basic Stitches You’ll Use
Don’t worry if you’re new — these stitches are simple and essential for beginners:
- ch (chain)
- sl st (slip stitch)
- sc (single crochet)
- dc (double crochet)
Optional for the border/join:
- hdc (half double crochet)
If you know how to make a classic granny square, you’ll find this daisy square pattern very familiar!
🌼 Step-by-Step Crochet Daisy Tote Bag Tutorial
This tote is made of granny-style daisy squares joined together to form the bag panels, with a simple border and sturdy handles.
🌸 Step 1: Crochet the Daisy Center
- Using Color A (Yellow):
- Make a magic ring (or ch 4 and sl st to form a ring).
- Ch 2 (counts as first dc).
- Work 11 dc into the ring (12 dc total including the ch 2).
- Join with sl st into the top of the first dc.
- Fasten off.
💡 This is the cheerful center of your daisy!
🌼 Step 2: Make the Petals
- Attach Color B (White) to any stitch of the yellow center.
- Ch 2 (counts as first dc), 2 dc in same stitch, ch 1, sl st into next stitch.
- Repeat this pattern around:
- (3 dc in one stitch, ch 1, sl st into next stitch).
- Continue around the yellow circle — you’ll have 6 petals total.
- Join and fasten off.
💡 Each petal group gives your daisy a lovely, 3D look.
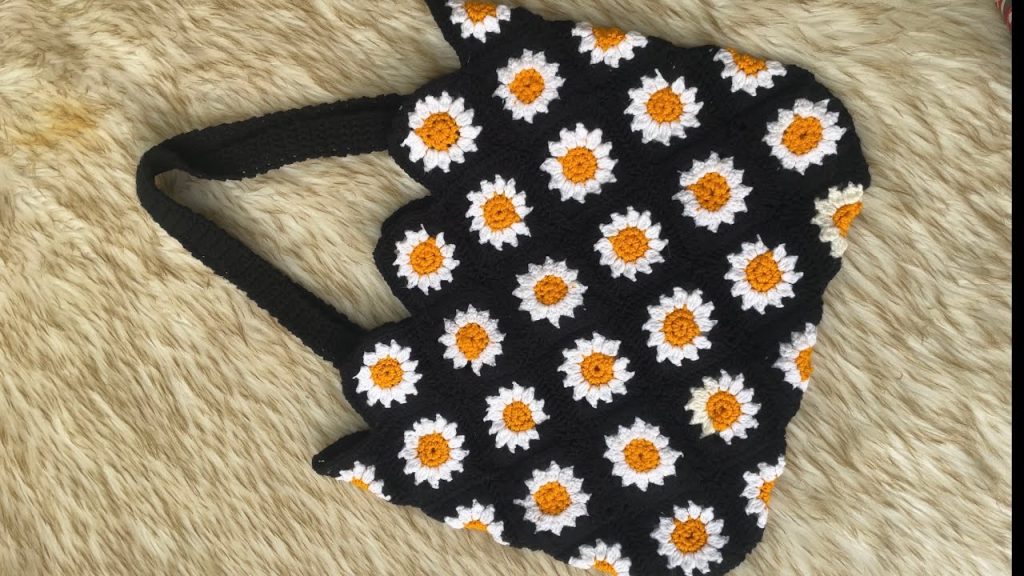
🌿 Step 3: Add the Square Background (Granny Square Style)
Now we’ll turn the flower into a square using Color C (Background).
- Attach yarn to the ch-1 space between petals.
- Ch 3 (counts as dc), 2 dc in same space, ch 2, 3 dc in same space → this is your first corner.
- In the next space between petals, work 3 dc (no chain in between).
- In the next space, make another corner: 3 dc, ch 2, 3 dc.
- Continue alternating corners and sides until you have a square shape with 4 corners total.
- Join with sl st and fasten off.
Congratulations — you’ve made your first daisy square! 🌼
🧵 Step 4: Make More Squares
You’ll need 13–15 daisy squares depending on the size you want for your tote bag.
For a medium tote:
- Front panel: 6 squares (2 rows of 3)
- Back panel: 6 squares (2 rows of 3)
- Sides & Bottom: 1 or 2 long rectangles (you can crochet continuous strips or join smaller squares)
💡 Tip: Lay your squares out before joining to choose the best color placement.
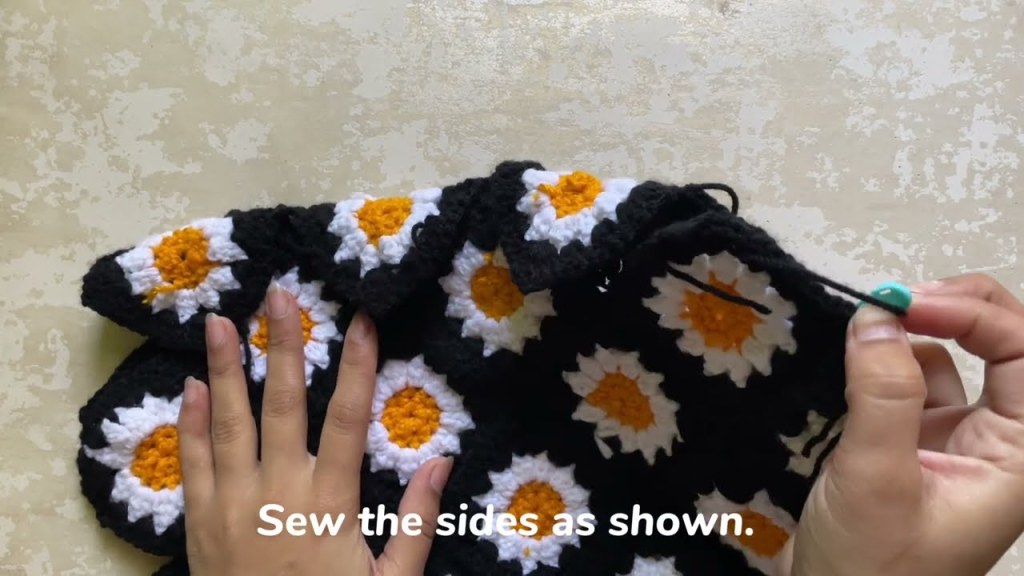
🌸 Step 5: Join the Squares
There are two main methods to join your daisy squares:
Option 1: Slip Stitch Join
- Place two squares right sides together.
- Insert hook through both squares’ corner stitches.
- Work slip stitches across to connect them.
- Continue joining all squares this way, row by row.
Option 2: Join-As-You-Go (JAYG)
- On your final round of each square, connect corners and sides to the neighboring squares using slip stitches.
- This creates a seamless, flexible connection.
Once you’ve joined all the squares, you’ll have your front and back panels ready.
🌿 Step 6: Create the Bag Base and Sides
Option 1: Flat Tote (No Depth)
- Simply join the front and back panels along the sides and bottom with slip stitches or single crochet.
Option 2: Boxy Tote (With Depth)
- Crochet a rectangular strip about 4 inches wide and as long as the combined width + sides + bottom of your panels.
- Join this strip around the panels to give your tote a roomy base.
This version makes your bag more functional for carrying larger items.
🌷 Step 7: Crochet the Handles
Now it’s time to make sturdy, comfortable handles!
Option 1: Crocheted Handles
- Attach yarn to the top edge of your bag.
- Ch 70 (or your preferred length for shoulder/handbag style).
- Skip a few stitches on the top edge, then attach the chain with sl st.
- Work 1 row of sc or hdc along the chain for durability.
- Repeat for the other side.
Option 2: Wooden or Rope Handles
Sew or crochet loops to attach pre-made wooden rings or rope handles for a boho aesthetic.
🌸 Step 8: Add Edging and Finishing Touches
To make your bag look neat and polished:
- Work one round of single crochet all around the top edge.
- Fasten off and weave in all yarn ends using a tapestry needle.
- Steam or block your bag lightly if needed.
Optional:
- Sew in a cotton fabric lining to prevent stretching.
- Add a magnetic snap or button for closure.
- Decorate with tassels, pom-poms, or mini crochet flowers. 🌺
🌼 Optional Daisy Tote Variations
Once you master the base design, have fun experimenting!
- 🌸 Mini Daisy Tote: Make smaller squares for a cute handbag.
- 🌿 Monochrome Tote: Use one color for a modern minimalist look.
- 🌻 Rainbow Daisy Tote: Use different petal colors for a cheerful summer vibe.
- 👜 Mesh Style: Add granny stitch rounds between daisies for an airy market bag.
- 🌺 Lined Tote with Zipper: Add lining fabric and a zipper for a more structured everyday purse.
🌻 Crochet Daisy Tote Bag Pattern Summary
Here’s a simplified version you can reference quickly:
| Section | Instructions |
|---|---|
| Center | Magic ring, 12 dc, join |
| Petals | (3 dc, ch 1, sl st) around center — 6 petals |
| Square Rounds | Work 3 dc, ch 2, 3 dc corners and 3 dc sides |
| Join Squares | Slip stitch or JAYG method |
| Handles | Ch 70, sc/hdc across for thickness |
| Finishing | Sc border, weave ends, optional lining |
💫 Tips for Success
- Use cotton yarn — it’s sturdy, washable, and holds shape.
- Keep your tension even for clean, consistent squares.
- Block your squares before joining for perfect alignment.
- Plan your color layout before assembly — symmetry enhances design.
- For extra strength, line the bag or reinforce handles with double layers.
🌸 Final Thoughts
The crochet daisy tote bag is a project that beautifully blends charm and utility. It’s a reflection of your creativity — every petal, stitch, and square woven together to form something you can proudly wear and use. 🌼
Whether you make it for yourself, a friend, or as a handmade gift, this tote bag captures the joy of crafting with yarn and imagination. Each daisy you crochet adds warmth, character, and a touch of handmade happiness.
So, grab your yarn, find your favorite sunny corner, and start crocheting your dream daisy tote bag today — one square at a time. ☀️🧶