by
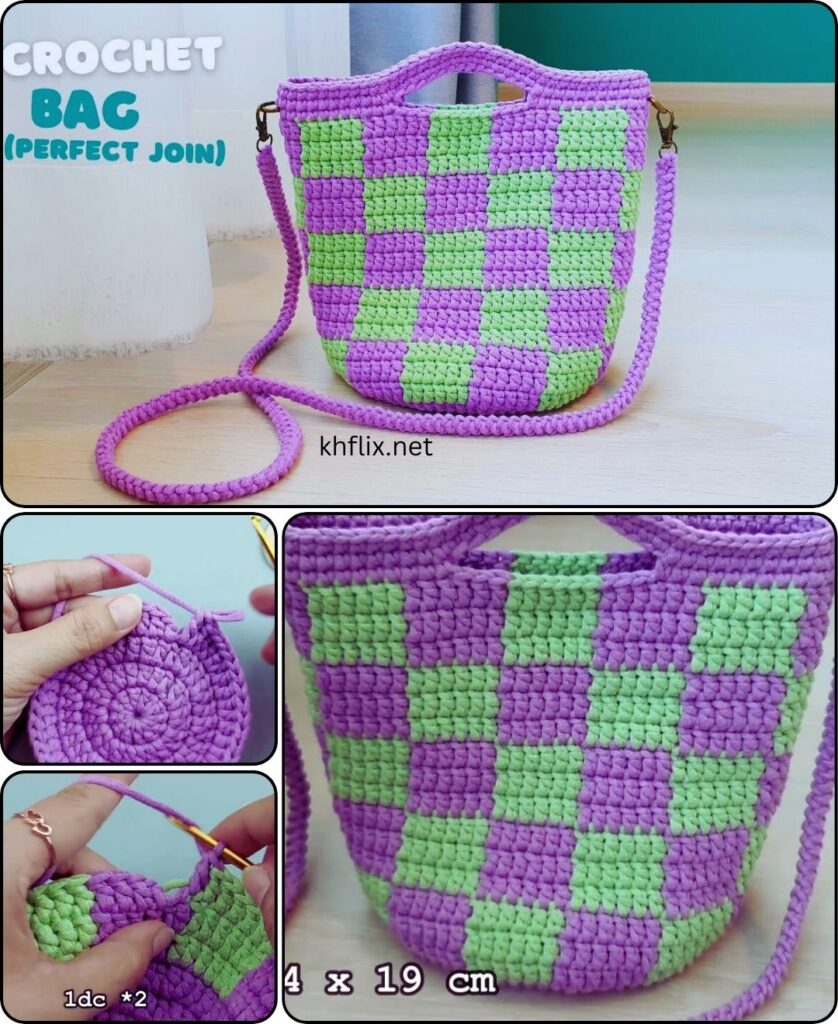
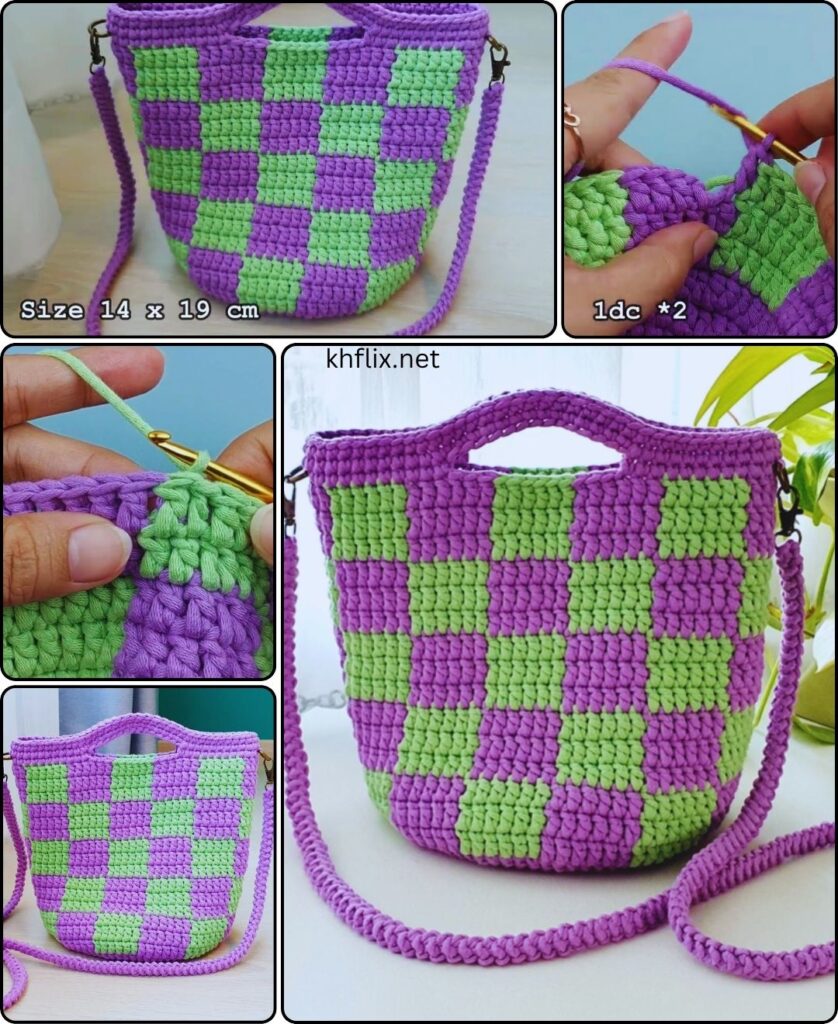
by Creating a crossbody bag with a checkered stitch pattern is a fantastic project that yields a unique and stylish accessory! The checkered stitch (often achieved using tapestry crochet techniques) involves carrying yarn and changing colors frequently, which creates a dense, sturdy fabric perfect for bags.
This tutorial will guide you through making a rectangular crossbody bag featuring a two-color checkered pattern, a flap closure, and a solid strap.
Pattern: How to Make a Crochet Checkered Stitch Crossbody Bag
Project Overview: This pattern creates a durable and visually appealing crossbody bag with a distinctive checkered pattern. The bag is worked from the bottom up in continuous rounds, with a flap attached directly to the body and a separate strap.
Skill Level: Intermediate to Advanced (Requires comfortable knowledge of basic stitches, working in the round, tapestry crochet techniques including carrying yarn and neat color changes, shaping, and assembly).
Finished Bag Dimensions (Approximate for adult):
- Width: 8.5 inches (21.5 cm)
- Height (Body only, excluding flap): 6.5 inches (16.5 cm)
- Depth: 1.5 inches (4 cm)
- Strap Length: Approximately 45-50 inches (114-127 cm) – adjustable.
Materials You’ll Need:
- Yarn:
- Worsted Weight (Medium #4) Cotton or Cotton Blend Yarn: Approximately 300-400 yards (275-365 meters) total.
- Color A: Approx. 200-250 yards (e.g., Cream, White, Black).
- Color B: Approx. 100-150 yards (e.g., Contrast color like Red, Blue, Green, Yellow).
- Why Cotton/Blend? Cotton is durable, has excellent stitch definition for patterns, and minimizes stretch. A blend can add softness.
- Crochet Hook:
- Size H/5.0mm (or a size that produces a very dense, firm fabric for tapestry crochet. Go down a hook size if your fabric feels too loose or gappy, or if the carried yarn shows through too much).
- Yarn Needle (Tapestry Needle): For weaving in ends and seaming.
- Scissors
- Stitch Markers (Highly Recommended): To mark the beginning of rounds and specific points for color changes.
- Magnetic Snap or Button (Optional): For flap closure.
- Fabric for Lining (Optional, but highly recommended): Approximately 1/2 yard of cotton fabric. This dramatically increases the bag’s durability, hides carried yarn, and prevents stretching.
- Matching Sewing Thread and Needle (Optional): For attaching lining and snap.
Gauge (Crucial for Bag Size & Pattern Definition!)
With H/5.0mm hook and chosen yarn, working in single crochet tapestry (carrying unused yarn): 16 sc = 4 inches (10 cm) wide 18 rows sc = 4 inches (10 cm) high
- It’s crucial that your fabric is dense and firm, with the carried yarn not showing through. Adjust hook size as needed.
Abbreviations Used:
- ch: chain
- sl st: slip stitch
- sc: single crochet
- st(s): stitch(es)
- inc: increase (working 2 stitches into the same stitch)
- FLO: front loop only
- FO: fasten off
- CA: Color A
- CB: Color B
Understanding the Checkered Stitch (Tapestry Crochet)
The checkered pattern in this tutorial will be made using single crochet (sc) stitches. You will carry the unused yarn color inside your stitches as you work, changing colors every two stitches to create a 2×2 checkerboard.
How to Change Colors Neatly in SC: When working the last single crochet of a specific color:
- Insert hook into stitch.
- Yarn over with the current color and pull up a loop (2 loops on hook).
- Drop the current color, pick up the new color, yarn over with the new color, and pull through both loops on the hook. (This completes the sc stitch with the new color).
- Continue with the new color, making sure to crochet over the dropped previous color (and the other unused color, if carrying three or more) to keep it hidden inside your stitches.
Pattern Repeat: (2 sc in CA, 2 sc in CB) repeated. Ensure you change colors on the second sc of each pair.
Understanding the Bag Structure
- Bag Base: Crocheted first as an oval in plain single crochet.
- Bag Sides: Worked upwards from the base, using the checkered stitch pattern.
- Flap: Crocheted directly from the back of the bag, continuing the checkered pattern.
- Strap: Crocheted separately in a solid color for simplicity and sturdiness.
- Assembly & Finishing: Attaching hardware, weaving ends, adding optional lining.
Let’s Start Crocheting Your Checkered Crossbody Bag!
Part 1: The Bag Base (Solid Color A)
We’ll start with an oval base in a single solid color (CA) to establish the sturdy foundation.
- With Color A and H/5.0mm hook, ch 31.
- Round 1: Work 2 sc in the 2nd ch from hook. Sc in each of the next 28 ch. Work 4 sc in the last ch. (This turns the corner). Now, working down the other side of the foundation chain, sc in each of the next 28 ch. Work 2 sc in the very last ch (this is the same ch as the first 2 sc you made). Do NOT join with sl st, we will work in continuous rounds. (64 sc).
- Place a stitch marker in the first sc of the round.
- Round 2: Work 2 sc in the first st. Sc in each of the next 30 sts. Work 2 sc in each of the next 3 sts. Sc in each of the next 30 sts. Work 2 sc in the last st. (70 sc).
- Round 3: Work 2 sc in the first st. Sc in each of the next 32 sts. Work 2 sc in each of the next 3 sts. Sc in each of the next 32 sts. Work 2 sc in the last st. (76 sc).
- Round 4: Work 2 sc in the first st. Sc in each of the next 34 sts. Work 2 sc in each of the next 3 sts. Sc in each of the next 34 sts. Work 2 sc in the last st. (82 sc).
- Your base should now be a sturdy oval, approx. 8.5 inches long and 1.5 inches wide.
Part 2: The Bag Sides (Checkered Stitch Pattern)
Now we introduce the checkered pattern. You will be working in continuous rounds. Remember to carry the unused yarn neatly inside your stitches and change colors on the last pull-through of the previous stitch.
- Round 5: Work 1 sc in the FLO (front loop only) of each st around. (82 sc).
- Working in the FLO of this round creates a defined ridge that helps the sides stand up straight. Also, it creates an unworked back loop on the inside of the bag, which is great for sewing in a lining later.
- In the last st of this round, on the final pull-through, change to Color B.
- Round 6 (Start Checkered Pattern): With CB, work 2 sc. On the last pull-through of the 2nd sc, change to CA. With CA, work 2 sc. On the last pull-through of the 2nd sc, change to CB.
- Repeat (2 sc in CB, 2 sc in CA) around the entire round. (82 sc).
- Crucially, ensure you are crocheting over the unused yarn color(s) to hide them inside your stitches.
- Place your stitch marker in the first sc of the round.
- Round 7: With CA, work 2 sc. On the last pull-through of the 2nd sc, change to CB. With CB, work 2 sc. On the last pull-through of the 2nd sc, change to CA.
- Repeat (2 sc in CA, 2 sc in CB) around the entire round. (82 sc).
- Notice that the color changes in this round are opposite to the previous round, creating the checkerboard effect. Continue carrying the unused yarn.
- Repeat Rounds 6 and 7 alternately until the bag body measures approximately 6.5 inches (16.5 cm) high from the base. This will be about 28-30 rounds of checkered pattern (Round 5 is the first plain sc round, then about 14-15 repetitions of the 2-round pattern).
- To finish this section, end after a Round 7 type row. Make a sl st into the next stitch. FO the current color (CA), and FO the other color (CB), leaving tails to weave in.
Part 3: The Flap (Checkered Pattern)
The flap will be crocheted directly onto the back opening of the bag, continuing the checkered pattern.
- Identify the back: Lay your bag flat. The starting point of your rounds (where the initial increases were concentrated, or where you placed your stitch marker) usually ends up at the back/side. Count 41 stitches from the last stitch you made on the main body of the bag (counting backwards along the opening edge). This will be one of the “side” stitches.
- Join Yarn: Join Color A with a sl st in this 41st stitch. (This marks the beginning of your flap).
- Row 1 (Flap): Ch 1. With CA, work 2 sc. On the last pull-through of the 2nd sc, change to CB. With CB, work 2 sc. On the last pull-through of the 2nd sc, change to CA.
- Repeat (2 sc in CA, 2 sc in CB) across the next 40 stitches. You should end with 2 sc in CA (total 41 sts). Do not FO CB at the end of the row.
- Row 2: Ch 1, turn. With CB, work 2 sc. On the last pull-through of the 2nd sc, change to CA. With CA, work 2 sc. On the last pull-through of the 2nd sc, change to CB.
- Repeat (2 sc in CB, 2 sc in CA) across the 40 stitches. You should end with 2 sc in CB.
- Repeat Rows 1 and 2 alternately for 15 more rows (total 17 rows of checkered pattern for the flap). Ensure you carry the unused yarn neatly.
- This creates a rectangular flap.
Shaping the Flap (Optional – Rounded Corners/Pointed):
- If you want to shape the flap, you’ll need to decrease stitches and adjust the color changes accordingly. For a basic tutorial, continuing the straight pattern is easiest.
- For a subtle rounded edge (example):
- Row 18: Ch 1, turn. Sc in the first 2 sts. Work 1 sc in the next 37 sts. Sc in the last 2 sts. (41 sts, no color change).
- Row 19: Ch 1, turn. Sc in the first 2 sts. Sc2tog (single crochet 2 together – a decrease). Sc in the next 33 sts. Sc2tog. Sc in the last 2 sts. (39 sts).
- FO both CA and CB, leaving a long tail of CA for weaving.
Part 4: The Strap (Solid Color A)
A solid single crochet strap is durable and less complex than a checkered one.
- With Color A and H/5.0mm hook, ch 201. (Adjust chain length for desired strap length – approx. 45-50 inches for crossbody).
- Row 1: Sc in the 2nd ch from hook. Sc in each remaining ch across. (200 sc).
- Row 2: Ch 1, turn. Sc in each sc across. (200 sc).
- Repeat Row 2 for 2-3 more rows (total 3-4 rows of sc for the strap width).
- A strap that is 3-4 rows wide (approx. 0.75 – 1 inch wide) is usually comfortable and sturdy.
- FO, leaving a very long tail (at least 12 inches) on each end of the strap for sewing.

Part 5: Assembly & Finishing
- Weave in All Ends: Before attaching anything, use your yarn needle to weave in all loose yarn tails neatly into the crochet fabric. This is especially important with tapestry crochet to ensure carried yarn doesn’t peek out.
- Attach the Strap:
- Lay your bag flat. Determine where you want the strap to attach (typically on the side seams near the top opening).
- Using the long tails you left on the strap, securely sew each end of the strap to the inside top corners of the bag body. Use strong, tight stitches to ensure it’s very durable. You can fold the strap end over slightly and sew through multiple layers for extra strength.
- Attach Magnetic Snap/Button (Optional):
- Position one part of the magnetic snap on the underside of the flap, centered, about 1-1.5 inches from the edge. Use matching sewing thread and needle to securely stitch it in place.
- Close the flap and mark where the other part of the snap should go on the front of the bag. Stitch it securely.
- If using a button, sew the button to the front of the bag, and crochet a small loop on the underside of the flap to go around the button.
- Add Fabric Lining (Optional, but highly recommended for durability):
- This is the most effective way to make your bag long-lasting, prevent stretching, and hide the carried yarn from the inside.
- Measure the exact dimensions of your crocheted bag (width, height, depth).
- Cut fabric pieces to match, adding a 1/2 inch (1.25 cm) seam allowance on all sides. You’ll typically need: 1 main rectangle (for back, bottom, and front) and 2 side rectangles. You can also add a flap lining.
- Sew the fabric pieces together using a sewing machine or hand-stitching to create a bag shape.
- Hem the top edge of the lining.
- Insert the fabric lining into your crocheted bag.
- Hand-sew the top edge of the fabric lining to the inside top edge of your crocheted bag, using small, neat stitches.
- Final Checks: Give your bag a good once-over. Ensure all stitches are secure, ends are woven in, and the strap is firmly attached.
Tips for Success with Checkered Stitch:
- Tension is Paramount: Maintain consistent tension, especially when carrying the unused yarn. If you pull too tight, the fabric will pucker. If too loose, the carried yarn will show through.
- Carrying Yarn: Always crochet over the unused yarn color(s). This keeps them hidden and ready for the next color change.
- Color Changes: Practice changing colors smoothly so the new color comes through cleanly.
- Work on the “Right Side”: For bags worked in continuous rounds, the “right side” of your work will always be facing you. This helps keep the pattern consistent.
- Preventing Skewing: Single crochet worked in the round can sometimes skew diagonally. To minimize this, some crocheters find it helpful to alternate starting points slightly, or to simply ensure very even tension. Blocking the finished bag can also help.
Enjoy crocheting and showing off your stylish new checkered stitch crossbody bag!