 by
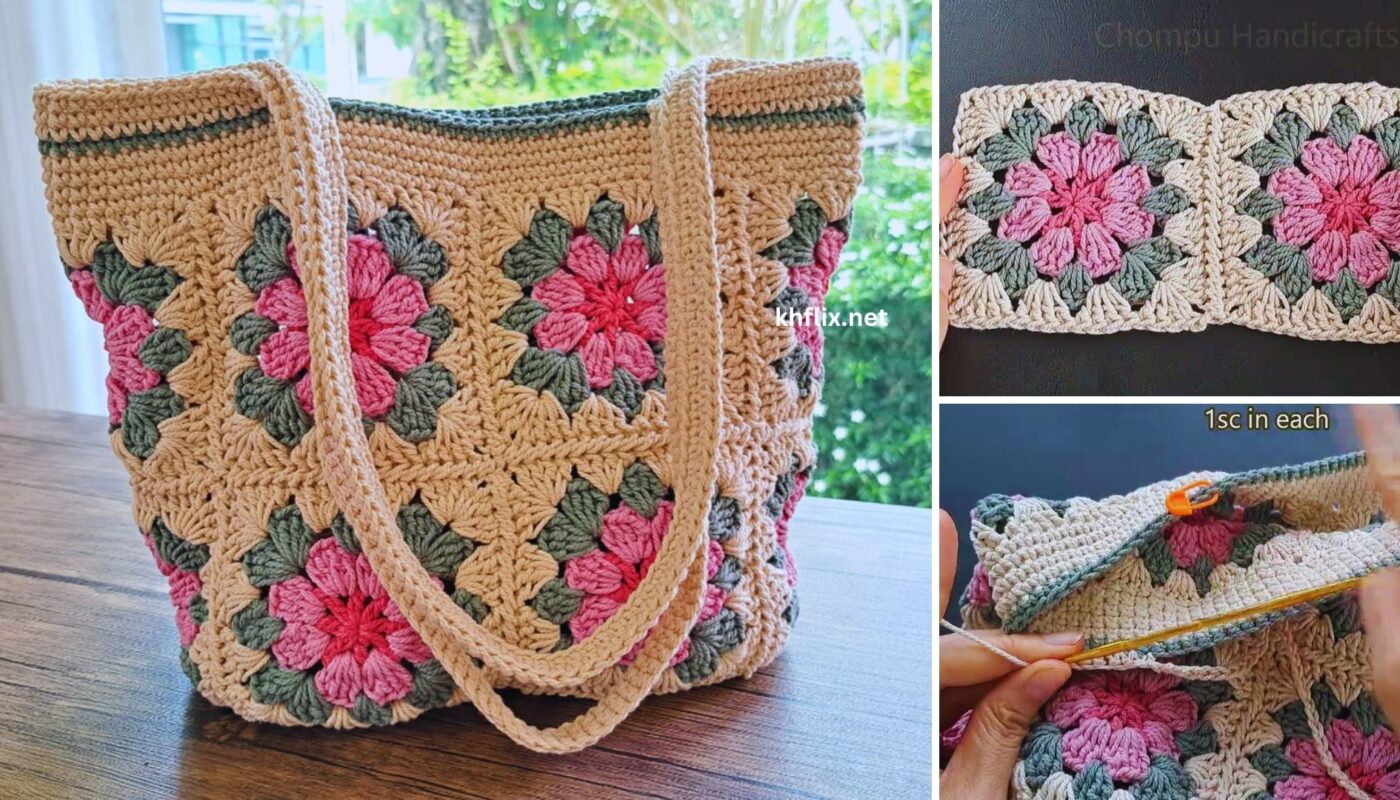
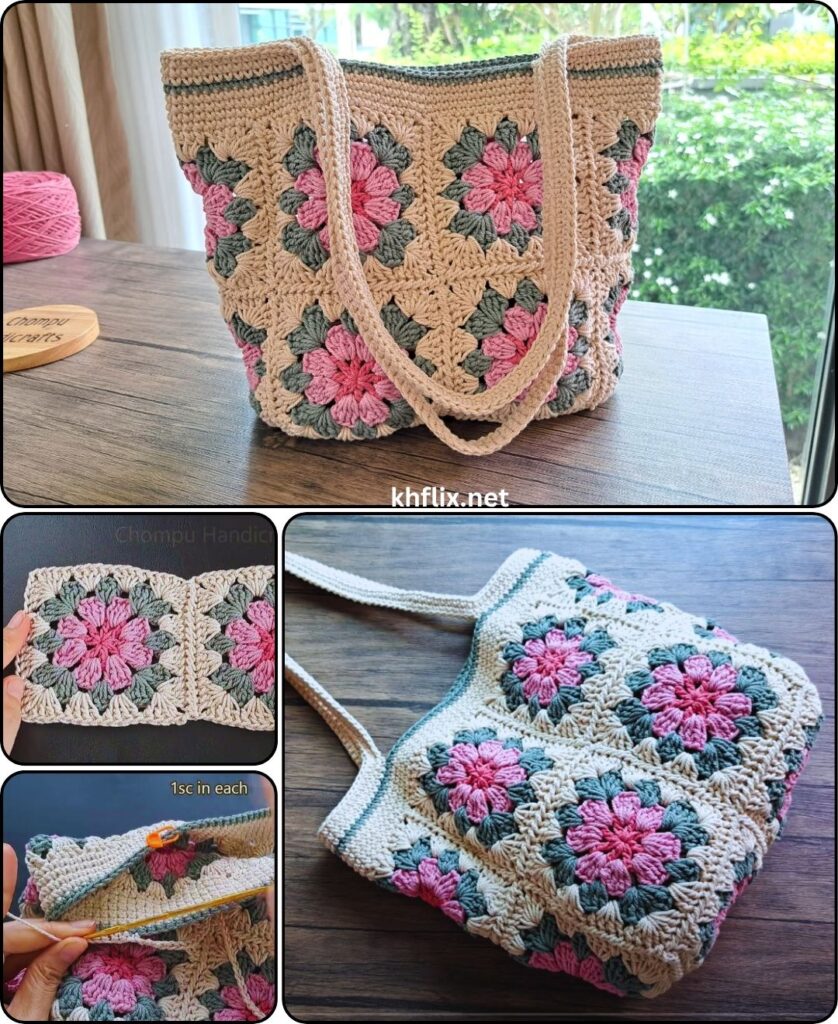
by You’re looking to crochet a beautiful and unique Flower Granny Square Bag! This project is fantastic because it combines the timeless appeal of granny squares with a lovely floral motif, allowing for endless color possibilities to create a truly personalized accessory.
This tutorial will guide you through creating individual flower granny squares and then joining them to form a stylish and practical bag.

How to Crochet a Flower Granny Square Bag
This project involves two main steps: crocheting multiple flower granny squares and then assembling them into a bag. The result is a charming, often vintage-inspired, and highly customizable bag.
Skill Level: Intermediate
You should be comfortable with:
- Basic crochet stitches: (chain, slip stitch, single crochet, half double crochet, double crochet, treble crochet).
- Working in joined rounds.
- Creating a Magic Ring (or similar starting method).
- Understanding how to change colors neatly.
- Basic seaming/joining techniques for crochet motifs.
Finished Bag Dimensions (Approximate):
This tutorial will aim for a medium-sized bag, approximately 12 inches (30.5 cm) wide and 12 inches (30.5 cm) tall (excluding handles). You can adjust the size by making more or fewer squares. Each square will be approximately 6×6 inches (15×15 cm).
Materials You’ll Need:
- Yarn:
- Worsted Weight (Medium #4) Cotton or Cotton Blend Yarn: This type of yarn is highly recommended for bags due to its durability, sturdiness, and stitch definition. It also holds up well to wear and tear.
- Total Yarn: Approximately 300-500 yards (275-450 meters), depending on bag size and number of colors.
- Colors: Choose at least 3-4 contrasting or complementary colors per square (one for the center, one for petals, one for background, possibly another for joining/border). You’ll also need a main color for the bag’s border and handles.
- Flower Center Color (Color A): Small amount per square.
- Petal Color (Color B): Small amount per square.
- Granny Square Background Color (Color C): Larger amount per square.
- Optional Outer Square Color (Color D): Small amount per square.
- Bag Border/Handle Color (Color E): Larger amount for finishing.
- Crochet Hook:
- Size H/5.0mm: Or the hook size that gives you a firm, dense fabric that holds its shape well.
- Yarn Needle (Tapestry Needle): Essential for weaving in ends and seaming squares together.
- Scissors
- Stitch Markers (Recommended): Helpful for marking corners or the beginning of rounds.
Gauge (Important for Square Size!):
Your gauge will determine the size of your individual squares and, therefore, the overall size of your bag.
- A finished Flower Granny Square should measure approximately 6×6 inches (15×15 cm) after the final round.
- Adjust your hook size if necessary to achieve this size. If your squares are too small, go up a hook size; if too large, go down.
Abbreviations Used:
- ch: chain
- sl st: slip stitch
- sc: single crochet
- hdc: half double crochet
- dc: double crochet
- tr: treble crochet (or triple crochet)
- st(s): stitch(es)
- inc: increase (work 2 stitches into the same stitch)
- MR: Magic Ring (or Magic Circle/Adjustable Ring)
- FO: fasten off
- (\ ): repeat instructions within parentheses a specified number of times.
- [ ]: indicates the total number of stitches at the end of a round.
- (dc3tog): double crochet 3 together (cluster stitch, explained in pattern)
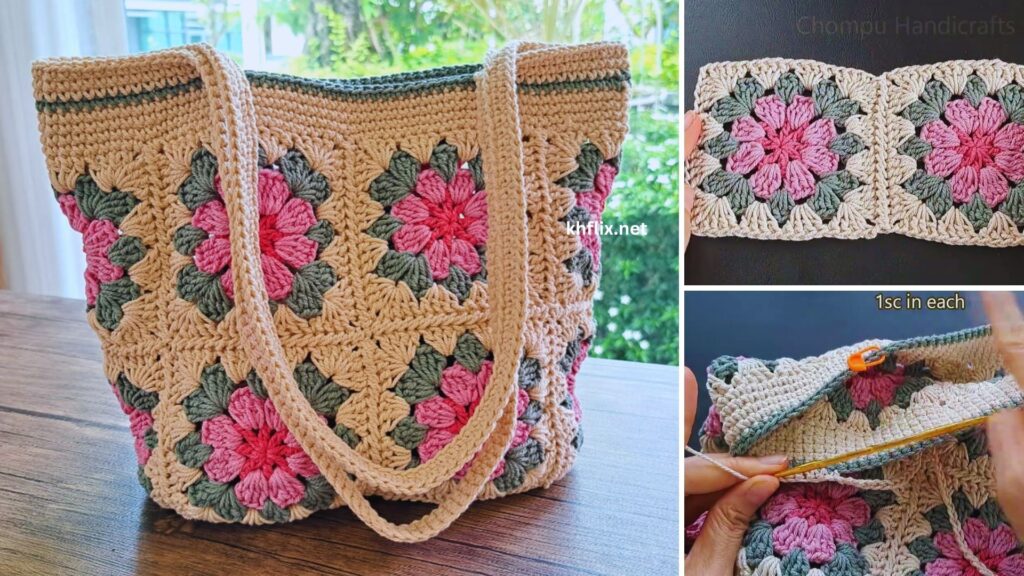
Part 1: How to Crochet a Flower Granny Square Motif
You will make 8 identical Flower Granny Squares for a typical bag layout (4 for the front, 4 for the back). Adjust this number for a larger or smaller bag.
This pattern uses a classic “Popcorn Flower” center, but you can substitute it with other flower granny square patterns if you prefer.
Flower Granny Square Pattern:
Flower Center (Color A):
- Start: Make a Magic Ring (MR).
- Round 1: Ch 2 (does NOT count as a stitch). Work 12 dc into the MR. Pull the tail tight to close the ring. Sl st to the top of the first dc to join. [12 dc]
- FO Color A, leaving a 4-inch tail to weave in.
Flower Petals (Color B):
- Join: Join Color B with a sl st in any dc of Round 1.
- Round 2 (Petals): Ch 3 (counts as 1 dc). Work (dc3tog) in the same stitch as join. (Yarn over, insert hook into st, pull up loop, yarn over, pull through 2 loops) 3 times into the same stitch. Yarn over, pull through all 4 loops on hook. Ch 2 to secure the popcorn and create space.
- (Work (dc4tog) in the next dc of Round 1. Ch 2). Repeat from * to * 10 more times. (You will have 12 popcorn stitches, each followed by Ch 2).
- Sl st to the top of the first dc3tog to join. [12 popcorn sts, 12 ch-2 spaces]
- FO Color B, leaving a 4-inch tail.
Square Shaping (Color C):
- Join: Join Color C with a sl st in any Ch-2 space from Round 2.
- Round 3: Ch 3 (counts as 1 dc). Work (2 dc, Ch 2, 3 dc) in the same Ch-2 space (this creates your first corner).
- Work (3 dc) in the next Ch-2 space.
- Work (3 hdc) in the next Ch-2 space.
- Work (3 sc) in the next Ch-2 space.
- Work (3 hdc) in the next Ch-2 space.
- Work (3 dc) in the next Ch-2 space.
- (Work (3 dc, Ch 2, 3 dc) in the next Ch-2 space (this creates your next corner). Work (3 dc) in the next Ch-2 space. Work (3 hdc) in the next Ch-2 space. Work (3 sc) in the next Ch-2 space. Work (3 hdc) in the next Ch-2 space. Work (3 dc) in the next Ch-2 space). Repeat from * to * 2 more times to complete the 4 sides.
- Sl st to the top of the beginning Ch 3 to join. [4 corners with (3dc, Ch2, 3dc), and sets of 3dc, 3hdc, 3sc, 3hdc, 3dc on each side]
- Note: This round starts to shape the circle into a square. The stitch heights are varied to help flatten the sides.
- FO Color C, leaving a 4-inch tail.
Granny Square Border (Color D – Optional, or continue with Color C/E):
If you want a more distinct border around each square, use Color D. Otherwise, continue with Color C for this round, or switch to Color E if you plan for your joining color to be this outer round.
- Join: Join Color D with a sl st in any Ch-2 corner space from Round 3.
- Round 4: Ch 3 (counts as 1 dc). Work (2 dc, Ch 2, 3 dc) in the same Ch-2 space (first corner).
- Work (3 dc) in the space between the next two 3-stitch groups along the side. (3 dc in the space between the first 3dc and 3hdc groups, 3 dc in the space between the 3hdc and 3sc groups, 3 dc in the space between the 3sc and 3hdc groups, 3 dc in the space between the 3hdc and 3dc groups).
- (Work (3 dc, Ch 2, 3 dc) in the next Ch-2 corner space. Work (3 dc) in each space between the next 3-stitch groups along the side). Repeat from * to * 2 more times.
- Sl st to the top of the beginning Ch 3 to join. [4 corners with (3dc, Ch2, 3dc), and 5 groups of 3dc on each side]
- FO Color D, leaving a 4-inch tail.
<!– end list –>
- Repeat this pattern to make a total of 8 flower granny squares.
- Weave in all ends for each square before joining them. This makes the final assembly much cleaner.
Part 2: Assembling the Bag
We’ll use a “whip stitch” or “slip stitch join” method for assembly. The whip stitch provides a neat, almost invisible seam, while the slip stitch join creates a raised seam. I’ll describe the whip stitch here.
Bag Layout:
- Lay out your 8 squares. You’ll have two main panels for the bag: Front Panel and Back Panel.
- Each panel will consist of 4 squares arranged in a 2×2 grid.
<!– end list –>
    FRONT PANEL          BACK PANEL
+---+---+            +---+---+
| A | B |            | E | F |
+---+---+            +---+---+
| C | D |            | G | H |
+---+---+            +---+---+
A. Joining Squares into Panels
- Prepare Yarn for Joining: Using Color E (your main bag/joining color), cut a long piece of yarn (at least 3-4 feet or 1 meter) for each seam. It’s better to have too much than too little. Thread it onto your yarn needle.
- Join Squares A and B:
- Place Square A and Square B right sides facing (the side you want to be the outside of your bag).
- Align the stitches along one edge.
- Starting at a corner, insert your yarn needle through both loops of the first stitch on both squares.
- Work a whip stitch by repeatedly inserting the needle from front to back through both loops of corresponding stitches along the edge. Pull tight enough to close the gap but not so tight that it puckers.
- Continue until the end of the edge. Secure the yarn and weave in the tail.
- Join Squares C and D: Repeat the process to join Square C and Square D.
- Join Rows (A+B to C+D):
- Now you have two strips: (A+B) and (C+D).
- Place the (A+B) strip and the (C+D) strip right sides facing.
- Align the stitches along the long edge where they will meet. Ensure your center seams line up.
- Whip stitch along this entire seam.
- Repeat for the Back Panel: Follow the same steps to join squares E, F, G, and H into your Back Panel.
- Weave in all tails from joining the squares.
B. Joining Panels Together
Now you have two large 2×2 square panels.
- Join Side Seams:
- Place your Front Panel and Back Panel right sides facing.
- Align the stitches along the side edges and the bottom edge.
- Starting at one of the bottom corners, use Color E and your yarn needle to whip stitch along the entire bottom edge.
- Continue up the first side seam.
- Secure the yarn and weave in the tail.
- Repeat for the second side seam.
- Do NOT join the top edge – this will be the opening of your bag.
- Turn Bag Right Side Out: Once all the seams are sewn, turn your bag right side out. Admire your assembled squares!
Part 3: Finishing the Bag (Top Border and Handles)
Now we’ll give the bag a neat top edge and add sturdy handles. We’ll use Color E for this.
A. Top Border
- Join: Join Color E with a sl st to any stitch at the top opening of your bag, preferably near a side seam.
- Round 1 (Sc Border): Ch 1 (does NOT count as a stitch). Sc evenly around the entire top opening of the bag. Aim for 1 sc in each dc, and 1 sc in each ch-2 space if you come across one from your square corners, ensuring the round lies flat. (You should have approximately 24 stitches per square edge, totaling around 96-104 stitches for a 4-square panel). Sl st to the first sc to join.
- Round 2 (Hdc Border): Ch 1. Hdc in the same stitch. Hdc in each stitch around. Sl st to the first hdc to join.
- Round 3 (Hdc Border): Ch 1. Hdc in the same stitch. Hdc in each stitch around. Sl st to the first hdc to join.
- This creates a sturdy, neat top edge. DO NOT CUT Color E, you’ll use it for the handles.
B. Handles
You’ll create two strong handles for your bag.
- Handle Placement: Lay your bag flat. Mark the placement for your handles using stitch markers. A common placement is to count in about 15-20 stitches from each side seam on the front and back of the bag. This will create a gap in the middle for the bag opening.
- Example for 100 stitches total around the top:
- Attach yarn at a side seam.
- Sc in the next 20 stitches.
- Chain 60 (for your first handle strap – adjust chain length for desired handle drop).
- Skip the next 30 stitches (this creates the opening).
- Sc in the next 20 stitches (this is the other side of the handle attachment).
- Chain 60 (for your second handle strap).
- Skip the last 30 stitches.
- Sl st to the first sc of the round.
- Example for 100 stitches total around the top:
- Round (Handle Reinforcement 1):
- Ch 1. Sc in the same stitch and in each sc along the bag’s top edge (the 20 stitches from each side).
- Sc in each of the 60 chain stitches you just made (working along the first handle chain).
- Sc in each sc along the next 20 stitches of the bag’s top edge.
- Sc in each of the 60 chain stitches for your second handle.
- Sl st to the first sc to join. [Around 160 stitches total – (20+60+20+60)]
- Round (Handle Reinforcement 2):
- Ch 1. Sc in the same stitch. Sc in each stitch around (working along bag edge stitches and around the handle loops).
- Sl st to the first sc to join. [160 stitches]
- FO Color E, leaving a long tail.
Part 4: Final Finishing
- Weave in All Remaining Ends: This is the last and final step to make your bag look professional and prevent unraveling. Use your yarn needle to securely weave in any remaining yarn tails from the border and handle sections.
- Blocking (Optional, but Recommended):
- Lightly mist your finished bag with water.
- Gently shape it and lay it flat on a clean surface or a blocking mat. You can stuff the inside lightly with tissue paper or a pillow to help it hold its shape while drying.
- Allow it to air dry completely. Blocking helps to even out stitches and set the overall shape of the bag, making it look more polished.
- Optional: Add a Fabric Lining: For extra durability, to prevent small items from slipping through stitches, or to add inner pockets, consider sewing a fabric lining for your bag. This is done after all crocheting is complete.
Your unique and beautiful Crochet Flower Granny Square Bag is now complete! Enjoy carrying your fantastic handmade creation.